文中若有代码、术语等错误,欢迎指正
文章目录
008、事件系统-设计
-
此节目的
理清顺序和设计才能更好的编码
-
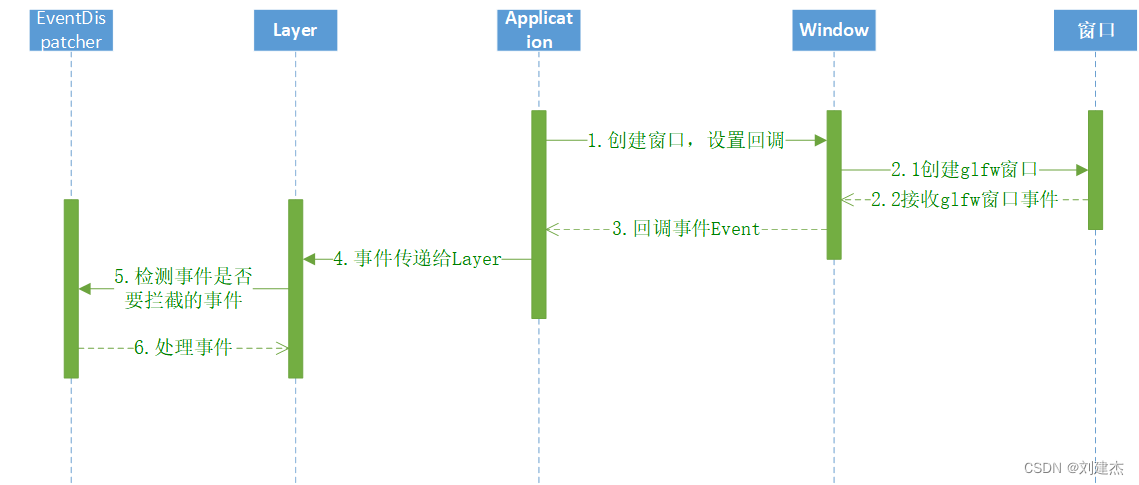
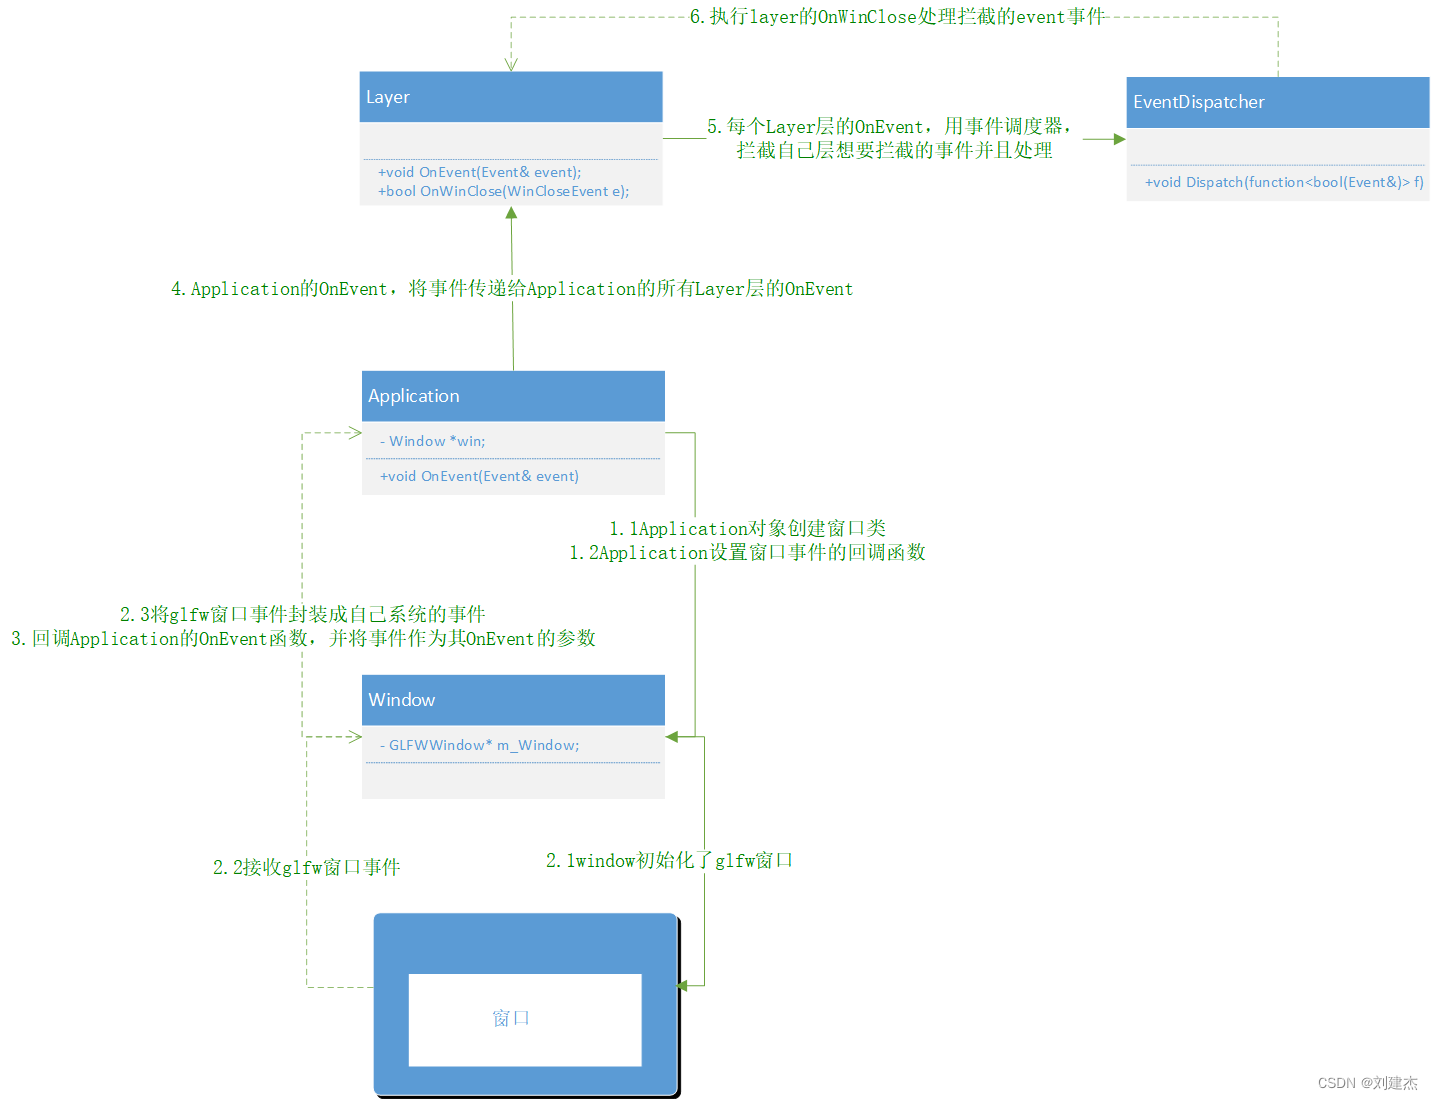
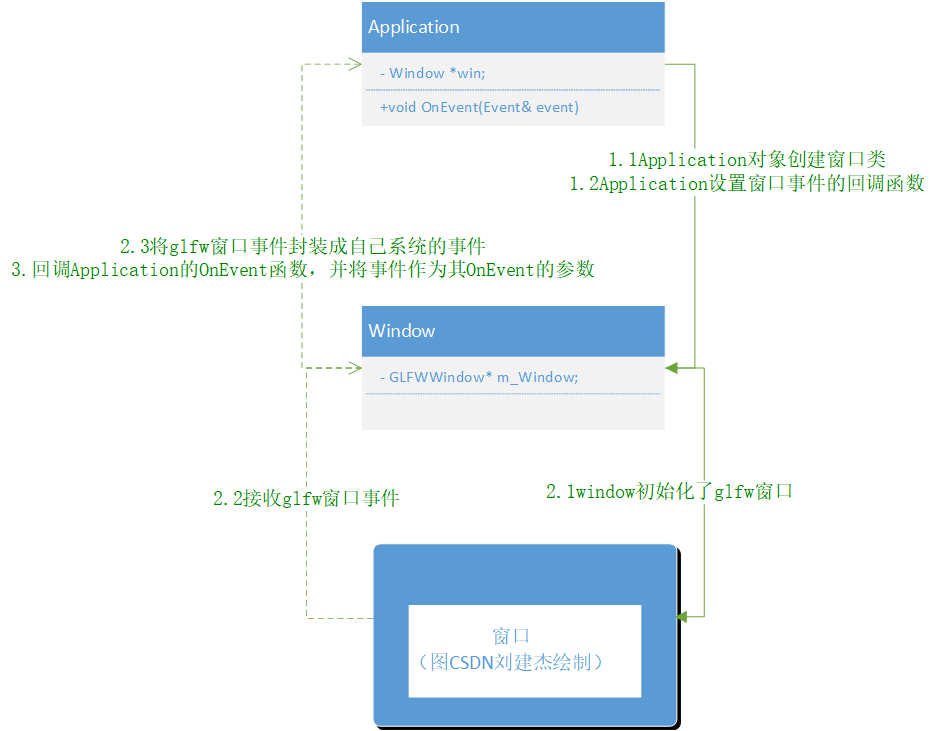
设计如图
-
声明
图是我自己缝合的,流程与大意没错,但是不符合软件工程对应图的规范。
大致是根据视频草稿图与大意画的
-
使用时序图简单表示
-
使用类图详细表示
在软件工程中,类图没有消息传递的,不符合规范,但大意是这样
-
009、事件系统-自定义事件
前言
-
此节目的
由008节的计划窗口事件图中的2.3将glfw窗口事件分组成自己系统的事件Event,即写出对应glfw窗口事件的自定义事件Event类。
-
事件最终的设计
为了简便,自定义事件是立即处理事件,没有缓冲事件。
缓冲事件:键盘a一直按下第一个立刻输出,顿了一下才一直输出。
-
glfw窗口事件
-
窗口相关事件
重新调整大小、窗口关闭等
-
鼠标事件
移动、滚动、按下
-
键盘事件
键盘按下、释放
-
-
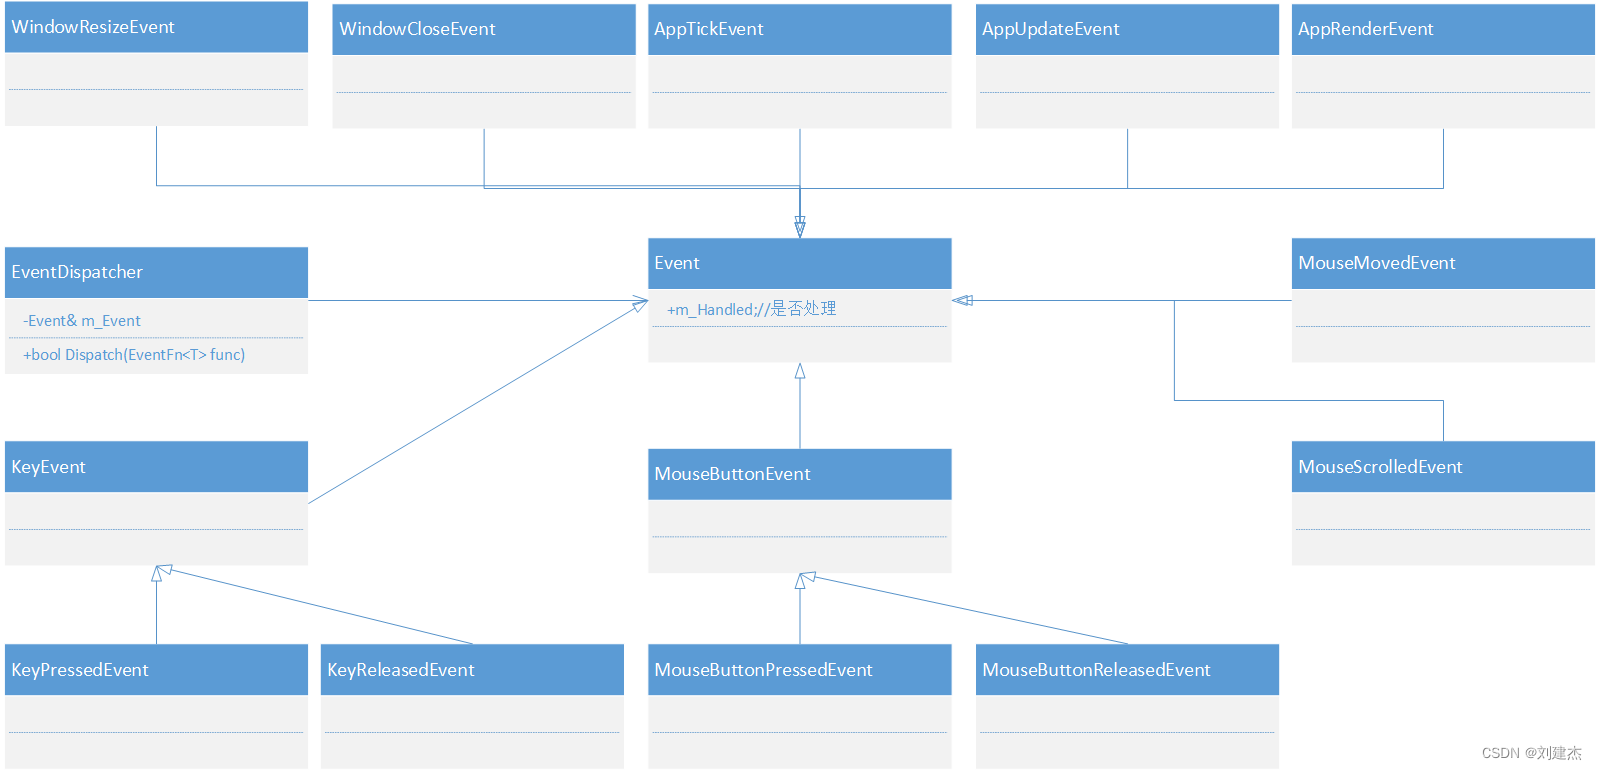
类图
自定义事件类与使用
声明与定义类代码
-
声明
由于类过多,只写几个类
-
Event
/* 为了简便,自定义事件是立即处理事件,没有缓冲事件。 缓冲事件:键盘a一直按下第一个立刻输出,顿了一下才一直输出。 */ // 事件类别-一个类一个标识 enum class EventType{ None = 0, WindowClose, WindowResize, WindowFocus, WindowLostFocus, WindowMoved, AppTick, AppUpdate, AppRender, KeyPressed, KeyReleased, MouseButtonPressed, MouseButtonReleased, MouseMoved, MouseScrolled }; // 事件分类-多个类一个分类,即多个类属于同一个分类 enum EventCategory { None = 0, EventCategoryApplication = BIT(0), // 1 EventCategoryInput = BIT(1), // 2 EventCategoryKeyboard = BIT(2), // 4 EventCategoryMouse = BIT(3), // 8 EventCategoryMouseButton = BIT(4) // 16 }; // 宏定义:每个子类都需要重写父类虚函数代码,可以用宏定义简洁代码 #define EVENT_CLASS_TYPE(type) static EventType GetStaticType() { return EventType::##type; }\ virtual EventType GetEventType() const override { return GetStaticType(); }\ virtual const char* GetName() const override { return #type; } #define EVENT_CLASS_CATEGORY(category) virtual int GetCategoryFlags() const override { return category; } class HAZEL_API Event { friend class EventDispatcher; public: virtual EventType GetEventType() const = 0; // 获取本事件是哪个类型 virtual const char* GetName() const = 0; // 获取本事件的名称c字符数组 virtual int GetCategoryFlags() const = 0; // 获取本事件属于哪个分类 virtual std::string ToString() const { return GetName(); } // 获取本事件的名称从c字符数组转为字符串 inline bool IsInCategory(EventCategory category) { return GetCategoryFlags() & category; } protected: bool m_Handled = false; }; -
WindowResizeEvent
class HAZEL_API WindowResizeEvent : public Event { public: WindowResizeEvent(unsigned int width, unsigned int height) : m_Width(width), m_Height(height) { } inline unsigned int GetWidth() const { return m_Width; } inline unsigned int GetHeight() const { return m_Height; } std::string ToString() const override { std::stringstream ss; ss << "WindowResizeEvent: " << m_Width << ", " << m_Height; return ss.str(); } // 关键地方:用宏定义来重写虚函数 EVENT_CLASS_TYPE(WindowResize) EVENT_CLASS_CATEGORY(EventCategoryApplication) private: unsigned int m_Width, m_Height; }; -
关键地方:用宏定义来重写虚函数
// 宏定义:每个子类都需要重写父类虚函数代码,可以用宏定义简洁代码 #define EVENT_CLASS_TYPE(type) static EventType GetStaticType() { return EventType::##type; }\ virtual EventType GetEventType() const override { return GetStaticType(); }\ virtual const char* GetName() const override { return #type; } EVENT_CLASS_TYPE(WindowResize) EVENT_CLASS_CATEGORY(EventCategoryApplication) // 会编译成 static EventType GetStaticType() { return EventType::WindowResize; } virtual EventType GetEventType() const override { return GetStaticType(); } virtual const char* GetName() const override { return "WindowResize"; } virtual int GetCategoryFlags() const override { return EventCategoryApplication; }可见,##type,是保持为变量,#type是转换为字符串
包含头文件
-
premake的lua脚本中
includedirs
{


    "%{prj.name}/src",
    "%{prj.name}/vendor/spdlog/include"
}
所以Hazel项目的包含目录包含src目录
// 因为Event.h所在src/Hazel/Events/Event.h
// 其它类包含Event.h,可以写成
#include "Hazel/Events/Event.h"// 而不用前缀src
重新编译
使用事件
-
application.h
#include "Core.h" #include "Events/Event.h"// 包含事件基类 namespace Hazel { -
Application.cpp
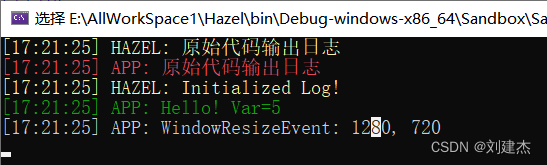
#include "Application.h" #include "Hazel/Events/ApplicationEvent.h" // 包含具体事件 #include "Hazel/Log.h" namespace Hazel { Application::Application(){ } Application::~Application(){ } void Application::Run() { WindowResizeEvent e(1280, 720); // 使用自定义事件 if (e.IsInCategory(EventCategoryApplication)) // 判断是否对应的分类 { HZ_TRACE(e); // 输出事件 } if (e.IsInCategory(EventCategoryInput)) { HZ_TRACE(e); } while (true); } } -
效果
事件调度器代码
// 事件调度器类
class EventDispatcher
{


    template<typename T>
    using EventFn = std::function<bool(T&)>;	// 声明function,接受返回类型bool,参数是T&的函数
    public:
    EventDispatcher(Event& event)
        : m_Event(event)
        {


        }
    template<typename T>
    bool Dispatch(EventFn<T> func)				// function参数接收函数指针
    {


        if (m_Event.GetEventType() == T::GetStaticType())	// 拦截的事件和想处理的事件类型是否匹配
        {


            m_Event.m_Handled = func(*(T*)&m_Event);		// 处理拦截的事件
            return true;
        }
        return false;
    }
    private:
    Event& m_Event;								// 拦截的事件
};
这个类的本身与作用由于(function+模板)变得很难看懂,可以看结合开头的事件设计图和后面的function基本使用代码一步一步理解
C++知识:Function
Bind用法
#include <iostream>
#include <functional>
using namespace std;
using namespace std::placeholders;// 占位符空间
void f(int a, int b, int c, int d, int e)
{


	cout << a << " " << b << " " << c << " " << d << " " << e << endl;
}
// _1 是在命名空间里的,bind可以翻转参数位置
int main(){


	int a = 1, b = 2, c = 3;
	auto g = bind(f, a, b, c, _2, _1);
	g(4, 5);	// 1 2 3 5 4
	return 0;
}
- 说明
- bind可以用_1,_2预占位,g可以理解是function<void(int a, int b, int c, int d, int e);function对象
- auto g = bind(f, a, b, c, _2, _1);将f函数绑定到function对象g上,并定好第一、二、三个参数
- g(4, 5),将调用执行f函数,4将绑定到_1上,5将绑定到_2上,本来_1实参会赋给f函数的d形参,_2实参给e形参,但由于bind时改变了对应位置
- 于是_1给e,_2给d,输出 1 2 3 5 4
function基本使用
#include <iostream>
#include <string>
#include <functional>
using namespace std;
using namespace std::placeholders;// 占位符空间

// 事件类与函数定义
class Event {

    							// 事件基类
public:
	virtual void Say() {

     cout << "Event::Say()" << endl; }
	bool m_Handled;						// 事件是否处理完
};
class WindowCloseEvent : public Event {

    	// 窗口关闭事件子类
public:
	virtual void Say() {

     cout << "WindowEvent::Say()" << endl;}
};
void LayerOnEvent(Event& e) {


	e.Say();
	cout << "LayerOnEvent(Event& e)" << endl;
}

// 4.using+带泛型的function
template<typename T>
using TemplateEventFn = std::function<void(T&)>;

// 5.额外理解,宏定义
#define BIND_EVENT_FN(x) bind(&x, _1)

int main() {


	// 1.普通的function
	Event e1;
	function<void(Event&)> func1 = LayerOnEvent;// 绑定返回类型void,参数是Event的函数
	func1(e1);

	// 2.使用using 代替function
	using EventFn = std::function<void(Event&)>;
	EventFn func2 = LayerOnEvent;
	func2(e1);

	// 3.使用bind
	function<void(Event&)> func3_1 = bind(&LayerOnEvent, _1);
	func3_1(e1);

	EventFn func3_2 = bind(&LayerOnEvent, _1);// bind第一个参数函数地址,第二个参数是调用Print函数时的参数
	func3_2(e1);

	// 4.使用template的 function
	TemplateEventFn<Event> func4 = LayerOnEvent;
	func4(e1);

	func4 = bind(&LayerOnEvent, _1);
	func4(e1);

	// 5.额外理解,宏定义
	TemplateEventFn<Event> func5 = BIND_EVENT_FN(LayerOnEvent);
	func5(e1);

	// 6.额外理解。尝试引用类型是否能执行子类的虚函数
	function<void(Event&)> func6 = LayerOnEvent;
	WindowCloseEvent windowe1;
	Event& event1 = windowe1;
	func6(event1);
	/*
		WindowEvent::Say()
		LayerOnEvent(Event& e)
	*/
	return 0;
}
012、事件系统-Demo
-
声明
由于008节设计了事件系统,而009只是实现了自定义事件,占整个事件系统的很小部分
于是我把012窗口事件的内容简化成demo,符合一开始的计划事件图。
demo是分为一个小点一个小点的,更好来理解整个事件系统。
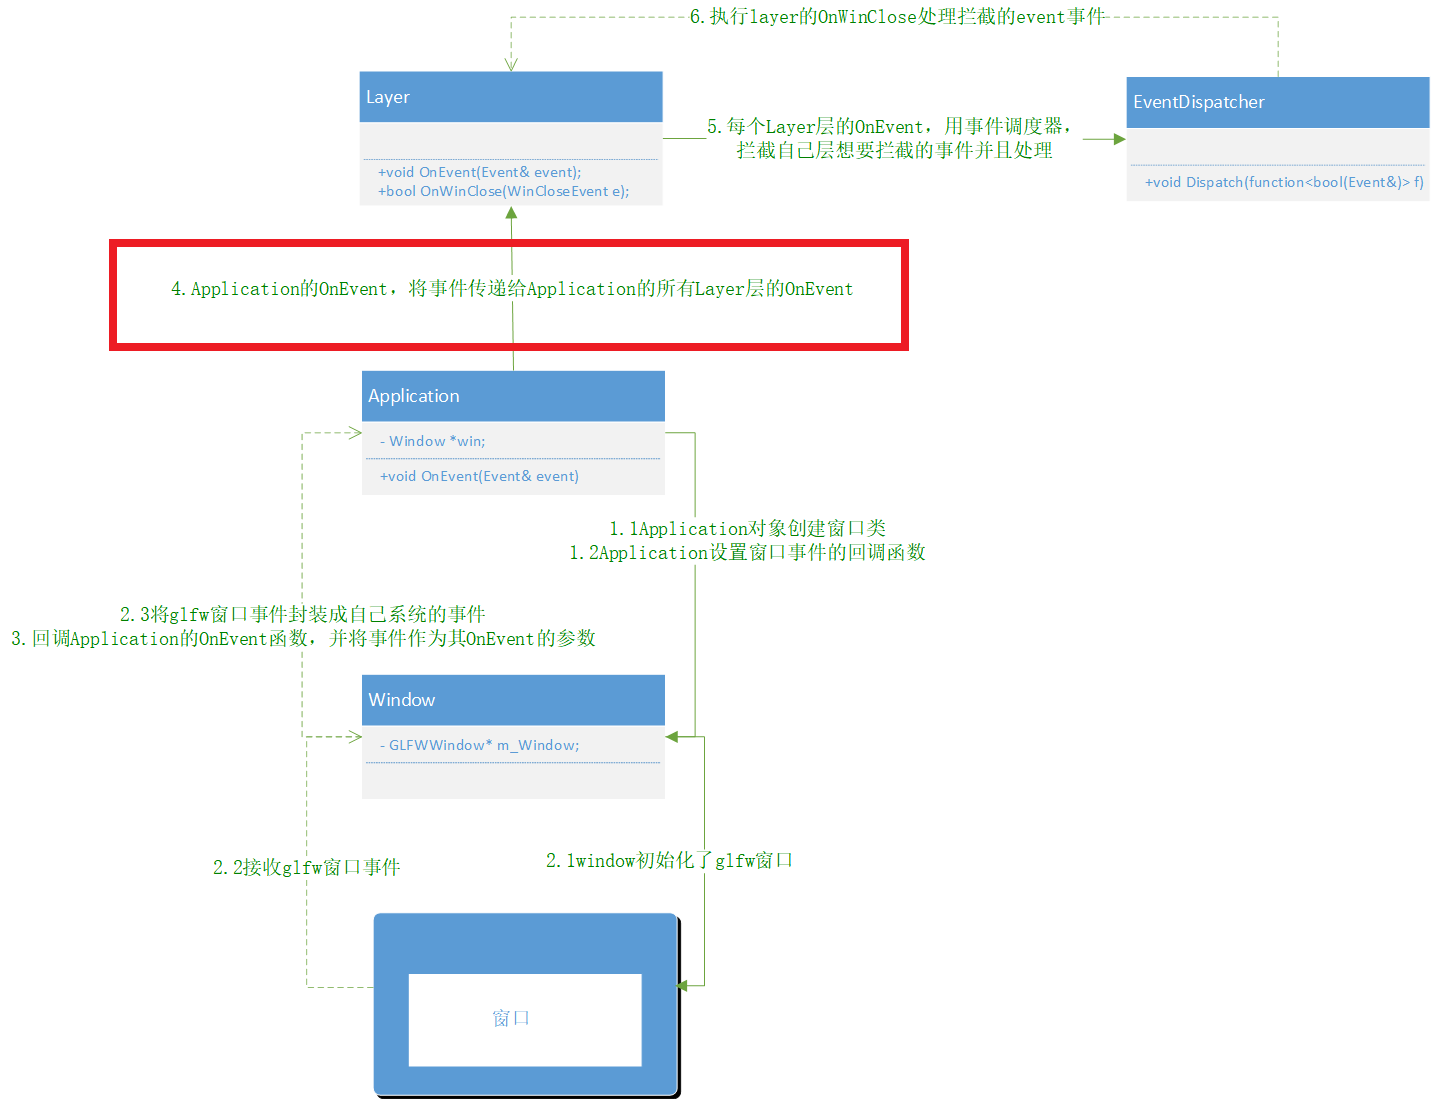
Layer用EventDispacher拦截处理事件(56)(难理解)
-
前言
此点Demo代码是对应一开始计划事件系统类图的第5、6步,而其它步骤的代码是模拟并且略过

-
代码
阅读代码,请按照注释的1、2、3、4、5、5.1…顺序阅读
#include <iostream> #include <string> #include <functional> using namespace std; using namespace std::placeholders;// 占位符空间 // 事件类定义// class Event { // 事件基类 public: virtual void Say() { cout << "Event::Say()" << endl; } bool m_Handled; // 事件是否处理完 }; class WindowCloseEvent : public Event { // 窗口关闭事件子类 public: virtual void Say() { cout << "WindowEvent::Say()" << endl; } }; // 事件调度器// class EventDispatcher { public: EventDispatcher(Event& event) :m_Event(event) { } template<typename T> using TemplateEventFn = std::function<bool(T&)>; // 使用using+模板function // 5.2 using TemplateEventFn = function<void(WindowCloseEvent&)> 与 TemplateEventFn<WindowCloseEvent> func template<typename T> void Dispatch(TemplateEventFn<T> func) { // 此时func = Layer::OnWindowClose // 5.3 拦截的事件m_Event与layer层想处理的事件类型是否匹配 if (true) { // 假设匹配 cout << "EventDispatcher::Dispatch(TemplateEventFn<T> func)" << endl; // 6 执行layer的OnWindowClose处理拦截的m_Event事件 m_Event.m_Handled = func(*(T*)&m_Event); /* (0) 函数声明:OnWindowClose(WindowEvent& e); (0) 显式调用:OnWindowClose(*(WindowEvent*)&m_Event) (1) OnWindowClose参数要求WindowEvent,而m_Event是Event类型,所以要(WindowEvent*)&m_Event (2) OnWindowClose参数是引用类型,所以要*(WindowEvent*)&m_Event */ } } private: Event& m_Event; // 拦截的事件 }; // Layer层// class Layer { // 属于Application的layer层 public: // 5.每个Layer层的OnEvent,用事件调度器,拦截自己层想要拦截的事件并且处理 void OnEvent(Event& e) { EventDispatcher dispatcher(e); // 5.1拦截WindowCloseEvent事件,并用本类的OnWindowClose函数处理 dispatcher.Dispatch<WindowCloseEvent>(bind(&Layer::OnWindowClose, this, _1));// bind在上一小点有demo,this在类时要使用,_1依旧是执行OnWindowClose的参数 } bool OnWindowClose(WindowCloseEvent& e) { e.Say(); cout << "Layer::OnWindowClose(WindowCloseEvent& e)" << endl; return true; // 代表处理完了 } }; int main() { // 1.Application对象创建窗口类,窗口类初始化了glfw窗口 // 2.将glfw窗口事件封装成自己系统的事件 WindowCloseEvent windowe1; // 3.回调Application的OnEvent函数,并将事件作为其OnEvent的参数 // 4.Application的OnEvent,将事件传递给Application的所有Layer层的OnEvent Layer layer; layer.OnEvent(windowe1); return 0; } -
效果

Application设置window回调函数与回调(123)
-
前言
此点是对应一开始计划事件系统类图的第1、2、3步,但没有glfw窗口,只能模拟glfw窗口事件
-
代码
#include <iostream> #include <string> #include <functional> using namespace std; using namespace std::placeholders;// 占位符空间 // 事件类定义// class Event { // 事件基类 public: virtual void Say() { cout << "Event::Say()" << endl; } bool m_Handled; // 事件是否处理完 }; class WindowCloseEvent : public Event { // 窗口关闭事件子类 public: virtual void Say() { cout << "WindowEvent::Say()" << endl;} }; // 窗口类定义// class Window { public: using EventCallbackFn = std::function<void(Event&)>; // 声明function类型void function(Event&) static Window* CreateWindow() { // 模拟创建窗口 return new Window; } void SetEventCallback(const EventCallbackFn& callback) { EventCallback = callback; // 绑定Application::OnEvent } void SendEvent() { cout << "Window::模拟glfw窗口事件" << endl; // 2.将glfw窗口事件封装成自己系统的事件 WindowCloseEvent windowe; // 3.回调Application的OnEvent函数,并将事件作为其OnEvent的参数 EventCallback(windowe); } EventCallbackFn EventCallback; // 定义function }; // 应用层类定义// class Application { public: Window* win; // 持有的窗口类 void OnEvent(Event& event) { event.Say(); cout << "Application::OnEvent(Event& event)" << endl; // 4.Application的OnEvent,将事件传递给Application的所有Layer层的OnEvent // ...... } }; int main() { Application app; // 1.1Application对象创建窗口类,窗口类初始化了glfw窗口 app.win = Window::CreateWindow(); // 1.2Application设置窗口事件的回调函数 app.win->SetEventCallback(bind(&Application::OnEvent, app, _1));// bind的argument1是函数地址,arug2是哪个类,arug3是调用OnEvent的参数 // 1.3模拟glfw窗口事件 app.win->SendEvent(); return 0; } -
效果

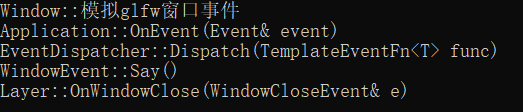
Application将事件传给Layer(4)与整个事件系统流程
-
前言
此点是对应一开始计划事件系统类图的第4步,并且整合前两点的代码,除了缺少glfw窗口与glfw窗口事件是完整的事件系统流程
-
代码
#include <iostream> #include <string> #include <functional> using namespace std; using namespace std::placeholders;// 占位符空间 // 事件类定义// class Event { // 事件基类 public: virtual void Say() { cout << "Event::Say()" << endl; } bool m_Handled; // 事件是否处理完 }; class WindowCloseEvent : public Event { // 窗口事件子类 public: virtual void Say() { cout << "WindowEvent::Say()" << endl;} }; // 事件调度器// class EventDispatcher { public: EventDispatcher(Event& event) :m_Event(event) { } template<typename T> using TemplateEventFn = std::function<bool(T&)>; // 使用using+模板function // 5.2 using TemplateEventFn = function<void(WindowCloseEvent&)> 与 TemplateEventFn<WindowCloseEvent> func template<typename T> void Dispatch(TemplateEventFn<T> func) { // 此时func = Layer::OnWindowClose // 5.3 拦截的事件m_Event与layer层想处理的事件类型是否匹配 if (true) { // 假设匹配 cout << "EventDispatcher::Dispatch(TemplateEventFn<T> func)" << endl; // 6 执行layer的OnWindowClose处理拦截的m_Event事件 m_Event.m_Handled = func(*(T*)&m_Event); /* (0) 函数声明:OnWindowClose(WindowEvent& e); (0) 显式调用:OnWindowClose(*(WindowEvent*)&m_Event) (1) OnWindowClose参数要求WindowEvent,而m_Event是Event类型,所以要(WindowEvent*)&m_Event (2) OnWindowClose参数是引用类型,所以要*(WindowEvent*)&m_Event */ } } private: Event& m_Event; // 拦截的事件 }; // Layer层// class Layer { // 属于Application的layer层 public: // 5.每个Layer层的OnEvent,用事件调度器,拦截自己层想要拦截的事件并且处理 void OnEvent(Event& e) { EventDispatcher dispatcher(e); // 5.1拦截WindowCloseEvent事件,并用本类的OnWindowClose函数处理 dispatcher.Dispatch<WindowCloseEvent>(bind(&Layer::OnWindowClose, this, _1));// bind在上一小点有demo,this在类时要使用,_1依旧是执行OnWindowClose的参数 } bool OnWindowClose(WindowCloseEvent& e) { e.Say(); cout << "Layer::OnWindowClose(WindowCloseEvent& e)" << endl; return true; // 代表处理完了 } }; // 窗口类定义// class Window { public: using EventCallbackFn = std::function<void(Event&)>; // 声明function类型void function(Event&) static Window* CreateWindow() { // 模拟创建窗口 return new Window; } void SetEventCallback(const EventCallbackFn& callback) { EventCallback = callback; // 绑定Application::OnEvent } void SendEvent() { cout << "Window::模拟glfw窗口事件" << endl; // 2.将glfw窗口事件封装成自己系统的事件 WindowCloseEvent windowe; // 3.回调Application的OnEvent函数,并将事件作为其OnEvent的参数 EventCallback(windowe); } EventCallbackFn EventCallback; // 定义function }; // 应用层类定义// class Application { public: Window* win; // 持有的窗口类 void OnEvent(Event& event) { cout << "Application::OnEvent(Event& event)" << endl; // 4.Application的OnEvent,将事件传递给Application的所有Layer层的OnEvent Layer layer; layer.OnEvent(event); } }; int main() { Application app; // 1.1Application对象创建窗口类,窗口类初始化了glfw窗口 app.win = Window::CreateWindow(); // 1.2Application设置窗口事件的回调函数 app.win->SetEventCallback(bind(&Application::OnEvent, app, _1));// bind的argument1是函数地址,arug2是哪个类,arug3是调用OnEvent的参数 // 1.3模拟glfw窗口事件 app.win->SendEvent(); return 0; } -
效果