flume 1.7在windows下的安装与运行
一、安装
- 安装java,配置环境变量。
- 安装flume,flume的官网http://flume.apache.org/,下载地址,下载后直接解压即可。
二、运行
创建配置文件:在解压后的文件apache-flume-1.6.0-bin/conf下创建一个example.conf,内容如下。
 # example.conf: A single-node Flume configuration

 # Name the components on this agent
 a1.sources = r1
 a1.sinks = k1
 a1.channels = c1

 # Describe/configure the source
 a1.sources.r1.type = netcat
 a1.sources.r1.bind = localhost
 a1.sources.r1.port = 44444

 # Describe the sink
 a1.sinks.k1.type = logger

 # Use a channel which buffers events in memory
 a1.channels.c1.type = memory
 a1.channels.c1.capacity = 1000
 a1.channels.c1.transactionCapacity = 100

 # Bind the source and sink to the channel
 a1.sources.r1.channels = c1
 a1.sinks.k1.channel = c1
配置说明:
sources配置:
- netcat 监控某个端口,将流经端口的每一个文本行数据作为Event输入
- bind中是要添加 ip地址或主机名
- port中是要添加绑定主机的端口
Flume模块sinks配置:
- a1.sinks.k1.type=logger logger数据写入日志文件(打印出来)
Flume模式channels配置:
- a1.channels.c1.type=memory
- a1.channels.c1.capacity=1000
- a1.channels.c1.transactionCapacity=100
momory event数据存储到内存中,缓存数据
1000 缓存的数据是1000条
100 每个事物缓存的最大单元数目
Flume模块channel配置:(配置sources,sinks文件与channel的关系)
a1.sources.r1.channels=c1
a1.sinks.k1.channel=c1
2.1、打开cmd进入到apache-flume-1.6.0-bin\bin目录下,运行如下命令。
flume-ng.cmd agent -conf ../conf -conf-file ../conf/example.conf -name a1 -property flume.root.logger=INFO,console
效果图(右键查看原图):

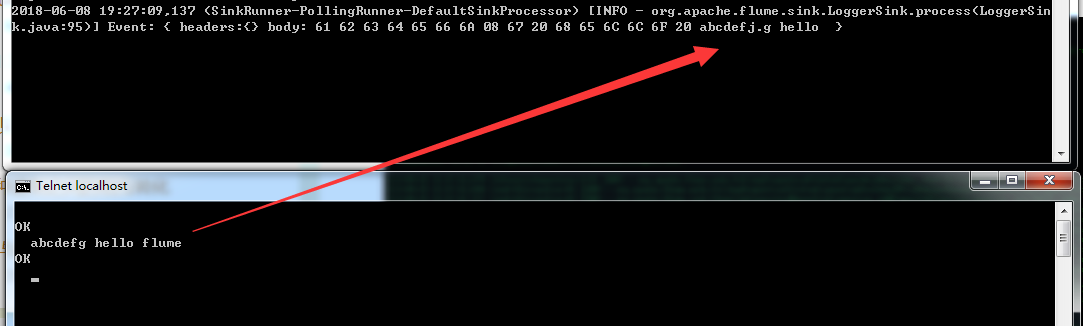
2.2、另外打开一个cmd窗口,运行如下命令。
telnet localhost 44444
如果连接成功,则该窗口会变为输入状态,可以输入文字。同时在步骤2中的cmd窗口中,也会显示接收到的信息。 效果图(右键查看原图):