引言
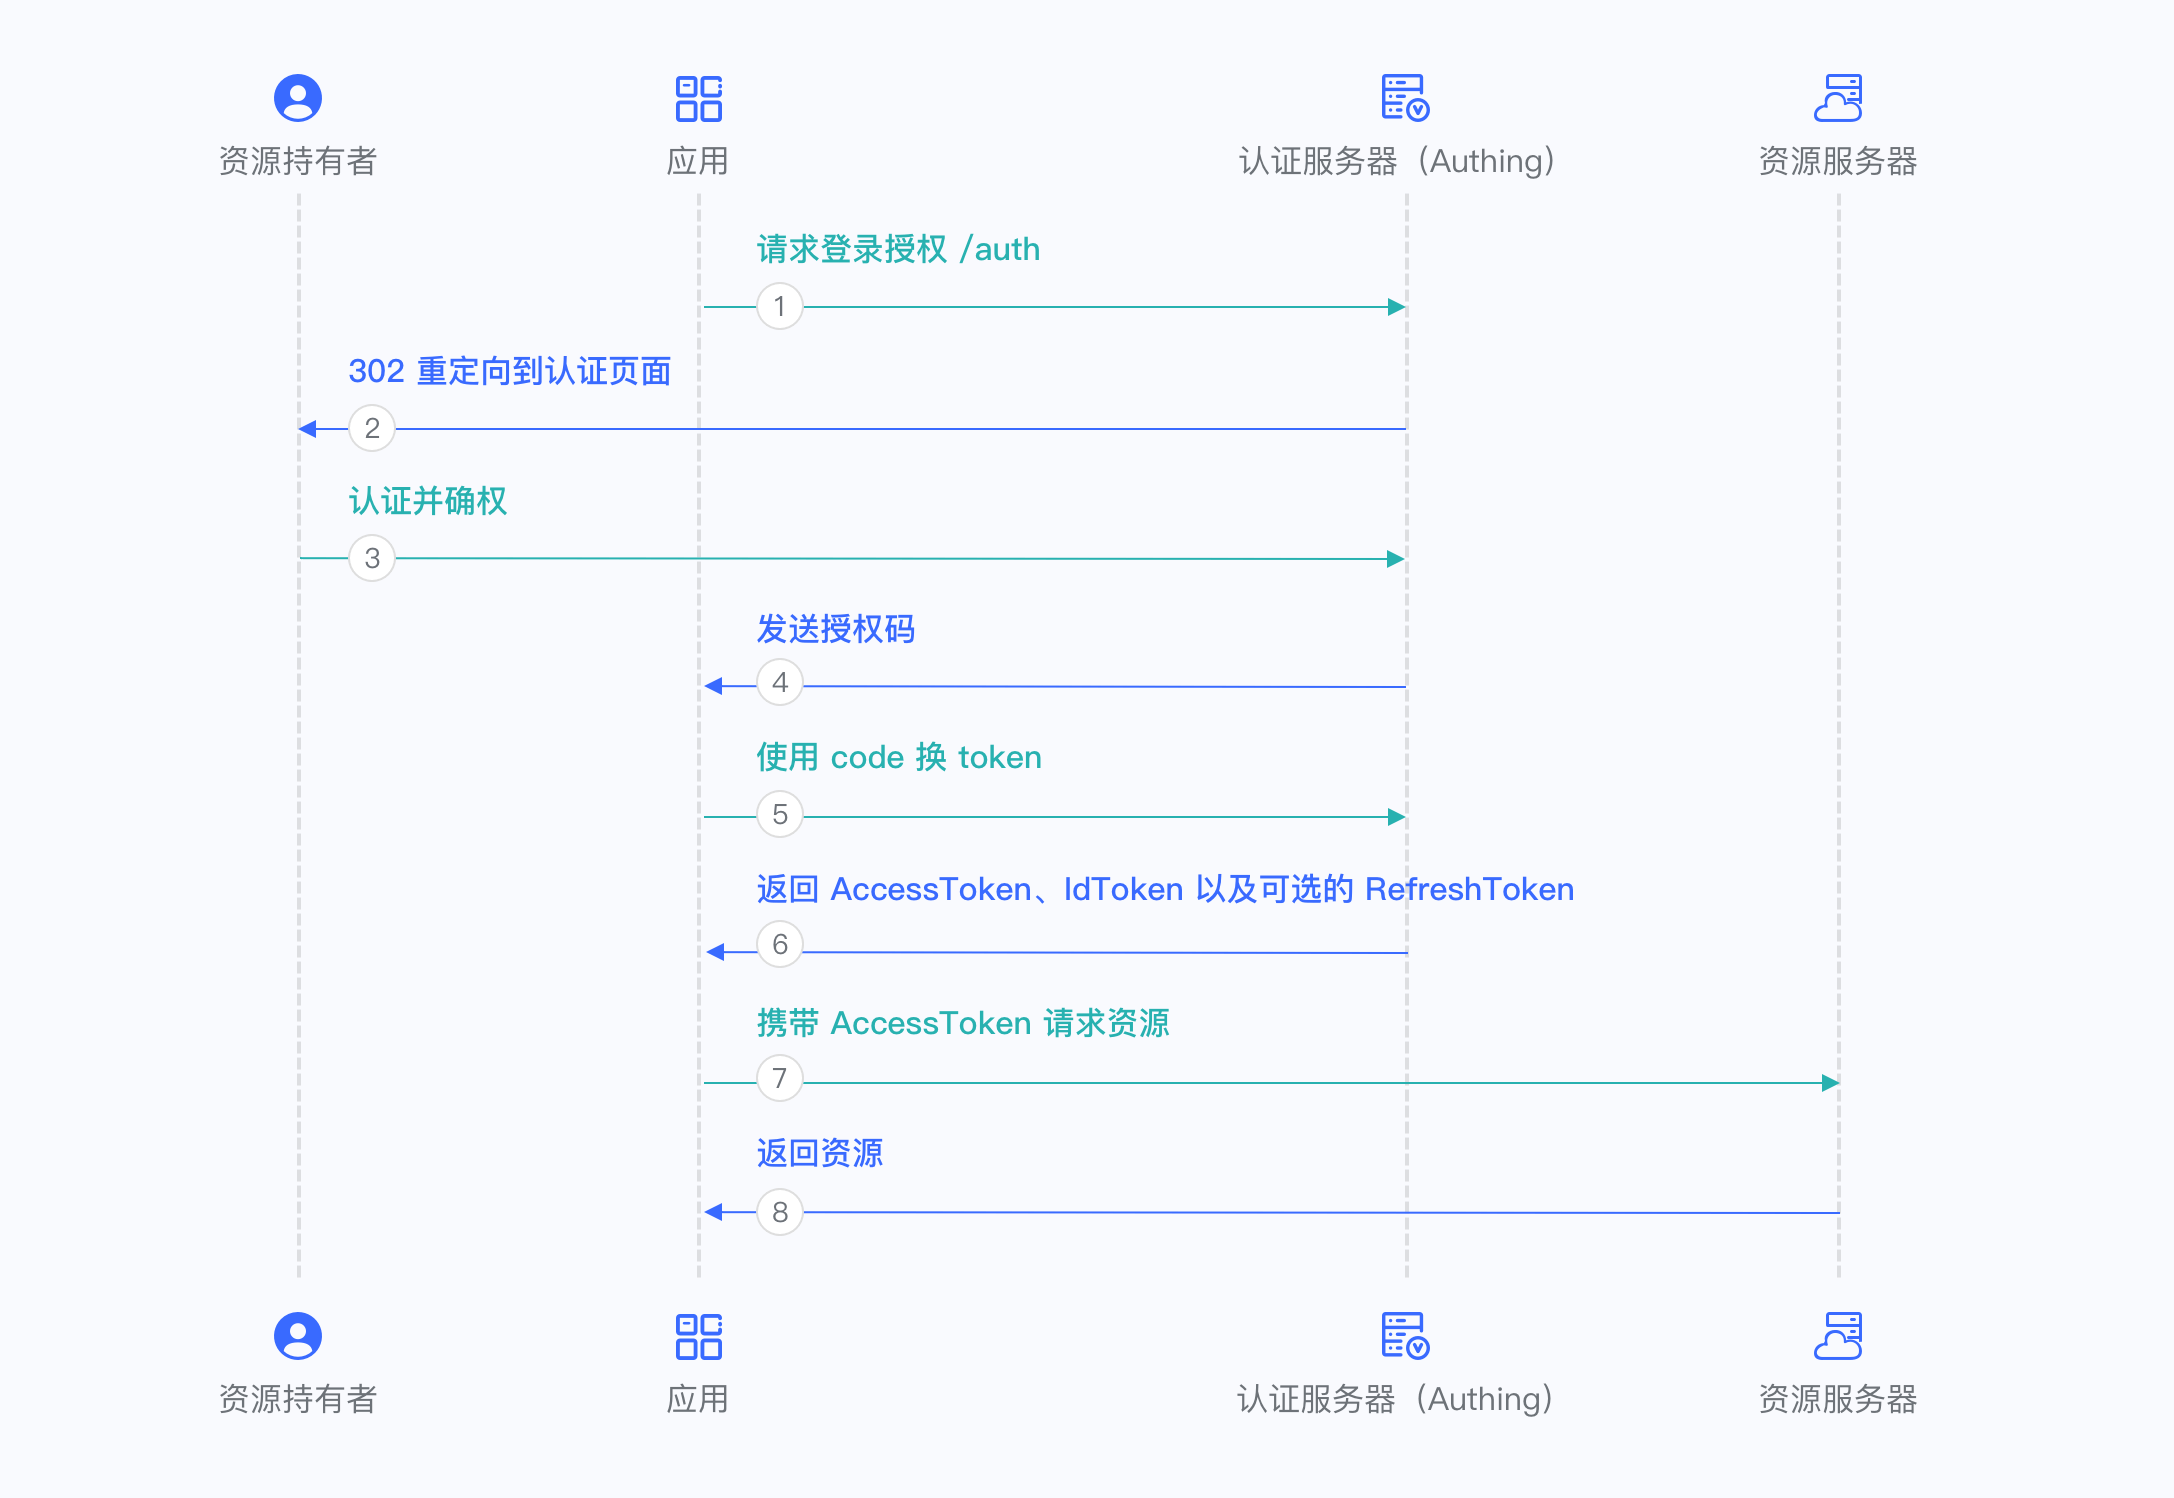
之前的文章讲过OAuth2体系,以授权码流程为例(参见下图),
其中资源服务器(Resource Server)作为服务的提供者,
用户在客户端应用完成授权流程后,客户端应用需要携带AccessToken请求资源服务器,
也即是要想访问资源服务器就需要提供正确的Authorization: Bearer AccessToken,
如此在将资源服务器接入Swagger UI后,是无法直接访问其后端API的,
例如直接访问会返回Http Status 401,除非在Swagger UI中接入正确的AccessToken。
接来下结合Springdoc & OpenAPI 3.0介绍3种支持Resource Server接入Swagger UI并支持OAuth2的方式。
注: 关于Springdoc和OpenAPI 3.0的更多说明可参见我之前的文章:
SpringBoot应用生成RESTful API文档 - Swagger 2.0、OAS 3.0、Springfox、Springdoc、Smart-doc
注:
本文Springdoc Swagger UI集成OAuth2认证示例的具体代码可参见:
https://gitee.com/luoex/spring-cloud-demo/tree/develop/api-doc-demo/springdoc-oas3-oauth2
本文使用的OAuth2 AuthServer具体代码可参见:
https://gitee.com/luoex/oauth2-auth-server-oidc/tree/main/samples/oauth2-auth-server-oidc-minimal
方式1:Bearer Token
此种方式较为简单,即直接配置Swagger UI支持自定义Bearer token,具体配置如下:
代码配置:
import io.swagger.v3.oas.annotations.OpenAPIDefinition;
import io.swagger.v3.oas.annotations.enums.SecuritySchemeIn;
import io.swagger.v3.oas.annotations.enums.SecuritySchemeType;
import io.swagger.v3.oas.annotations.info.Info;
import io.swagger.v3.oas.annotations.security.*;
import io.swagger.v3.oas.annotations.servers.Server;


/**
 * OAS 3.0 配置
 *
 * @author luohq
 * @date 2023-02-26
 */
@OpenAPIDefinition(
        info = @Info(
                title = "Springdoc OAS3.0 - OAuth2 Resource Server - RESTful API",
                description = "Springdoc OAS3.0 - OAuth2 Resource Server - RESTful API",
                version = "v1"
        ),
        servers = {

    @Server(url = "http://springdoc-resource-server:8080")},
        security = @SecurityRequirement(name = "Bearer access_token")
)
@SecurityScheme(
        name = "Bearer access_token",
        type = SecuritySchemeType.HTTP,
        in = SecuritySchemeIn.HEADER,
        scheme = "bearer",
        description = "直接将有效的access_token填入下方,后续该access_token将作为Bearer access_token"
)
public class OpenApiBearerConfig {


}
设置Resource Server的Swagger-UI访问Host为:
http://springdoc-resource-server:8080,
启动后访问Swagger UI:
http://springdoc-resource-server:8080/swagger-ui/index.html
注:
本地开发调试需配置本地Host:
127.0.0.1 springdoc-resource-server
后文示例均通过该Host访问示例Swagger UI。
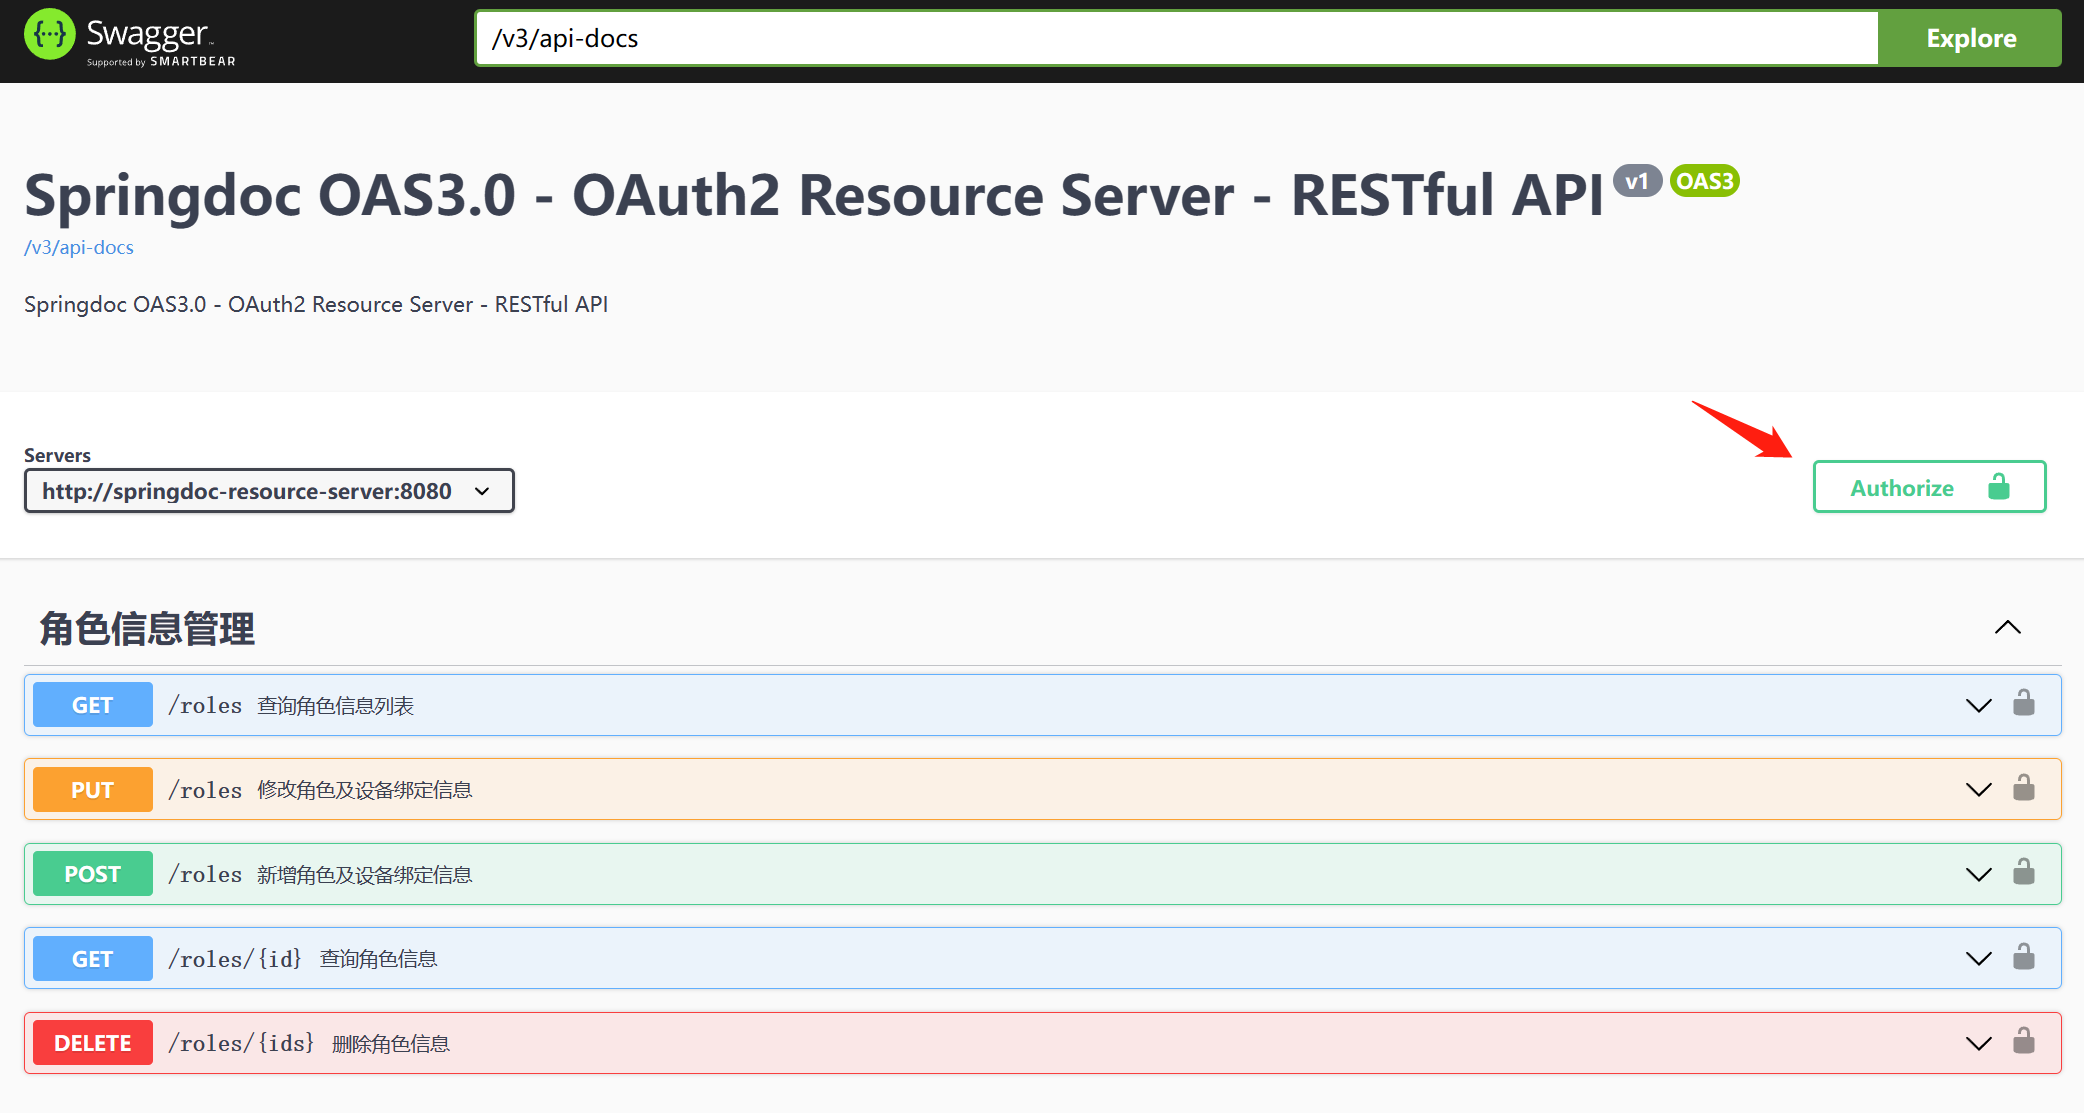
点击右侧的Authorize按钮,即可触发Swagger UI的认证流程,
在Bearer Token方式中点击Authorize按钮会弹出如下输入框:
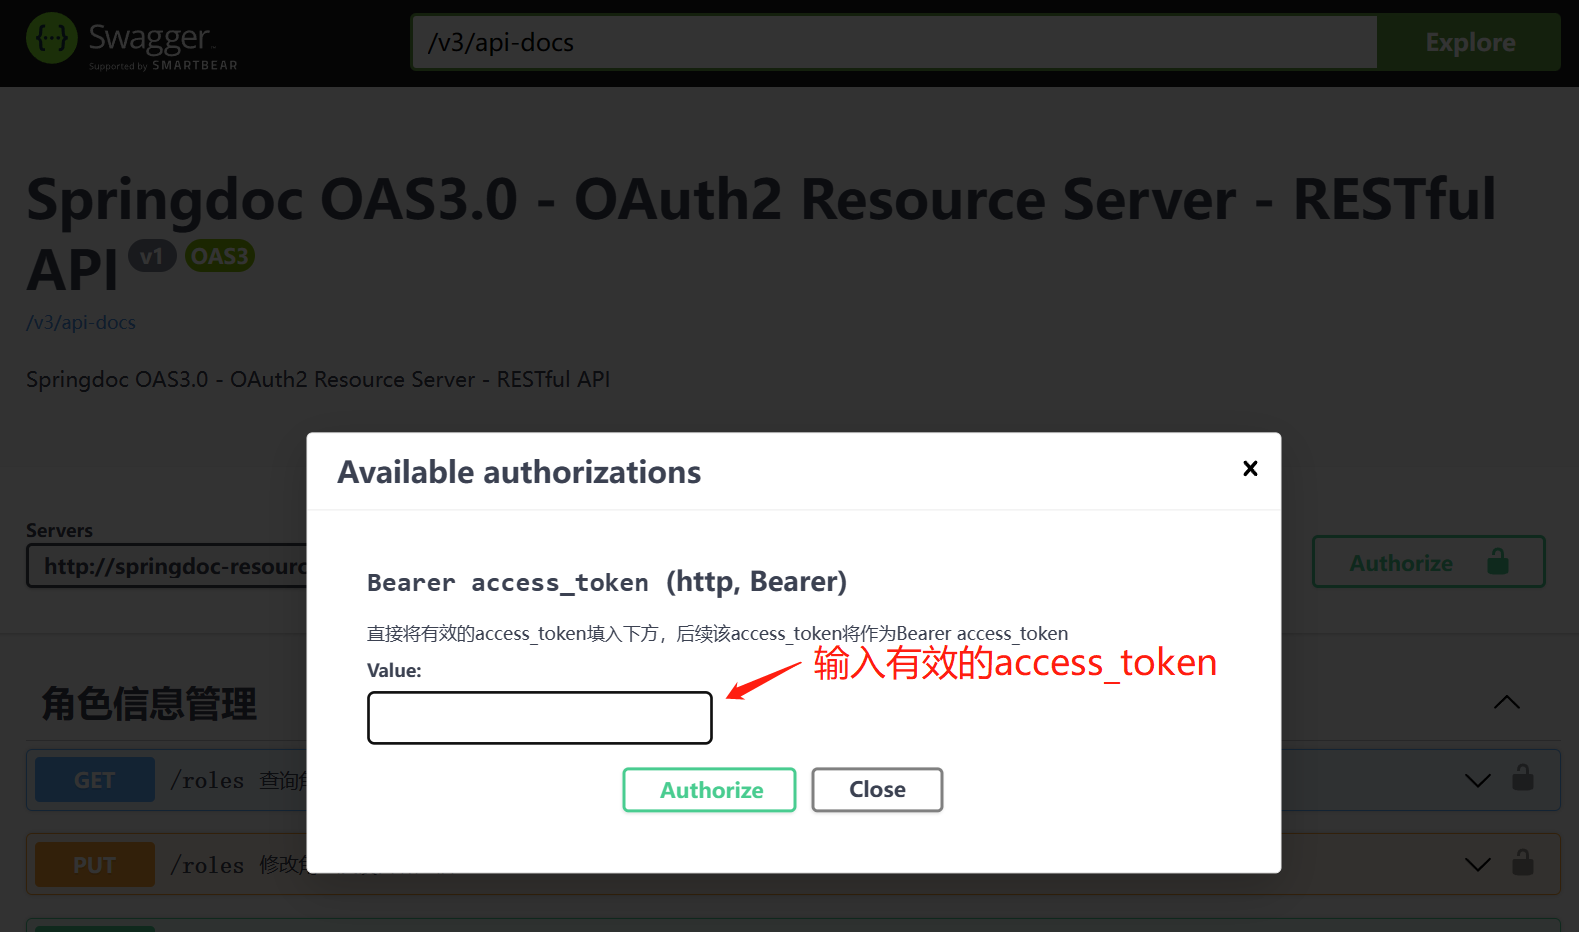
在输入框中输入有效的access_token后点击下方的Authorize按钮即可完成,
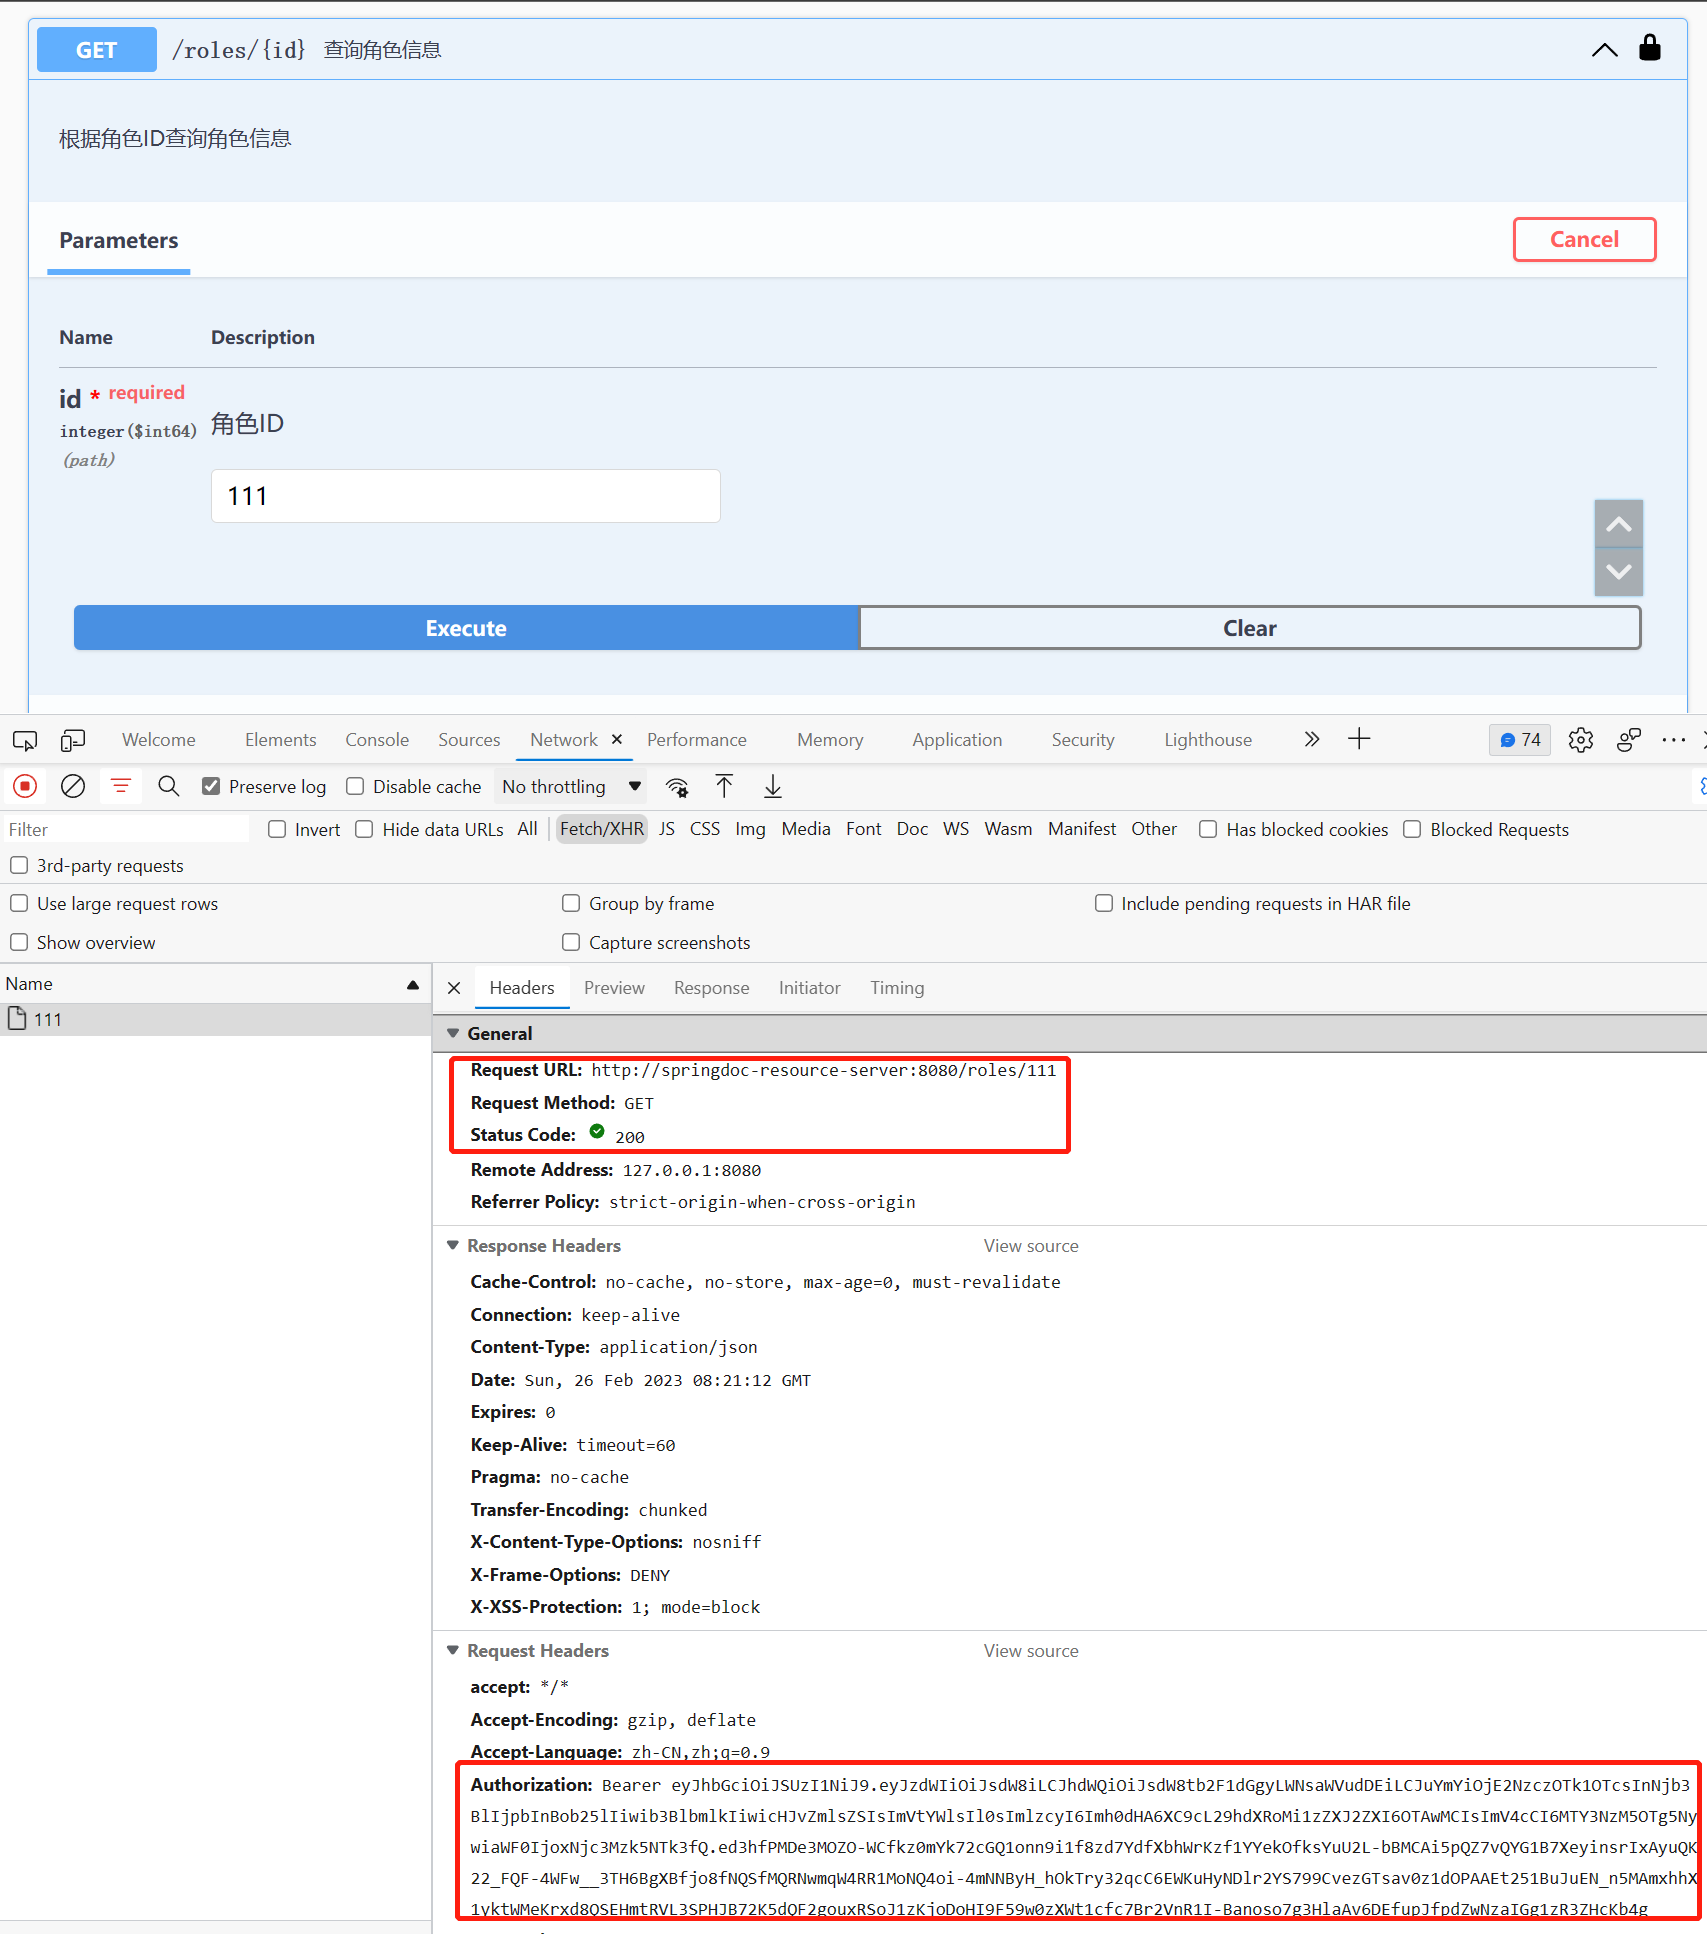
之后在Swagger UI中点击Try it out -> Execute 发送测试请求时,均会携带请求头:
Authorization: Bearer {your_input_token_value}
如此便可通过Resource Server对access_token的校验,正常获得请求结果。
方式2:标准OAuth2授权码流程
此种方式Swagger UI作为OAuth2客户端,通过标准的授权码流程接入,
设置Resource Server的Swagger-UI访问Host为:
http://springdoc-resource-server:8080
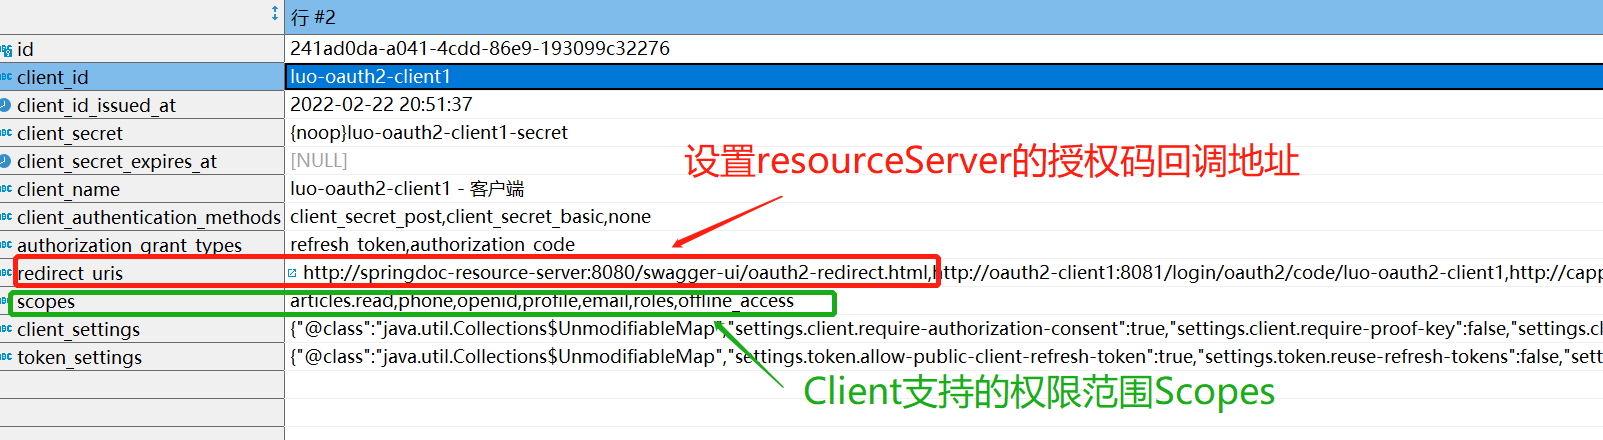
Swagger-UI授权码回调地址为:http://{swagger-ui-host}:{port}/swagger-ui/oauth2-redirect.html,
即:http://springdoc-resource-server:8080/swagger-ui/oauth2-redirect.html
切记 需在OAuth2 Client注册信息中指定该redirect_uri ,否则由Swagger-UI跳转到OAuth2 授权端点(即登录页)时报错Http 400。
代码配置:
import io.swagger.v3.oas.annotations.OpenAPIDefinition;
import io.swagger.v3.oas.annotations.enums.SecuritySchemeType;
import io.swagger.v3.oas.annotations.info.Info;
import io.swagger.v3.oas.annotations.security.*;
import io.swagger.v3.oas.annotations.servers.Server;


/**
 * OAS 3.0 配置
 *
 * @author luohq
 * @date 2023-02-26
 */
@OpenAPIDefinition(
        info = @Info(
                title = "Springdoc OAS3.0 - OAuth2 Resource Server - RESTful API",
                description = "Springdoc OAS3.0 - OAuth2 Resource Server - RESTful API",
                version = "v1"
        ),
        servers = {

    @Server(url = "http://springdoc-resource-server:8080")},
        security = @SecurityRequirement(name = "OAuth2 Flow", scopes = {

    "openid", "phone", "email", "profile", "roles"})
)
@SecurityScheme(
        name = "OAuth2 Flow",
        type = SecuritySchemeType.OAUTH2,
        flows = @OAuthFlows(
                authorizationCode = @OAuthFlow(
                        authorizationUrl = "${springdoc.swagger-ui.oauth.authorization-url}",
                        tokenUrl = "${springdoc.swagger-ui.oauth.token-url}",
                        scopes = {


                                //此处需根据Client注册时支持的Scopes进行配置
                                //openid,phone,email,profile,roles
                                @OAuthScope(name = "openid", description = "OpenId Connect"),
                                @OAuthScope(name = "phone", description = "手机号"),
                                @OAuthScope(name = "email", description = "电子邮件"),
                                @OAuthScope(name = "profile", description = "用户身份信息"),
                                @OAuthScope(name = "roles", description = "角色"),
                        }
                )
        ),
        description = "OAuth2授权码认证流程,<br/>根据需要选择下方的Scopes。"
)
public class OpenApiOAuth2Config {


}
application.yaml配置:
# springdoc配置
springdoc:
  swagger-ui:
    oauth:
      # 接入的Client凭证信息
      client-id: luo-oauth2-client1
      client-secret: luo-oauth2-client1-secret
      # Swagger UI上默认选中的scopes
      scopes:
        - openid
        - phone
        - email
        - profile
      #  OAuth2端点(绝对路径)
      authorization-url: http://oauth2-server:9000/oauth2/authorize
      token-url: http://oauth2-server:9000/oauth2/token
启动后访问Swagger UI:
http://springdoc-resource-server:8080/swagger-ui/index.html
点击右侧的Authorize按钮,即可触发Swagger UI的OAuth2 授权码认证流程,
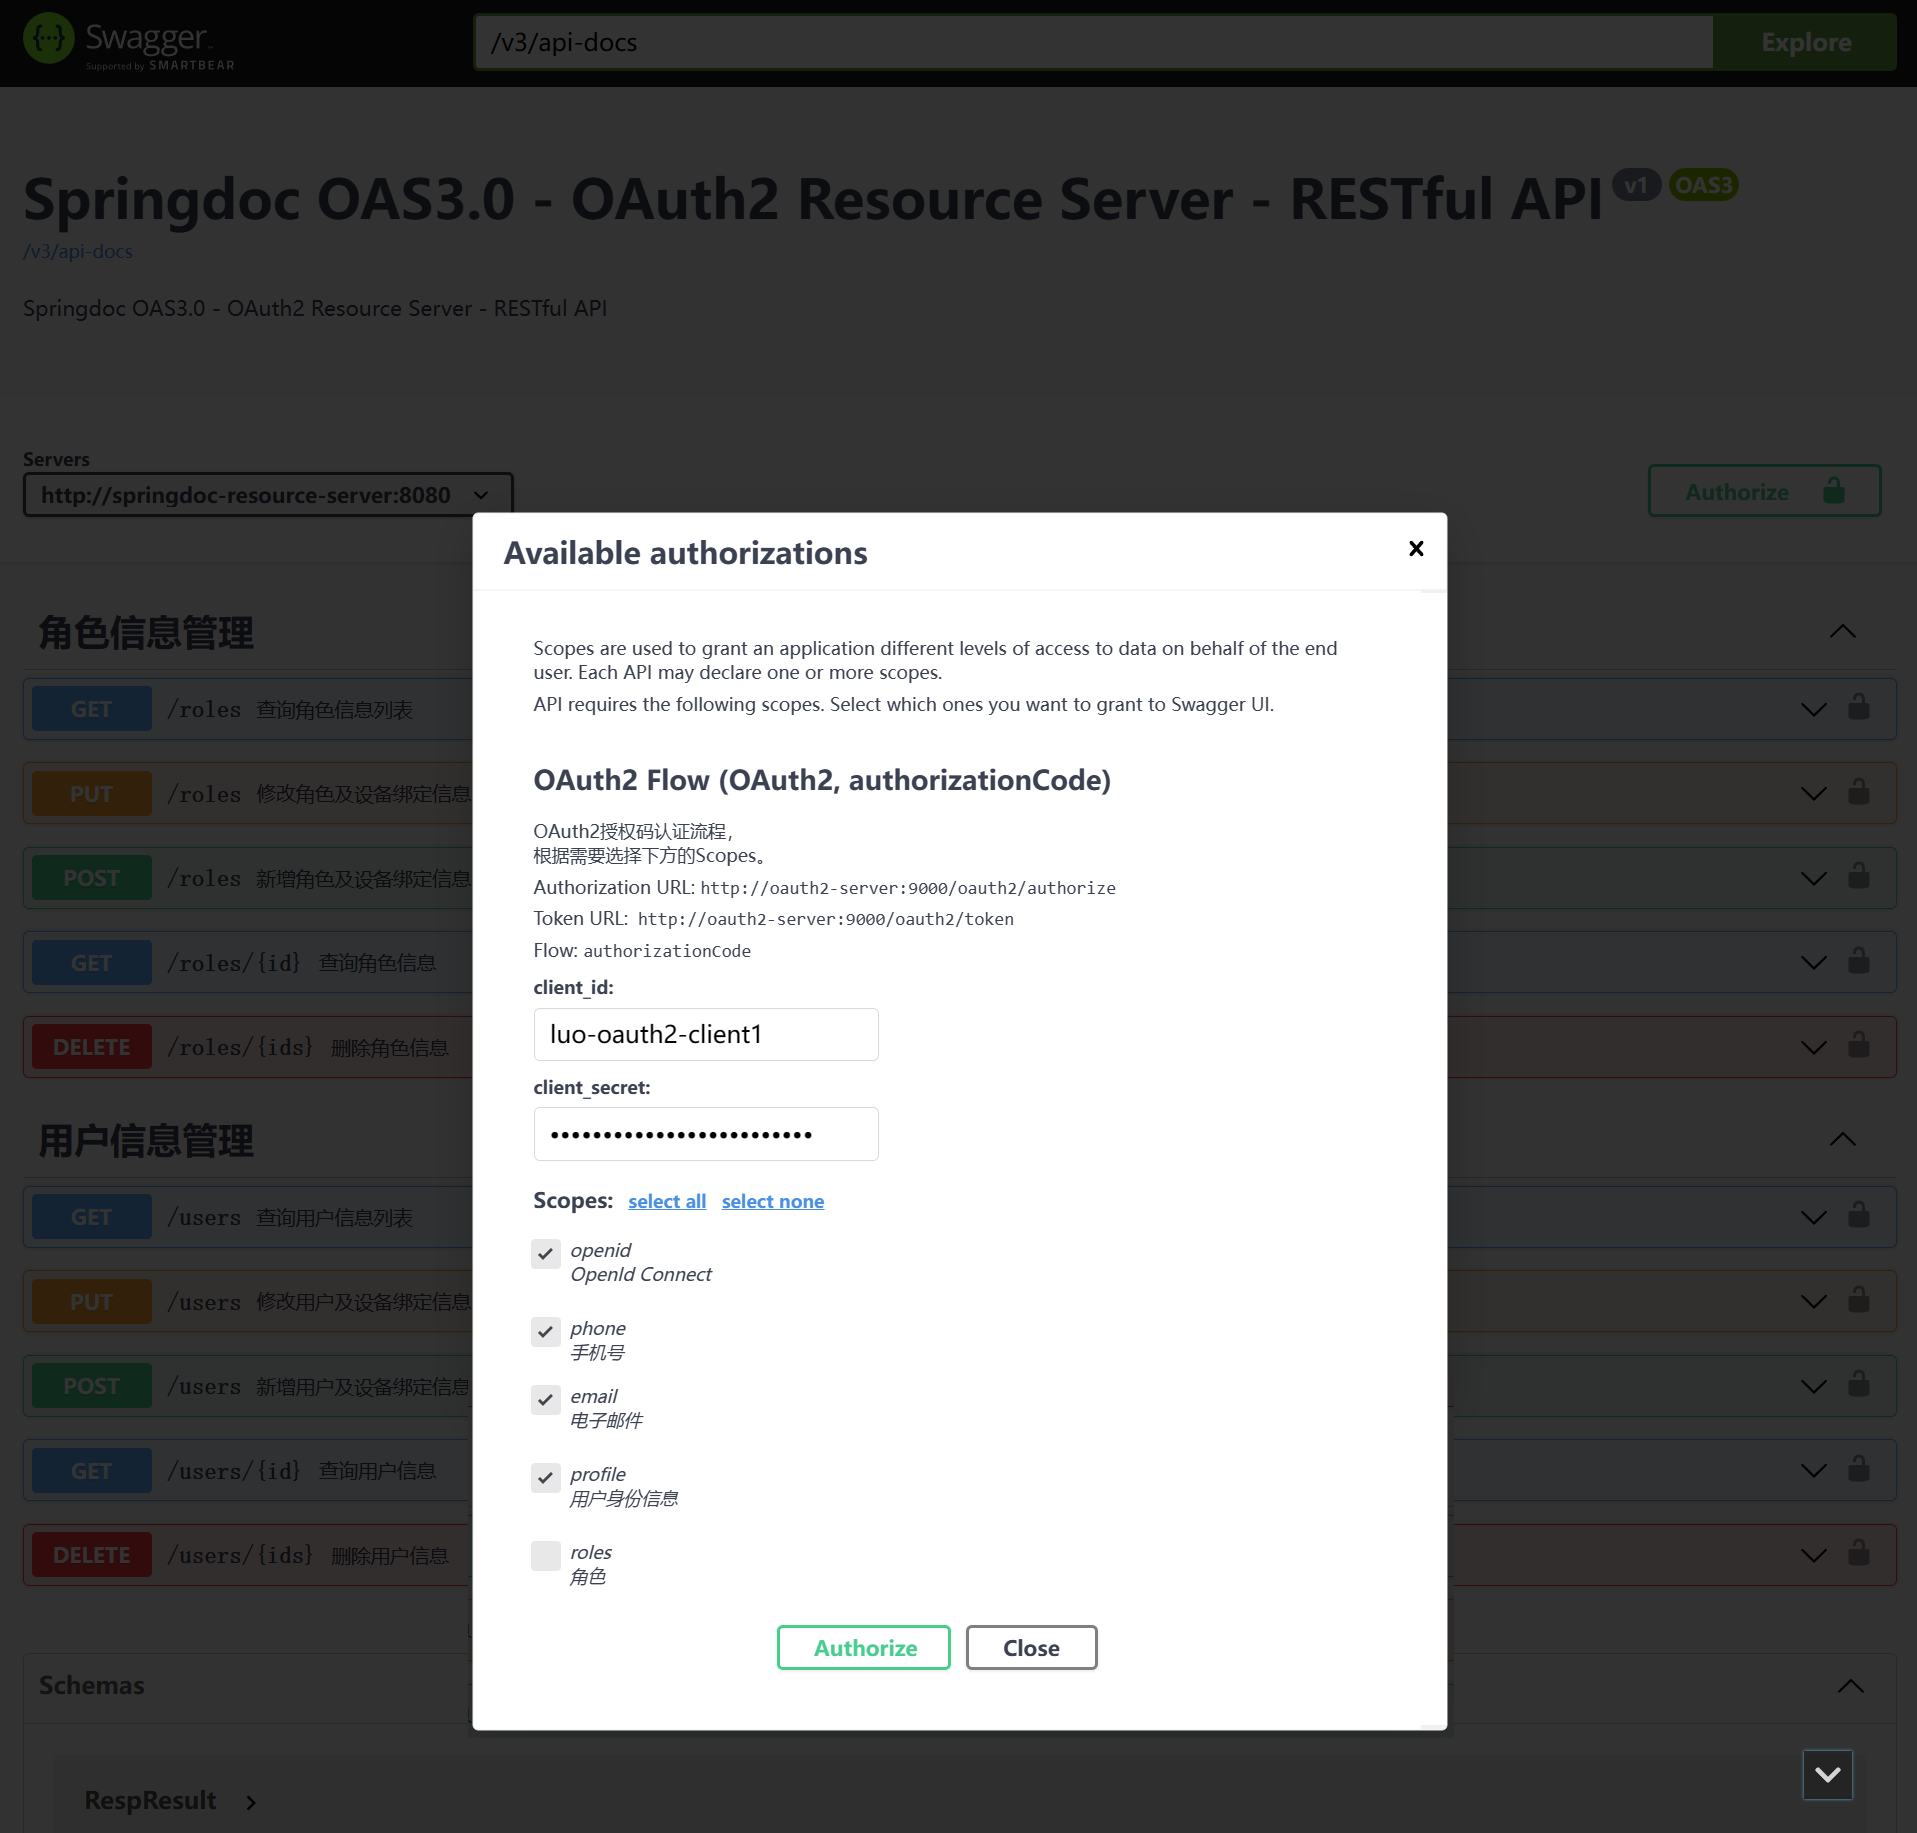
如上图,弹框中已默认填入application.yaml中配置好的client_id和client_secret,
同时设置了Scopes的默认选中,可根据需求调整Scopes的选择,
之后点击Authorize按钮,即在新弹出的Tab页中重定向到OAuth2认证服务器端AuthServer,
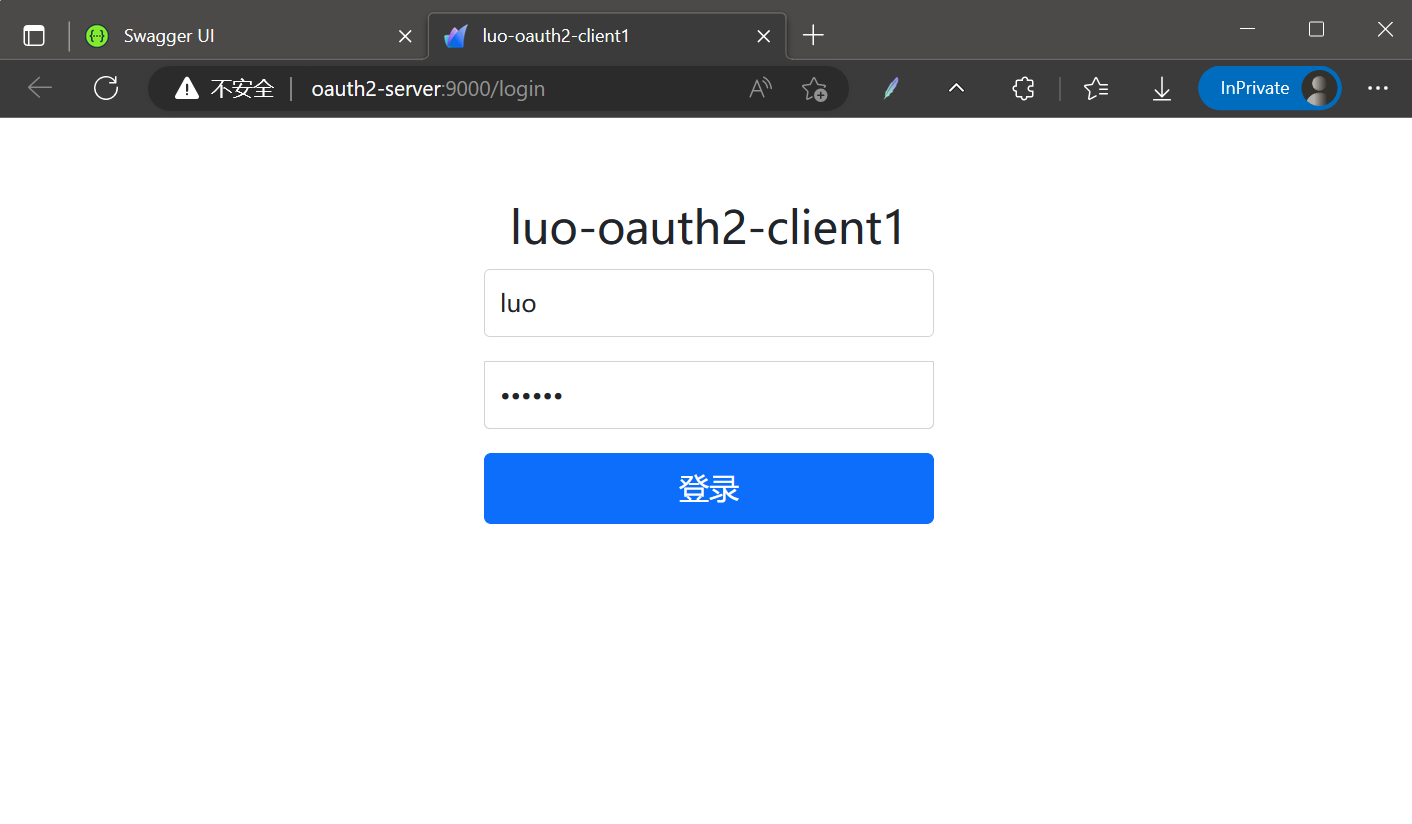
完成登录后,AuthServer登录页会重定到Swagger UI的授权码回调处理页面:
http://springdoc-resource-server:8080/swagger-ui/oauth2-redirect.html
Swagger UI的授权码回调处理页获取授权码,并自动关闭AuthServer Tab页,
然后交由原Swagger UI页面通过授权码换取access_token:
注:
Swagger UI在浏览器端直接调用OAuth2 AuthServer的Token端点,由于两者不在同一域名下,直接调用会报CORS错误,
所以需在AuthServer端设置允许Origin: http://springdoc-resource-server:8080跨域访问。

之后在Swagger UI中点击Try it out -> Execute 发送测试请求时,均会携带请求头:
Authorization: Bearer {access_token}
如此便可通过Resource Server对access_token的校验,正常获得请求结果。
方式3:集成OIDC发现端点
此种方式Swagger UI同样作为OAuth2客户端,只不过通过OIDC发现端点获取支持的OAuth2授权流程、端点URL及权限范围Scopes等,
例如测试使用的OAuth2 AuthServer提供OIDC发现端点:
http://oauth2-server:9000/.well-known/openid-configuration
其响应结果如下:
{


    //发布URI
    "issuer": "http://oauth2-server:9000",
    //授权端点
    "authorization_endpoint": "http://oauth2-server:9000/oauth2/authorize",
    //Token端点
    "token_endpoint": "http://oauth2-server:9000/oauth2/token",
    //Token端点认证方法
    "token_endpoint_auth_methods_supported": [
        "client_secret_basic",
        "client_secret_post",
        "none"
    ],
     //支持的授权流程
    "grant_types_supported": [
        "authorization_code",
        "client_credentials",
        "refresh_token"
    ],
     //支持的授权范围
    "scopes_supported": [
        "openid"
    ],

    "jwks_uri": "http://oauth2-server:9000/oauth2/jwks",
    "userinfo_endpoint": "http://oauth2-server:9000/userinfo",
    "response_types_supported": [
        "code"
    ],
    "subject_types_supported": [
        "public"
    ],
    "id_token_signing_alg_values_supported": [
        "RS256"
    ],
    "end_session_endpoint": "http://oauth2-server:9000/logout"
}
如此可以识别出该AuthServer支持的授权流程包括:
- authorization_code
- client_credentials
- refresh_token
相关端点URL为:
- 授权端点 - “authorization_endpoint”: “http://oauth2-server:9000/oauth2/authorize”
- Token端点 - “token_endpoint”: “http://oauth2-server:9000/oauth2/token”
支持的权限范围Scopes:
- openid
具体集成的代码配置:
import io.swagger.v3.oas.annotations.OpenAPIDefinition;
import io.swagger.v3.oas.annotations.enums.SecuritySchemeType;
import io.swagger.v3.oas.annotations.info.Info;
import io.swagger.v3.oas.annotations.security.SecurityRequirement;
import io.swagger.v3.oas.annotations.security.SecurityScheme;
import io.swagger.v3.oas.annotations.servers.Server;


/**
 * OAS 3.0 配置
 *
 * @author luohq
 * @date 2023-02-26
 */
@OpenAPIDefinition(
        info = @Info(
                title = "Springdoc OAS3.0 - OAuth2 Resource Server - RESTful API",
                description = "Springdoc OAS3.0 - OAuth2 Resource Server - RESTful API",
                version = "v1"
        ),
        servers = {

    @Server(url = "http://springdoc-resource-server:8080")},
        security = @SecurityRequirement(name = "OIDC Flow", scopes = {

    "openid"})
)
@SecurityScheme(
        name = "OIDC Flow",
        type = SecuritySchemeType.OPENIDCONNECT,
        openIdConnectUrl = "${springdoc.swagger-ui.oauth.oidc-url}",
        description = "OpenIdConnect认证流程,<br/>由OIDC发现端点自动识别支持的授权流程,<br/>根据需要选择下方的Scopes。"
)
public class OpenApiOidcConfig {


}
application.yaml配置:
# springdoc配置
springdoc:
  swagger-ui:
    oauth:
      # 接入的Client凭证信息
      client-id: luo-oauth2-client1
      client-secret: luo-oauth2-client1-secret
      # Swagger UI上默认选中的scopes
      scopes:
        - openid
      #  OIDC发现端点(绝对路径)
      oidc-url: http://oauth2-server:9000/.well-known/openid-configuration
注:
Swagger UI集成OIDC同样需要配置OAuth2 client-id和client-secret,
但仅需配置OIDC发现端点URl即可,无需同集成OAuth2模式时配置authorization-url、token-url及需要支持的Scopes,
Swagger UI可通过解析OIDC发现端点自动识别出OAuth2 AuthServer支持的授权流程、端点URL、权限范围Scopes等。
设置Resource Server的Swagger-UI访问Host为:
http://springdoc-resource-server:8080
Swagger-UI授权码回调地址为:http://{swagger-ui-host}:{port}/swagger-ui/oauth2-redirect.html,
即:http://springdoc-resource-server:8080/swagger-ui/oauth2-redirect.html
同集成OAuth2模式时一样,切记 需在OAuth2 Client注册信息中指定该redirect_uri ,
否则由Swagger-UI跳转到OAuth2 授权端点(即登录页)时报错Http 400。
启动后访问Swagger UI:
http://springdoc-resource-server:8080/swagger-ui/index.html
点击右侧的Authorize按钮,即可触发Swagger UI的OIDC认证流程(识别出3种,选择第一条授权码流程即可),
授权码认证流程同之前方式2中流程一样,可参见之前方式2中的介绍。

扩展:同时支持多种认证方式
Swagger UI支持同时集成多种认证方式,例如同时支持上面提到的3中方式,具体集成如下。
代码配置:
import io.swagger.v3.oas.annotations.OpenAPIDefinition;
import io.swagger.v3.oas.annotations.enums.SecuritySchemeIn;
import io.swagger.v3.oas.annotations.enums.SecuritySchemeType;
import io.swagger.v3.oas.annotations.info.Info;
import io.swagger.v3.oas.annotations.security.*;
import io.swagger.v3.oas.annotations.servers.Server;


/**
 * OAS 3.0 配置
 *
 * @author luohq
 * @date 2023-02-26
 */
@OpenAPIDefinition(
        info = @Info(
                title = "Springdoc OAS3.0 - OAuth2 Resource Server - RESTful API",
                description = "Springdoc OAS3.0 - OAuth2 Resource Server - RESTful API",
                version = "v1"
        ),
        servers = {

    @Server(url = "http://springdoc-resource-server:8080")},
        //集成多种认证模式
        security = {


                @SecurityRequirement(name = "Bearer access_token"),
                @SecurityRequirement(name = "OAuth2 Flow", scopes = {

    "openid", "phone", "email", "profile", "roles"}),
                @SecurityRequirement(name = "OIDC Flow", scopes = {

    "openid"})
        }
)
@SecurityScheme(
        name = "Bearer access_token",
        type = SecuritySchemeType.HTTP,
        in = SecuritySchemeIn.HEADER,
        scheme = "bearer",
        description = "直接将有效的access_token填入下方,后续该access_token将作为Bearer access_token"
)
@SecurityScheme(
        name = "OAuth2 Flow",
        type = SecuritySchemeType.OAUTH2,
        flows = @OAuthFlows(
                authorizationCode = @OAuthFlow(
                        authorizationUrl = "${springdoc.swagger-ui.oauth.authorization-url}",
                        tokenUrl = "${springdoc.swagger-ui.oauth.token-url}",
                        scopes = {


                                //此处需根据Client注册时支持的Scopes进行配置
                                //openid,phone,email,profile,roles
                                @OAuthScope(name = "openid", description = "OpenId Connect"),
                                @OAuthScope(name = "phone", description = "手机号"),
                                @OAuthScope(name = "email", description = "电子邮件"),
                                @OAuthScope(name = "profile", description = "用户身份信息"),
                                @OAuthScope(name = "roles", description = "角色"),
                        }
                )
        ),
        description = "OAuth2授权码认证流程,<br/>根据需要选择下方的Scopes。"
)
@SecurityScheme(
        name = "OIDC Flow",
        type = SecuritySchemeType.OPENIDCONNECT,
        openIdConnectUrl = "${springdoc.swagger-ui.oauth.oidc-url}",
        description = "OpenIdConnect认证流程,<br/>由OIDC发现端点自动识别支持的授权流程,<br/>根据需要选择下方的Scopes。"
)
public class OpenApiComboConfig {


}
application.yaml配置:
# springdoc配置
springdoc:
  swagger-ui:
    oauth:
      # 接入的Client凭证信息
      client-id: luo-oauth2-client1
      client-secret: luo-oauth2-client1-secret
      # Swagger UI上默认选中的scopes
      scopes:
        - openid
        - phone
        - email
        - profile
      #  OAuth2端点(绝对路径)
      authorization-url: http://oauth2-server:9000/oauth2/authorize
      token-url: http://oauth2-server:9000/oauth2/token
      #  OIDC发现端点(绝对路径)
      oidc-url: http://oauth2-server:9000/.well-known/openid-configuration
参考:
https://swagger.io/docs/specification/authentication/openid-connect-discovery/
https://gitee.com/mirrors_OAI/OpenAPI-Specification/blob/3.0.1/versions/3.0.1.md#security-scheme-object
https://springdoc.org/
https://github.com/springdoc