时隔半年多,毕设男孩终于重操旧业,回到了 LSTM进行时间序列预测和异常检测的路上。
如果有阅读过我之前的博客,可以发现使用 LSTM作单类的时间序列异常检测也是基于对于时间序列的预测进行 登堂入室LSTM:使用LSTM进行简单的时间序列异常检测
本次我们要进行的是 使用 注意力机制 + LSTM 进行时间序列预测,项目地址为Keras Attention Mechanism
对于时间步的注意力机制
首先我们把它git clone 到本地,然后配置好所需环境 笔者的 tensorflow版本为1.6.0 Keras 版本为 2.0.2
打开文件夹,我们主要需要的是attention_lstm.py 以及 attention_utils.py 脚本
项目中生成数据的函数为
def get_data_recurrent(n, time_steps, input_dim, attention_column=10):
    """
    Data generation. x is purely random except that it's first value equals the target y.
    In practice, the network    should learn that the target = x[attention_column].
    Therefore, most of its attention should be focused on the value addressed by attention_column.
    :param n: the number of samples to retrieve.
    :param time_steps: the number of time steps of your series.
    :param input_dim: the number of dimensions of each element in the series.
    :param attention_column: the column linked to the target. Everything else is purely random.
    :return: x: model inputs, y: model targets
    """
    x = np.random.standard_normal(size=(n, time_steps, input_dim))
    y = np.random.randint(low=0, high=2, size=(n, 1))
    x[:, attention_column, :] = np.tile(y[:], (1, input_dim))
    return x, y
默认的 n = 30000, input_dim = 2 ,timesteps = 20。生成的数据为:
| shape | |
|---|---|
| x | 30000 x 20 x 2 |
| y | 30000 x 1 |
其中 x 的第11个 timestep 两维的数据 与y相同,其他timestep 维的数据为随机数。
所以当我们使用这样的数据去进行 注意力机制 LSTM 的训练,我们希望得到的结果是 注意力层 主要关注第11个timestep 而对其他timestep 的关注度较低。
直接运行 attention_lstm.py 脚本
此时的网络结构为:

可以看到是在 LSTM 层之后使用了注意力机制
最后会汇总画一张图
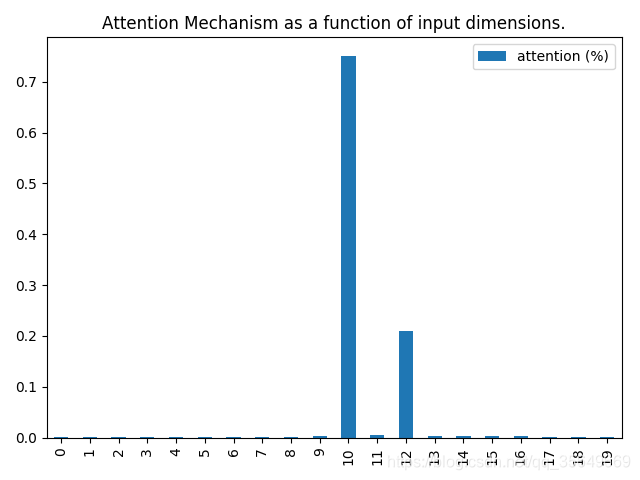
可以看到 可以看到注意力的权重主要汇总在了第11个timestep,说明注意力机制很成功
对于维的注意力机制
上述的例子 是将注意力机制使用在了 timestep 上,决定哪个时间步对于结果的影响较大。
而如果我们想将 注意力机制使用在维上呢? 比如使用多维去预测一维的数据,我们想使用注意力机制
决定哪些维对于预测维起关键作用。
比较简单的方法就是将输入数据 reshape 一下 将timesteps 与 input_dim 维对换 再运行就可以了,因为本代码的设置就是对 输入的第2维加入注意力机制.
进阶的方法就是 自写一下 attention_3d_block 函数:
def attention_3d_block(inputs):
    # inputs.shape = (batch_size, time_steps, input_dim)
    input_dim = int(inputs.shape[2])
    a = inputs
    #a = Permute((2, 1))(inputs)
    #a = Reshape((input_dim, TIME_STEPS))(a) # this line is not useful. It's just to know which dimension is what.
    a = Dense(input_dim, activation='softmax')(a)
    if SINGLE_ATTENTION_VECTOR:
        a = Lambda(lambda x: K.mean(x, axis=1), name='dim_reduction')(a)
        a = RepeatVector(input_dim)(a)
    a_probs = Permute((1, 2), name='attention_vec')(a)
    #a_probs = a
    output_attention_mul = merge([inputs, a_probs], name='attention_mul', mode='mul')
    return output_attention_mul
其实严格来讲我们所做的改变不多,作者使用了 Permute层对于数据进行了 第2和第3维的对换,我们则没有进行对换操作。
接下来 再在attention_utils.py 脚本中写一个产生数据集的新函数:
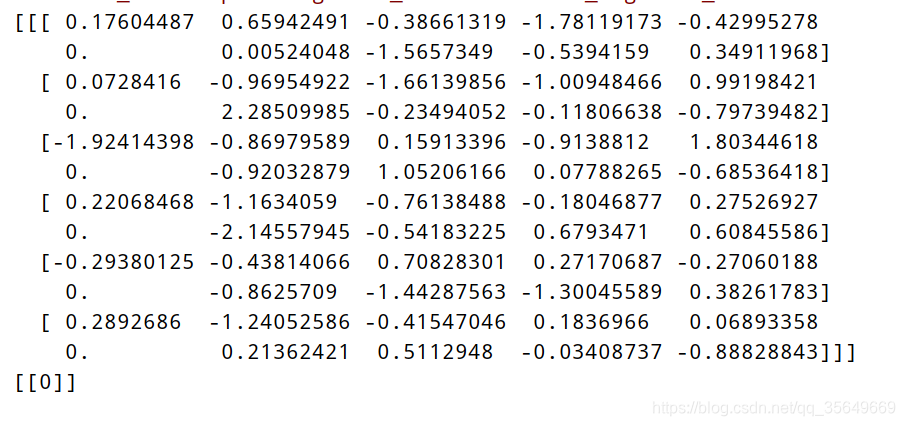
def get_data_recurrent2(n, time_steps, input_dim, attention_dim=5):
    """
    假设 input_dim = 10  time_steps = 6
    产生一个  x 6 x 10 的数据 其中每步的第 6 维 与 y相同

    """
    x = np.random.standard_normal(size=(n, time_steps, input_dim))
    y = np.random.randint(low=0, high=2, size=(n, 1))
    x[:,:,attention_dim] =  np.tile(y[:], (1, time_steps))

    return x,y
试着产生一组数据 get_data_recurrent2(1,6,10)
然后我们稍微改动一下main函数进行新的训练。迭代十次后结果为:
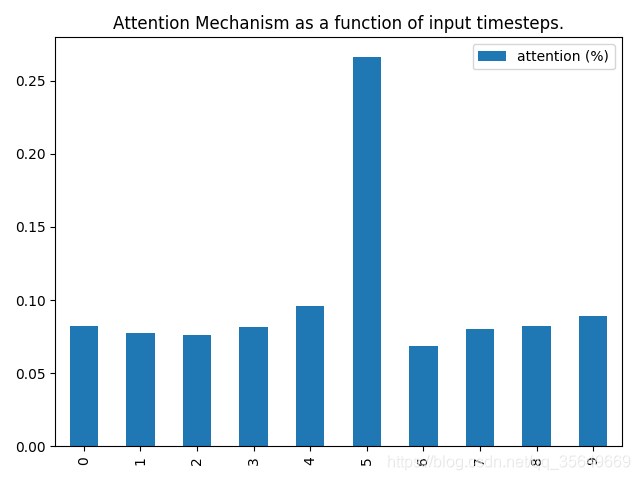
可以看到,第6维的权重比较大。
如果我们对于timesteps的注意力画一个汇总图,即改动一下
attention_vector = np.mean(get_activations(m, testing_inputs_1,print_shape_only=False,layer_name='attention_vec')[0], axis=2).squeeze()
可以看到对于timesteps的注意力是相同的(其实如果对于开头时间步的注意力机制,对输入维的注意力画一个汇总图,也是相同的)

对于时间步和输入维的注意力机制
待补充
注:参考 keras-attention-mechanism
以及 Keras中文文档
代码已上传到我的github