简述
特征的选取方式一共有三种,在sklearn实现了的包裹式(wrapper)特诊选取只有两个递归式特征消除的方法,如下:
recursive feature elimination ( RFE )通过学习器返回的 coef_ 属性 或者 feature_importances_ 属性来获得每个特征的重要程度。 然后,从当前的特征集合中移除最不重要的特征。在特征集合上不断的重复递归这个步骤,直到最终达到所需要的特征数量为止。RFECV通过交叉验证来找到最优的特征数量。如果减少特征会造成性能损失,那么将不会去除任何特征。这个方法用以选取单模型特征相当不错,但是有两个缺陷,一,计算量大。二,随着学习器(评估器)的改变,最佳特征组合也会改变,有些时候会造成不利影响。
RFE
性能升降问题
PFE 自身的特性,使得我们可以比较好的进行手动的特征选择,但是同样的他也存在原模型在去除特征后的数据集上的性能表现要差于原数据集,这和方差过滤一样,同样是因为去除的特征中保留有有效信息的原因。下面的代码就很好的展示了这种现象。
from sklearn.feature_selection import RFE, RFECV
from sklearn.svm import LinearSVC
from sklearn.datasets import load_iris
from  sklearn import model_selection

iris = load_iris()
X, y = iris.data, iris.target
## 特征提取
estimator = LinearSVC()
selector = RFE(estimator=estimator, n_features_to_select=2)
X_t = selector.fit_transform(X, y)
### 切分测试集与验证集
X_train, X_test, y_train, y_test = model_selection.train_test_split(X, y,
                                                                    test_size=0.25, random_state=0, stratify=y)
X_train_t, X_test_t, y_train_t, y_test_t = model_selection.train_test_split(X_t, y,
                                                                            test_size=0.25, random_state=0,
                                                                            stratify=y)
## 测试与验证
clf = LinearSVC()
clf_t = LinearSVC()
clf.fit(X_train, y_train)
clf_t.fit(X_train_t, y_train_t)
print("Original DataSet: test score=%s" % (clf.score(X_test, y_test)))
print("Selected DataSet: test score=%s" % (clf_t.score(X_test_t, y_test_t)))
Original DataSet: test score=0.973684210526
Selected DataSet: test score=0.947368421053
从上面的代码我们可以看出,原模型的性能在使用RFE后确实下降了,如同方差过滤,单变量特征选取一样,这种方式看来使用这个方法我们也需要谨慎一些啊。
一些重要的属性与参数
- n_features_to_select :选出的特征整数时为选出特征的个数,None时选取一半
- step : 整数时,每次去除的特征个数,小于1时,每次去除权重最小的特征
print("N_features %s" % selector.n_features_) # 保留的特征数
print("Support is %s" % selector.support_) # 是否保留
print("Ranking %s" % selector.ranking_) # 重要程度排名
N_features 2
Support is [False True False True]
Ranking [3 1 2 1]
RFECV
原理与特性
使用交叉验证来保留最佳性能的特征。不过这里的交叉验证的数据集切割对象不再是 行数据(样本),而是列数据(特征),同时学习器本身不变,最终得到不同特征对于score的重要程度,然后保留最佳的特征组合。其分割方式类似于随机森林中的列上子采样。
一些重要的属性与参数
- step : 整数时,每次去除的特征个数,小于1时,每次去除权重最小的特征
- scoring : 字符串类型,选择sklearn中的
scorer作为输入对象 - cv :
- 默认为3折
- 整数为cv数
- object:用作交叉验证生成器的对象
- An iterable yielding train/test splits.
对于 迭代器或者没有输入(None), 如果 y 是 二进制 或者 多类,则使用 sklearn.model_selection.StratifiedKFold. 如果学习器是个分类器 或者 如果 y 不是 二进制 或者 多类,使用 sklearn.model_selection.KFold.
如果你对于前面的花不太理解,那么你可以看一下下面的例子,或者自己动手尝试一下
例子一
对于前面RFE中的数据集进行验证,应当应该保留那些特征:
iris = load_iris()
X = iris.data
y = iris.target
estimator = LinearSVC()
selector = RFECV(estimator=estimator, cv=3)
selector.fit(X, y)
print("N_features %s" % selector.n_features_)
print("Support is %s" % selector.support_)
print("Ranking %s" % selector.ranking_)
print("Grid Scores %s" % selector.grid_scores_)
N_features 4
Support is [ True True True True]
Ranking [1 1 1 1]
Grid Scores [ 0.91421569 0.94689542 0.95383987 0.96691176]
好吧,看来都应该保留
例子二
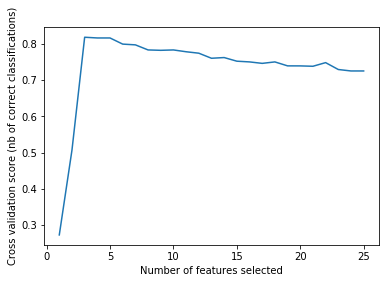
RFECV的强大作用:
import matplotlib.pyplot as plt
from sklearn.svm import SVC
from sklearn.model_selection import StratifiedKFold
from sklearn.feature_selection import RFECV
from sklearn.datasets import make_classification

# Build a classification task using 3 informative features
X, y = make_classification(n_samples=1000, n_features=25, n_informative=3,
                           n_redundant=2, n_repeated=0, n_classes=8,
                           n_clusters_per_class=1, random_state=0)

# Create the RFE object and compute a cross-validated score.
svc = SVC(kernel="linear")
# The "accuracy" scoring is proportional to the number of correct
# classifications
rfecv = RFECV(estimator=svc, step=1, cv=StratifiedKFold(2),
              scoring='accuracy')
rfecv.fit(X, y)

print("Optimal number of features : %d" % rfecv.n_features_)
print("Ranking of features : %s" % rfecv.ranking_)

# Plot number of features VS. cross-validation scores
plt.figure()
plt.xlabel("Number of features selected")
plt.ylabel("Cross validation score (nb of correct classifications)")
plt.plot(range(1, len(rfecv.grid_scores_) + 1), rfecv.grid_scores_)
plt.show()
Optimal number of features : 3
Ranking of features : [ 5 1 12 19 15 6 17 1 2 21 23 11 16 10 13 22 8 14 1 20 7 9 3 4 18]
(划重点了,咳咳)
通过RFECV我们得知,原来只需要三个特征就好了,首先这确实符合我们构造的数据,同时这也向我们展示了RFECV的强大潜力,看来它将成为我们之后进行特征选取的一个重要助手(^o^)/~
三个特殊的多类比较特征选择
假阳性率(false positive rate) SelectFpr
伪发现率(false discovery rate) SelectFdr
或者族系误差(family wise error) SelectFwe
其实际意义请参考 wiki:Multiple_comparisons_problem
下面是代码展示
from sklearn.feature_selection import SelectFdr,f_classif,SelectFpr,SelectFwe,chi2,mutual_info_classif

iris = load_iris()
X = iris.data
y = iris.target

selector1 = SelectFpr(score_func = mutual_info_classif,alpha=0.5)
# alpha是预期错误发现率的上限,默认是0.5,score_func 默认为 f_classif
selector1.fit(X, y)
print("\nScores of features %s" % selector1.scores_)
print("p-values of feature scores is %s" % selector1.pvalues_)
# print("Shape after transform is ",selector1.transform(X).shape)


selector2 = SelectFdr(score_func = f_classif,alpha=4.37695696e-80) # alpha是预期错误发现率的上限
selector2.fit(X, y)
print("\nScores of features %s" % selector2.scores_)
print("p-values of feature scores is %s" % selector2.pvalues_)
print("Shape after transform is ",selector2.transform(X).shape)

selector3 = SelectFwe(score_func = chi2,alpha=1) # alpha是预期错误发现率的上限
selector3.fit(X, y)
print("\nScores of features %s" % selector3.scores_)
print("p-values of feature scores is %s" % selector3.pvalues_)
print("Shape after transform is ",selector3.transform(X).shape)
输出:
Scores of features [ 0.54158942 0.21711645 0.99669173 0.99043692]
p-values of feature scores is None
Scores of features [ 119.26450218 47.3644614 1179.0343277 959.32440573]
p-values of feature scores is [ 1.66966919e-31 1.32791652e-16 3.05197580e-91 4.37695696e-85]
Shape after transform is (150, 2)
Scores of features [ 10.81782088 3.59449902 116.16984746 67.24482759]
p-values of feature scores is [ 4.47651499e-03 1.65754167e-01 5.94344354e-26 2.50017968e-15]
Shape after transform is (150, 4)
通用RFE:GenericUnivariateSelect
在学习了前面的RFE之后,sklearn还封装了一个通用的RFE:GenericUnivariateSelect,它可以通过超参数来设置我们需要的RFE,一共是三个超参数灰常简单易用。
- score_func : 评价函数(和前面的意思一样)
- mode : sklearn 封装的模型
- param : 之前sklearn中封装的模型都有一个相应的控制阈值的超参数 param,此处意义相同
下面是一个简单的小例子
from sklearn.feature_selection import GenericUnivariateSelect

iris = load_iris()
X = iris.data
y = iris.target
estimator = LinearSVC()
selector = GenericUnivariateSelect(score_func=f_classif,mode='fpr',param= 0.5)
# mode : {'percentile', 'k_best', 'fpr', 'fdr', 'fwe'}
selector.fit(X, y)
print("\nScores of features %s" % selector.scores_)
print("p-values of feature scores is %s" % selector.pvalues_)
print("Shape after transform is ",selector.transform(X).shape)
print("Support is ",selector.get_support())
print("Params is ",selector.get_params())
Scores of features [ 119.26450218 47.3644614 1179.0343277 959.32440573]
p-values of feature scores is [ 1.66966919e-31 1.32791652e-16 3.05197580e-91 4.37695696e-85]
Shape after transform is (150, 4)
Support is [ True True True True]
Params is {'mode': 'fpr', 'param': 0.5, 'score_func': <function f_classif at 0x7f6ecee7d7b8>}