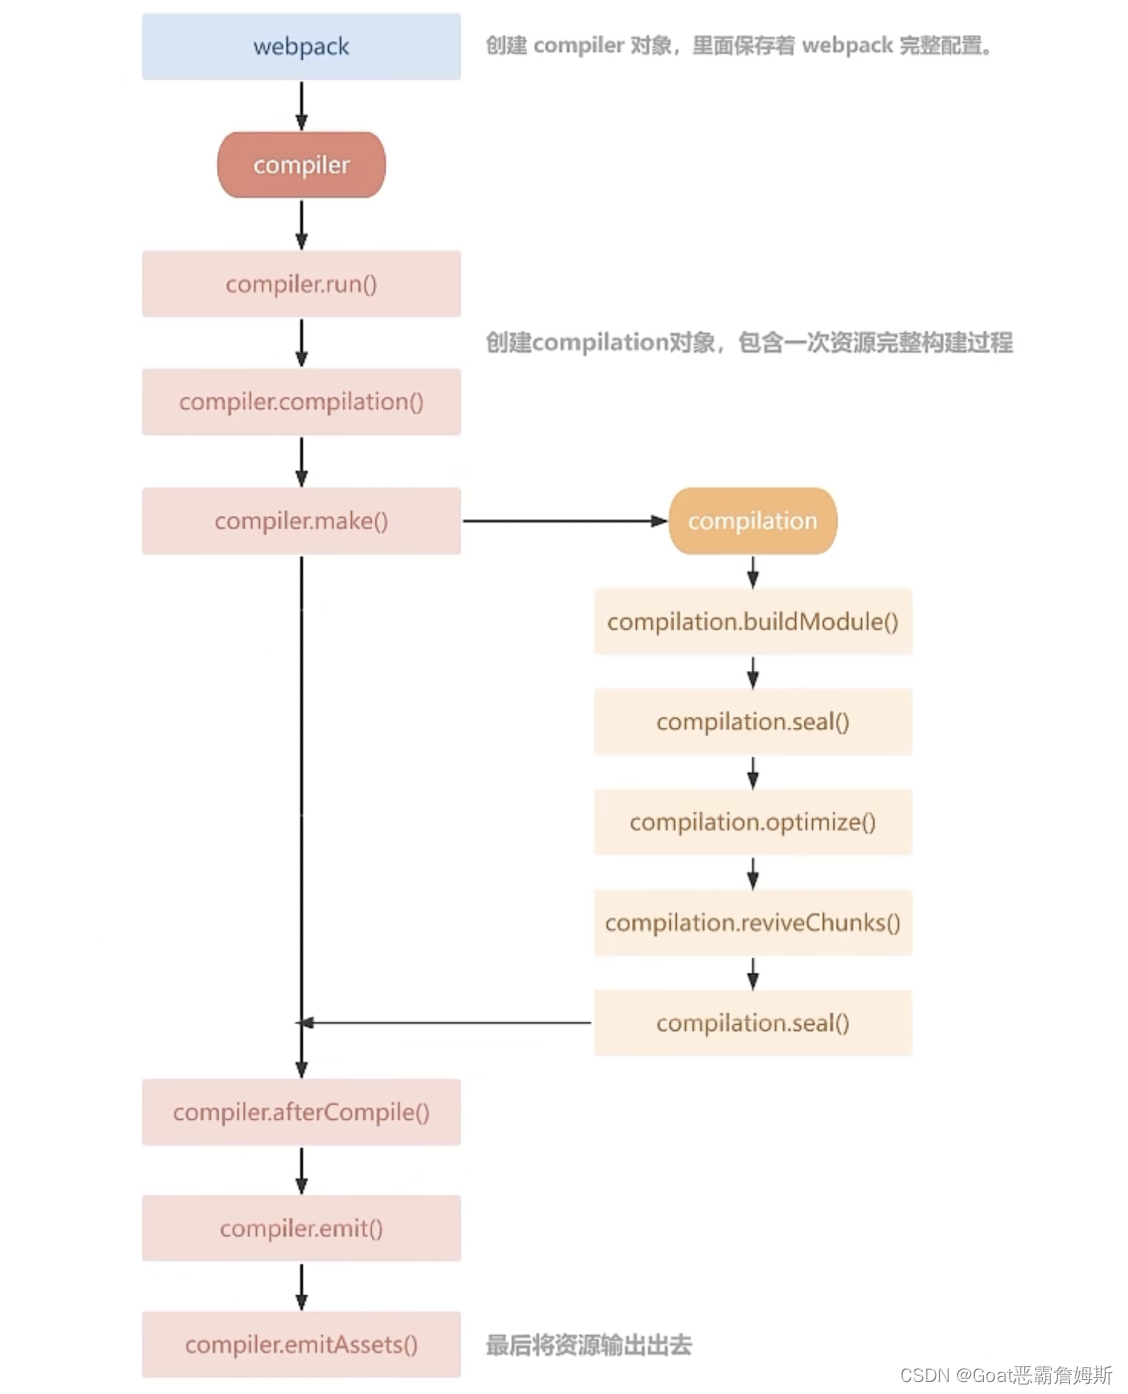
通过插件我们可以拓展webpack,加入自定义的构建行为,使webpack可以执行更广泛的任务。
plugin工作原理:
webpack工作就像是生产流水线,要通过一系列处理流程后才能将源文件转为输出结果,在不同阶段做不同的事,插件就是通过插入在某个阶段,执行一些特定的事情。
webpack通过tapable来组织这条复杂的生产线,webpack在执行的过程中会广播事件,插件只需要监听它关心的事件,就能加入到这条生产线中,改变运作。
代码角度来说:webpack在编译的过程中,会触发一系列的tapable钩子事件,插件要做的就是找到对应的钩子,往上面挂自己的任务,也就是注册事件,webpack在构建的时候,就会一起触发注册的事件。
webpack内部钩子函数
钩子函数的本质就是事件,为了方便我们直接接入和控制编译过程,webpack把编译过程中触发的各类关键事件封装成事件接口暴露了出来,这些就是钩子。
Tapable
为webpack提供了统一的插件接口,类型定义,是webpack的核心功能库。webpack目前有十种ooks。Tapable统一暴露了三个方法给插件,用于注入不同类型的自定义构建行为:
tap:可以注册同步钩子和异步钩子
tapAsync:回调方式注册异步钩子
tapPromise:Promise方式注册异步钩子
plugin构建对象
Compiler 对象中保存着完整的webpack环境配置,每次启动webpack构件时,都只创建一次的对象,我们可以通过compiler获取到ebpack的主环境配置,比如:loader,plugin等。主要有以下属性(compiler 钩子 | webpack 中文文档 | webpack 中文文档 | webpack 中文网):
compiler.options 可以访问本次启动webpack时所有的配置文件,包括但不限于loader,entry,output,plugin等等完整配置信息。
compiler.inputFileSystem compiler.outputFileSystem 可进行文件操作,类似于node中fs模块。
compiler.hooks 可以注册Tapable的不同种类Hook,从而可以再compiler生命周期中植入不同的逻辑。
Compilation 对象代表一次资源的构建,compilation实例可以访问所有的模块以及他们的依赖。
一个compilation会构建依赖图中所有的模块进行编译。在编译阶段,模块会被加载(load),封存(seal),优化(optimize),分块(split),哈希(hash)和重新构建(restore)。主要有以下属性(compilation 钩子 | webpack 中文文档 | webpack 中文文档 | webpack 中文网):
compilation.modules 可以访问所有模块,打包的每一个文件都是一个模块。
compilation.chunks chunks即是多个modules组成而来的一个代码块。入口文件引入的资源组成一个chunk,通过代码分割的模块又是另外的chunk。
compilation.assets 可以访问本次打包生成所有文件的结果。
compilation.hooks 可以注册Tapable的不同种类Hook,用于在compilation编译模块阶段进行逻辑添加以及修改。
写法如下:
//1.webpack加载webpack.config.js中所有配置,此时就会new TestPlugin(),执行插件的constructor
//2.创建compiler对象
//3.遍历所有plugins中插件,调用插件的apply方法,
//4.再去执行剩下的编译流程(触发各个hooks事件)
class TestPlugin{
constructor(){}
apply(compiler){
//文档可知environment是同步,所以使用tap注册
compiler.hooks.environment.tap("TestPlugin",()=>{
})
//emit是异步串行,按照顺序执行完才往下走
compiler.hooks.emit.tap("TestPlugin",(compilation)=>{
})
compiler.hooks.emit.tapAsync("TestPlugin",(compilation,callback)=>{
setTimeout(()=>{
callback() //callback执行后才继续往下走
},1000)
})
compiler.hooks.emit.tapPromise("TestPlugin",(compilation)=>{
return new Promise((resolve,reject)=>{
setTimeout(()=>{
resolve()
},1000)
})
})
//make是异步并行
compiler.hooks.make.tapAsync("TestPlugin",(compilation,callback)=>{
//compilation钩子函数要在make钩子里触发
compilation.hooks.seal.tap("TestPlugin",()=>{
})
setTimeout(()=>{
callback() //callback执行后才继续往下走
},3000)
}),
compiler.hooks.make.tapAsync("TestPlugin",(compilation,callback)=>{
setTimeout(()=>{
callback() //callback执行后才继续往下走
},2000)
}),
compiler.hooks.make.tapAsync("TestPlugin",(compilation,callback)=>{
setTimeout(()=>{
callback() //callback执行后才继续往下走
},1000)
})
}
}
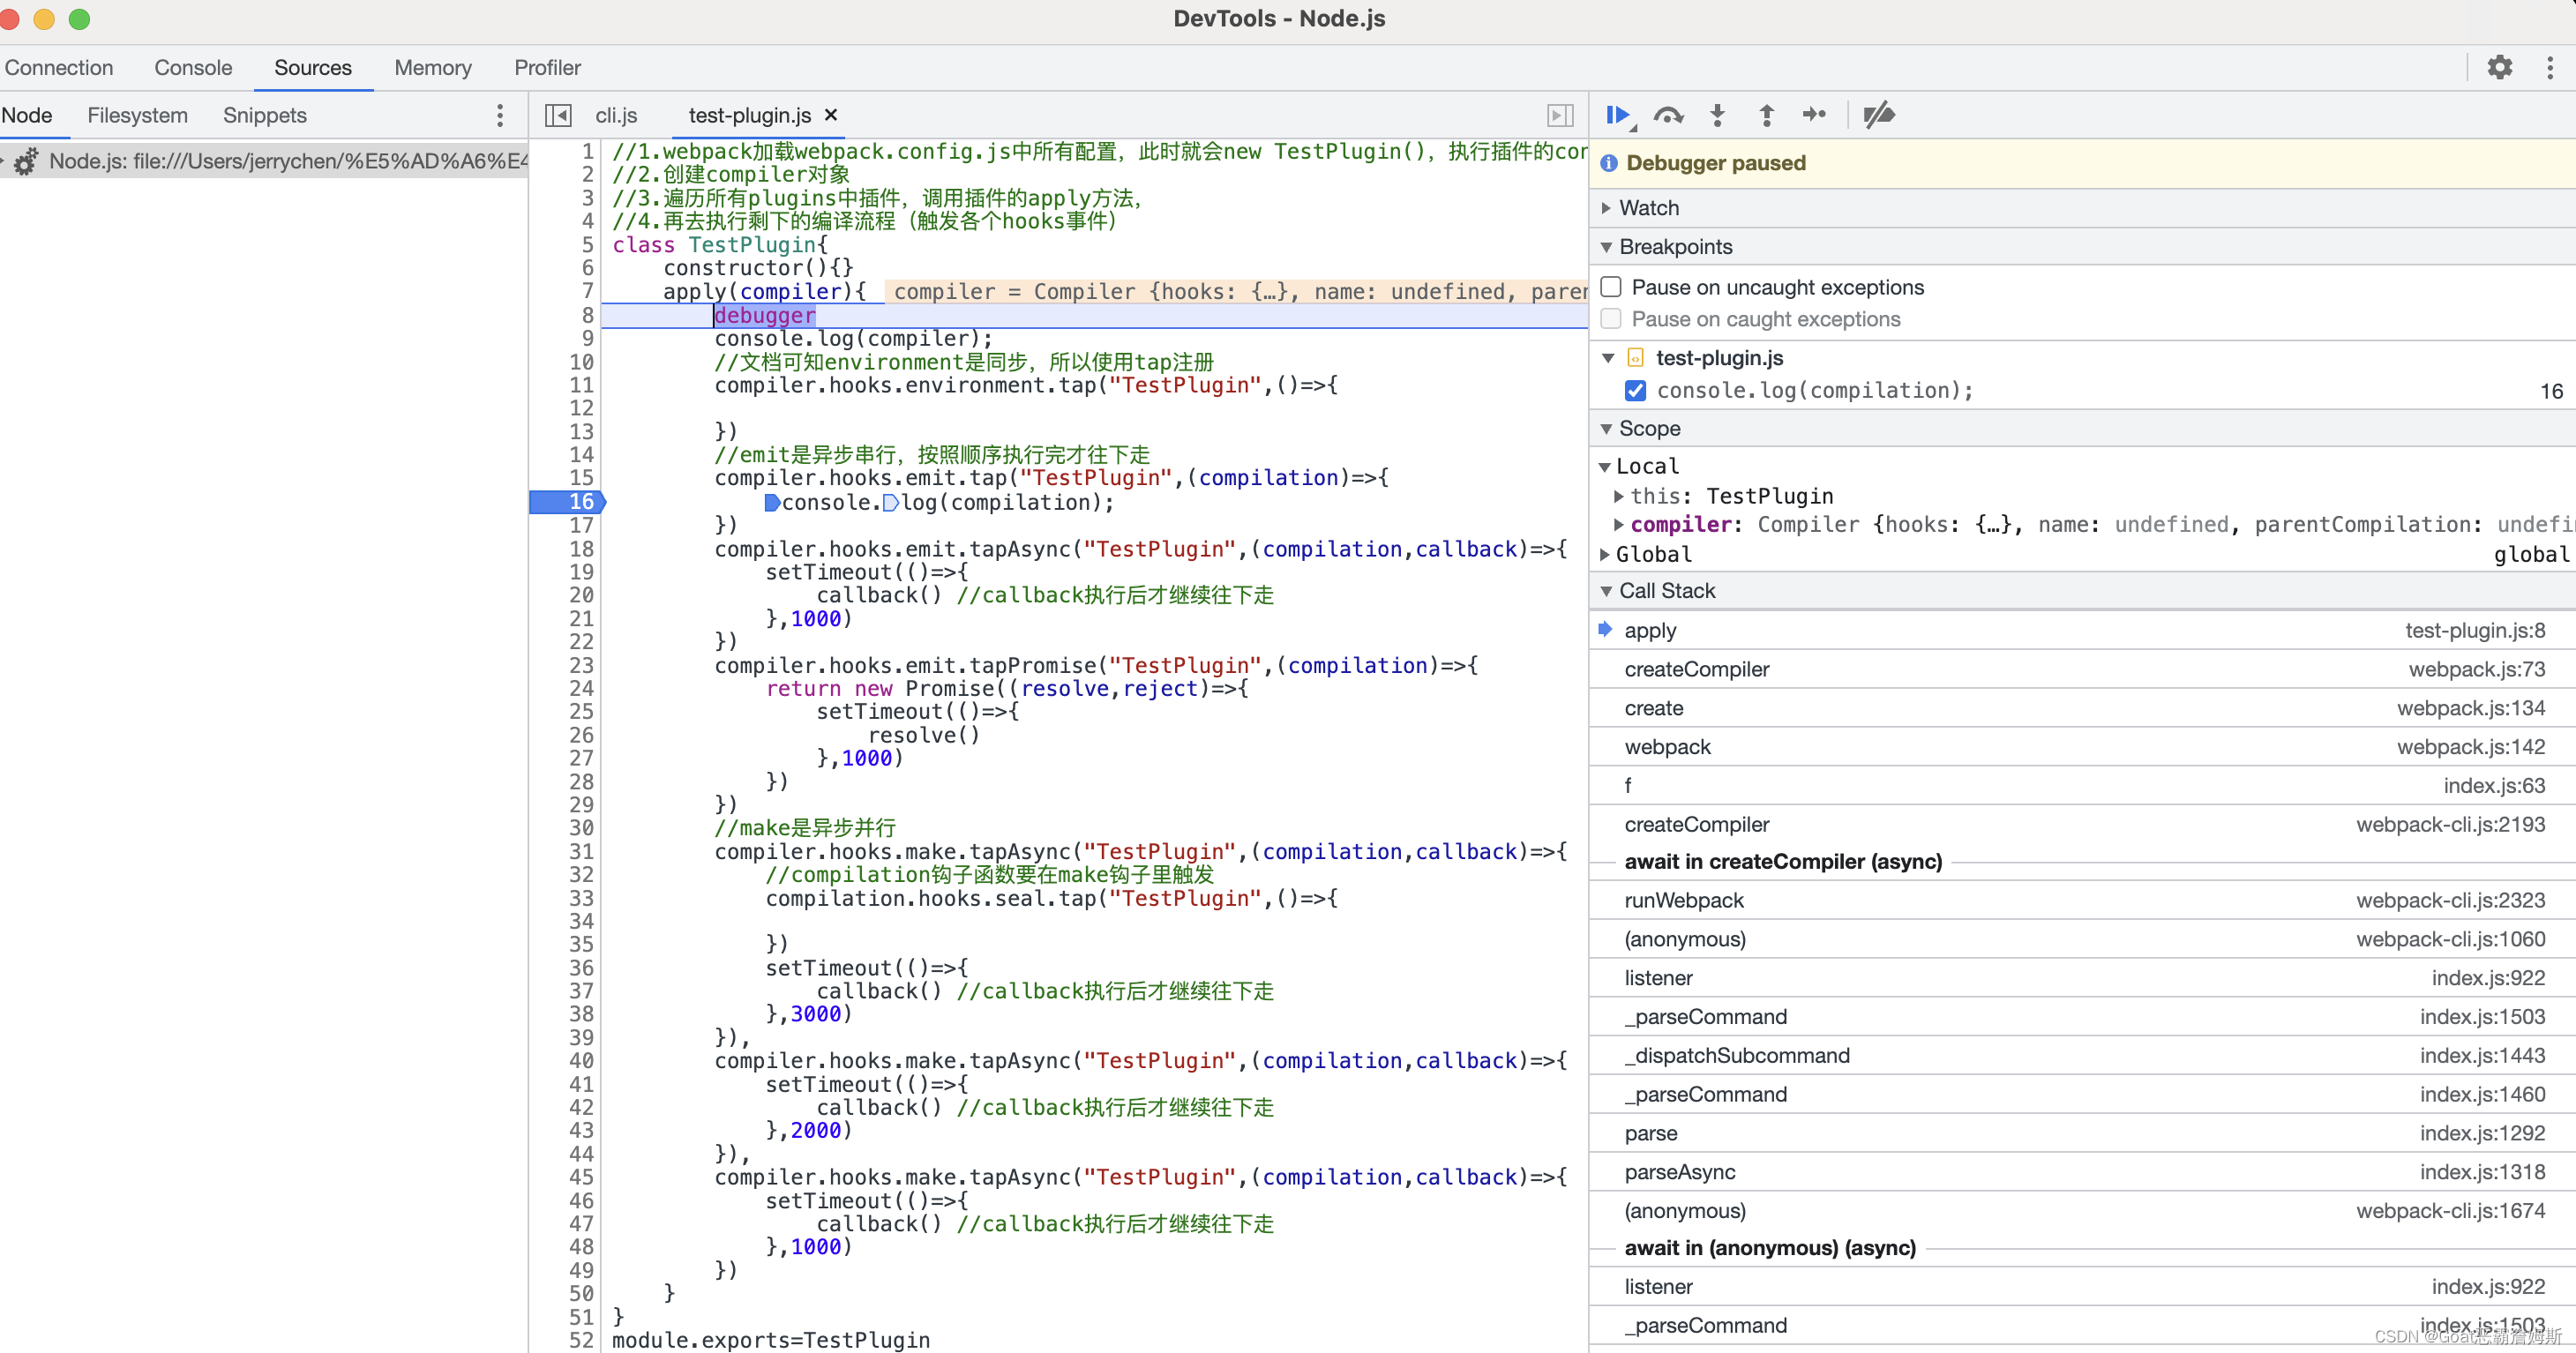
module.exports=TestPlugin关于compiler以及compilation的调试:
首行断点
"scripts": {
    "debug": "node --inspect-brk ./node_modules/webpack-cli/bin/cli.js"
  }
在TestPlugin中debugger
class TestPlugin{
    constructor(){}
    apply(compiler){
        debugger
        console.log(compiler);
        //文档可知environment是同步,所以使用tap注册
        compiler.hooks.environment.tap("TestPlugin",()=>{

        })
        ...
运行指令:npm run debug,启动后打开浏器控制台,点击node标志,进入调试模式
点击下一个断点,就是我们的debugger的地方,可以看到compiler的内容,当然也包括compilation。
这里以下都是生产环境:
自定义bannerWebpackPlugin:给打包后文件添加注释:
需要使用compiler.hooks.afterCompile钩子函数,在compilation 结束和封印之后触发
class BannerWebpackPlugin{
    constructor(options={}){
        this.options = options
    }
    apply(compiler){
        compiler.hooks.afterCompile.tapAsync("BannerWebpackPlugin",(compilation,callback)=>{
            debugger
            // 1.获取即将输出的资源文件compiler.assets
            // 2.只保留js和css资源
            const extension = ['css','js']
            //assets文件都是 文件路径:文件内容的格式 所以做一下处理
            const assets = Object.keys(compilation.assets).filter(assetPath=>{
                let splitted = assetPath.split(".")
                return extension.includes(splitted[splitted.length-1])
            })
            // 3.遍历资源添加注释
            let prefix = `/*
            *author:${this.options.author}
            */`
            assets.forEach(asset=>{
                //找到原文件内容
                const source = compilation.assets[asset].source()
                //内容添加注释
                const content = prefix + source

                compilation.assets[asset]={
                    //调用source方法,返回内容
                    source(){
                        return content
                    },
                    //返回资源大小
                    size(){
                        return content.length
                    }
                }
            })
            callback()
        })
    }
}
module.exports = BannerWebpackPlugin
plugins: [
new HtmlWebpackPlugin({
template: path.resolve(__dirname, "public/index.html"),
}),
// new TestPlugin(),
new BannerWebpackPlugin({
author:"胖虎"
})
],自定义cleanWebpackPlugin:
我们希望每次打包以后都能够清空上次的打包内容。
我们在compiler.hooks.emit钩子函数触发,即将输出资源前清空,通过文件操作outputFileSystem操作文件
class CleanWebpackPlugin {
    constructor(){}
    apply(compiler){
        //获取打包目录
        const outputpath = compiler.options.output.path
        const fs = compiler.outputFileSystem
        compiler.hooks.emit.tapAsync("CleanWebpackPlugin",(compilation,callback)=>{
            //清空内容
            this.removeFiles(fs,outputpath)
            callback()
        })
    }
    removeFiles(fs,filePath){
        debugger
        console.log(filePath);
        // 想要删除打包目录下的所有文件,需要先删除这个包下的所有资源,然后再删除这个目录
        // 获取当前目录下所有的资源
        const files = fs.readdirSync(filePath)
        //遍历一个一个删除,判断文件还是文件夹,文件直接删除,文件夹递归
        files.forEach(file => {
            const path = `${filePath}/${file}`
            const fileStat = fs.statSync(path)
            if(fileStat.isDirectory()){
                this.removeFiles(fs,path)
            }else{
                fs.unlink(path,()=>{})
            }
        });
    }
}

module.exports=CleanWebpackPlugin
plugins: [
new HtmlWebpackPlugin({
template: path.resolve(__dirname, "public/index.html"),
}),
// new TestPlugin(),
new BannerWebpackPlugin({
author:"胖虎"
}),
new CleanWebpackPlugin()
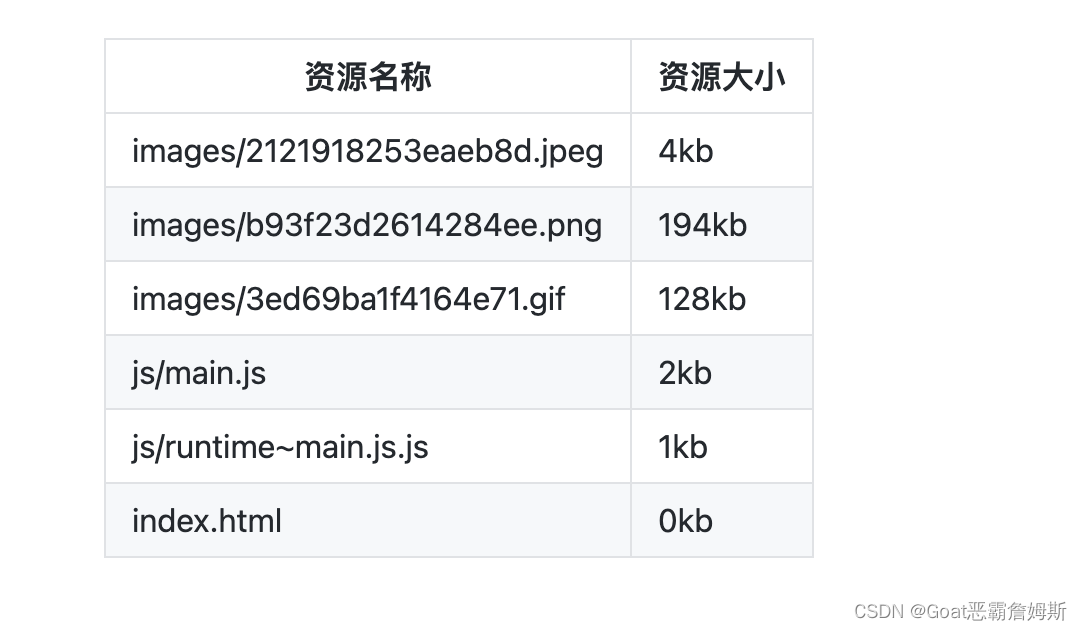
],自定义analyze-webpack-plugin, 分析webpack打包资源大小并输出分析文件。
也还是在compiler.hooks.emit钩子函数触发
class AnalyzeWebpackPlugin {
    constructor() { }
    apply(compiler) {
        compiler.hooks.emit.tapAsync("AnalyzeWebpackPlugin", (compilation, callback) => {
            const assets = Object.entries(compilation.assets)
            let content = `|资源名称|资源大小|
|---|---|`
            assets.forEach(([filename, file]) => {
                content += `\n|${filename}|${Math.floor(file.size()/1024)+"kb"}|`
            })
            // 生成一个md文件
            compilation.assets['analyze.md']={
                source(){
                    return content
                },
                size(){
                    return content.size
                }
            }
            callback()
        })
    }
}
module.exports=AnalyzeWebpackPlugin
plugins: [
new HtmlWebpackPlugin({
template: path.resolve(__dirname, "public/index.html"),
}),
// new TestPlugin(),
new BannerWebpackPlugin({
author:"胖虎"
}),
new CleanWebpackPlugin(),
new AnalyzeWebpackPlugin()
],效果:
自定义inline-chunk-webpack-plugin
webapck打包生成的runtime文件太小了,额外发请求性能不太好,将其内联到js中,从而减少请求数量,需要借助html-webpack-plugin来实现,将runtime内联注入到index.html中。下面是html-webpack-plugin原理图。
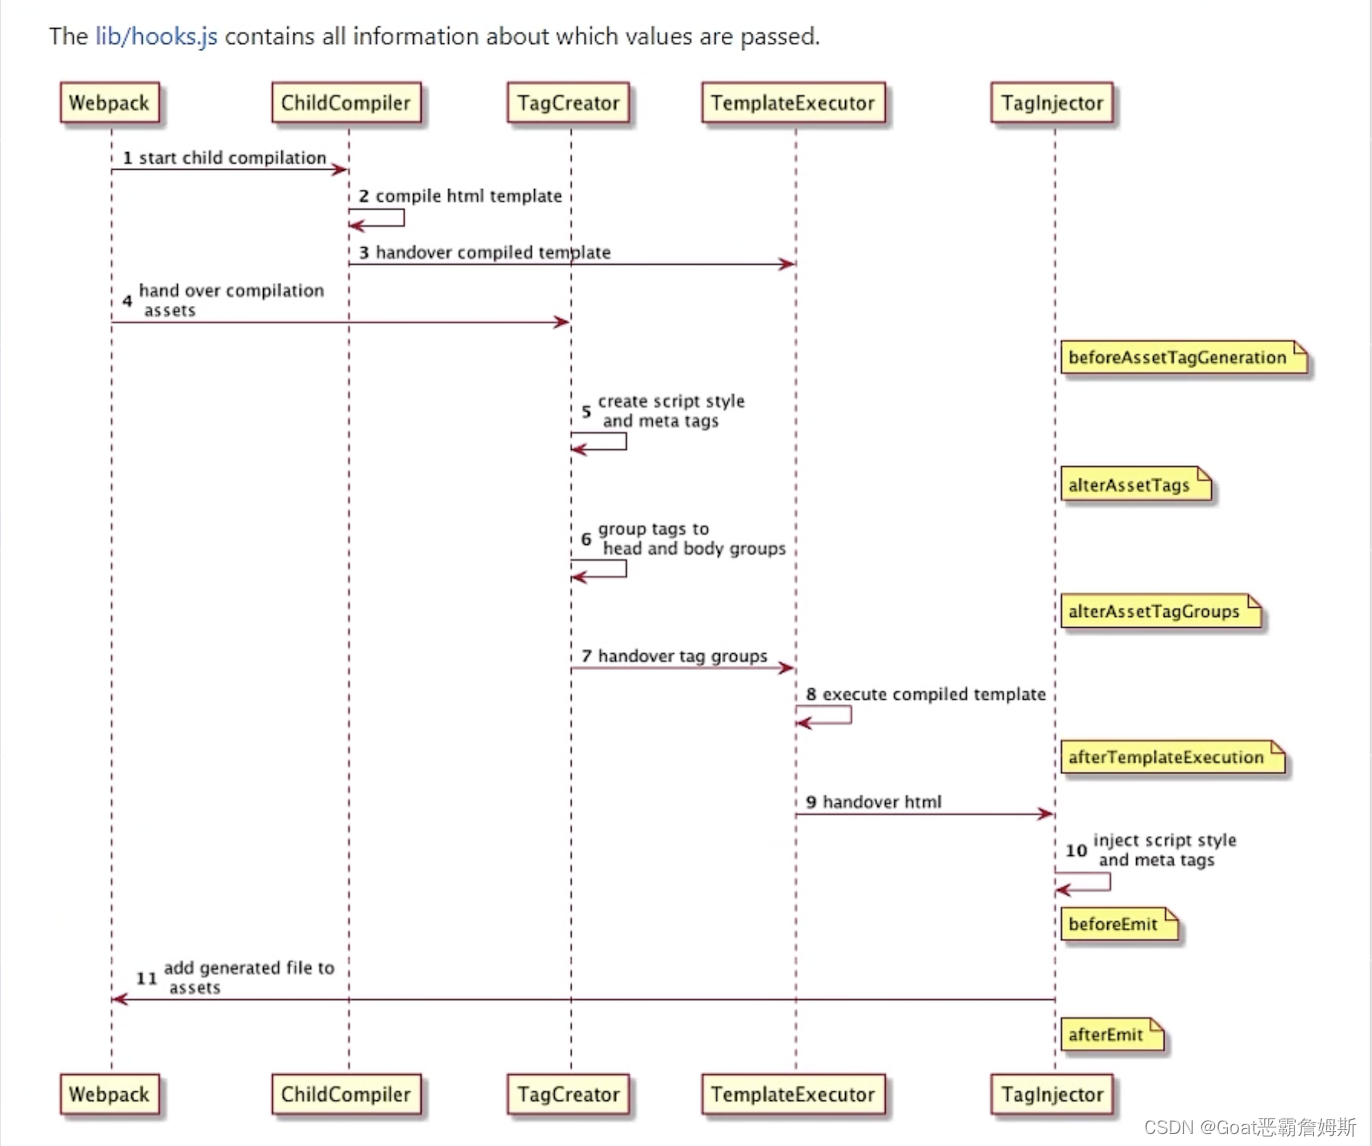
html-webpack-plugin有6个生命周期函数,我们在alterAssetTagGroups中(已经将文件分好组)来找到runtime文件,变成inline script标签。在compiler.hooks.compilation钩子触发。
生成runtime文件:
optimization: {
    splitChunks: {
      chunks: "all",
    },
    runtimeChunk: {
      name: (entrypoint) => `runtime~${entrypoint.name}.js`,
    },
  },
const HtmlWebpackPlugin = require('safe-require')('html-webpack-plugin')
class InlineChunkWebpackPlugin {
constructor(tests) {
this.tests=tests
}
apply(compiler) {
compiler.hooks.compilation.tap("InlineChunkWebpackPlugin", (compilation, compilationParams) => {
// 获取HtmlWebpackPlugin的钩子,注册
HtmlWebpackPlugin.getHooks(compilation).alterAssetTagGroups.tap("InlineChunkWebpackPlugin", (assets) => { //assets是获取的资源包含headTags以及bodyTags
// headTags: [
// {
// tagName: 'script',
// voidTag: false,
// meta: [Object],
// attributes: [Object]
// },
// {
// tagName: 'script',
// voidTag: false,
// meta: [Object],
// attributes: [Object]
// }
// ],
// bodyTags: [],
// 我们需要修改:
// {
// tagName: 'script',
// innerHTML: runtime文件内容,
// closeTag: true
// }
assets.headTags = this.getInlineChunk(assets.headTags, compilation.assets)
assets.bodyTags = this.getInlineChunk(assets.bodyTags, compilation.assets)
})
// 删除已经被注入的文件
HtmlWebpackPlugin.getHooks(compilation).afterEmit.tap("InlineChunkWebpackPlugin", (outputname,plugin) => { //assets是获取的资源包含headTags以及bodyTags
Object.keys(compilation.assets).forEach(filePath=>{
if(this.tests.some(test=>test.test(filePath))){
delete compilation.assets[filePath]
}
})
})
})
}
getInlineChunk(tags, assets) {
return tags.map(tag => {
if (tag.name != "script") return tag
const filePath = tag.attributes.src
if (!filePath) return tag
if (!this.tests.some(test=>{test.test(filePath)})) return tag
return {
tagName: 'script',
innerHTML: assets[filePath].source(),
closeTag: true
}
});
}
}
module.exports = InlineChunkWebpackPluginplugins: [
new HtmlWebpackPlugin({
template: path.resolve(__dirname, "public/index.html"),
}),
// new TestPlugin(),
new BannerWebpackPlugin({
author:"胖虎"
}),
new CleanWebpackPlugin(),
new AnalyzeWebpackPlugin(),
new InlineChunkWebpackPlugin([/runtime(.*)\.js$/g]) //可自定义输入文件正则来删除已注入的文件
],