loader主要是帮助webpac将不同类型的文件转换为webpack可识别的模块。
分类:enforce属性
pre 前置loader,normal 普通loader,inline:内联loader,post:后置loader
如果不写默认是 normal类型
执行顺序:pre > normal > inline > post
相同等级的,从后往前执行。
//普通loader,执行顺序:loader3,loader2,loader1
module:{
    {
        test:/\.js$/,
        loader:"loader1"
    },
    {
        test:/\.js$/,
        loader:"loader2"
    },
    {
        test:/\.js$/,
        loader:"loader3"
    },

}

//不同级别loader,执行顺序:loader1,loader2,loader3
module:{
    {
        enforce:"pre",
        test:/\.js$/,
        loader:"loader1"
    },
    {
        test:/\.js$/,
        loader:"loader2"
    },
    {
        enforce:"post",
        test:/\.js$/,
        loader:"loader3"
    },

}
使用loader的方式:
配置方式:如上述直接在webpack.config.js文件配置,加上enforce配置。(pre normal post)
内联方式:在每个import语句中显示指定loader(inline)
inline loader用法:
这里使用css-loader,style-loader来处理这个css资源,!是为了隔开各个loader
import Styles from 'style-loader!css-loader?modules!./styles.css'inline loader可以通过添加不同的前缀,跳过其他类型的loader:
! :表示跳过normal loader,即使在module里配置了style-loader,css-loader,如是normal类型的,也不会执行的。
import Styles from '!style-loader!css-loader?modules!./styles.css'- ! :表示跳过pre和normal loader,即使在module里配置了style-loader,css-loader,如是pre或normal类型的,也不会执行的。
import Styles from '-!style-loader!css-loader?modules!./styles.css'! ! :表示跳过pre和normal和post loader,即使在module里配置了style-loader,css-loader,如是pre或normal或post类型的,也不会执行的。
import Styles from '!!style-loader!css-loader?modules!./styles.css'但是一般不会选择使用inline,因为不好复用。
实际使用:
新创建一个项目:
npm init -y//webpack.config.js
const path = require("path")
const HtmlWebpackPlugin=reuqire("html-webpack-plugin")
module.exports={
entry:"./src/main.js",
output:{
path:path.resolve(__dirname,"./dist"),
filename:"js/[name].js",
clean:true
},
module:{
rules:[]
},
plugins:[
new HtmlWebpackPlugin({
template:path.resolve(__dirname,"public/index.html")
})
],
mode:"development"
}//index.html
<!DOCTYPE html>
<html lang="en">
<head>
<meta charset="UTF-8">
<meta http-equiv="X-UA-Compatible" content="IE=edge">
<meta name="viewport" content="width=device-width, initial-scale=1.0">
<title>myLoader</title>
</head>
<body>
<div id="app"></div>
</body>
</html>//main.js
console.log("hello main");下载依赖:
npm i webpack webpack-cli html-webpack-plugin -D尝试打包:npx webpack成功
新建loaders文件夹,建立test-loader.js
loader是一个函数,当webpack解析资源时,会调用响应的loader,传入内容loader会作为参数收到数据并且返回出去,
content 文件内容
map SourceMap相关
meta 别的loader传来的数据
module.exports=function(content,map,meta){
    console.log(content);
    return content
}
webpack.config.js配置:
rules:[
            {
                test:/\.js$/,
                loader:"./loaders/test-loader.js"
            }
        ]
loader的分类
同步loader:
// 同步loader
// 简单写法,只有一个loader
// module.exports=function(content){
//     return content
// }
//多个loader传递,倾向于这个
module.exports=function(context,map,meta){
    //第一个参数:表示是否有错误,有错就是具体内容,无错就是null
    //第二个参数:传递的内容
    //第三个参数:source-map,继续传递
    //第四个参数:meta给其他loader的参数,可以自己写,也可以传上一个下来的

    this.callback(null,context,map,meta)
}异步loader:异步代码一定要放在异步loader中放在同步中会有问题。
// 异步loader,会等待异步做完后再做其他的事
module.exports=function(context,map,meta){
    const callback = this.async();
    setTimeout(()=>{
        console.log("test2");
        callback(null,context,map,meta)
    },1000)
}
在webpack配置:
rules:[
            // {
            //     test:/\.js$/,
            //     loader:"./loaders/test-loader.js"
            // },
            {
                test:/\.js$/,
                use:[
                    "./loaders/test/test1.js","./loaders/test/test2.js"
                ]
            },
        ]
raw loader:可以写异步或者同步,但是要在最后加一句:module.exports.raw = true
//接收的content数据是buffer类型的
module.exports=function(context,map,meta){
    const callback = this.async();
    setTimeout(()=>{
        console.log("test2");
        callback(null,context,map,meta)
    },1000)
}
module.exports.raw = true
pitch loader:在输出的对象里加上pitch方法,这个方法会在loader执行之前先执行,优先级大于loader,会先把每个loader的pitch方法执行后,在按照顺序执行loader
pitch的执行顺序取决于loader的顺序,同级的话,正向顺序执行,如果loader存在不同的优先级,那么pitch也根据优先级的反向顺序执行。
例如:
全部为normal,从左向右,从上到下执行;
存在pre,normal,post,则从优先级低的开始执行,post=>normal=>pre
pitch全部执行结束后,执行loader
如果在pitch方法中加入了返回值,那么之后的所有pitch以及loader全部都不执行,直接跳到前一个pitch方法对应的loader中继续加载loader。
module.exports=function(context,map,meta){
console.log("loader1");
this.callback(null,context,map,meta)
}
module.exports.pitch=function(){
console.log("pitch1");
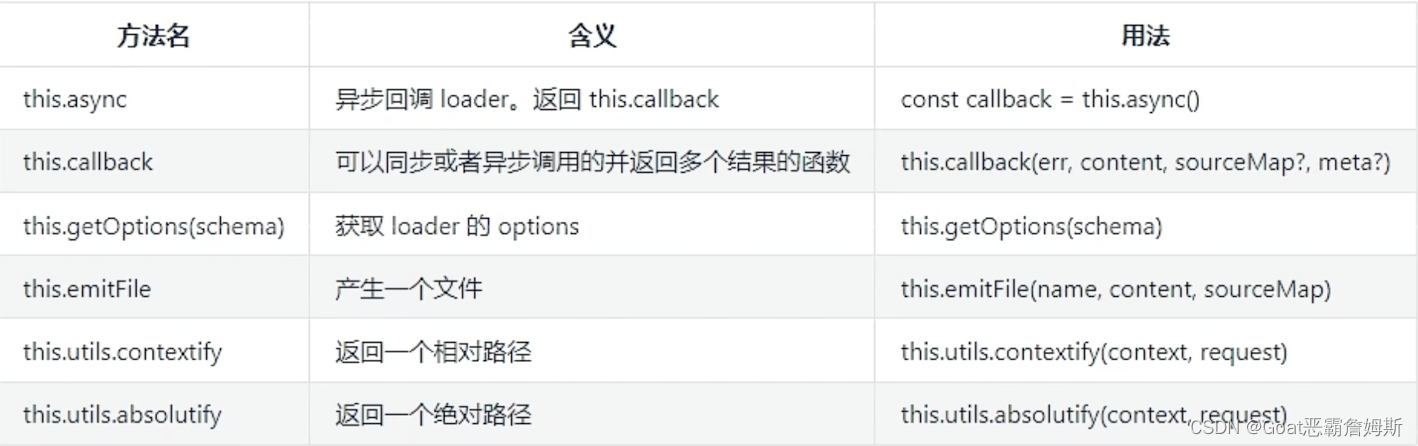
}loader API
说几个常用的,具体的参考:Loader Interface | webpack 中文文档 | webpack 中文文档 | webpack 中文网
自定义clean-log-loader:
module.exports=function(content,map,meta){
    return content.replace(/console\.log\(.*\);?/g,"")
}
rules:[
// {
// test:/\.js$/,
// loader:"./loaders/test-loader.js"
// },
// {
// test:/\.js$/,
// use:[
// // "./loaders/test/test1.js","./loaders/test/test2.js"
// // "./loaders/test/test3.js"
// "./loaders/test/test4.js","./loaders/test/test5.js","./loaders/test/test6.js"
// ]
// },
// {
// enforce:"pre",
// test:/\.js$/,
// loader:"./loaders/test/test4.js"
// },
// {
// enforce:"post",
// test:/\.js$/,
// loader:"./loaders/test/test6.js"
// },
// {
// test:/\.js$/,
// loader:"./loaders/test/test5.js"
// },
{
test:/\.js$/,
loader:"./loaders/clean-log-loader.js"
},
]自定义banner-loader,添加作者:
module.exports=function(context,map,meta){
    //获取传入的options选项
    //schema要符合JSONschema的验证规则
    let schema = {
        "type":"object",
        "properties":{
            "author":{ //author属性
                "type":"string"
            }
        },
        "additionalProperties":false //是否允许添加其他的属性
    }
    let options = this.getOptions(schema)
    const prefix =`
    /*
    *Author:${options.author}
    */
    `
    return prefix+context
}
rules:[
{
test:/\.js$/,
loader:"./loaders/clean-log-loader.js"
},
{
test:/\.js$/,
loader:"./loaders/banner-loader.js",
options:{
author:"大熊",
age:18
}
},
]自定义babel-loader:
下载依赖:
npm i @babel/core @babel/preset-env -D//babel-loader
const babel = require("@babel/core")
module.exports=function(context,map,meta){
let schema = {
"type":"object",
"properties":{
"presets":{
"type":"array"
}
},
additionalProperties:true
}
const callback = this.async()
let options = this.getOptions(schema)
babel.transform(context,options,function(err,result){
if(err) callback(err)
else callback(null,result.code,)
})
return context
}{
test:/\.js$/,
loader:"./loaders/babel-loader.js",
options:{
presets:["@babel/preset-env"],
}
},然后打包发现箭头函数转为普通函数。
自定义file-loader:主要针对图片,字体等文件,转为二进制的流。
下载工具:
npm i loader-utils -D
const loaderUtils = require("loader-utils")
module.exports=function(content){
    //1.根据文件内容生成带hash值的文件名
    const interpolateName = loaderUtils.interpolateName(
        this,//上下文this
        "[hash].[ext][query]",//生成文件名称格式
        content// 处理内容
    )
    //interpolateName = `images/${interpolateName}`可以设置输出的路径
    //2.将文件输出
    this.emitFile(interpolateName,content)
    // 3.返回:module.exports = "文件路径(文件名)"
    return `module.exports = "${interpolateName}"`
}
module.exports.raw=true
{
test:/\.(png|jpe?g|gif)$/,
loader:"./loaders/file-loader.js",
type:"javascript/auto" //阻止webpack默认处理图片资源,只用file-loader处理
},自定义style loader
module.exports=function(context,map,meta){
    // 不能直接会用style-loader,只能处理样式,不能处理引入的其他资源
    //借助css-loader解决样式中引用其他资源的问题,但是css暴露的是js代码,style-loader需要执行js代码得到返回值,再创建style标签,插入到页面上,不好操作,于是styleloader使用pitch的方式
}
module.exports.pitch = function(remainningRequest){ // remainningRequest剩余要处理的数据
    // 1.将remainningRequest改为相对路径(后面处理只能使用相对路径)
    const relativePath = remainningRequest.split("!").map(absolutePath=>{
        // 返回一个相对路径
        return this.utils.contextify(this.context,absolutePath) //this.context指当前loader所在的目录
    }).join("!")
    // 2.在这里会使用css-loader处理资源,引入css-loader处理后的资源,创建tyle并引入。
    // 添加!!:加载完pitch方法以后不再执行其他的loader,包括pre,normal,post
    // 引入 styke使用内联的用法
    const script = `
        import style from "!!${relativePath}"
        const styleEl = document.createElement('style')
        styleEl.innerHTML= style
        document.head.appendChild(styleEl)
    `
    // 终止后面的loader执行
    return script
}
{
test:/\.css$/,
use:["./loaders/style-loader.js","css-loader"]
},