
目录
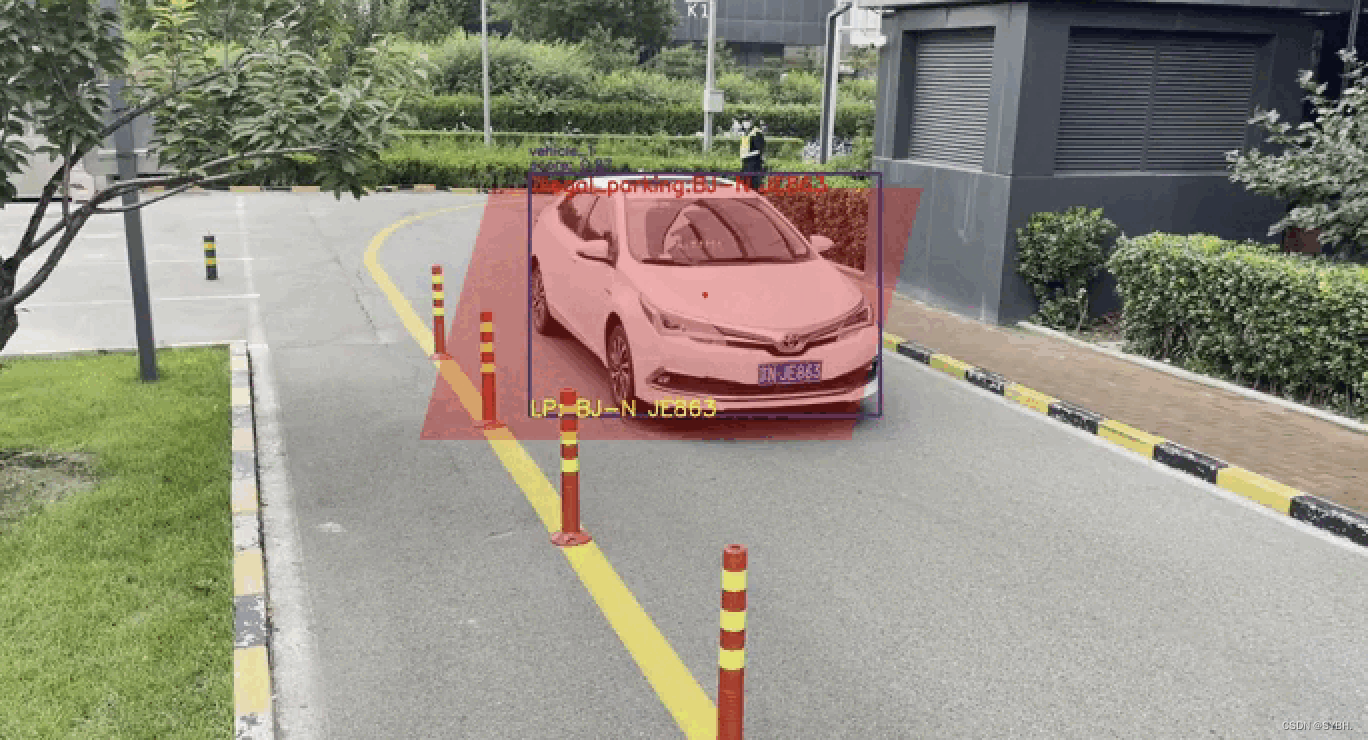
车辆违章停车检测在智能交通、城市管理等领域具有重要应用价值。本文将详细介绍如何使用高精度目标检测模型PP-YOLOv5进行车辆识别与跟踪,根据车辆的跟踪轨迹以及指定的违停区域判断是否违章停车,并展示违章停车车牌号。
1. 准备工作
在开始编写车辆跟踪与违章停车检测代码之前,需要安装以下Python库:
torch:PyTorch库,用于构建和训练深度学习模型。opencv-python:OpenCV库,用于图像处理和计算机视觉任务。numpy:用于进行矩阵运算和图像处理。matplotlib:用于绘制图像和可视化结果。
pip install torch opencv-python numpy matplotlib接下来,从YOLOv5 GitHub仓库克隆代码,并安装YOLOv5所需的依赖库。
git clone https://github.com/ultralytics/yolov5.git
cd yolov5
pip install -r requirements.txt
2. 车辆识别
车辆识别是车辆跟踪与违章停车检测的第一步,我们将使用高精度的PP-YOLOv5模型进行车辆识别。首先,下载预训练的PP-YOLOv5模型权重文件(例如yolov5s.pt)并将其保存到当前目录。
接下来,编写车辆识别函数:
import cv2
import torch
from yolov5.models.experimental import attempt_load
from yolov5.utils.general import non_max_suppression, scale_coords
from yolov5.utils.torch_utils import select_device

def detect_vehicles(image, model, device, conf_thres=0.5, iou_thres=0.5):
    img = torch.from_numpy(image).float().to(device) / 255.0  # Normalize
    img = img.permute(2, 0, 1).unsqueeze(0)  # Rearrange and add batch dimension

    with torch.no_grad():
        pred = model(img)[0]  # Forward pass
        pred = non_max_suppression(pred, conf_thres, iou_thres)  # NMS

    detections = []
    for det in pred:
        if det is not None and det.size(0) > 0:
            for *xyxy, conf, cls in det:
                if cls == 2:  # Class ID for 'car' in COCO dataset
                    x1, y1, x2, y2 = map(int, xyxy)
                    detections.append((x1, y1, x2, y2))
    return detections

device = select_device()
weights = 'yolov5s.pt'
model = attempt_load(weights, map_location=device)
model.eval()

image_path = 'input_image.jpg'
image = cv2.imread(image_path)
detections = detect_vehicles(image, model, device)在上面的代码中,我们首先加载预训练的PP-YOLOv5模型,并将其设置为评估模式。然后,读取输入图像,并使用模型进行车辆识别。对于检测到的每个车辆,我们将其坐标添加到detections列表中。
需要注意的是,我们在此使用的PP-YOLOv5模型是针对COCO数据集进行训练的,因此类别ID为2的物体表示汽车。根据实际需求,可以调整conf_thres和iou_thres参数以提高检测性能。
3. 车辆跟踪
在完成车辆识别后,我们需要实现车辆跟踪功能。在本文中,我们将使用SORT(Simple Online and Realtime Tracking)算法进行车辆跟踪。首先,安装filterpy库,它提供了卡尔曼滤波器所需的实现。
pip install filterpy接下来,从SORT GitHub仓库克隆代码,并将sort.py文件放置在当前目录。然后,导入Sort类并创建一个跟踪器实例:
from sort import Sort

tracker = Sort()现在,我们可以使用tracker实例对检测到的车辆进行跟踪。为此,我们需要将检测结果转换为SORT算法所需的格式,并将每个跟踪结果与原始图像上的车辆相匹配:
def draw_tracking_results(image, tracks):
    for track in tracks:
        x1, y1, x2, y2, track_id = map(int, track)
        cv2.rectangle(image, (x1, y1), (x2, y2), (255, 0, 0), 2)
        cv2.putText(image, f'Track {track_id}', (x1, y1 - 5), cv2.FONT_HERSHEY_SIMPLEX, 0.6, (255, 0, 0), 2)
    return image

detections_np = np.array(detections)
tracks = tracker.update(detections_np)
tracked_image = draw_tracking_results(image.copy(), tracks)在上面的代码中,我们首先定义了一个draw_tracking_results函数,用于在图像上绘制跟踪结果。然后,我们将检测结果转换为NumPy数组,并使用tracker.update方法进行跟踪。最后,我们在原始图像上绘制跟踪结果。
4. 违章停车检测
在实现了车辆识别和跟踪功能后,我们可以通过分析车辆的跟踪轨迹来判断是否存在违章停车。为此,需要首先定义违停区域:
no_parking_zone = [(100, 200), (500, 200), (500, 500), (100, 500)]在上面的代码中,我们定义了一个四边形违停区域,其顶点坐标为(100, 200)、(500, 200)、(500, 500)和(100, 500)。请根据实际需求调整这些坐标值。
接下来,我们需要确定车辆是否在违停区域内停留了一段时间。为此,我们可以使用tracker.get_track_history(track_id)方法获取指定ID的车辆轨迹,并根据轨迹判断是否违停:
def is_parked(track_history, no_parking_zone, min_stay_frames=30):
    parked_frames = 0
    for x1, y1, x2, y2 in track_history:
        # Check if the vehicle is within the no-parking zone
        if cv2.pointPolygonTest(no_parking_zone, ((x1 + x2) / 2, (y1 + y2) / 2), False) >= 0:
            parked_frames += 1
            if parked_frames >= min_stay_frames:
                return True
        else:
            parked_frames = 0
    return False

violations = {}
for track in tracks:
    track_id = int(track[4])
    track_history = tracker.get_track_history(track_id)

    if is_parked(track_history, no_parking_zone):
violations[track_id] = track_history在上面的代码中,我们首先定义了一个is_parked函数,用于判断给定轨迹中的车辆是否在违停区域内停留了一段时间。然后,我们遍历所有跟踪结果,并使用is_parked函数判断是否存在违停。如果存在违停,将违停车辆的轨迹添加到violations字典中。
需要注意的是,我们在此使用了min_stay_frames参数来设置车辆在违停区域内停留的最小帧数。根据实际需求和视频帧率,可以调整此参数以提高检测性能。
5. 车牌识别
为了展示违章停车车辆的车牌号,我们需要实现车牌识别功能。在本文中,我们将使用开源的HyperLPR库进行车牌识别。首先,安装HyperLPR库:
pip install hyperlpr接下来,导入hyperlpr模块并创建一个车牌识别器实例:
from hyperlpr import LPR

lpr = LPR()现在,我们可以使用lpr.recognize方法对违章停车车辆的车牌进行识别:
def crop_image(image, bbox):
    x1, y1, x2, y2 = bbox
    return image[y1:y2, x1:x2]

violating_vehicles = []
for track_id, track_history in violations.items():
    bbox = track_history[-1]  # Get the last bounding box of the track
    cropped_vehicle = crop_image(image, bbox)
    license_plate = lpr.recognize(cropped_vehicle)

    if license_plate:
        violating_vehicles.append((track_id, license_plate))

print("违章停车车辆车牌号:")
for track_id, license_plate in violating_vehicles:
print(f"Track {track_id}: {license_plate}")在上面的代码中,我们首先定义了一个crop_image函数,用于从图像中提取车辆区域。然后,我们遍历所有违章停车车辆,从原始图像中提取车辆区域,并对车牌进行识别。最后,我们打印出违章停车车辆的车牌号。
6. 结论
本文详细介绍了如何使用高精度模型PP-YOLOv5进行车辆识别与跟踪,根据车辆的跟踪轨迹以及指定的违停区域判断是否违章停车,并展示违章停车车牌号。整个过程包括车辆识别、车辆跟踪、违章停车检测和车牌识别四个步骤。实际应用时,可以根据需求调整参数以提高检测性能。
需要注意的是,本文中的方法可能受限于PP-YOLOv5模型的预训练数据集(COCO)和车牌识别库(HyperLPR)的性能。为了获得更好的检测效果,可以尝试使用针对特定场景和地区进行训练的模型,或者使用其他更先进的车牌识别算法。