文章目录
这篇主要讲一下数据处理中科学计算部分的知识。
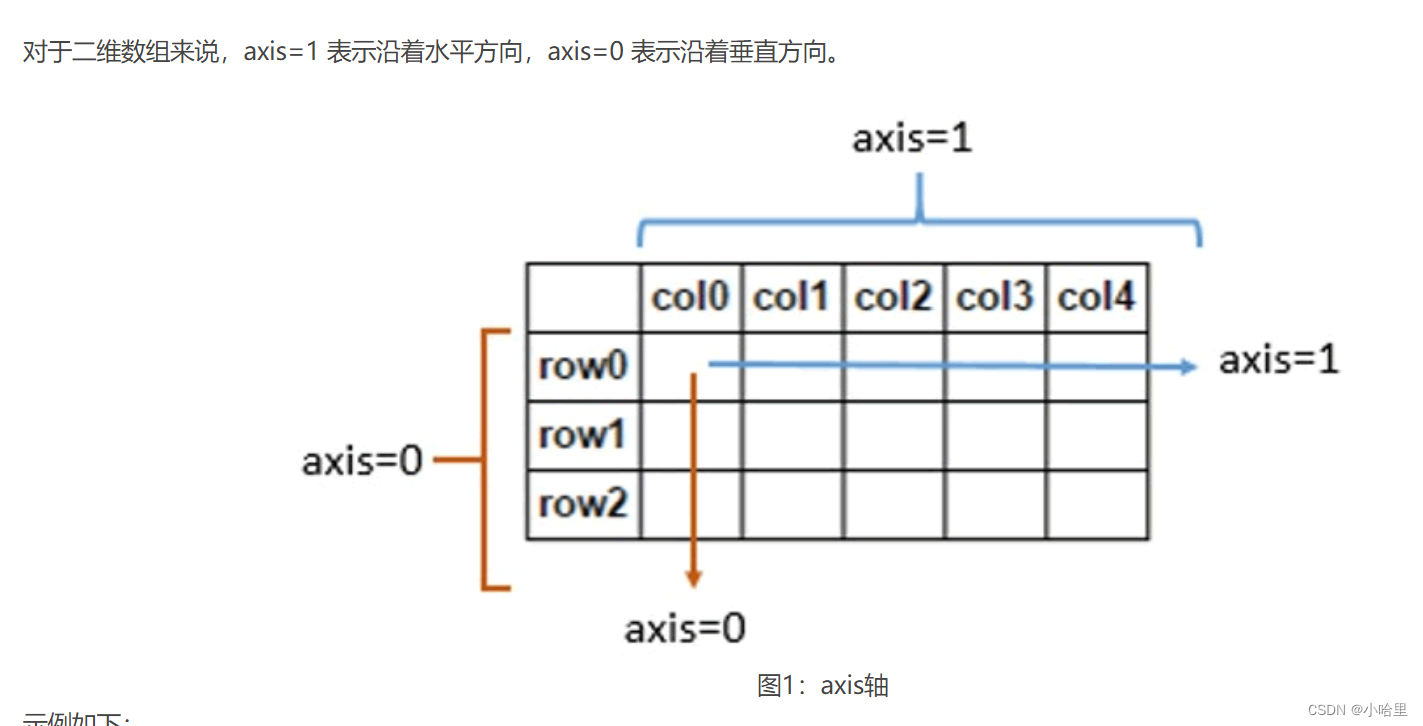
- 之前有一篇pandas处理数据的。
讲一下这几个库的区别。
- Pandas主要用来处理类表格数据(excel,csv),提供了计算接口,可用Numpy或其它方式进行计算。
- NumPy 主要用来处理数值数据(尤其是矩阵,向量为核心的),本质上是纯数学。
- Scipy基于Numpy封装,集成了一些高阶抽象和物理模型。
- matplotlib是画图用的。
1、numpy
什么是numpy?
- NumPy是一个主要用于数据分析、科学计算和数据科学的Python库。
- NumPy 主要支持多维数组和矩阵。
- NumPy 有助于对数组及其向量化进行数学运算,这可以提高性能和执行时间。
- 参考资料:1, 2
ndarray对象,数组指定形状创建(要会)
# 创建array数组
a = np.array([1,2,3])
b = np.array([[1,2,3],[4,5,6]])
c = np.array([2,4,6,8], dtype="float")
print(b.ndim)  # 数组维度
print(a.shape) # 数组形状
print(a.size)  # 数组大小
a = np.array([1,2,3,4,5], dtype = np.int8)
print(a.itemsize)  # 数组中每个元素的大小
list=range(6)
a=np.fromiter(iter(list), dtype=float)
x = np.arange(1,10,2)  #[1 3 5 7 9]
a = np.linspace(1,10,10) # [ 1. 2. 3. 4. 5. 6. 7. 8. 9. 10.]
a = np.linspace(10, 20, 5, endpoint = False)  #  [10. 12. 14. 16. 18.]
a = np.logspace(1,10,num = 10, base = 2) #  [ 2. 4. 8. 16. 32. 64. 128. 256. 512. 1024.]

# 创建指定形状的空数组
a = np.empty((3,2), dtype = int)
b = np.zeros(6,dtype="int64" )  # 使用0来创建数组
a = np.ones((3,2), dtype = int) # 大小一样,数据都为1
l = [1,2,3,4,5,6,7]
a = np.asarray(l);
l=[[1,2,3,4,5,6,7],[8,9]]
a = np.asarray(l);

# 修改数组形状
e = np.array([[1,2],[3,4],[5,6]])
e = e.reshape(2,3)   # 全部啦成一列,3x2变成了2x3
数组的索引,切片与遍历(要会)
# 数组切片
a = np.arange(10)
s = slice(2,9,3) #从索引2开始到索引9停止,间隔时间为2, [2 5 8]
b = a[2:9:2] # [2 5 8]
b = a[3] # 3
b = a[2:] # [2  3  4  5  6  7  8  9]
a = np.array([[1,2,3],[3,4,5],[4,5,6]])
print(a[1:]) # [[1 2 3] [3 4 5][4 5 6]] =>[[3 4 5][4 5 6]]


# 数组索引
x = np.array([[1,  2],  [3,  4],  [5,  6]])
y = x[[0,1,2],[0,1,0]]  # #[0,1,2]代表行索引;[0,1,0]代表列索引
print (y) # [1  4  5]

# 数组遍历
a = np.arange(0,60,5)
a = a.reshape(3,4)

#使用nditer迭代器,并使用for进行遍历
for x in np.nditer(a):
   print(x)
# 0 5 10 15 20 25 30 35 40 45 50 55

# 转置
b = a.T
print (b)
for x in np.nditer(b):
   print(x, end=",")
# 0 5 10 15 20 25 30 35 40 45 50 55
数组的相加,转置,展开(要会)
# 数组加法
a = np.array([[ 0, 0, 0],
           [10,10,10],
           [20,20,20],
           [30,30,30]])
#b数组与a数组形状不同
b = np.array([1,2,3])
print(a + b)
"""
[[ 1  2  3]
[11 12 13]
[21 22 23]
[31 32 33]]
"""


import numpy as np

# numpy.ndarray.flat 返回一个数组迭代器,实例如下
a = np.arange(9).reshape(3,3)
for row in a:
    print (row)
#使用flat属性:
for ele in a.flat:
    print (ele,end=",")
"""
#原数组
[0 1 2]
[3 4 5]
[6 7 8]
#输出元素
0,1,2,3,4,5,6,7,8,
"""

# numpy.ravel() 将多维数组中的元素以一维数组的形式展开,该方法返回数组的视图(view)
a = np.arange(8).reshape(2,4)
print ('原数组:')
print (a)
print ('调用 ravel 函数后:')
print (a.ravel())
print ('F 风格顺序调用 ravel 函数之后:')
print (a.ravel(order = 'F'))
"""
原数组:
[[0 1 2 3]
[4 5 6 7]]
调用 ravel 函数后:
[0 1 2 3 4 5 6 7]
F 风格顺序调用 ravel 函数之后:
[0 4 1 5 2 6 3 7]
"""

# transpose	将数组的维度值进行对换,比如二维数组维度(2,4)使用该方法后为(4,2)。
# ndarray.T	与 transpose 方法相同。
a = np.arange(12).reshape(3,4)
print (a)
print (np.transpose(a))

# rollaxis	沿着指定的轴向后滚动至规定的位置。
# swapaxes	对数组的轴进行对换。
a = np.arange(27).reshape(3,3,3)
print (a)
print(np.swapaxes(a,2,0))  #对换0轴与2轴

# 修改数组维度操作
# broadcast	生成一个模拟广播的对象。
# broadcast_to	将数组广播为新的形状。
# expand_dims	扩展数组的形状。
# squeeze	从数组的形状中删除一维项。
数组元素增删改查(最好会)
# resize	返回指定形状的新数组。
# append	将元素值添加到数组的末尾。
# insert	沿规定的轴将元素值插入到指定的元素前。
# delete	删掉某个轴上的子数组,并返回删除后的新数组。
# argwhere	返回数组内符合条件的元素的索引值。
# unique	用于删除数组中重复的元素,并按元素值由大到小返回一个新数组。

a = np.array([[1,2,3],[4,5,6]])
print(a)
print(a.shape) #a数组的形状
b = np.resize(a,(3,2))
print (b)
print(b.shape) #b数组的形状
b = np.resize(a,(3,3)) #修改b数组使其形状大于原始数组
print(b)

a = np.array([[1,2,3],[4,5,6]])
print (np.append(a, [7,8,9])) #向数组a添加元素
print (np.append(a, [[7,8,9]],axis = 0)) #沿轴 0 添加元素
print (np.append(a, [[5,5,5],[7,8,9]],axis = 1)) #沿轴 1 添加元素


a = np.array([[1,2],[3,4],[5,6]])
print (np.insert(a,3,[11,12])) #不提供axis的情况,会将数组展开
print (np.insert(a,1,[11],axis = 0)) #沿轴 0 垂直方向
print (np.insert(a,1,11,axis = 1)) #沿轴 1 水平方向

a = np.arange(12).reshape(3,4) #a数组
print(np.delete(a,5)) #不提供axis参数情况
print(np.delete(a,1,axis = 1)) #删除第二列
a = np.array([1,2,3,4,5,6,7,8,9,10]) #删除经切片后的数组
print (np.delete(a, np.s_[::2]))

x = np.arange(6).reshape(2,3)
y = np.argwhere(x>1) #返回所有大于1的元素索引

a = np.array([5,2,6,2,7,5,6,8,2,9])
print (a)
uq = np.unique(a) #对a数组的去重
print (uq) #数组去重后的索引数组
u,indices = np.unique(a, return_index = True) #打印去重后数组的索引
ui,indices = np.unique(a,return_inverse = True) #去重数组的下标:
uc,indices = np.unique(a,return_counts = True)#返回去重元素的重复数量, 元素出现次数:
numpy字符串与位运算
import numpy as np


# NumPy位运算
# 1	bitwise_and	&	计算数组元素之间的按位与运算。
# 2	bitwise_or	|	计算数组元素之间的按位或运算。
# 3	invert	~	计算数组元素之间的按位取反运算。
# 4	left_shift	<<	将二进制数的位数向左移。
# 5	right_shift	>>	将二进制数的位数向右移。

# NumPy处理字符串数组函数
# add()	对两个数组相应位置的字符串做连接操作。
print(np.char.add(['welcome','url'], [' to C net','is c.biancheng.net'] ))
# multiply() 	返回多个字符串副本,比如将字符串“ hello”乘以3,则返回字符串“ hello hello hello”。
print (np.char.multiply('c.biancheng.net',3))
# center()	用于居中字符串,并将指定的字符,填充在原字符串的左右两侧。
print(np.char.center("c.bianchneg.net", 20, '*'))
# capitalize()	将字符串第一个字母转换为大写。
print (np.char.capitalize('python'))
# title()	标题样式,将每个字符串的第一个字母转换为大写形式。
print(np.char.title("welcome to china"))
# lower()	将数组中所有的字符串的大写转换为小写。
print(np.char.lower("WELCOME TO MYHOME"))
# upper() 	将数组中所有的字符串的小写转换为大写。
print(np.char.upper("Welcome To Python"))
# split() 	通过指定分隔符对字符串进行分割,并返回一个数组序列,默认分隔符为空格。
print(np.char.split("Welcome To Python"),sep = " ")
# splitlines() 	以换行符作为分隔符来分割字符串,并返回数组序列。
print("Splitting the String line by line..")
print(np.char.splitlines("Welcome\nTo\nPython"))
# strip()	删除字符串开头和结尾处的空字符。
str = "     welcome to Python     "
print(np.char.strip(str))
# join() 	返回一个新的字符串,该字符串是以指定分隔符来连接数组中的所有元素。
print (np.char.join(':','Love'))
print (np.char.join([':','-'],['Love','Python'])) #也可指定多个分隔符
# replace()	用新的字符串替换原数组中指定的字符串。
str = "Welcome to China"
print(np.char.replace(str, "Welcome to","Hello"))
# decode() 	用指定的编码格式对数组中元素依次执行解码操作。
# encode()	用指定的编码格式对数组中元素依次执行编码操作。
encode_str = np.char.encode("Welcome to China", 'cp500')
decode_str =np.char.decode(encode_str, 'cp500')
print(encode_str)
print(decode_str)
数学,统计函数,算数运算(重要)
import numpy as np

arr = np.array([0, 30, 60, 90, 120, 150, 180])
#计算arr数组中给定角度的三角函数值
#通过乘以np.pi/180将其转换为弧度
print(np.sin(arr * np.pi/180))
print(np.cos(arr * np.pi/180))
print(np.tan(arr * np.pi/180))

arr = np.array([12.202, 90.23120, 123.020, 23.202])
print("数组值四舍五入到小数点后两位",np.around(arr, 2))
print("数组值四舍五入到小数点后-1位",np.around(arr, -1))

a = np.array([-1.8,  1.1,  -0.4,  0.9,  18])
print (np.floor(a)) #对数组a向下取整
print (np.ceil(a)) #对数组a向上取整

# 数组的加减乘除(重要)
a = np.arange(9, dtype = np.float_).reshape(3,3)
b = np.array([10,10,10])
print(np.add(a,b))
print(np.subtract(a,b))
print(np.multiply(a,b))
print(np.divide(a,b))

# 数组取倒数(每个位置)
a = np.array([0.25, 1.33, 1, 0, 100])
print (np.reciprocal(a)) #对数组a使用求倒数操作
b = np.array([100], dtype = int)
print( np.reciprocal(b) ) #b数组的数据类型为整形int

# 数组次方(对应位置)
a = np.array([10,100,1000])
print (np.power(a,2))
b = np.array([1,2,3])
print (np.power(a,b))


# 数组取模(对应位置)
a = np.array([11,22,33])
b = np.array([3,5,7])
print( np.mod(a,b)) #a与b相应位置的元素做除法
print(np.remainder(a,b)) #remainder方法一样


# numpy.amin() 和 numpy.amax()
# 这两个函数用于计算数组沿指定轴的最小值与最大值:
# amin() 沿指定的轴,查找数组中元素的最小值,并以数组形式返回;
# amax() 沿指定的轴,查找数组中元素的最大值,并以数组形式返回。
a = np.array([[3,7,5],[8,4,3],[2,4,9]])
print (np.amin(a))
print(np.amin(a,1)) #调用 amin() 函数,axis=1
print(np.amax(a))
print(np.amax(a,axis=0))#再次调用amax()函数

# numpy.ptp() 用于计算数组元素中最值之差值,也就是(最大值 - 最小值)。
a = np.array([[2,10,20],[80,43,31],[22,43,10]])
print("原数组",a)
print("沿着axis 1:",np.ptp(a,1))
print("沿着axis 0:",np.ptp(a,0))


# 沿指定轴,计算数组中任意百分比分位数
a = np.array([[2,10,20],[80,43,31],[22,43,10]])
print("数组a:",a)
print("沿着axis=0计算百分位数",np.percentile(a,10,0))
print("沿着axis=1计算百分位数",np.percentile(a,10,1))

# numpy.median() 用于计算 a 数组元素的中位数(中值):
a = np.array([[30,65,70],[80,95,10],[50,90,60]])
print(np.median(a))
print(np.median(a, axis = 1))

# 沿指定的轴,计算数组中元素的算术平均值(即元素之总和除以元素数量)
a = np.array([[1,2,3],[3,4,5],[4,5,6]])
print (np.mean(a))
print (np.mean(a, axis =  0))
print (np.mean(a, axis =  1))

# 加权平均值是将数组中各数值乘以相应的权数,然后再对权重值求总和,最后以权重的总和除以总的单位数(即因子个数)。
a = np.array([1,2,3,4])
print (np.average(a))
we = np.array([4,3,2,1])
print(np.average(a,weights = we))
print(np.average([1,2,3,4],weights =  [4,3,2,1], returned =  True))

# 方差,在统计学中也称样本方差
print (np.var([1,2,3,4]))
# 标准差np.std()
print (np.std([1,2,3,4]))
排序,搜索,最大100个索引(好用)
import numpy as np

# 排序
a = np.array([[3,7],[9,1]])
print(np.sort(a))
print(np.sort(a, axis = 0))
dt = np.dtype([('name',  'S10'),('age',  int)]) #设置在sort函数中排序字段
a = np.array([("raju",21),("anil",25),("ravi",  17),  ("amar",27)], dtype = dt)
print(np.sort(a, order = 'name'))#按name字段排序

# argsort() 沿着指定的轴,对输入数组的元素值进行排序
a = np.array([90, 29, 89, 12])
print("原数组",a)
sort_ind = np.argsort(a)
print("打印排序元素索引值",sort_ind)
#使用索引数组对原数组排序
sort_a = a[sort_ind]
print("打印排序数组")
for i in sort_ind:
    print(a[i],end = " ")

# numpy.lexsort() 按键序列对数组进行排序
a = np.array(['a','b','c','d','e'])
b = np.array([12, 90, 380, 12, 211])
ind = np.lexsort((a,b))
#打印排序元素的索引数组
print(ind)
#使用索引数组对数组进行排序
for i in ind:
    print(a[i],b[i])

# numpy.nonzero() 该函数从数组中查找非零元素的索引位置
b = np.array([12, 90, 380, 12, 211])
print("原数组b",b)
print("打印非0元素的索引位置")
print(b.nonzero())

# numpy.where() 的返回值是满足了给定条件的元素索引值。
b = np.array([12, 90, 380, 12, 211])
print(np.where(b>12))
c = np.array([[20, 24],[21, 23]])
print(np.where(c>20))

# numpy.extract() 该函数的返回值是满足了给定条件的元素值
x = np.arange(9.).reshape(3, 3)
print(x)  #设置条件选择偶数元素
condition = np.mod(x,2)== 0 #输出布尔值数组
print(condition)
print(np.extract(condition, x)) #按condition提取满足条件的元素值

# numpy.argmax() 该函数返回最大值的的索引,与其相反的函数是 argmin() 求最小值索引
a = np.array([[30,40,70],[80,20,10],[50,90,60]])
print (a)
print (np.argmax(a))
print (a.flatten()) #将数组以一维展开
maxindex = np.argmax(a, axis =  0)  #沿轴 0 的最大值索引:
print (maxindex)
maxindex = np.argmax(a, axis =  1)  #沿轴 1 的最大值索引
print (maxindex)

# 数组的拷贝copy
a = np.array([[1,2,3,4],[9,0,2,3],[1,2,3,19]])
print("原数组",a)
print("a数组ID:",id(a))
b = a.copy()
print("b数组ID:",id(b))
print("打印经过copy方法的b数组:")
print(b)
b.shape=4,3
print("原数组",a)
print("经过copy方法的b数组",b)

# 字节交换numpy.ndarray.byteswap()
a = np.array([1, 256, 8755], dtype = np.int16)
print(a)
#以16进制形式表示内存中的数据
print(map(hex,a))
#byteswap()函数通过传递True参数在适当的位置进行转换
#调用byteswap()函数
print(a.byteswap(True))
#十六进制形式
print(map(hex,a))
矩阵库,线性代数(非常好用)
import numpy.matlib
import numpy as np
#矩阵中会填充无意义的随机值
print(np.matlib.empty((2,2)))
# numpy.matlib.zeros() 创建一个以 0 填充的矩阵
print(np.matlib.zeros((2,2)))
# numpy.matlib.ones() 创建一个以 1 填充的矩阵。
print(np.matlib.ones((2,2)))
# numpy.matlib.eye() 返回一个对角线元素为 1,而其他元素为 0 的矩阵 。
print (np.matlib.eye(n =  3, M =  4, k =  0, dtype =  float))
# 该函数返回一个给定大小的单位矩阵,矩阵的对角线元素为 1,而其他元素均为 0。
print (np.matlib.identity(5, dtype = float))
# numpy.matlib.rand() 创建一个以随机数填充,并给定维度的矩阵。
print (np.matlib.rand(3,3))


# 实现 matrix 与 ndarray 之间的转换,如下所示:
i = np.matrix('1,2;3,4')
j = np.asarray(i)
print (j)
k = np.asmatrix (j)
print (k)


# dot	两个数组的点积。
A=[1,2,3]
B=[4,5,6]
print(np.dot(A,B))
a = np.array([[100,200], [23,12]])
b = np.array([[10,20], [12,21]])
dot = np.dot(a,b)
print(dot)

# vdot	两个向量的点积。
a = np.array([[100,200],[23,12]])
b = np.array([[10,20],[12,21]])
vdot = np.vdot(a,b)
print(vdot)

# inner	两个数组的内积。
A=[[1 ,10], [100,1000]]
B=[[1,2], [3,4]]
print(np.inner(A ,B)) #inner函数
print(np.dot(A,B)) #dot函数

# matmul	两个数组的矩阵积。
a = np.array([[1,2,3],[4,5,6],[7,8,9]])
b = np.array([[23,23,12],[2,1,2],[7,8,9]])
mul = np.matmul(a,b)
print(mul)

# det	计算输入矩阵的行列式。
a = np.array([[1,2],[3,4]])
print(np.linalg.det(a))

# solve	求解线性矩阵方程。
m = np.array([[3,2,1],[1,1,1],[1,2,-1]])
print ('数组 m:')
print (m)
print ('矩阵 n:')
n = np.array([[10],[6],[2]])
print (n)
print ('计算:m^(-1)n:')
x = np.linalg.solve(m,n)
print (x)

# inv	计算矩阵的逆矩阵,逆矩阵与原始矩阵相乘,会得到单位矩阵。
a = np.array([[1,2],[3,4]])
print("原数组:",a)
b = np.linalg.inv(a)
print("求逆:",b)

# multiple() 函数用于两个矩阵的逐元素乘法,示例如下:
array1=np.array([[1,2,3],[4,5,6],[7,8,9]],ndmin=3)
array2=np.array([[9,8,7],[6,5,4],[3,2,1]],ndmin=3)
result=np.multiply(array1,array2)

# matmul() 用于计算两个数组的矩阵乘积。
array1=np.array([[1,2,3],[4,5,6],[7,8,9]],ndmin=3)
array2=np.array([[9,8,7],[6,5,4],[3,2,1]],ndmin=3)
result=np.matmul(array1,array2)

# dot() 函数用于计算两个矩阵的点积。
array1=np.array([[1,2,3],[4,5,6],[7,8,9]],ndmin=3)
array2=np.array([[9,8,7],[6,5,4],[3,2,1]],ndmin=3)
result=np.dot(array1,array2)
文件读写(最好会)
import numpy as np

# numpy.save() 方法将输入数组存储在.npy文件中。
a = np.array([1,2,3,4,5])
np.save('first',a)

# 使用 load() 从 first.npy 文件中加载数据,如下所示:
b = np.load('outfile.npy')
print( b)

# savetxt() 和 loadtxt() 分别表示以文本格式存储数据或加载数据。其中 savetxt() 的语法格式如下:
a = np.array([1,2,3,4,5])
np.savetxt('second.txt',a)
#使用loadtxt重载数据
b = np.loadtxt('second.txt')
print(b)
2、matplotlib
- Matplolib是另一个用于数据可视化的有用Python库。描述性分析和可视化数据对任何组织都是非常重要的。Matplotlib提供了各种方法来有效地可视化数据。
- Matplotlib允许您快速制作线形图、饼状图、直方图和其他专业级图形。 使用Matplotlib,可以定制图形的每个方面。Matplotlib具有缩放、规划和以图形格式保存图形等交互式功能。
- 参考资料:1
第一个图与第2个图(要会)
import numpy as np
import math
#调用math.pi方法弧度转为角度
x = np.arange(0, math.pi*2, 0.05)
y = np.sin(x)

from matplotlib import pyplot as plt
plt.plot(x,y)
plt.xlabel("angle")
plt.ylabel("sine")
plt.title('sine wave')
#使用show展示图像
plt.show()

#########################################

# 您可以向 plot() 函数中添加格式化字符,来实现不同样式的显示或标记。
# 同时 Matplotlib 还定义了一些颜色字符,如下所示:
import numpy as np
x = np.arange(1,11)
y = 2 * x + 5

from matplotlib import pyplot as plt
plt.title("Matplotlib demo1")
plt.xlabel("x axis")
plt.ylabel("y axis")
plt.plot(x,y,"ob") # 原点图
plt.show()


#########################################
# 使用bar绘制柱状图

from matplotlib import pyplot as plt
#第一组数据
x1 = [5,8,10]
y1 = [12,16,6]
#第二组数据
x2 = [6,9,11]
y2 = [6,15,7]
plt.bar(x1, y1, align = 'center')
plt.bar(x2, y2, color = 'g', align = 'center')
plt.title('Bar graph')
#设置x轴与y轴刻度
plt.ylabel('Y axis')
plt.xlabel('X axis')
plt.show()
figure, axes 对象与subplot,与for循环绘图(好用)
# 2类 图形对象
from matplotlib import pyplot as plt
import numpy as np
import math
x = np.arange(0, math.pi*2, 0.05)
y = np.sin(x)
fig = plt.figure()
ax = fig.add_axes([0,0,1,1])
ax.plot(x,y)
ax.set_title("sine wave")
ax.set_xlabel('angle')
ax.set_ylabel('sine')
plt.show()

import matplotlib.pyplot as plt
y = [1, 4, 9, 16, 25,36,49, 64]
x1 = [1, 16, 30, 42,55, 68, 77,88]
x2 = [1,6,12,18,28, 40, 52, 65]
fig = plt.figure()
ax = fig.add_axes([0,0,1,1])
#使用简写的形式color/标记符/线型
l1 = ax.plot(x1,y,'ys-')
l2 = ax.plot(x2,y,'go--')
ax.legend(labels = ('tv', 'Smartphone'), loc = 'lower right') # legend placed at lower right
ax.set_title("Advertisement effect on sales")
ax.set_xlabel('medium')
ax.set_ylabel('sales')
plt.show()


#########################################

# subplot() 允许您在同一画布中的不同位置绘制多个图像,可以理解为对画布按行、列分割
import numpy as np
import matplotlib.pyplot as plt

#计算正弦和余弦曲线上的点的 x 和 y 坐标
x = np.arange(0, 3 * np.pi, 0.1)
y_sin = np.sin(x)
y_cos = np.cos(x)

#绘制subplot 网格为2行1列
plt.subplot(2, 1, 1)  #激活第一个 subplot
plt.plot(x, y_sin)  #绘制第一个图像
plt.title('Sine')
#将第二个 subplot 激活,并绘制第二个图像
plt.subplot(2, 1, 2)
plt.plot(x, y_cos)
plt.title('Cosine') #展示图像
plt.show()


import matplotlib.pyplot as plt
fig,a =  plt.subplots(2,2)
import numpy as np
x = np.arange(1,5)
#绘制平方函数
a[0][0].plot(x,x*x)
a[0][0].set_title('square')
#绘制平方根图像
a[0][1].plot(x,np.sqrt(x))
a[0][1].set_title('square root')
#绘制指数函数
a[1][0].plot(x,np.exp(x))
a[1][0].set_title('exp')
#绘制对数函数
a[1][1].plot(x,np.log10(x))
a[1][1].set_title('log')
plt.show()


# subplot2grid()可以使用不同数量的行、列来创建跨度不同的绘图区域
import matplotlib.pyplot as plt
#使用 colspan指定列,使用rowspan指定行
a1 = plt.subplot2grid((3,3),(0,0),colspan = 2)
a2 = plt.subplot2grid((3,3),(0,2), rowspan = 3)
a3 = plt.subplot2grid((3,3),(1,0),rowspan = 2, colspan = 2)
import numpy as np
x = np.arange(1,10)
a2.plot(x, x*x)
a2.set_title('square')
a1.plot(x, np.exp(x))
a1.set_title('exp')
a3.plot(x, np.log(x))
a3.set_title('log')
plt.tight_layout()
plt.show()


#############################################################
# 3.2 画图函数
import matplotlib.pyplot as plt
plt.rcParams["font.sans-serif"] = ["SimHei"]  # 设置字体
plt.rcParams["axes.unicode_minus"] = False  # 正常显示负号

def draw_pic(dfx, dfy, kkk, top, time):
    fig, ax = plt.subplots()
    ax.set_title('knn='+str(kkk)+'时:'+'acc的关系')
    ax.set_xlabel('top值'+top)
    ax.set_ylabel('acc占比/time间占比')
    ax.plot(dfx, dfy, ".-", label="随着XXX增高,XXX提高")
    ax.plot(dfx, time, ".-", label="随着XXX维度增高,XXX降低")
    # ax.legend(loc='upper left')
    ax.legend(loc='lower right')
    for a,b in zip(dfx,dfy):
        ax.text(a, b+0.05, '%.0f' % b, ha='center', va= 'bottom',fontsize=7)
    return ax
网格,坐标轴,刻度,标签设置,中文字体(最好会)
# grid()设置网格格式
import matplotlib.pyplot as plt
import numpy as np
#fig画布;axes子图区域
fig, axes = plt.subplots(1,3, figsize = (12,4))
x = np.arange(1,11)
axes[0].plot(x, x**3, 'g',lw=2)
#开启网格
axes[0].grid(True)
axes[0].set_title('default grid')
axes[1].plot(x, np.exp(x), 'r')
#设置网格的颜色,线型,线宽
axes[1].grid(color='b', ls = '-.', lw = 0.25)
axes[1].set_title('custom grid')
axes[2].plot(x,x)
axes[2].set_title('no grid')
fig.tight_layout()
plt.show()

#############################################################################

# Matplotlib坐标轴格式
# 示例:右侧的子图显示对数刻度,左侧子图则显示标量刻度。
import matplotlib.pyplot as plt
import numpy as np
fig, axes = plt.subplots(1, 2, figsize=(10,4))
x = np.arange(1,5)
axes[0].plot( x, np.exp(x))
axes[0].plot(x,x**2)
axes[0].set_title("Normal scale")
axes[1].plot (x, np.exp(x))
axes[1].plot(x, x**2)
#设置y轴
axes[1].set_yscale("log")
axes[1].set_title("Logarithmic scale (y)")
axes[0].set_xlabel("x axis")
axes[0].set_ylabel("y axis")
axes[0].xaxis.labelpad = 10
#设置x、y轴标签
axes[1].set_xlabel("x axis")
axes[1].set_ylabel("y axis")
plt.show()

# 控制坐标轴绘图边界
import matplotlib.pyplot as plt
fig = plt.figure()
ax = fig.add_axes([0,0,1,1])
#为左侧轴,底部轴添加颜色
ax.spines['bottom'].set_color('blue')
ax.spines['left'].set_color('red')
ax.spines['left'].set_linewidth(2)
#将侧轴、顶部轴设置为None
ax.spines['right'].set_color(None)
ax.spines['top'].set_color(None)
ax.plot([1,2,3,4,5])
plt.show()


# 控制坐标轴范围
import matplotlib.pyplot as plt
import numpy as np
fig = plt.figure()
#添加绘图区域
a1 = fig.add_axes([0,0,1,1])
#准备数据
x = np.arange(1,10)
#绘制函数图像
a1.plot(x, np.exp(x))
#添加题目
a1.set_title('exp')
plt.show()

import matplotlib.pyplot as plt
fig = plt.figure()
a1 = fig.add_axes([0,0,1,1])
import numpy as np
x = np.arange(1,10)
a1.plot(x, np.exp(x),'r')
a1.set_title('exp')
#设置y轴
a1.set_ylim(0,10000)
#设置x轴
a1.set_xlim(0,10)
plt.show()


#############################################################################

# 刻度和刻度标签
import matplotlib.pyplot as plt
import numpy as np
import math
x = np.arange(0, math.pi*2, 0.05)
#生成画布对象
fig = plt.figure()
#添加绘图区域
ax = fig.add_axes([0.1, 0.1, 0.8, 0.8])
y = np.sin(x)
ax.plot(x, y)
#设置x轴标签
ax.set_xlabel('angle')
ax.set_title('sine')
ax.set_xticks([0,2,4,6])
#设置x轴刻度标签
ax.set_xticklabels(['zero','two','four','six'])
#设置y轴刻度
ax.set_yticks([-1,0,1])
plt.show()


#############################################################################
# 中文字体配置

# 重写配置文件
import matplotlib.pyplot as plt
plt.rcParams["font.sans-serif"]=["SimHei"] #设置字体
plt.rcParams["axes.unicode_minus"]=False #该语句解决图像中的“-”负号的乱码问题
#绘制折线图
import matplotlib.pyplot as plt
plt.rcParams["font.sans-serif"]=["SimHei"] #设置字体
plt.rcParams["axes.unicode_minus"]=False #正常显示负号
year = [2017, 2018, 2019, 2020]
people = [20, 40, 60, 70]
#生成图表
plt.plot(year, people)
plt.xlabel('年份')
plt.ylabel('人口')
plt.title('人口增长')
#设置纵坐标刻度
plt.yticks([0, 20, 40, 60, 80])
#设置填充选项:参数分别对应横坐标,纵坐标,纵坐标填充起始值,填充颜色
plt.fill_between(year, people, 20, color = 'green')
#显示图表
plt.show()


###################################################################################

# 文本绘制
import matplotlib.pyplot as plt
plt.rcParams["font.sans-serif"]=["SimHei"] #设置字体
plt.rcParams["axes.unicode_minus"]=False #正常显示负号
fig = plt.figure()
#添加绘图区域
ax = fig.add_axes([0,0,1,1])
#设置格式
ax.set_title('axes title')
ax.set_xlabel('xlabel')
ax.set_ylabel('ylabel')
# 3,8 表示x,y的坐标点;style设置字体样式为斜体;bbox用来设置盒子的属性,比如背景色
ax.text(3, 8, 'C语言中网网,编程爱好者都喜欢的网站', style='italic',bbox = {

    'facecolor': 'yellow'},fontsize=15)
#绘制数学表达式,用$符包裹
ax.text(2, 6, r'an equation: $E = mc^2$', fontsize = 15)
#添加文字,并设置样式
ax.text(4, 0.05, '网址:c.biancheng.net',verticalalignment = 'bottom', color = 'green', fontsize = 15)
ax.plot([2], [1], 'o')
#xy为点的坐标;xytext为注释内容坐标;arrowprops设置箭头的属性
ax.annotate('C语言中文网', xy = (2, 1), xytext = (3, 4),arrowprops = dict(facecolor = 'blue', shrink = 0.1))
#设置坐标轴x,y
ax.axis([0, 10, 0, 10])
plt.show()
双轴图,饼状图,折线图,散点图等(最好会)
import matplotlib.pyplot as plt
import numpy as np

#############################################################
# 双轴图
#创建图形对象
fig = plt.figure()
#添加子图区域
a1 = fig.add_axes([0,0,1,1])
#准备数据
x = np.arange(1,11)
#绘制指数函数
a1.plot(x,np.exp(x))
a1.set_ylabel('exp')
#添加双轴
a2 = a1.twinx()
#‘ro’表示红色圆点
a2.plot(x, np.log(x),'ro-')
#绘制对数函数
a2.set_ylabel('log')
#绘制图例
fig.legend(labels = ('exp','log'),loc='upper left')
plt.show()

#############################################################

# 柱状图
import numpy as np
import matplotlib.pyplot as plt
#准备数据
data = [[30, 25, 50, 20],
[40, 23, 51, 17],
[35, 22, 45, 19]]
X = np.arange(4)
fig = plt.figure()
#添加子图区域
ax = fig.add_axes([0,0,1,1])
#绘制柱状图
ax.bar(X + 0.00, data[0], color = 'b', width = 0.25)
ax.bar(X + 0.25, data[1], color = 'g', width = 0.25)
ax.bar(X + 0.50, data[2], color = 'r', width = 0.25)


countries = ['USA', 'India', 'China', 'Russia', 'Germany']
bronzes = np.array([38, 17, 26, 19, 15])
silvers = np.array([37, 23, 18, 18, 10])
golds = np.array([46, 27, 26, 19, 17])
# 此处的 _ 下划线表示将循环取到的值放弃,只得到[0,1,2,3,4]
ind = [x for x, _ in enumerate(countries)]
#绘制堆叠图
plt.bar(ind, golds, width=0.5, label='golds', color='gold', bottom=silvers+bronzes)
plt.bar(ind, silvers, width=0.5, label='silvers', color='silver', bottom=bronzes)
plt.bar(ind, bronzes, width=0.5, label='bronzes', color='#CD853F')
#设置坐标轴
plt.xticks(ind, countries)
plt.ylabel("Medals")
plt.xlabel("Countries")
plt.legend(loc="upper right")
plt.title("2019 Olympics Top Scorers")
plt.show()

#############################################################
# 饼状图

from matplotlib import pyplot as plt
import numpy as np
#添加图形对象
fig = plt.figure()
ax = fig.add_axes([0,0,1,1])
#使得X/Y轴的间距相等
ax.axis('equal')
#准备数据
langs = ['C', 'C++', 'Java', 'Python', 'PHP']
students = [23,17,35,29,12]
#绘制饼状图
ax.pie(students, labels = langs,autopct='%1.2f%%')
plt.show()


#############################################################
# 折线图
import matplotlib.pyplot as plt
#准备绘制数据
x = ["Mon", "Tues", "Wed", "Thur", "Fri","Sat","Sun"]
y = [20, 40, 35, 55, 42, 80, 50]
# "g" 表示红色,marksize用来设置'D'菱形的大小
plt.plot(x, y, "g", marker='D', markersize=5, label="周活")
#绘制坐标轴标签
plt.xlabel("登录时间")
plt.ylabel("用户活跃度")
plt.title("C语言中文网活跃度")
#显示图例
plt.legend(loc="lower right")
#调用 text()在图像上绘制注释文本
#x1、y1表示文本所处坐标位置,ha参数控制水平对齐方式, va控制垂直对齐方式,str(y1)表示要绘制的文本
for x1, y1 in zip(x, y):
    plt.text(x1, y1, str(y1), ha='center', va='bottom', fontsize=10)
#保存图片
plt.savefig("1.jpg")
plt.show()


#############################################################

# 散点图
import matplotlib.pyplot as plt
girls_grades = [89, 90, 70, 89, 100, 80, 90, 100, 80, 34]
boys_grades = [30, 29, 49, 48, 100, 48, 38, 45, 20, 30]
grades_range = [10, 20, 30, 40, 50, 60, 70, 80, 90, 100]
fig=plt.figure()
#添加绘图区域
ax=fig.add_axes([0,0,1,1])
ax.scatter(grades_range, girls_grades, color='r',label="girls")
ax.scatter(grades_range, boys_grades, color='b',label="boys")
ax.set_xlabel('Grades Range')
ax.set_ylabel('Grades Scored')
ax.set_title('scatter plot')
#添加图例
plt.legend()
plt.show()
3D图,等高线图,振动图,箱型图,提琴图等
#########################################
# 3D图

from mpl_toolkits import mplot3d
import numpy as np
import matplotlib.pyplot as plt
fig = plt.figure()
#创建绘图区域
ax = plt.axes(projection='3d')
#构建xyz
z = np.linspace(0, 1, 100)
x = z * np.sin(20 * z)
y = z * np.cos(20 * z)
c = x + y
ax.scatter3D(x, y, z, c=c)
ax.set_title('3d Scatter plot')
plt.show()


from mpl_toolkits import mplot3d
import numpy as np
import matplotlib.pyplot as plt
#求向量积(outer()方法又称外积)
x = np.outer(np.linspace(-2, 2, 30), np.ones(30))
#矩阵转置
y = x.copy().T
#数据z
z = np.cos(x ** 2 + y ** 2)
#绘制曲面图
fig = plt.figure()
ax = plt.axes(projection='3d')
# 调用plot_surface()函数
ax.plot_surface(x, y, z,cmap='viridis', edgecolor='none')
ax.set_title('Surface plot')
plt.show()

#########################################
# 等高线

import numpy as np
import matplotlib.pyplot as plt
#创建xlist、ylist数组
xlist = np.linspace(-3.0, 3.0, 100)
ylist = np.linspace(-3.0, 3.0, 100)
#将上述数据变成网格数据形式
X, Y = np.meshgrid(xlist, ylist)
#定义Z与X,Y之间的关系
Z = np.sqrt(X**2 + Y**2)
fig,ax=plt.subplots(1,1)
#填充等高线颜色
cp = ax.contourf(X, Y, Z)
fig.colorbar(cp) # 给图像添加颜色柱
ax.set_title('Filled Contours Plot')
ax.set_xlabel('x (cm)')
ax.set_ylabel('y (cm)')
#画等高线
plt.contour(X,Y,Z)
plt.show()

#########################################
# 震动

import matplotlib.pyplot as plt
import numpy as np
x,y = np.meshgrid(np.arange(-2, 2, 0.2), np.arange(-2, 2, 0.25))
z = x*np.exp(-x**2 - y**2)
#计算数组中元素的梯度
v, u = np.gradient(z, 0.2, 0.2)
fig, ax = plt.subplots()
q = ax.quiver(x,y,u,v)
plt.show()

#########################################
# 箱型图
#利用随机数种子使每次生成的随机数相同
np.random.seed(10)
collectn_1 = np.random.normal(100, 10, 200)
collectn_2 = np.random.normal(80, 30, 200)
collectn_3 = np.random.normal(90, 20, 200)
collectn_4 = np.random.normal(70, 25, 200)
data_to_plot=[collectn_1,collectn_2,collectn_3,collectn_4]
fig = plt.figure()
#创建绘图区域
ax = fig.add_axes([0,0,1,1])
#创建箱型图
bp = ax.boxplot(data_to_plot)
plt.show()

#########################################
# 提琴图
import matplotlib.pyplot as plt
np.random.seed(10)
collectn_1 = np.random.normal(100, 10, 200)
collectn_2 = np.random.normal(80, 30, 200)
collectn_3 = np.random.normal(90, 20, 200)
collectn_4 = np.random.normal(70, 25, 200)
#创建绘制小提琴图的数据序列
data_to_plot = [collectn_1, collectn_2, collectn_3, collectn_4]
#创建一个画布
fig = plt.figure()
#创建一个绘图区域
ax = fig.add_axes([0,0,1,1])
# 创建一个小提琴图
bp = ax.violinplot(data_to_plot)
plt.show()