目录
1. 去掉验证码
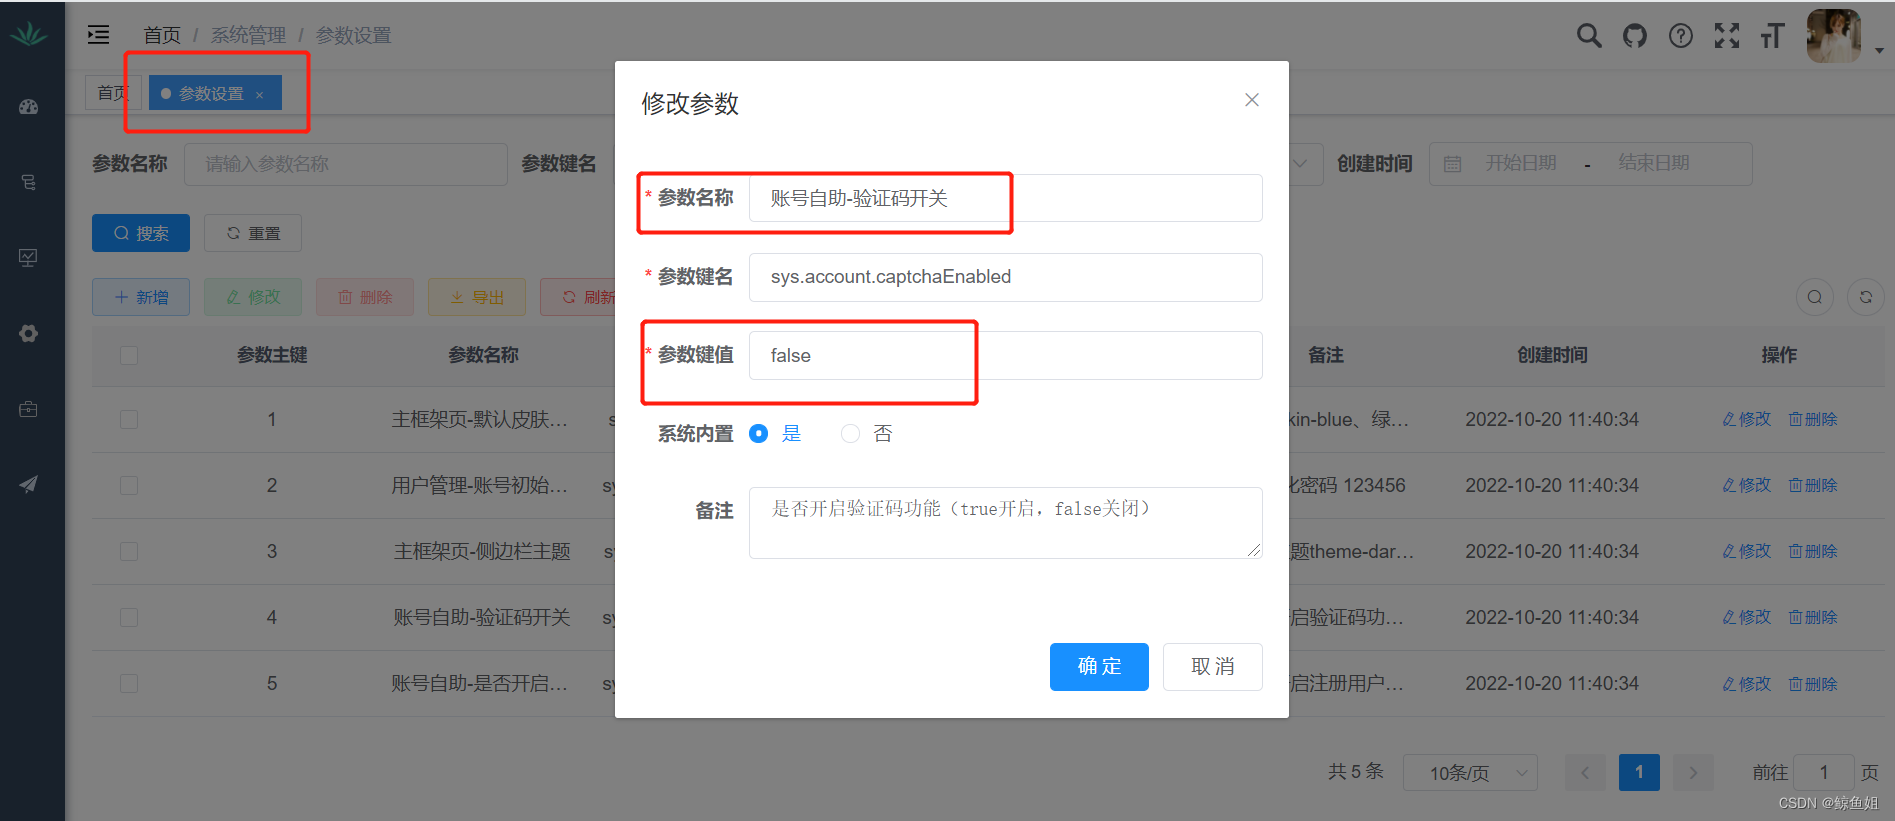
(1)在系统管理菜单中——》参数设置——》找到账户自助-验证码开关——》修改键值为false。
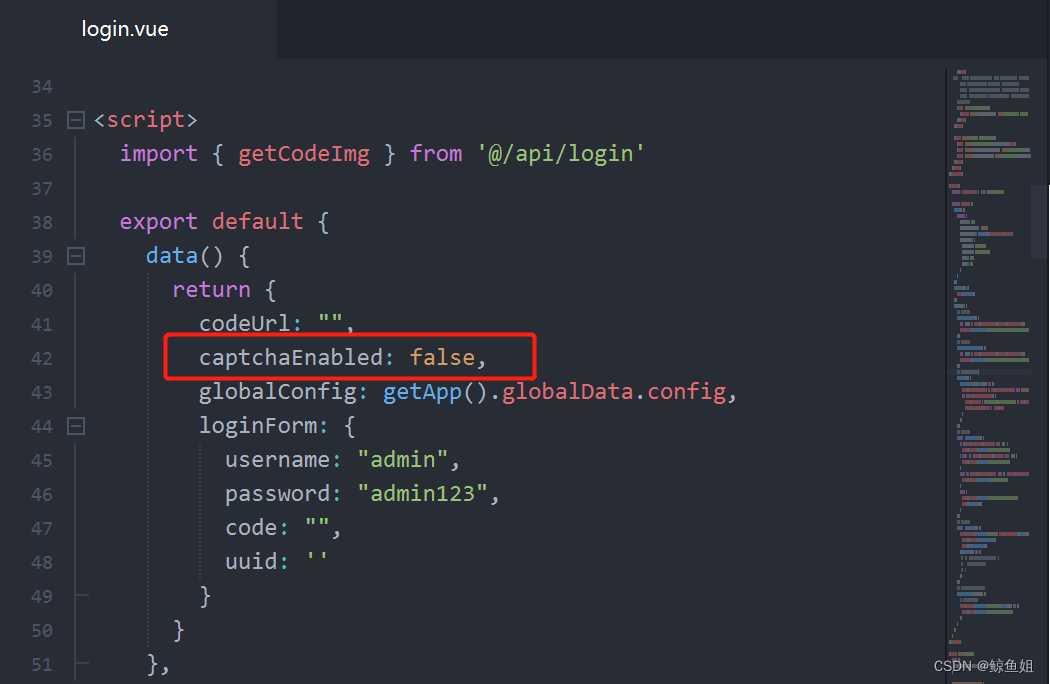
(2)在移动端前端将login.vue的captchaEnabled改为false,关闭验证码开关
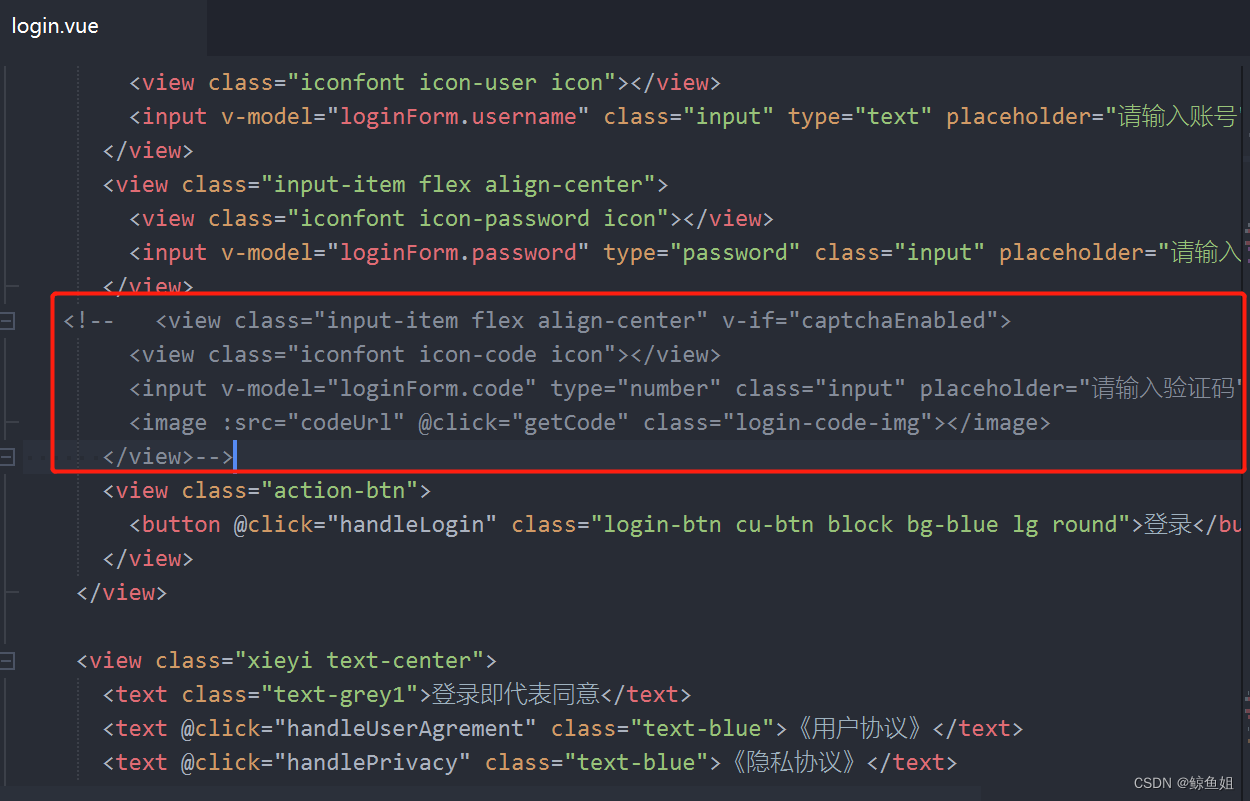
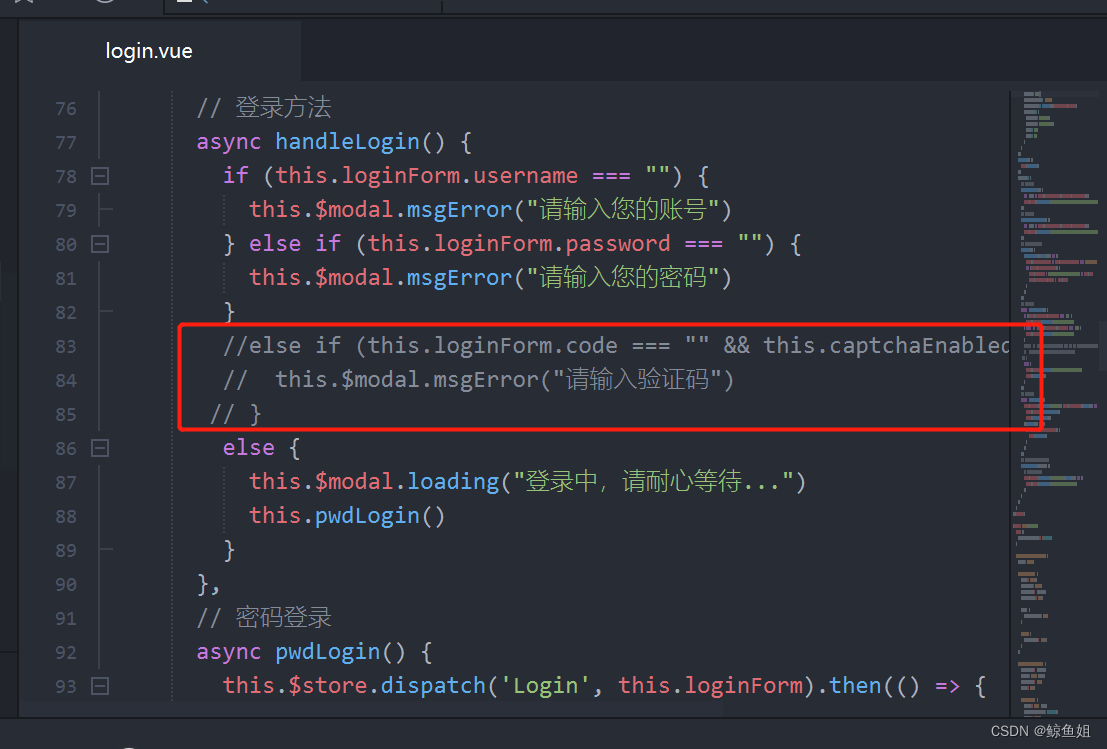
(3)在移动端login.vue注释掉此段。主要原因不注释的话,是在本机验证正常,上传服务器后显示不正常。
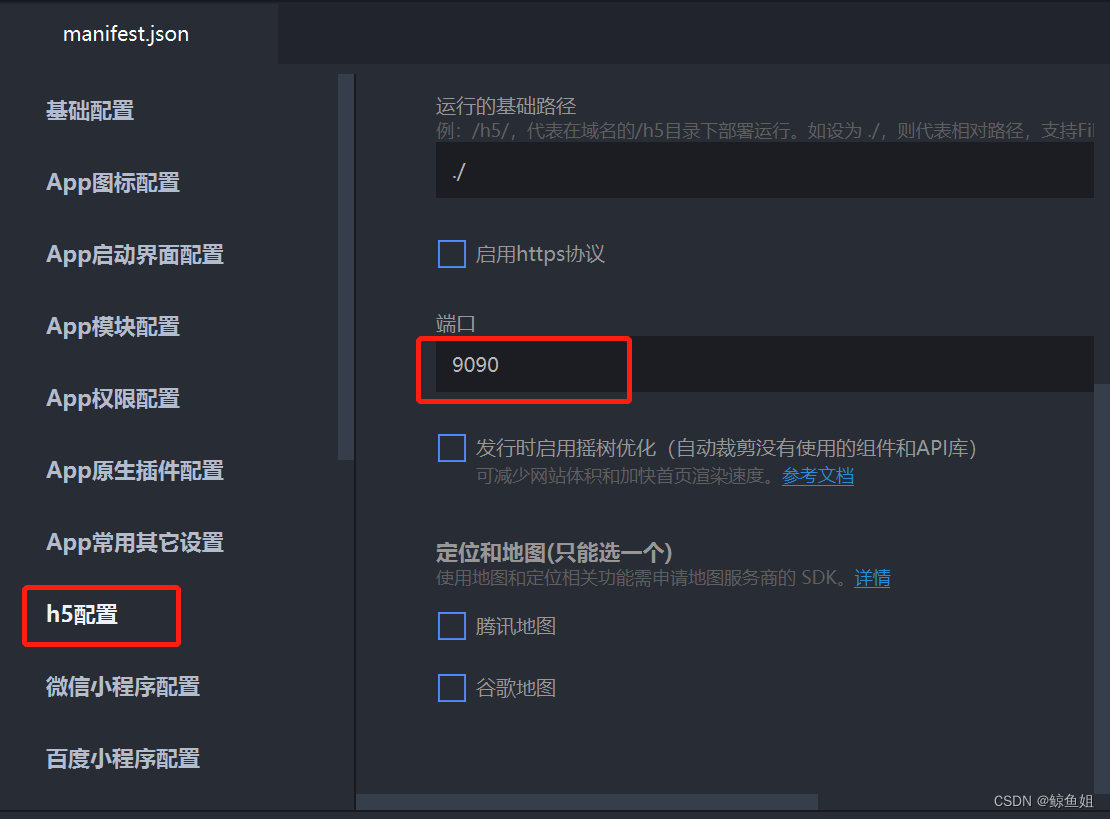
2. 修改前端h5端口
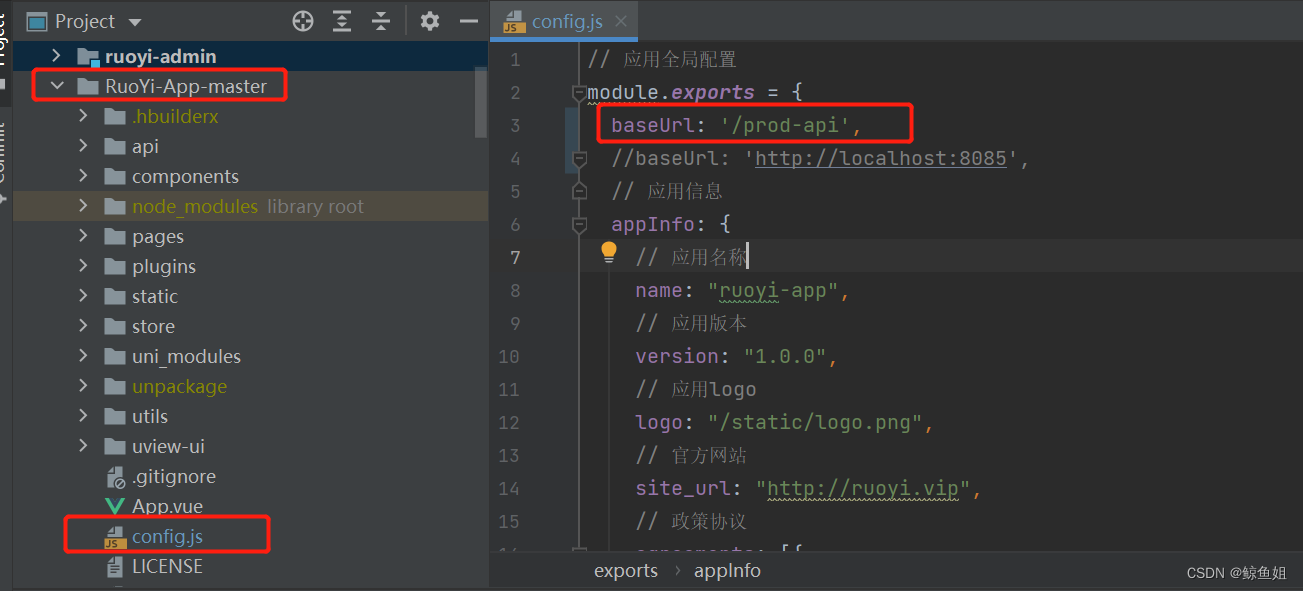
3. 修改后端端口
在根目录下config.js文件进行修改

4. H5打包部署
(1)将config.js的baseUrl换成/prod-api
(2)点击发布——》网站PC web或手机h5,然后填好标题及域名,点击发行按钮,即可成功打包。

(3)在控制台打开此目录

将此目录下的index文件和static文件夹上传到服务器前端目录下 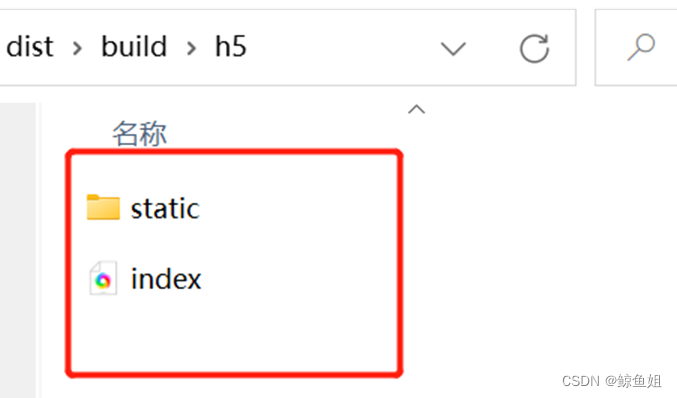
(4)配置Nginx
在nginx添加如下代码,
a. 注意前端端口号9090需要没有被其他程序占用,否则无法启动。
b. 后端端口地址此代码中是http://localhost:8085。如需修改后端代码,参照上面内容
c. 前端端口号9090需要防火墙设置所有ip都可以访问
d. /prod-api和移动端config.js的baseUrl内容/prod-api要一致
e.root /home/ptc/whale_sys/dist_h5此目录是移动端index和static文件上传的目录
  server {
    listen 9090;

    location / {
            root /home/ptc/whale_sys/dist_h5;
            try_files $uri $uri/ /index.html;
            index index.html index.htm;
        }
	location /prod-api/ {
	    proxy_set_header Host $http_host;
	    proxy_set_header X-Real-IP $remote_addr;
	    proxy_set_header REMOTE-HOST $remote_addr;
	    proxy_set_header X-Forwarded-For $proxy_add_x_forwarded_for;
	    proxy_set_header X-Forwarded-Proto $scheme;
        proxy_set_header X-NginX-Proxy true;
        proxy_pass http://localhost:8085/;
	}
    }
配置完后 ngnix -s reload热启动ngnix
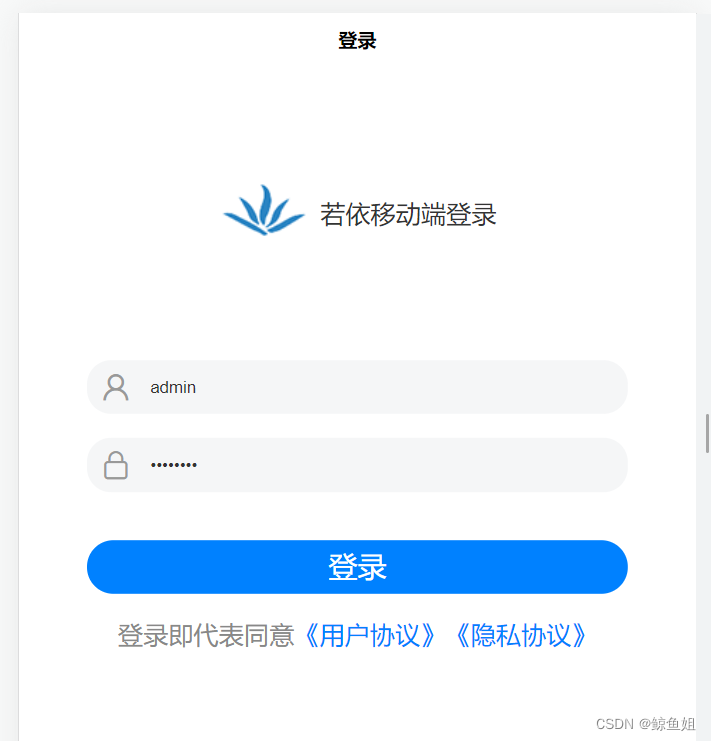
(5)在浏览器预览如下
5. 前后端参数传递
(1)使用@RequestParam 传参数
使用@RequestParam时,URL是这样的:http://host:port/path?参数名=参数值
前端:
let url=‘张三'
let params={'url':url}
getJsapiSignature(params).then(res => {....})
api:
export function getJsapiSignature(query) {
return request({
url: '/system/qywx/signature/',
method: 'get',
params: query
})
}
后端:
@GetMapping(value = "/system/qywx/signature/")
public WxJsapiSignature getJsapiSignature(@RequestParam("url") String url) {
        System.out.println(url);

}
(2)使用@PathVariable 传参数
使用@PathVariable时,URL是这样的:http://host:port/path/参数值
前端:
getGoodDataByCode(codeContent).then(res => {....})
api:
// 通过二维码查询物资信息
export function getGoodDataByCode(goodCode) {
return request({
url: '/feedback/goods/code/'+goodCode,
method: 'get',
})
}
后端:
@GetMapping(value = "code/{goodCode}")
public AjaxResult getInfo(@PathVariable("goodCode") String goodCode)
{
    return AjaxResult.success(fGoodsService.selectFGoodsByCode(goodCode));
}
6. vue数组技巧
(1)join方法用来将数组转化为字符串,并用顿号隔开
用法1: aaList:["aaa“,”bbb", "ccc"]
aaList.join(',')后就是aaa,bbb,ccc
用法提升: let images = []
this.fileList1.forEach((item) => {
images.push(item.url)
})
this.form.problemPhotos=images.join(',');
(2)splice方法用来替换/删除/添加数组内某一个值或几个值,该方法会改变初始数组。
- index:数组开始下标
- len:替换/删除的长度
- item:替换的值,为删除时item为空
-
删除:
-
let arr = ['1','2','3','4']; arr.splice(0,2); console.log(arr.toString()); //3,4 -
替换:
let arr = ['1','2','3','4'];
arr.splice(0,2,['5','6','7']);
console.log(arr.toString());
//5,6,7,3,4
新增: -
let arr = ['1','2','3','4'];
arr.splice(0,0,['5','6','7']);
console.log(arr.toString());
//5,6,7,1,2,3,4,
7. vue对象操作
(1)Object.assign() 方法用于将所有可枚举属性的值从一个或多个源对象复制到目标对象。它将返回目标对象。用法:
 Object.assign(target, ...sources)
 参数: target--->目标对象
       source--->源对象
       返回值:target,即目标对象
var target={name:'guxin',age:25};
var source={state:'single'}
var result=Object.assign(target,source);
console.log(target,target==result);结果:{name: 'guxin',age:25,state:'single'}
(2)JSON.parse格式转化,将字符串转换为对象
let res = JSON.parse(uploadRes.data) //最终传给的是字符串,这里需要转换格式
console.log(res.file)
8. 显示当前日期
需使用uview
var date = new Date();
this.form.problemDate = this.$u.timeFormat(date, 'yyyy-mm-dd hh:MM:ss')

9. 性别,状态显示使用filters过滤器
需求:有些数据注定需要转化之后才能给人看,但是又不想每次都反复写三目或很长的转化表达式
比如:性别,状态
<!-- 性别 -->
  <view >
	<text class="text-grey">性别</text>
	</view>
	<view >
	<text class="text-grey">{

   {info.sex | formatSex}}</text></view>
   </view>

export default {
  data(){
    return{
    }
  },
  //和computed,watch等同级别

  filters: {
			// 格式化性别
			formatSex: function(str) {
				const sexEnum = {
					"1": "男",
					"2": "女",
				}
				return sexEnum[str];
			}
   },
  methods: {
}

}
10 字典使用
(1)在页面中引入方法
import { getDicts } from "@/api/system/dict/data";
(2)加载数据字典
export default {
  data() {
    return {
      statusOptions: [],
      .....
...

onLoad(option) {
  this.getDicts("status_type").then(response => {
    this.statusOptions= response.data;
  });
},
(3)前端
<span>{ {statusType}}</span>
(4)读取数据字典显示内容
//使用find遍历查找,并显示字典值
let status=app.statusOptions.find(item=>item.dictValue==res.data.status);
this.statusType=status .dictLabel
(5)列表显示
将列表中的数字,遍历直接替换成字典值
this.dataList.forEach((self,index) => {
let status=this.statusOptions.find(item=>item.dictValue==self.status);
self.statusType=status.dictLabel
});
11. 获取当前用户
import { getUserProfile } from "@/api/system/user"
getUserProfile().then(response => {
app.form.problemUsername = response.data.nickName
app.form.problemUsernum = response.data.userName
});