文章目录
原视频链接
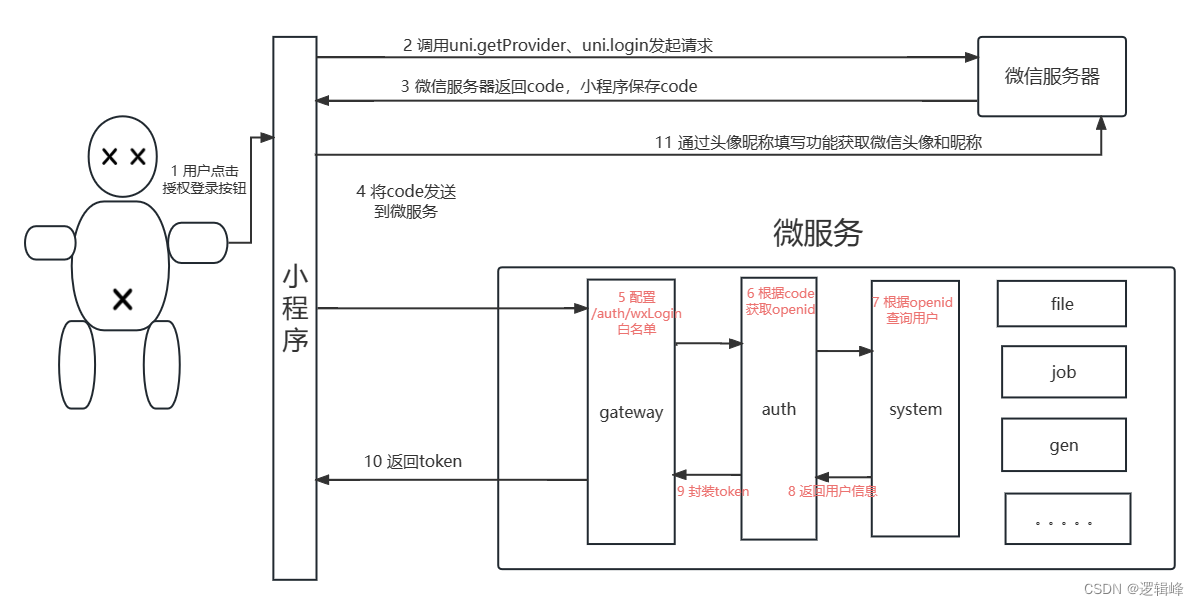
1 前言
结合RuoYi-Cloud和RuoYi-App实现微信小程序的授权登录。
之前讲过前后端分离版的授权登录,逻辑大致一致,不同点有:
- 微信头像和昵称的获取方式。由于最新的本地库通过
getUserProfile和getUserInfo获取不到用户头像和昵称。采用头像昵称填写功能。(备注:https://developers.weixin.qq.com/community/develop/doc/00022c683e8a80b29bed2142b56c01) - 微服务端采用
OpenFeign进行远程调用,不会远程调用的粉丝,可以学习一下。Feign的底层是Spring3.0的RestTemplate,若依的RestTemplate又借助于OkHttp。相对于Feign本身来讲,OpenFeign是支持Spring MVC的注解的,用起来非常方便。
1.1 环境准备
- 下载
RuoYi-Cloud代码
添加链接描述https://gitee.com/y_project/RuoYi-Cloud - 下载
RuoYi-App代码
https://gitee.com/y_project/RuoYi-App
1.2 登录流程图
2 小程序代码
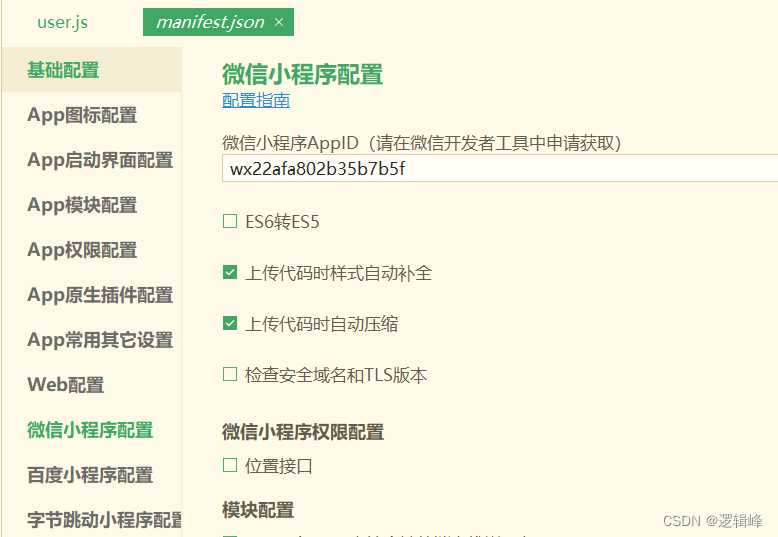
- 微信开发者工具基础库用的
2.30.* app模块配置微信登录
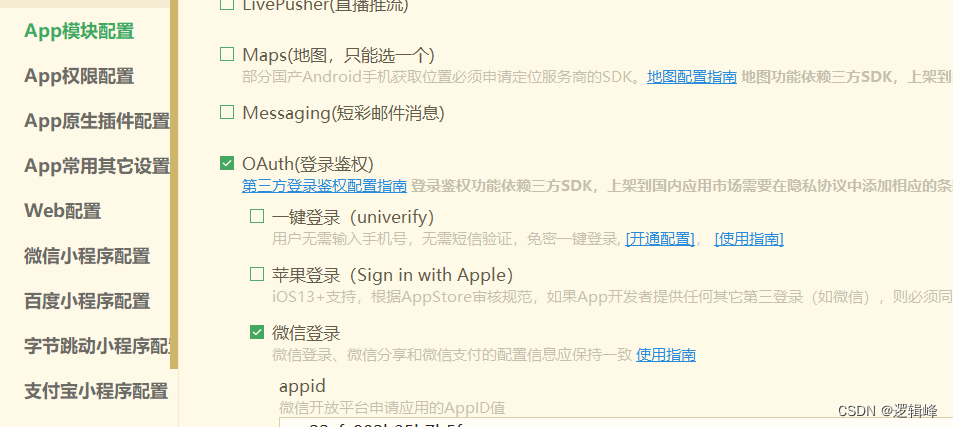
- 使用自己的
appid
2.1 RuoYi-App编辑api/login.js
- 登录、退出接口路径加
/auth - 获取用户信息接口路径加
/system - 获取验证码接口路径换成
/code
import request from '@/utils/request'

// 登录方法
export function login(username, password, code, uuid) {


  const data = {


    username,
    password,
    code,
    uuid
  }
  return request({


    'url': '/auth/login',
    headers: {


      isToken: false
    },
    'method': 'post',
    'data': data
  })
}

// 获取用户详细信息
export function getInfo() {


  return request({


    'url': '/system/user/getInfo',
    'method': 'get'
  })
}

// 退出方法
export function logout() {


  return request({


    'url': '/auth/logout',
    'method': 'delete'
  })
}

// 获取验证码
export function getCodeImg() {


  return request({


    'url': '/code',
    headers: {


      isToken: false
    },
    method: 'get',
    timeout: 20000
  })
}
2.4 新增按钮微信授权登录
- 在登录按钮下,新增微信授权登录按钮
<button @click="wxHandleLogin" class="login-btn cu-btn block bg-green lg round">微信授权登录</button>
2.6 新增wxHandleLogin方法获取code
// 微信登录
	async wxHandleLogin() {


			uni.getProvider({


				service:'Oauth',
				success: (res) => {


					console.log(res);
					if(res.provider.indexOf("WeiXin")){


						//登录
						uni.login({


							provider:'WeiXin',
							success: (loginRes) => {


							}
						})
					}
				}
			})
	}
2.9 创建sendWxLoginFormToLocalService方法
//向本地服务发起请求
	sendWxLoginFormToLocalService(){


				console.log("向后端发起请求" + this.wxLoginForm);
				this.$store.dispatch('wxLogin', this.wxLoginForm).then(() => {


				  this.$modal.closeLoading()
				}).catch(() => {


				})
	}
3 微服务代码
3.5 auth服务TokenController添加接口wxLogin
    public R<?> wxLogin(@RequestBody WxLoginBody wxLoginBody){


        String code = wxLoginBody.getCode();

        //想微信服务器发送请求获取用户信息
        String url = "https://api.weixin.qq.com/sns/jscode2session?appid=" + wxAppConfig.getAppId() + "&secret=" + wxAppConfig.getAppSecret() + "&js_code=" + code + "&grant_type=authorizatinon_code";
        String res = restTemplate.getForObject(url, String.class);
        JSONObject jsonObject = JSONObject.parseObject(res);

        //获取session_key和openid
        String sessionKey = jsonObject.getString("session_key");
        String openid = jsonObject.getString("openid");

        if (StringUtils.hasText(openid)){


            // 如果解析成功,获取token
            LoginUser userInfo = sysLoginService.wxLogin(openid);
            // 获取登录token
            return R.ok(tokenService.createToken(userInfo));
        }else{


            return R.fail("微信登录失败!");
        }
    }
3.7 ruoyi-api模块新增远程调用
/**
     * 通过openid查询用户信息
     *
     * @param openid openid 用户唯一标识
     * @param source 请求来源
     * @return 结果
     */
    @GetMapping("/user/getInfoByOpenid/{openid}")
    public R<LoginUser> getInfoByOpenid(@PathVariable("openid") String openid, @RequestHeader(SecurityConstants.FROM_SOURCE) String source);
3.9 system服务SysUserController新增内部接口getInfoByOpenid和addWxUser
- 数据库添加
unionId和openId - domain (SysUser)
/** unionId */
    private String unionId;

    /** openId */
    private String openId;

     public String getUnionId() {


        return unionId;
    }

    public void setUnionId(String unionId) {


        this.unionId = unionId;
    }

    public String getOpenId() {


        return openId;
    }

    public void setOpenId(String openId) {


        this.openId = openId;
    }
- controller 层(SysUserController)
	/**
     * 根据openid获取当前用户信息
     */
    public R<LoginUser> getInfoByOpenid(@PathVariable("openid") String openid)
    {


        SysUser sysUser = userService.selectUserByOpenid(openid);
        LoginUser sysUserVo = new LoginUser();
        if (StringUtils.isNull(sysUser))
        {


            sysUserVo.setSysUser(null);
            return R.ok(sysUserVo);
        }
        return R.ok(sysUserVo);
    }

	/**
     * 新增微信用户信息
     */
    public R<SysUser> addWxUser(@RequestBody SysUser sysUser)
    {


        String username = sysUser.getUserName();
        userService.insertWxUser(sysUser);
        return R.ok(sysUser);
    }
- service 层(SysUserServiceImpl)
接口:
	/**
     * 通过openid查询用户
     *
     * @param openid 用户唯一标识
     * @return 用户对象信息
     */
    public SysUser selectUserByOpenid(String openid);

	/**
     * 新增微信用户信息
     *
     * @param user 用户信息
     * @return 结果
     */
    public int insertWxUser(SysUser user);
实现类:
	/**
     * 通过openid查询用户
     *
     * @param openid 用户唯一标识
     * @return 用户对象信息
     */
    @Override
    public SysUser selectUserByOpenid(String openid)
    {


        return userMapper.selectUserByOpenid(openid);
    }

	/**
     * 新增微信用户信息
     *
     * @param user 用户信息
     * @return 结果
     */
    @Override
    public int insertWxUser(SysUser user)
    {


        // 新增用户信息
        return userMapper.insertUser(user);
    }
mapper 层 (SysUserMapper)
/**
     * 通过openid查询用户
     *
     * @param openid 用户唯一标识
     * @return 用户对象信息
     */
    public SysUser selectUserByOpenid(String openid);
mybatis.xml (SysUserMapper.xml)
u.union_id, u.open_id,

....
<select id="selectUserByOpenid" parameterType="String" resultMap="SysUserResult">
		<include refid="selectUserVo"/>
		where u.open_id = #{openId} and u.del_flag = '0'
	</select>
....
<insert id="insertUser" parameterType="SysUser" useGeneratedKeys="true" keyProperty="userId">
 		insert into sys_user(
 			<if test="userId != null and userId != 0">user_id,</if>
 			<if test="deptId != null and deptId != 0">dept_id,</if>
 			<if test="userName != null and userName != ''">user_name,</if>
 			<if test="nickName != null and nickName != ''">nick_name,</if>
 			<if test="email != null and email != ''">email,</if>
 			<if test="avatar != null and avatar != ''">avatar,</if>
 			<if test="phonenumber != null and phonenumber != ''">phonenumber,</if>
 			<if test="sex != null and sex != ''">sex,</if>
 			<if test="password != null and password != ''">password,</if>
 			<if test="status != null and status != ''">status,</if>
 			<if test="createBy != null and createBy != ''">create_by,</if>
 			<if test="remark != null and remark != ''">remark,</if>
			<if test="openId != null and openId != ''">open_id,</if>
			<if test="unionId != null and unionId != ''">union_id,</if>
 			create_time
 		)values(
 			<if test="userId != null and userId != ''">#{userId},</if>
 			<if test="deptId != null and deptId != ''">#{deptId},</if>
 			<if test="userName != null and userName != ''">#{userName},</if>
 			<if test="nickName != null and nickName != ''">#{nickName},</if>
 			<if test="email != null and email != ''">#{email},</if>
 			<if test="avatar != null and avatar != ''">#{avatar},</if>
 			<if test="phonenumber != null and phonenumber != ''">#{phonenumber},</if>
 			<if test="sex != null and sex != ''">#{sex},</if>
 			<if test="password != null and password != ''">#{password},</if>
 			<if test="status != null and status != ''">#{status},</if>
 			<if test="createBy != null and createBy != ''">#{createBy},</if>
 			<if test="remark != null and remark != ''">#{remark},</if>
			<if test="openId != null and openId != ''">#{openId},</if>
			<if test="unionId != null and unionId != ''">#{unionId},</if>
 			sysdate()
 		)
	</insert>