文章目录
一、 项目初始化
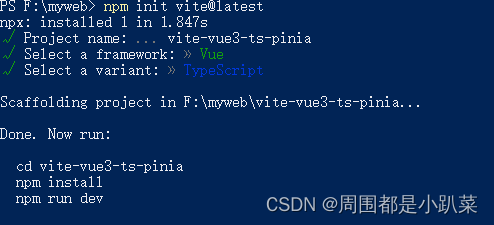
按步骤创建项目
// 使用 vite-cli 命令
npm init vite@latest
// 项目名称
? Project name: vite-vue3-ts-pinia
// 选择框架
? Select a framework: » - Use arrow-keys. Return to submit.
vanilla // 原生js
> vue // 默认就是 vue3
react // react
preact // 轻量化react框架
lit // 轻量级web组件
svelte // svelte框架
// 使用 typescript
? Select a variant: › - Use arrow-keys. Return to submit.
vue
❯ vue-ts
// 完成上面操作后,项目算是搭建完成了
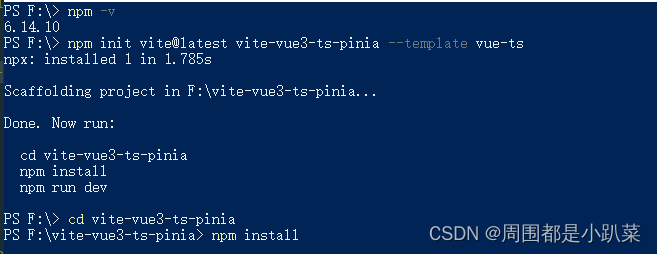
cd vite-vue3-ts-pinia
npm install
npm run dev
快速创建项目–推荐
// npm 6.x
npm init vite@latest project-name --template vue-ts

// npm 7+, 需要额外的双横线:
npm init vite@latest project-name -- --template vue-ts
集成配置
npm i @types/node --save-dev
修改tsconfig.json
tsconfig.json全解析
{


  "compilerOptions": {


    "typeRoots": [
      "node_modules/@types",
      "src/types"
   ],
    "target": "esnext",
    "useDefineForClassFields": true,
    "module": "esnext",
    "moduleResolution": "node",
    "strict": true,
    "jsx": "preserve",
    "sourceMap": true,
    "resolveJsonModule": true,
    "esModuleInterop": true,
    "lib": ["esnext", "dom"],
    "baseUrl": "./",
    "paths":{


      "@": ["src"],
      "@/*": ["src/*"],
    }
  },
  "include": ["src/**/*.ts", "src/**/*.d.ts", "src/**/*.tsx", "src/**/*.vue"]
}
修改 vite.config.ts
import {

     defineConfig } from 'vite';
import vue from '@vitejs/plugin-vue';
import * as path from 'path';

// https://vitejs.dev/config/
export default defineConfig({


  resolve: {


    //设置别名
    alias: {


      '@': path.resolve(__dirname, 'src')
    }
  },
  plugins: [vue()],
  server: {


    port: 3000, //启动端口
    hmr: {


      host: "0.0.0.0",
      port: 3000,
    },
    // 设置 https 代理
    proxy: {


      '/api': {


        target: 'your https address',
        changeOrigin: true,
        rewrite: (path: string) => path.replace(/^\/api/, '')
      }
    }
  }
});
二、 代码风格
安装eslint
npm i eslint eslint-plugin-vue --save-dev
因为 ESLint 默认使用 Espree 进行语法解析,无法识别 TypeScript 的一些语法,所以需要安装 @typescript-eslint/parser 替代掉默认的解析器
npm install @typescript-eslint/parser --save-dev
安装对应的插件 @typescript-eslint/eslint-plugin 它作为 eslint 默认规则的补充,提供了一些额外的适用于 ts 语法的规则。
npm install @typescript-eslint/eslint-plugin --save-dev
创建配置文件: .eslintrc.js
module.exports = {


    parser: 'vue-eslint-parser',

    parserOptions: {


        parser: '@typescript-eslint/parser',
        ecmaVersion: 2020,
        sourceType: 'module',
        ecmaFeatures: {


            jsx: true
        }
    },

    extends: [
        'plugin:vue/vue3-recommended',
        'plugin:@typescript-eslint/recommended',
    ],

    rules: {


        // override/add rules settings here, such as:
    }
};
创建忽略文件:.eslintignore
# Logs
logs
*.log
npm-debug.log*
yarn-debug.log*
yarn-error.log*
pnpm-debug.log*
lerna-debug.log*

node_modules/
dist/
dist-ssr
*.local

# Editor directories and files
.vscode/*
!.vscode/extensions.json
.idea
.DS_Store
*.suo
*.ntvs*
*.njsproj
*.sln
*.sw?
命令行式运行:修改 package.json
{


    ...
    "scripts": {


        ...
        "eslint:comment": "使用 ESLint 检查并自动修复 src 目录下所有扩展名为 .js 和 .vue 的文件",
        "eslint": "eslint --ext .js,.vue --ignore-path .gitignore --fix src",
    }
    ...
}
安装prettier
安装:
npm i prettier eslint-config-prettier eslint-plugin-prettier --save-dev
创建配置文件: prettier.config.js 或 .prettierrc.js
module.exports = {


    // 一行最多 80 字符
    printWidth: 80,
    // 使用 4 个空格缩进
    tabWidth: 4,
    // 不使用 tab 缩进,而使用空格
    useTabs: false,
    // 行尾需要有分号
    semi: true,
    // 使用单引号代替双引号
    singleQuote: true,
    // 对象的 key 仅在必要时用引号
    quoteProps: 'as-needed',
    // jsx 不使用单引号,而使用双引号
    jsxSingleQuote: false,
    // 末尾使用逗号
    trailingComma: 'all',
    // 大括号内的首尾需要空格 { foo: bar }
    bracketSpacing: true,
    // jsx 标签的反尖括号需要换行
    jsxBracketSameLine: false,
    // 箭头函数,只有一个参数的时候,也需要括号
    arrowParens: 'always',
    // 每个文件格式化的范围是文件的全部内容
    rangeStart: 0,
    rangeEnd: Infinity,
    // 不需要写文件开头的 @prettier
    requirePragma: false,
    // 不需要自动在文件开头插入 @prettier
    insertPragma: false,
    // 使用默认的折行标准
    proseWrap: 'preserve',
    // 根据显示样式决定 html 要不要折行
    htmlWhitespaceSensitivity: 'css',
    // 换行符使用 lf
    endOfLine: 'auto'
}
修改 .eslintrc.js 配置
module.exports = {


    ...

    extends: [
        'plugin:vue/vue3-recommended',
        'plugin:@typescript-eslint/recommended',
        'prettier',
        'plugin:prettier/recommended'
    ],

    ...
};
**命令行式运行:**修改 package.json
{


    ...
    "scripts": {


        ...
        "prettier:comment": "自动格式化当前目录下的所有文件",
        "prettier": "prettier --write"
    }
    ...
}
三、 状态管理工具–Pinia
优点
- Vue2 和 Vue3 都能支持
- 抛弃传统的 Mutation ,只有 state, getter 和 action ,简化状态管理库
- 不需要嵌套模块,store 之间可以自由使用,更好的代码分割;
- 足够轻量,压缩后的体积只有1.6kb;
使Pinia 基本使用
安装
npm i pinia --save
使用
新建 src/store 文件,创建 index.ts并导出 store
import {

    createPinia} from "pinia";
const store=createPinia()
export default store
在 src/store 下面创建一个 user.ts
import {

    createPinia} from "pinia";
export const useUserStore = defineStore({


    id: 'user',
    state: () => {


        return {


            name: 'Pinia'
        }
    },
    actions: {


        updateName(name) {


            this.name = name
        }
    }
})
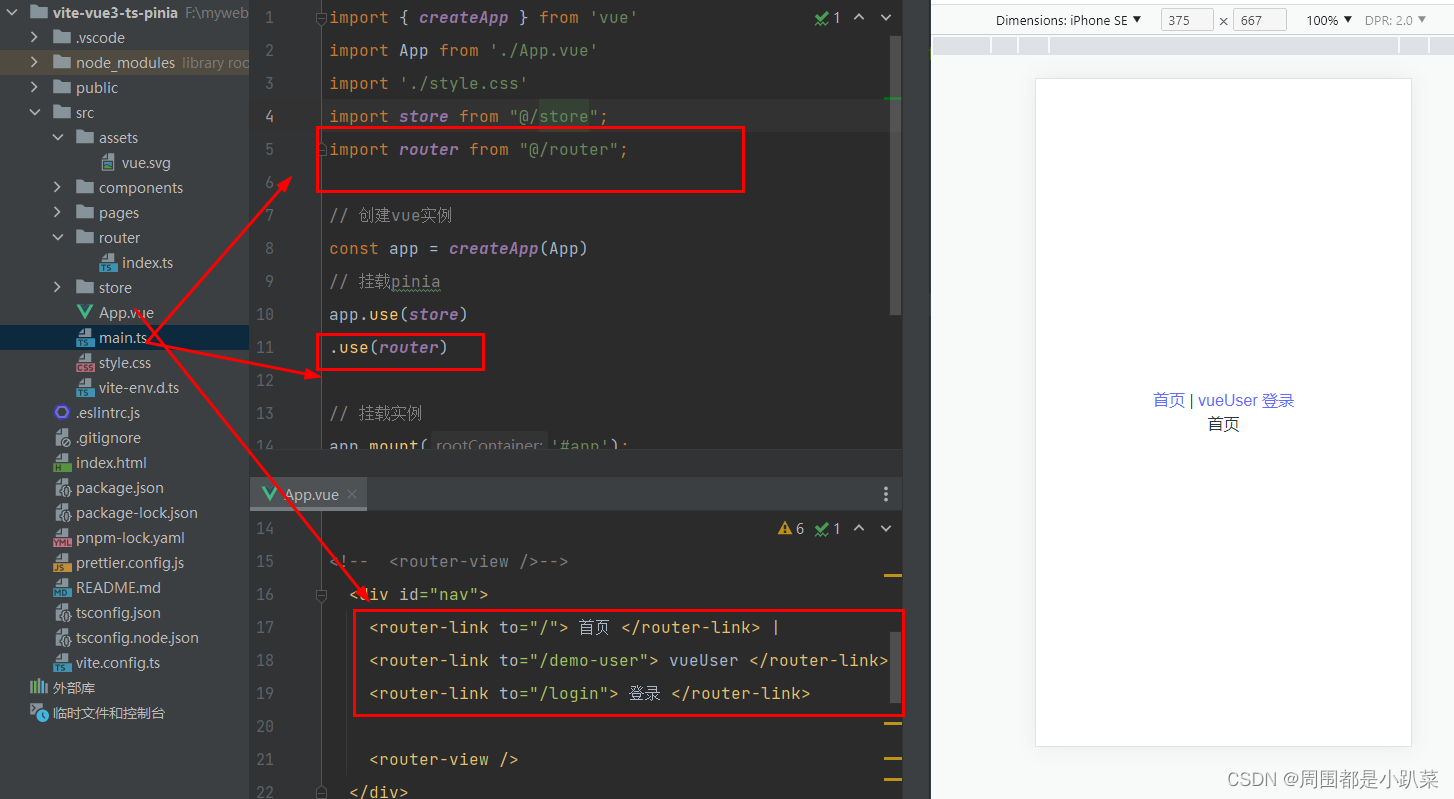
main.ts引用
import {

     createApp } from 'vue'
import './style.css'
import store from "@/store";
import App from './App.vue'
// 创建vue实例
const app = createApp(App)
// 挂载pinia
app.use(store)
// 挂载实例
app.mount('#app');
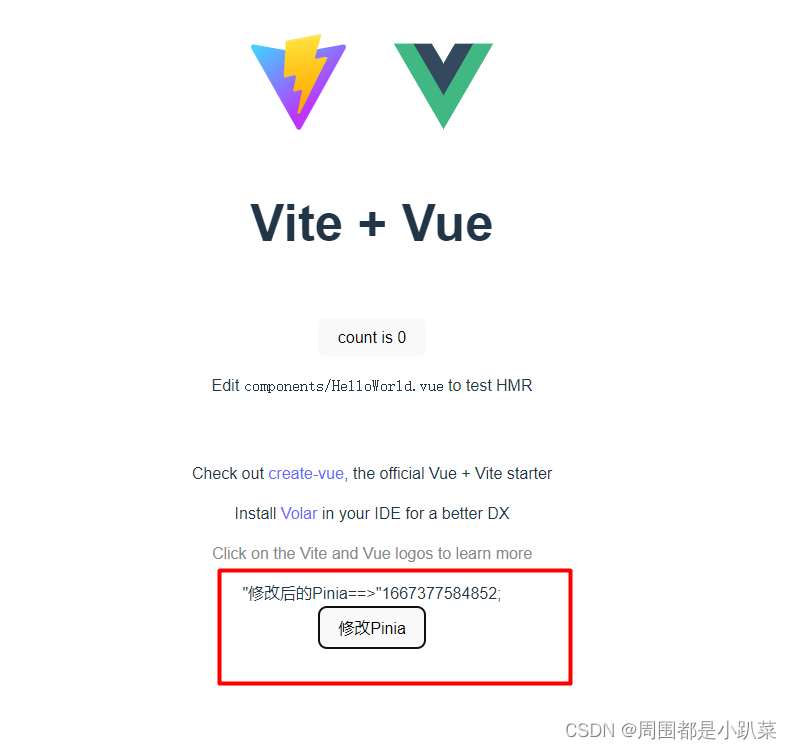
组件中获取和修改State
<!--  在需要的页面使用该组件:pinia-demo.vue,-->
<template>
  <div>{

   { userStore.name }}</div>
  <button @click="handleChange">修改Pinia</button>
</template>

<script lang="ts" setup>
  import {

       useUserStore } from '@/store/user'

  const userStore = useUserStore()
  //修改Pinia的state
  const handleChange = () => {


    userStore.name=`"修改后的Pinia==>"${
        Date.now()};`
  };

  // return {


  //   handleChange
  // }
</script>

<style scoped></style>
四、Vue-Router4 快速上手指南
安装
npm i vue-router --save
快速上手
新建 src/router/index.ts,导出 router
history 模式是 hash 模式的升级版,区别在浏览器链接的显示的不同
hash 模式:把前端路由路径用 # 号拼接在真实 URL 后面的模式。当 # 后面的路径发生变化时,浏览器不会重新发起请求,而是出发 hashchange 事件。hash
模式链接样式:http://localhost:8080/#/homehistory 模式:history API 是 HTML5 的新特性,允许开发者直接更改前端路由。history
模式链接样式:http://localhost:8080/home
import {

     createWebHistory, createRouter,RouteRecordRaw } from "vue-router";
const routes: Array<RouteRecordRaw> = [
    {


        path: '/login',
        name: 'Login',
        meta: {


            title: '登录',
            keepAlive: true,
            requireAuth: false
        },
        component: () => import('@/pages/login.vue')
    },
    {


        path: '/',
        name: 'Index',
        meta: {


            title: '首页',
            keepAlive: true,
            requireAuth: true
        },
        component: () => import('@/pages/index.vue')
    },

]

const router = createRouter({


    history: createWebHistory(),
    routes
});
export default router;
五、VueUse快速上手指南
什么是 VueUse
VueUse 是一个基于 Composition API 的实用函数集合。通俗的来说,这就是一个工具函数包,它可以帮助你快速实现一些常见的功能,免得你自己去写,解决重复的工作内容。以及进行了基于 Composition API 的封装。让你在 vue3 中更加得心应手。
简单上手
安装 VueUse
npm i @vueuse/core
使用 VueUse
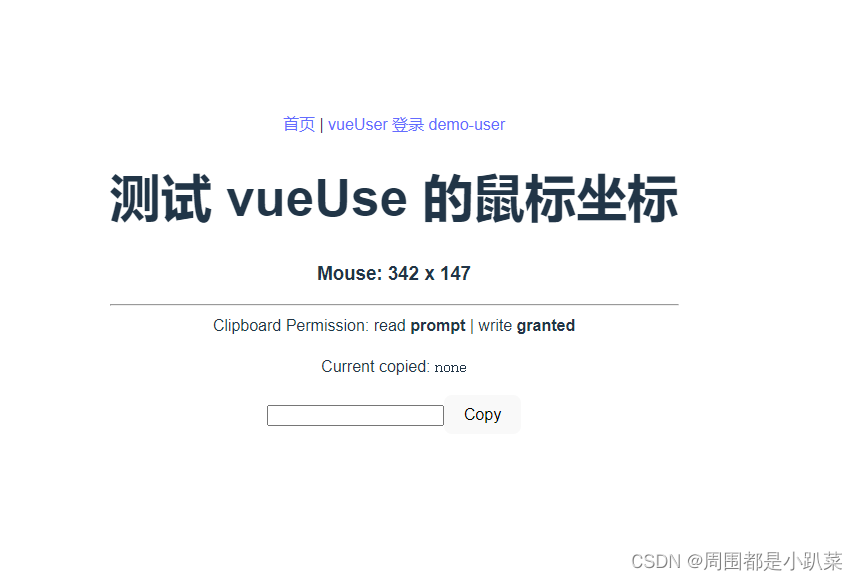
<template>
  <h1> 测试 vueUse 的鼠标坐标 </h1>
  <h3>Mouse: {

    {

    x}} x {

    {

    y}}</h3>
  <hr>
  <div v-if="isSupported">
    <note>
      Clipboard Permission: read <b>{

    {

     permissionRead }}</b> | write
      <b>{

    {

     permissionWrite }}</b>
    </note>
    <p>
      Current copied: <code>{

    {

     text || 'none' }}</code>
    </p>
    <input v-model="input" type="text">
    <button @click="copy(input)">
      Copy
    </button>
  </div>
  <p v-else>
    Your browser does not support Clipboard API
  </p>
  </template>

<script lang="ts" setup>
import {

     useMouse,useLocalStorage,usePreferredDark,useToggle  } from '@vueuse/core'
// 监听当前鼠标坐标的一个方法,他会实时的获取鼠标的当前的位置
const {

     x, y } = useMouse()
//持久化数据的方法,他会把数据持久化到本地存储中
const store = useLocalStorage(
    'my-storage',
    {


      name: 'Apple',
      color: 'red',
    },
)
// 使用剪贴板
import {

     ref } from 'vue'
import {

     useClipboard, usePermission } from '@vueuse/core'
const input = ref('')
const {

     text, isSupported, copy } = useClipboard()
const permissionRead = usePermission('clipboard-read')
const permissionWrite = usePermission('clipboard-write')


</script>
还有很多很多函数库,具体可以前往看看 官方文档
六、全局样式CSS
原生 css 新特性
新建样式文件 src/styles/index.css
body, h1, h2, h3, h4, h5, h6, hr, p, blockquote,/* structural elements 结构元素 */
dl, dt, dd, ul, ol, li, /* list elements 列表元素 */
pre, /* text formatting elements 文本格式元素 */
fieldset, lengend, button, input, textarea, /* form elements 表单元素 */
th, td {


    /* table elements 表格元素 */
    margin: 0;
    padding: 0;
}
/* 设置默认字体 */
body,
button,
input,
select,
textarea {


    /* for ie */
    /*font: 12px/1 Tahoma, Helvetica, Arial, "宋体", sans-serif;*/
    /* 用 ascii 字符表示,使得在任何编码下都无问题 */
    /*font: 12px/1 Tahoma, Helvetica, Arial, '\5b8b\4f53', sans-serif;*/
    font: 12px/1  'Microsoft YaHei';
    touch-action: manipulation;
}
scss 或 less
安装
npm add -D scss
npm add -D less
<style lang="scss">
   .scssstyle{

      }
 </style>


<style lang="less">
   .lessstyle {

      }
 </style>
封装axios
Axios 是一个基于 promise 的 HTTP 库,简单的讲就是可以发送get、post请求
封装axios,主要是通过拦截器分别处理HTTP请求和响应,并反馈HTTP请求结果
安装依赖
安装axios依赖,安装element-plus,用来反馈请求结果
npm i axios
npm i element-plus
封装
index.ts文件
- 定义请求返回的数据格式,和服务端约定好数据格式
- 定义axios的配置信息,用于在创建axios实例时传入
- 请求拦截器,前端所有的接口请求都会先达到请求拦截器,我们可以在此添加请求头信息
- 响应拦截器,服务端返回的数据会先达到响应拦截器,我们可以处理服务端的响应信息。如果是报错,就处理常见的报错;如果是成功,就返回数据
- 封装常用的get、put、post、delete接口方法
方案一:https://blog.csdn.net/weixin_44590591/article/details/121950152
其他方案后续更新
UI 样式库
这里列举几个:element-plus、Vant UI 、Ant Design Vue、vuetify