在根目录下新建store文件夹,在文件夹下新建index.ts文件
一. src>>store>>index.ts文件中创建store
import { defineStore } from 'pinia'

interface State { }

export const useUserStore = defineStore('main', {
  state: ():State => ({ }),
  //类似于computed
  getters: { },
  //类似于methods
  actions: { }
})
二.在组件中应用store
<template>
  <div class="page">
    用户名: {

   {user.name}}
    <a-button type="primary" @click="changeName">修改用户名</a-button>
  </div>
</template>
1. 读取state中的属性
<script setup lang="ts">
  import { useUserStore } from '@/store'
  const user = useUserStore()
</script>
2.state值的六种改变方式
(1)直接修改
<script setup lang="ts">
  import { useUserStore } from '@/store'
  const user = useUserStore()
  const changeName = () =>{
    user.name = '后端'
  }
</script>
(2)$patch批量修改
该修改方式需要定义store的时候,并没有对state函数返回值做类型限制,且批量修改只能修改state函数返回值中已存在的属性
<script setup lang="ts">
  import { useUserStore } from '@/store'
  const user = useUserStore()
  const changeName = () =>{
    user.$patch({
      name: 'vue',
      age: 4,
    })
  }
</script>
(3)$patch带逻辑修改
该中方式支持创建store时对state函数返回值类型限定,
-- 若限定中可以有任意属性,则可以添加state中没有的属性
-- 若没有返回值类型限定,则只能修改创建state时已存在的属性
<script setup lang="ts">
  import { useUserStore } from '@/store'
  const user = useUserStore()
  const changeName = () =>{
    user.$patch(state => {
      if(..){
        state.name = 'react'
        state.type = '前端'
      }
    })
  }
</script>
(4)$state替换state
<script setup lang="ts">
  import { useUserStore } from '@/store'
  const user = useUserStore()
  const changeName = () =>{
    user.$state = {
      userId: '666',
      name: 'vscode',
      age: 18
    }
  }
</script>
(5)借助actions方法
src>>store>>index.ts
actions: {
  changName(name:string){
    this.name = name
  }
}
组件中
<script setup lang="ts">
  import { useUserStore } from '@/store'
  const user = useUserStore()
  const changeName = () =>{
    user.changName('333')
  }
</script>
(6)使用$reset重置state
const store = useStore()
store.$reset()
3.借助 storeToRefs 解构state
<script setup lang="ts">
  import { storeToRefs } from "pinia";
  import { useUserStore } from '@/store'
  const { name } = storeToRefs(useUserStore())
  const changeName = () =>{
    name.value = '111'
  }
</script>
4. actions
可以直接this.xx访问到state中的属性,也可以this.xxx访问到actions中的方法
(1) 处理同步逻辑
actions: {
  changName(name:string){
    this.name = name
  },
}
(2) 处理异步逻辑
import { defineStore } from 'pinia'

interface User {
  userId: string,
  name: string,
  age: number,
  [propName: string]: any
}

const login = ():Promise<User> => {
  return new Promise(resolve => {
    setTimeout(()=>{
      resolve({
        userId: '666',
        name: '333',
        age: 4
      })
    },1000)
  })
}

export const useUserStore = defineStore('main', {
  state: () => {
    return {
      user: <User>{}
    }
  },
  //类似于computed
  getters: {

  },
  //类似于methods
  actions: {
    changName(name:string){
      this.user.name = name
    },
    async setUser(){
      const userInfo = await login()
      this.user = userInfo
    }
  }
})
5.getters
需要定义返回类型,可以在定义常规函数时通过this访问到 整个 store 的实例
(1)函数式写法
//类似于computed
getters: {
  enName():string{
    return this.user.name
  }
},
(2)接收参数
state: () => {
  let users: Array<User> = []
  return {
    user: <User>{},
    users,
  }
},
//类似于computed
getters: {
  getUserById: (state) => {
    return (userId:string) => state.users.find((user) => user.id === userId)
  }
},
组件中应用
<template>
  <div class="page">
    用户名: {

   {store.user.name}}<br>{

   {store.users}}<br> {

   { store.getUserById('666') }}
    <br>
    <a-button style="margin-right:10px" type="primary" @click="changeName">修改用户名</a-button>
    <a-button type="primary" @click="addUser">添加用户名</a-button>
  </div>
</template>

<script setup lang="ts">
  import { useUserStore } from '@/store'
  const store = useUserStore()
  const changeName = () =>{
    store.user.name = 'vue'
  }
  const addUser = () =>{
    const user = {
      userId: '666',
      name: 'react',
      age: 4
    }
    store.users.push(user)
  }
</script>
6.组件中对store实例方法的使用
(1)借助$subscribe监测state值的变化
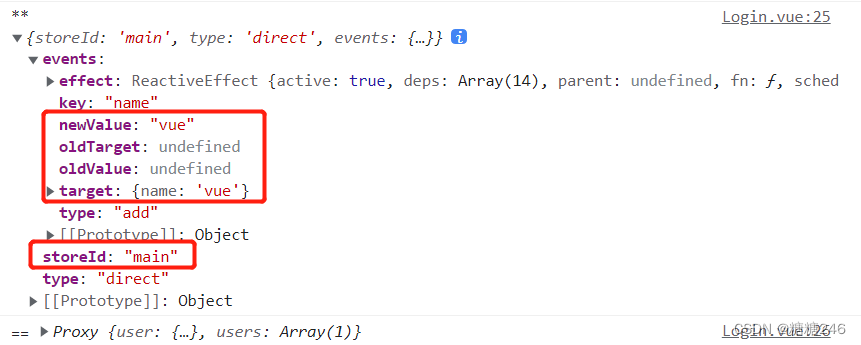
state中的值发生改变,则会触发 $subscribe 函数,接收一个箭头函数,箭头函数会内部传递两个参数,第一个参数为对变化的监控,第二个参数为修改后的state
store.$subscribe((arg, state)=>{
  console.log('**',arg)
  console.log('==',state)
},{ //第二个参数为配置对象
  detached: true, //组件销毁后依然监测state值的变化
  deep: true, //深度监测
  flush: 'post', //回调的刷新时机 pre默认值,dom更新前调用 sync同步调用 post dom更新后调用
  immediate: true, //立即触发一次
})
(2)借助$onAction监测actions中方法的调用
store.$onAction(arg=>{
  console.log('//', arg)
  arg.after(()=>{
    console.log('123')
  })
}, true) //true为第二个参数,可以不写,写上表示组件销毁后依然监测actions的调用情况
三.借助插件实现持久化保存数据(刷新不丢失)
同vuex一样,刷新页面的时候,store中的数据会重置为初始化,但是pinia支持通过插件将数据保存到 localStorage/sessionStorage/cookie 中
1. src>>plugins>>piniaPlugin.ts
import { PiniaPluginContext } from 'pinia'
import { toRaw } from 'vue'

type Options = {
  key?: string,
  type?: string
}

const _piniaKey:string = 'pinia'
const _type = 'session'

const setStorage = (key:string, value: any, type:string) => {
  switch (type) {
    case 'session':
      sessionStorage.setItem(key, JSON.stringify(value))
      break
    case 'local':
      localStorage.setItem(key, JSON.stringify(value))
      break
  }
}
const getStorage = (key:string, type:string) => {
  let data:any
  switch (type) {
    case 'session':
      data = sessionStorage.getItem(key) ? JSON.parse(sessionStorage.getItem(key) as string) : {}
      break
    case 'local':
      data = localStorage.getItem(key) ? JSON.parse(localStorage.getItem(key) as string) : {}
      break
  }
  return data
}

const piniaPlugin = (option: Options) => {
  return (context: PiniaPluginContext) => {
    const { store } = context
    const data = getStorage(`${option?.key ?? _piniaKey}-${store.$id}`, `${option?.type ?? _type}`)
    store.$subscribe(() => {
      setStorage(`${option?.key ?? _piniaKey}-${store.$id}`, toRaw(store.$state), `${option?.type ?? _type}`)
    })
    return {
      ...data
    }
  }
}
export default piniaPlugin
2.修改mian.ts
import { createApp } from 'vue'
import App from './App.vue'
import router from '@router/index'
import { createPinia } from 'pinia'
import piniaPlugin from './plugins/piniaPlugin'

const store = createPinia()
store.use(piniaPlugin(
  {
    key: 'pinia',
    type: 'local'
  }
))

const app = createApp(App)

app
.use(store)
.use(router)
.mount('#app')