近年来,机器学习(ML)生命周期的每一个方面都开发了工具,以使定制模型更容易从想法变成现实。
最令人兴奋的是,社区倾向于使用Pytorch和Tensorflow等开源工具,从而使模型开发过程更加透明和可复制。
在这篇文章中,我们将介绍如何集成两个开源工具来处理ML项目的不同部分:FiftyOne和Detectron2。
Detectron2是由Facebook AI Research开发的一个库,旨在让你能够在自己的数据上轻松训练最先进的检测和分割算法。
FiftyOne是一个工具包,旨在让你轻松可视化数据、管理高质量数据集并分析模型结果。
你可以使用FiftyOne来管理你的自定义数据集,使用Detectron2在FiftyOne数据集上训练模型,然后在Fifty One中评估Detectron 2模型结果,以了解如何改进数据集,继续循环,直到你拥有高性能模型。
这篇文章紧跟官方的Detectron2教程,对其进行了扩充,以展示如何使用FiftyOne数据集和评估。
Colab
查看此笔记本,在浏览器中随此帖子一起阅读。
https://colab.research.google.com/github/voxel51/fiftyone/blob/v0.17.2/docs/source/tutorials/detectron2.ipynb
安装程序
首先,我们需要安装FiftyOne和Detector2。
# Install FiftyOne
pip install fiftyone

# Install Detectron2 from Source (Other options available)

python -m pip install 'git+https://github.com/facebookresearch/detectron2.git'
# (add --user if you don't have permission)

# Or, to install it from a local clone:
git clone https://github.com/facebookresearch/detectron2.git
python -m pip install -e detectron2

# On macOS, you may need to prepend the above commands with a few environment variables:
CC=clang CXX=clang++ ARCHFLAGS="-arch x86_64" python -m pip install ...
现在让我们在Python中导入FiftyOne和Detectron2。
# import FiftyOne
import fiftyone as fo
import fiftyone.zoo as foz

# Import PyTorch and Detectron2
import torch, detectron2

# Setup detectron2 logger
import detectron2
from detectron2.utils.logger import setup_logger
setup_logger()

# import some common libraries
import numpy as np
import os, json, cv2, random
from google.colab.patches import cv2_imshow

# import some common detectron2 utilities
from detectron2 import model_zoo
from detectron2.engine import DefaultPredictor
from detectron2.config import get_cfg
from detectron2.utils.visualizer import Visualizer
from detectron2.data import MetadataCatalog, DatasetCatalog
准备数据集
在这篇文章中,我们将展示如何使用自定义的FiftyOne数据集来训练Detectron2模型。我们将从在COCO数据集上预训练的现有模型中训练车牌分割模型,该模型可在Detectron2的模型库中获得。
由于COCO数据集没有“车牌”类别,我们将使用FiftyOne数据集Zoo中Open Images v6数据集中的车牌分割来训练模型识别这一新类别。
注意:Open Images v6数据集中的图像使用CC-BY 2.0许可证。
为了提高模型性能,我们总是可以从官方的“训练”分割中添加更多数据,但这将需要更长的时间来训练,因此我们将在本演练中坚持“验证”分割。
dataset = foz.load_zoo_dataset(
    "open-images-v6",
    split="validation",
    classes=["Vehicle registration plate"],
    label_types=["segmentations"],
)
从模型库下载数据集时指定一个类将确保只出现具有给定类之一的样本。然而,这些样本可能仍然包含其他标签,因此我们可以使用FiftyOne强大的过滤功能轻松地仅保留“车辆牌照”标签。
我们还将对这些样本进行“验证”,并创建自己的拆分。
from fiftyone import ViewField as F

# Remove other classes and existing tags
dataset.filter_labels("segmentations", F("label") == "Vehicle registration plate").save()
dataset.untag_samples("validation")
import fiftyone.utils.random as four
four.random_split(dataset, {"train": 0.8, "val": 0.2})接下来,我们需要将数据集从FiftyOne的格式解析为Detectron2的格式,以便我们可以将其注册到相关的Detectron 2目录中进行训练。这是集成FiftyOne和Detectron2最重要的代码片段。
from detectron2.structures import BoxMode

def get_fiftyone_dicts(samples):
    samples.compute_metadata()

    dataset_dicts = []
    for sample in samples.select_fields(["id", "filepath", "metadata", "segmentations"]):
        height = sample.metadata["height"]
        width = sample.metadata["width"]
        record = {}
        record["file_name"] = sample.filepath
        record["image_id"] = sample.id
        record["height"] = height
        record["width"] = width

        objs = []
        for det in sample.segmentations.detections:
            tlx, tly, w, h = det.bounding_box
            bbox = [int(tlx*width), int(tly*height), int(w*width), int(h*height)]
            fo_poly = det.to_polyline()
            poly = [(x*width, y*height) for x, y in fo_poly.points[0]]
            poly = [p for x in poly for p in x]
            obj = {
                "bbox": bbox,
                "bbox_mode": BoxMode.XYWH_ABS,
                "segmentation": [poly],
                "category_id": 0,
            }
            objs.append(obj)

        record["annotations"] = objs
        dataset_dicts.append(record)

    return dataset_dicts

for d in ["train", "val"]:
    view = dataset.match_tags(d)
    DatasetCatalog.register("fiftyone_" + d, lambda view=view: get_fiftyone_dicts(view))
    MetadataCatalog.get("fiftyone_" + d).set(thing_classes=["vehicle_registration_plate"])

metadata = MetadataCatalog.get("fiftyone_train")
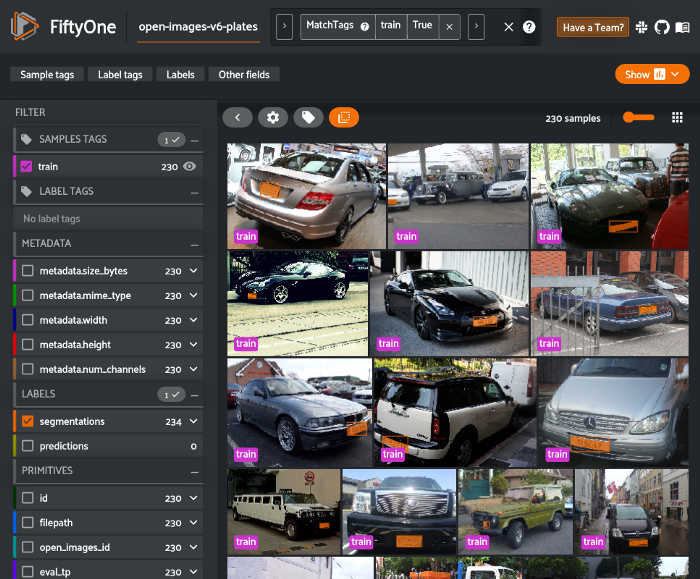
让我们可视化一些示例,以确保正确加载所有内容:
dataset_dicts = get_fiftyone_dicts(dataset.match_tags("train"))
ids = [dd["image_id"] for dd in dataset_dicts]

view = dataset.select(ids)
session = fo.launch_app(view)
加载模型并训练!
根据官方的Detector2教程,我们现在在FiftyOne数据集上微调COCO预训练的R50-FPN Mask R-CNN模型。
如果使用链接的Colab笔记本,这将需要几分钟的时间来运行。
from detectron2.engine import DefaultTrainer

cfg = get_cfg()
cfg.merge_from_file(model_zoo.get_config_file("COCO-InstanceSegmentation/mask_rcnn_R_50_FPN_3x.yaml"))
cfg.DATASETS.TRAIN = ("fiftyone_train",)
cfg.DATASETS.TEST = ()
cfg.DATALOADER.NUM_WORKERS = 2
cfg.MODEL.WEIGHTS = model_zoo.get_checkpoint_url("COCO-InstanceSegmentation/mask_rcnn_R_50_FPN_3x.yaml")  # Let training initialize from model zoo
cfg.SOLVER.IMS_PER_BATCH = 2  # This is the real "batch size" commonly known to deep learning people
cfg.SOLVER.BASE_LR = 0.00025  # pick a good LR
cfg.SOLVER.MAX_ITER = 300    # 300 iterations seems good enough for this toy dataset; you will need to train longer for a practical dataset
cfg.SOLVER.STEPS = []        # do not decay learning rate
cfg.MODEL.ROI_HEADS.BATCH_SIZE_PER_IMAGE = 128   # The "RoIHead batch size". 128 is faster, and good enough for this toy dataset (default: 512)
cfg.MODEL.ROI_HEADS.NUM_CLASSES = 1  # only has one class (Vehicle registration plate). (see https://detectron2.readthedocs.io/tutorials/datasets.html#update-the-config-for-new-datasets)
# NOTE: this config means the number of classes, but a few popular unofficial tutorials incorrect uses num_classes+1 here.

os.makedirs(cfg.OUTPUT_DIR, exist_ok=True)
trainer = DefaultTrainer(cfg)
trainer.resume_or_load(resume=False)
trainer.train()
# Look at training curves in tensorboard:
tensorboard --logdir output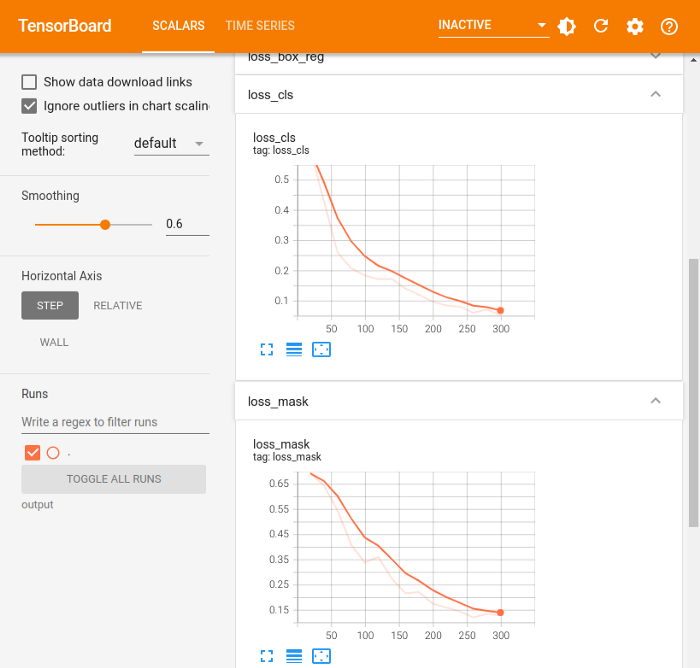
使用训练模型进行推断和评估
现在模型已经训练好了,我们可以在数据集的验证分割上运行它,看看它是如何执行的!
首先,我们需要将训练后的模型权重加载到Detectron2预测器中。
# Inference should use the config with parameters that are used in training
# cfg now already contains everything we've set previously. We changed it a little bit for inference:
cfg.MODEL.WEIGHTS = os.path.join(cfg.OUTPUT_DIR, "model_final.pth")  # path to the model we just trained

cfg.MODEL.ROI_HEADS.SCORE_THRESH_TEST = 0.7   # set a custom testing threshold
predictor = DefaultPredictor(cfg)
然后,我们对验证集中的每个样本生成预测,并将Detectron2的输出转换为FiftyOne格式,然后将其添加到FiftyOne数据集。
def detectron_to_fo(outputs, img_w, img_h):
    # format is documented at https://detectron2.readthedocs.io/tutorials/models.html#model-output-format
    detections = []
    instances = outputs["instances"].to("cpu")

    for pred_box, score, c, mask in zip(
        instances.pred_boxes, instances.scores, instances.pred_classes, instances.pred_masks,
    ):
        x1, y1, x2, y2 = pred_box
        fo_mask = mask.numpy()[int(y1):int(y2), int(x1):int(x2)]
        bbox = [float(x1)/img_w, float(y1)/img_h, float(x2-x1)/img_w, float(y2-y1)/img_h]
        detection = fo.Detection(label="Vehicle registration plate", confidence=float(score), bounding_box=bbox, mask=fo_mask)
        detections.append(detection)

    return fo.Detections(detections=detections)

val_view = dataset.match_tags("val")
dataset_dicts = get_fiftyone_dicts(val_view)
predictions = {}

for d in dataset_dicts:
    img_w = d["width"]
    img_h = d["height"]
    img = cv2.imread(d["file_name"])
    outputs = predictor(img)
    detections = detectron_to_fo(outputs, img_w, img_h)
    predictions[d["image_id"]] = detections

dataset.set_values("predictions", predictions, key_field="id")
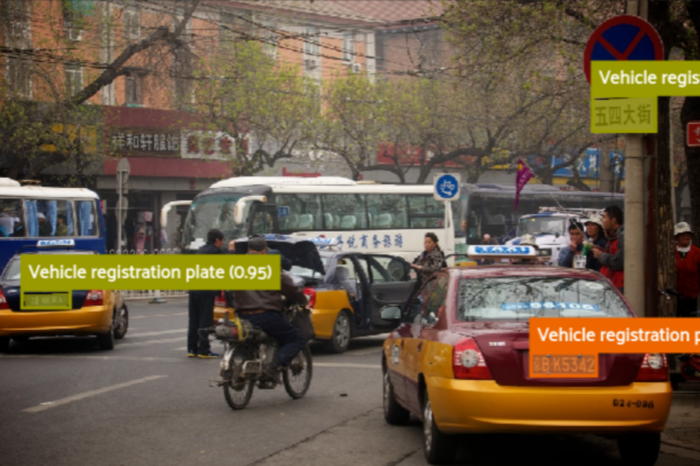
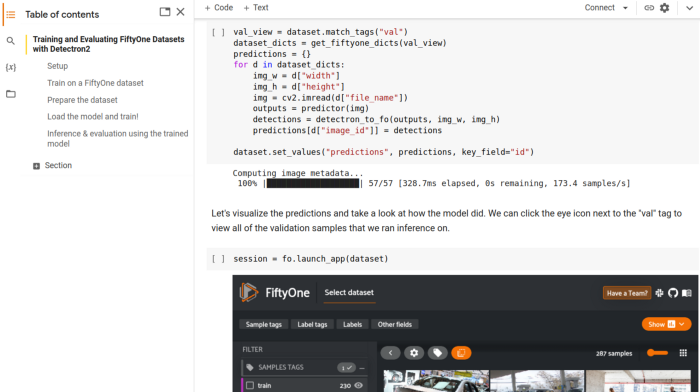
让我们可视化这些预测,看看模型是如何实现的。
我们可以单击“val”标记旁边的眼睛图标,查看我们运行推断的所有验证样本。
session = fo.launch_app(dataset)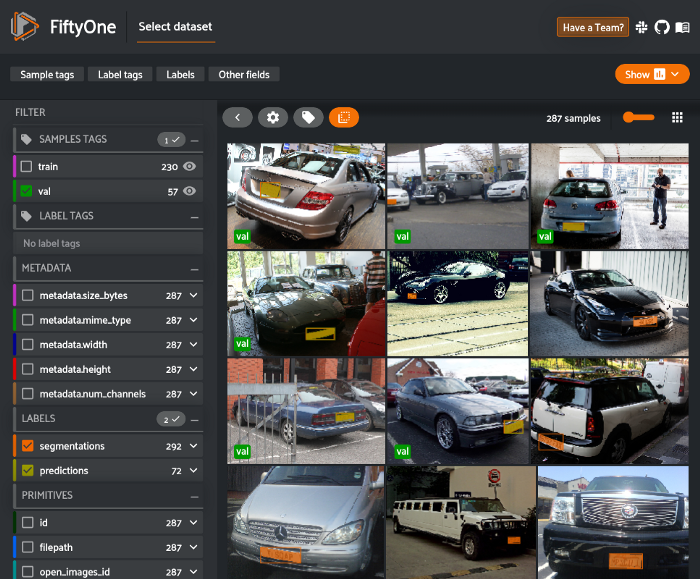
从这里,我们可以使用FiftyOne提供的内置评估方法。evaluate_detection方法可用于使用use_masks=True参数评估实例分段。
我们还可以使用COCO样式(默认)或Open Images样式的mAP协议来计算mAP。
results = dataset.evaluate_detections(
    "predictions",
    gt_field="segmentations",
    eval_key="eval",
    use_masks=True,
    compute_mAP=True,
)
我们可以使用此结果对象查看mAP、打印评估报告、绘制PR曲线、绘制混淆矩阵等。
results.mAP() # 0.12387340239495186

results.print_report()
precision recall f1-score support
Vehicle registration plate 0.72 0.18 0.29 292
micro avg 0.72 0.18 0.29 292
macro avg 0.72 0.18 0.29 292
weighted avg 0.72 0.18 0.29 292results.plot_pr_curves()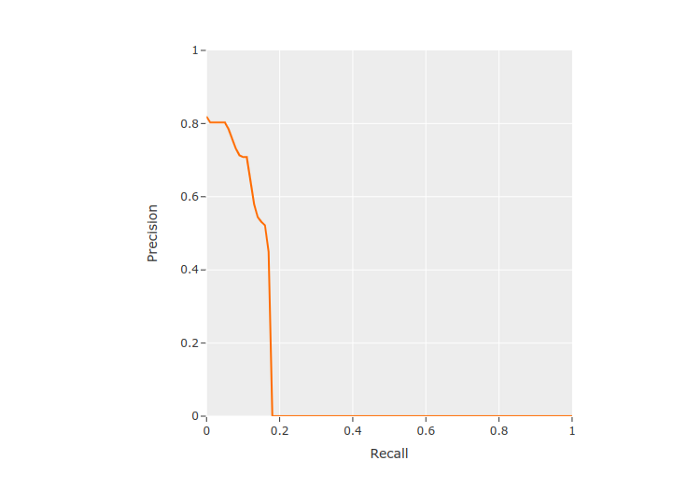
从PR曲线中,我们可以看到,该模型没有生成许多预测结果,导致了许多错误的否定结果,但生成的预测结果通常相当准确。
我们还可以在数据集中创建一个视图,以查看高置信度假阳性预测,以了解模型哪里出了问题,以及未来如何改进它。
from fiftyone import ViewField as F

session.view = dataset.filter_labels("predictions", (F("eval") == "fp") & (F("confidence") > 0.8))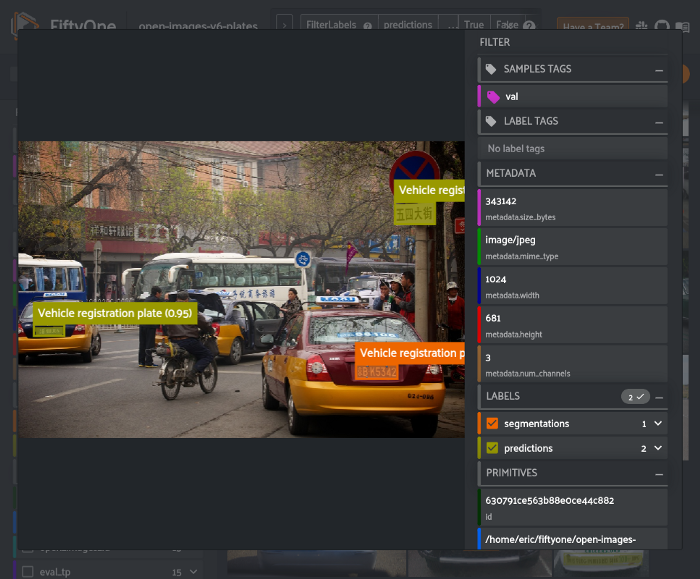
有几个像这样的假阳性样本,其中含有非拉丁字母的字符。这表明我们可能希望将来自更广泛国家的图像引入训练集。
从这里开始,我们可以利用这些发现对数据集进行迭代,改进样本和注释,然后重新训练模型。这个策划、训练和评估的循环需要反复进行,直到模型对你的任务具有足够的质量。
总结
Detectron2和FiftyOne是两个流行的开源工具,分别用于帮助ML模型开发的模型和数据集方面。
只需几个自定义Python函数,你就可以使用FiftyOne精心设计的数据集来训练Detectron2模型,并在FiftyOne中评估结果,从而比以往任何时候都更轻松地开发计算机视觉任务的模型!
☆ END ☆
如果看到这里,说明你喜欢这篇文章,请转发、点赞。微信搜索「uncle_pn」,欢迎添加小编微信「 woshicver」,每日朋友圈更新一篇高质量博文。
↓扫描二维码添加小编↓
