0 前言
使用数据集:某外卖数据集,共有11987条数据,标签数为2。
配置环境:Rtx3060 Laptop
1 数据准备
1.1 常量
包括batch_size、epochs、textcnn的滑动窗口大小、隐藏层、特征的大小、标签类别数等。
# 超参数
BATCH_SIZE = 64  # 批次大小
EPOCHS = 50  # 迭代轮数
WINDOWS_SIZE = [2, 4, 3]  # 滑动窗口大小
MAX_LEN = 200  # 最大长度
EMBEDDING_DIM = 600  # 隐藏层维度
FEATURE_SIZE = 200  # 特征大小
N_CLASS = 2  # 标签类数
# 设备
DEVICE = 'cuda' if torch.cuda.is_available() else 'cpu'
loss_func = nn.CrossEntropyLoss()  # 交叉熵损失函数
# 记录损失值、准确率
loss_list, accuracy_list = [], []
1.2 加载数据集
使用pandas读取数据,使用LabelEncoder映射label
# 数据准备
def data_prepare():
    # 加载数据集
    dataset = pd.read_csv('../data/waimai10k.txt', delimiter=',')
    labels = np.array(dataset['label'])
    labels = LabelEncoder().fit_transform(labels)
    return dataset, labels
2 数据预处理
步骤:
- 去除无用字符
- jieba分词
- 去低频词
- 序列化列表
注意这里没有去停用词
# 去除无用的字符
def clear_character(sentence):
    pattern1 = re.compile('[a-zA-Z0-9]')  # 英文字符和数字
    pattern2 = re.compile(u'[^\s1234567890::' + '\u4e00-\u9fa5]+')  # 表情和其他字符
    pattern3 = re.compile('[%s]+' % re.escape(punctuation + string.punctuation))  # 标点符号
    line1 = re.sub(pattern1, '', sentence)
    line2 = re.sub(pattern2, '', line1)
    line3 = re.sub(pattern3, '', line2)
    new_sentence = ''.join(line3.split())  # 去除空白
    return new_sentence


# 预处理
def preprocessing(df, col_name):
    t1 = time.time()
    print('去除无用字符')
    df[col_name + '_processed'] = df[col_name].apply(clear_character)

    print('中文分词')
    cut_words = []
    for content in df[col_name + '_processed'].values:
        seg_list = jieba.lcut(content)
        cut_words.append(seg_list)

    print('去低频词')
    min_threshold = 20
    word_list = []
    for seg_list in cut_words:
        word_list.extend(seg_list)
    counter = Counter(word_list)
    delete_list = []  # 要去除的停用词
    for k, v in counter.items():
        if v < min_threshold:
            delete_list.append(k)
    print(f'要去除掉低频词数量:{

      len(delete_list)}')
    for seg_list in tqdm(cut_words):
        for seg in seg_list:
            if seg in delete_list:
                seg_list.remove(seg)

    print('序列化列表')
    with open('../data/cut_words_waimai.pkl', 'wb') as f:
        pickle.dump(cut_words, f)

    t2 = time.time()
    print(f'共耗时{

      t2 - t1}秒')
3 文本表示
包括3个步骤:生成word2index、sent2index和sent2indexs,均是直接用索引表示
# 生成word2index
def compute_word2index(sentences, word2index):
    for sentences in sentences:
        for word in sentences:
            if word not in word2index:
                word2index[word] = len(word2index)  # word2index存储的是索引
    return word2index


# 生成sent2index
def compute_sent2index(sentence, max_len, word2index):
    sent2index = [word2index.get(word, 0) for word in sentence]
    if len(sentence) < max_len:
        sent2index += (max_len - len(sentence)) * [0]
    else:
        sent2index = sentence[:max_len]
    return sent2index


# 文本表示
def text_embedding():
    # 读取序列化的文件
    with open('../data/cut_words_waimai.pkl', 'rb') as f:
        sentences = pickle.load(f)

    # 生成词向量与句向量
    word2index = {

    "PAD": 0}
    word2index = compute_word2index(sentences, word2index)
    sent2indexs = []
    for sent in sentences:
        sentence = compute_sent2index(sent, MAX_LEN, word2index)
        sent2indexs.append(sentence)
    return word2index, sent2indexs
4 TextCNN模型
模型图(摘自论文):

模型共4大层:
第一层:词嵌入层
输入维度: l e n ( w o r d 2 i n d e x ) 输出维度: e m b e d d i n g d i m 输入维度:len(word2index) \quad 输出维度: embeddingdim 输入维度:len(word2index)输出维度:embeddingdim
第二层:一维卷积层+带泄露的Relu+一维最大池化层
卷积层:
输入维度: e m b e d d i n g d i m 输出维度: f e a t u r e s i z e 卷积核: h 输入维度:embedding_dim \quad 输出维度: featuresize 卷积核:h 输入维度:embeddingdim输出维度:featuresize卷积核:h
激活层:
LeakyReLU()
池化层:
池化核: m a x l e n − h + 1 池化核:maxlen-h+1 池化核:maxlen−h+1
第三层:Dropout层
第四层:全连接层
输入维度: f e a t u r e ∗ l e n ( w i n d o w s s i z e ) 输出维度: n c l a s s 输入维度:feature * len(windowssize) \quad 输出维度:nclass 输入维度:feature∗len(windowssize)输出维度:nclass
其中, h ∈ w i n d o w s s i z e = ( 2 , 4 , 3 ) h \in windowssize=(2,4,3) h∈windowssize=(2,4,3)
import numpy as np
import torch
from torch import nn
from torch.utils.data import Dataset


class TextCNN(nn.Module):
    def __init__(self, vocab_size, embedding_dim, feature_size, windows_size, max_len, n_class):
        super(TextCNN, self).__init__()
        # embedding层
        self.embed = nn.Embedding(num_embeddings=vocab_size, embedding_dim=embedding_dim)
        # 卷积层
        self.conv1 = nn.ModuleList([
            nn.Sequential(nn.Conv1d(in_channels=embedding_dim, out_channels=feature_size, kernel_size=h),
                          nn.LeakyReLU(),
                          nn.MaxPool1d(kernel_size=max_len - h + 1),
                          )
            for h in windows_size]
        )
        # dropout层
        self.dropout = nn.Dropout(p=0.25)
        # 全连接层
        self.fc1 = nn.Linear(in_features=feature_size * len(windows_size), out_features=n_class)

    def forward(self, x):
        x = self.embed(x)  # [batch_size, seq_len, embed_dim]
        x = x.permute(0, 2, 1)
        x = [conv(x) for conv in self.conv1]
        x = torch.cat(x, 1)
        x = x.view(-1, x.size(1))  # [batch_size, feature_size * len(windows_size)]
        x = self.dropout(x)
        x = self.fc1(x)
        return x


class MyDataSet(Dataset):
    def __init__(self, vectors, labels):
        self.vectors = torch.LongTensor(np.array(vectors))
        self.labels = torch.LongTensor(np.array(labels))

    def __getitem__(self, index):
        vector, label = self.vectors[index], self.labels[index]
        return vector, label

    def __len__(self):
        return len(self.vectors)
打印下来:
TextCNN(
  (embed): Embedding(4074, 600)
  (conv1): ModuleList(
    (0): Sequential(
      (0): Conv1d(600, 200, kernel_size=(2,), stride=(1,))
      (1): LeakyReLU(negative_slope=0.01)
      (2): MaxPool1d(kernel_size=199, stride=199, padding=0, dilation=1, ceil_mode=False)
    )
    (1): Sequential(
      (0): Conv1d(600, 200, kernel_size=(4,), stride=(1,))
      (1): LeakyReLU(negative_slope=0.01)
      (2): MaxPool1d(kernel_size=197, stride=197, padding=0, dilation=1, ceil_mode=False)
    )
    (2): Sequential(
      (0): Conv1d(600, 200, kernel_size=(3,), stride=(1,))
      (1): LeakyReLU(negative_slope=0.01)
      (2): MaxPool1d(kernel_size=198, stride=198, padding=0, dilation=1, ceil_mode=False)
    )
  )
  (dropout): Dropout(p=0.25, inplace=False)
  (fc1): Linear(in_features=600, out_features=2, bias=True)
5 模型训练
封装了2个函数
# 计算准确率
def get_accuracy(model, datas, labels):
    out = torch.softmax(model(datas), dim=1, dtype=torch.float32)
    predictions = torch.max(input=out, dim=1)[1]  # 最大值的索引
    y_predict = predictions.to('cpu').data.numpy()
    y_true = labels.to('cpu').data.numpy()
    accuracy = accuracy_score(y_true, y_predict)  # 准确率
    return accuracy


# 训练
def train(model, dataloaer, optimizer, epoch):
    model.train()  # 模型训练
    for i, (datas, labels) in enumerate(dataloaer):
        # 设备转换
        datas = datas.to(DEVICE)
        labels = labels.to(DEVICE)
        # 计算结果
        out = model(datas)
        # 计算损失值
        loss = loss_func(out, labels)
        # 梯度清零
        optimizer.zero_grad()
        # 反向传播
        loss.backward()
        # 梯度更新
        optimizer.step()
        # 打印损失值
        if i % 30 == 0:
            loss_list.append(loss.item())
            accuracy = get_accuracy(model, datas, labels)
            accuracy_list.append(accuracy)
            print('Train Epoch:%d Loss:%0.6f Accuracy:%0.6f' % (epoch, loss.item(), accuracy))
6 模型评估
# 绘制曲线
def plot_curve(accuracy_list, loss_list, model_name):
    # 计算平均值
    accuracy_array = np.array(accuracy_list).reshape(EPOCHS, -1)
    accuracy_array = np.mean(accuracy_array, axis=1)
    loss_array = np.array(loss_list).reshape(EPOCHS, -1)
    loss_array = np.mean(loss_array, axis=1)

    # 绘制Loss曲线
    plt.rcParams['figure.figsize'] = (16, 8)
    plt.subplots(1, 2)
    plt.subplot(1, 2, 1)
    plt.plot(range(EPOCHS), loss_array)
    plt.xlabel('epoch')
    plt.ylabel('loss')
    plt.title('Loss Curve')
    plt.subplot(1, 2, 2)
    plt.plot(range(EPOCHS), accuracy_array)
    plt.xlabel('epoch')
    plt.ylabel('accuracy')
    plt.title('Accuracy Cure')
    plt.savefig(f'../figure/waimai10k_{

      model_name}.png')
最终的评估曲线:
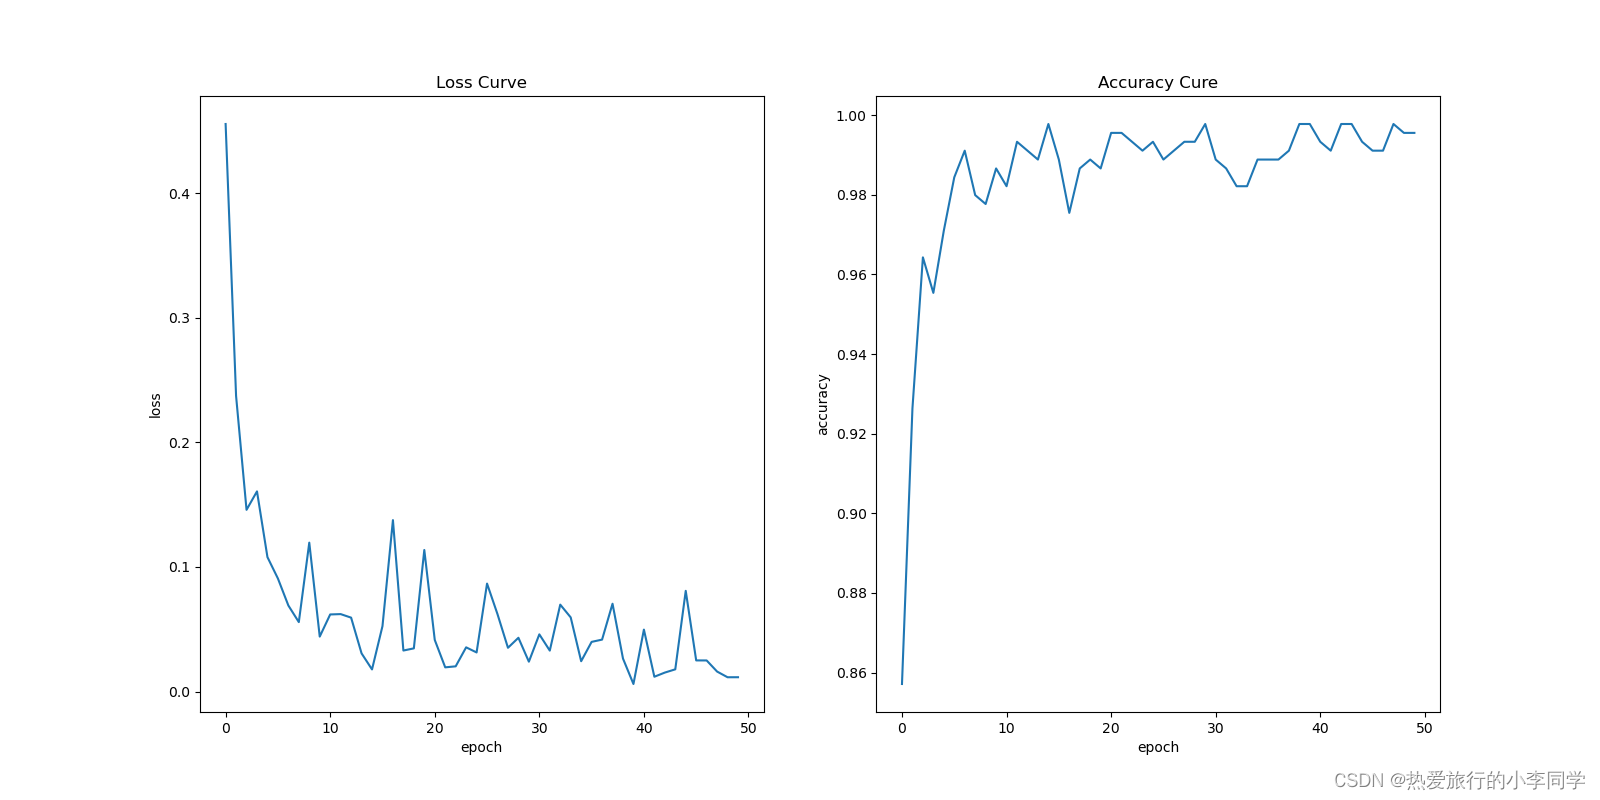
经过了50个epoch的训练,在训练集上的准确率有98%
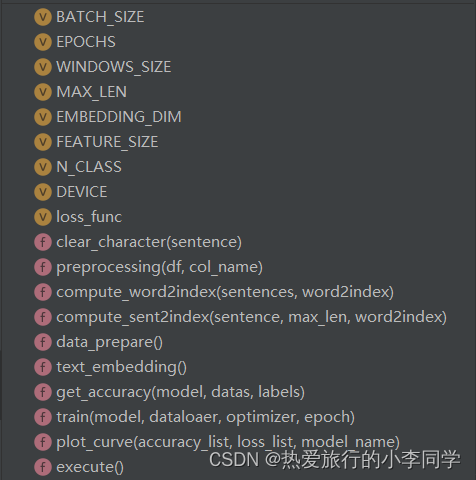
7 总览
pycharm的结构图
代码:
# 执行流程
def execute():
    # 数据准备
    dataset, labels = data_prepare()
    # 数据预处理
    preprocessing(dataset, 'review')
    # 文本表示
    word2index, sent2indexs = text_embedding()
    # 装载数据集
    train_dataset = MyDataSet(sent2indexs, labels)
    dataloader_train = DataLoader(dataset=train_dataset, batch_size=BATCH_SIZE, shuffle=True)
    # 构建模型
    vocab_size = len(word2index)
    model = TextCNN(vocab_size=vocab_size, embedding_dim=EMBEDDING_DIM, windows_size=WINDOWS_SIZE,
                    max_len=MAX_LEN, feature_size=FEATURE_SIZE, n_class=N_CLASS).to(DEVICE)
    optimizer = optim.Adam(model.parameters(), lr=0.001)
    # 模型训练
    for i in range(EPOCHS):
        print(f'{

      i+1}/{

      EPOCHS}')
        train(model, dataloader_train, optimizer, i+1)
    # 模型保存
    torch.save(model.state_dict(), '../model/textcnn_waimai.pkl')
    # 绘制曲线
    plot_curve(accuracy_list, loss_list, 'TextCNN')


if __name__ == '__main__':
    execute()
8 完整代码
import pickle
import numpy as np
import matplotlib.pyplot as plt
import pandas as pd
import time
import jieba
import re
import torch
import string
from zhon.hanzi import punctuation
from tqdm import tqdm
from torch import nn, optim
from torch.utils.data import DataLoader
from collections import Counter
from sklearn.preprocessing import LabelEncoder
from sklearn.metrics import accuracy_score
from textcnn import TextCNN, MyDataSet

# 超参数
BATCH_SIZE = 64  # 批次大小
EPOCHS = 50  # 迭代轮数
WINDOWS_SIZE = [2, 4, 3]  # 滑动窗口大小
MAX_LEN = 200  # 最大长度
EMBEDDING_DIM = 600  # 隐藏层维度
FEATURE_SIZE = 200  # 特征大小
N_CLASS = 2  # 标签类数
# 设备
DEVICE = 'cuda' if torch.cuda.is_available() else 'cpu'
loss_func = nn.CrossEntropyLoss()  # 交叉熵损失函数
# 记录损失值、准确率
loss_list, accuracy_list = [], []


# 去除无用的字符
def clear_character(sentence):
    pattern1 = re.compile('[a-zA-Z0-9]')  # 英文字符和数字
    pattern2 = re.compile(u'[^\s1234567890::' + '\u4e00-\u9fa5]+')  # 表情和其他字符
    pattern3 = re.compile('[%s]+' % re.escape(punctuation + string.punctuation))  # 标点符号
    line1 = re.sub(pattern1, '', sentence)
    line2 = re.sub(pattern2, '', line1)
    line3 = re.sub(pattern3, '', line2)
    new_sentence = ''.join(line3.split())  # 去除空白
    return new_sentence


# 预处理
def preprocessing(df, col_name):
    t1 = time.time()
    print('去除无用字符')
    df[col_name + '_processed'] = df[col_name].apply(clear_character)

    print('中文分词')
    cut_words = []
    for content in df[col_name + '_processed'].values:
        seg_list = jieba.lcut(content)
        cut_words.append(seg_list)

    print('去低频词')
    min_threshold = 20
    word_list = []
    for seg_list in cut_words:
        word_list.extend(seg_list)
    counter = Counter(word_list)
    delete_list = []  # 要去除的停用词
    for k, v in counter.items():
        if v < min_threshold:
            delete_list.append(k)
    print(f'要去除掉低频词数量:{

      len(delete_list)}')
    for seg_list in tqdm(cut_words):
        for seg in seg_list:
            if seg in delete_list:
                seg_list.remove(seg)

    print('序列化列表')
    with open('../data/cut_words_waimai.pkl', 'wb') as f:
        pickle.dump(cut_words, f)

    t2 = time.time()
    print(f'共耗时{

      t2 - t1}秒')


# 生成word2index
def compute_word2index(sentences, word2index):
    for sentences in sentences:
        for word in sentences:
            if word not in word2index:
                word2index[word] = len(word2index)  # word2index存储的是索引
    return word2index


# 生成sent2index
def compute_sent2index(sentence, max_len, word2index):
    sent2index = [word2index.get(word, 0) for word in sentence]
    if len(sentence) < max_len:
        sent2index += (max_len - len(sentence)) * [0]
    else:
        sent2index = sentence[:max_len]
    return sent2index


# 数据准备
def data_prepare():
    # 加载数据集
    dataset = pd.read_csv('../data/waimai10k.txt', delimiter=',')
    labels = np.array(dataset['label'])
    labels = LabelEncoder().fit_transform(labels)
    return dataset, labels


# 文本表示
def text_embedding():
    # 读取序列化的文件
    with open('../data/cut_words_waimai.pkl', 'rb') as f:
        sentences = pickle.load(f)

    # 生成词向量与句向量
    word2index = {

    "PAD": 0}
    word2index = compute_word2index(sentences, word2index)
    sent2indexs = []
    for sent in sentences:
        sentence = compute_sent2index(sent, MAX_LEN, word2index)
        sent2indexs.append(sentence)
    return word2index, sent2indexs


# 计算准确率
def get_accuracy(model, datas, labels):
    out = torch.softmax(model(datas), dim=1, dtype=torch.float32)
    predictions = torch.max(input=out, dim=1)[1]  # 最大值的索引
    y_predict = predictions.to('cpu').data.numpy()
    y_true = labels.to('cpu').data.numpy()
    accuracy = accuracy_score(y_true, y_predict)  # 准确率
    return accuracy


# 训练
def train(model, dataloaer, optimizer, epoch):
    model.train()  # 模型训练
    for i, (datas, labels) in enumerate(dataloaer):
        # 设备转换
        datas = datas.to(DEVICE)
        labels = labels.to(DEVICE)
        # 计算结果
        out = model(datas)
        # 计算损失值
        loss = loss_func(out, labels)
        # 梯度清零
        optimizer.zero_grad()
        # 反向传播
        loss.backward()
        # 梯度更新
        optimizer.step()
        # 打印损失值
        if i % 30 == 0:
            loss_list.append(loss.item())
            accuracy = get_accuracy(model, datas, labels)
            accuracy_list.append(accuracy)
            print('Train Epoch:%d Loss:%0.6f Accuracy:%0.6f' % (epoch, loss.item(), accuracy))


# 绘制曲线
def plot_curve(accuracy_list, loss_list, model_name):
    # 计算平均值
    accuracy_array = np.array(accuracy_list).reshape(EPOCHS, -1)
    accuracy_array = np.mean(accuracy_array, axis=1)
    loss_array = np.array(loss_list).reshape(EPOCHS, -1)
    loss_array = np.mean(loss_array, axis=1)

    # 绘制Loss曲线
    plt.rcParams['figure.figsize'] = (16, 8)
    plt.subplots(1, 2)
    plt.subplot(1, 2, 1)
    plt.plot(range(EPOCHS), loss_array)
    plt.xlabel('epoch')
    plt.ylabel('loss')
    plt.title('Loss Curve')
    plt.subplot(1, 2, 2)
    plt.plot(range(EPOCHS), accuracy_array)
    plt.xlabel('epoch')
    plt.ylabel('accuracy')
    plt.title('Accuracy Cure')
    plt.savefig(f'../figure/waimai10k_{

      model_name}.png')


# 执行流程
def execute():
    # 数据准备
    dataset, labels = data_prepare()
    # 数据预处理
    preprocessing(dataset, 'review')
    # 文本表示
    word2index, sent2indexs = text_embedding()
    # 装载数据集
    train_dataset = MyDataSet(sent2indexs, labels)
    dataloader_train = DataLoader(dataset=train_dataset, batch_size=BATCH_SIZE, shuffle=True)
    # 构建模型
    vocab_size = len(word2index)
    model = TextCNN(vocab_size=vocab_size, embedding_dim=EMBEDDING_DIM, windows_size=WINDOWS_SIZE,
                    max_len=MAX_LEN, feature_size=FEATURE_SIZE, n_class=N_CLASS).to(DEVICE)
    optimizer = optim.Adam(model.parameters(), lr=0.001)
    # 模型训练
    for i in range(EPOCHS):
        print(f'{

      i+1}/{

      EPOCHS}')
        train(model, dataloader_train, optimizer, i+1)
    # 模型保存
    torch.save(model.state_dict(), '../model/textcnn_waimai.pkl')
    # 绘制曲线
    plot_curve(accuracy_list, loss_list, 'TextCNN')


if __name__ == '__main__':
    execute()