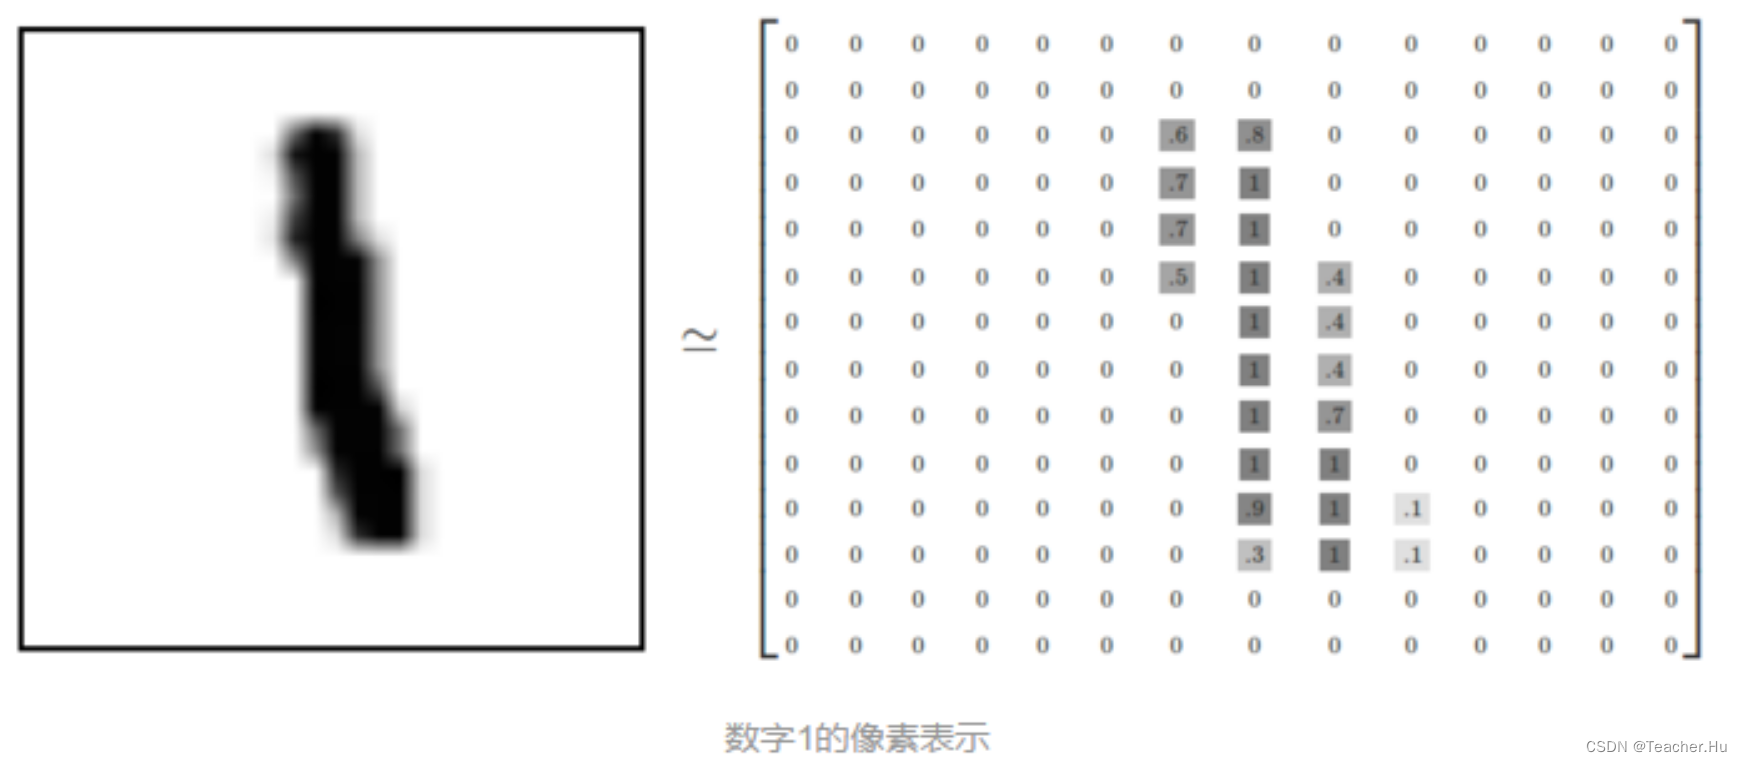
Mnist数据集介绍
该数据集由50000张训练图片和10000张测试图片组成,每张均为28*28像素的黑白图片。
一 、下载数据集
from pathlib import Path
import requests

DATA_PATH = Path("data")
PATH = DATA_PATH / "mnist"

PATH.mkdir(parents=True, exist_ok=True)

URL = "http://deeplearning.net/data/mnist/"
FILENAME = "mnist.pkl.gz"

if not (PATH / FILENAME).exists():
        content = requests.get(URL + FILENAME).content
        (PATH / FILENAME).open("wb").write(content)
解压和加载数据集
import pickle
import gzip
import numpy as np

with gzip.open((PATH / FILENAME).as_posix(), "rb") as f:
        ((x_train, y_train), (x_valid, y_valid), _) = pickle.load(f, encoding="latin-1")

print(x_valid.shape)
输出
(10000, 784)
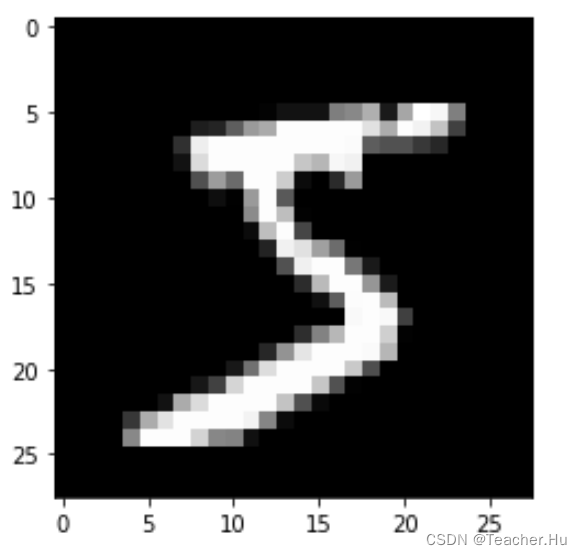
测试显示显示一张图片
from matplotlib import pyplot
pyplot.imshow(x_train[0].reshape((28, 28)), cmap="gray")
二、数据集预处理
import torch
import torch.nn.functional as F

x_train, y_train, x_valid, y_valid = map(
    torch.tensor, (x_train, y_train, x_valid, y_valid)
)
print(x_train)
print(x_train.shape)
print(y_train)
print(y_train.min(), y_train.max())
输出
tensor([[0., 0., 0.,  ..., 0., 0., 0.],
        [0., 0., 0.,  ..., 0., 0., 0.],
        [0., 0., 0.,  ..., 0., 0., 0.],
        ...,
        [0., 0., 0.,  ..., 0., 0., 0.],
        [0., 0., 0.,  ..., 0., 0., 0.],
        [0., 0., 0.,  ..., 0., 0., 0.]])
torch.Size([50000, 784])
tensor([5, 0, 4,  ..., 8, 4, 8])
tensor(0) tensor(9)
三、创建模型
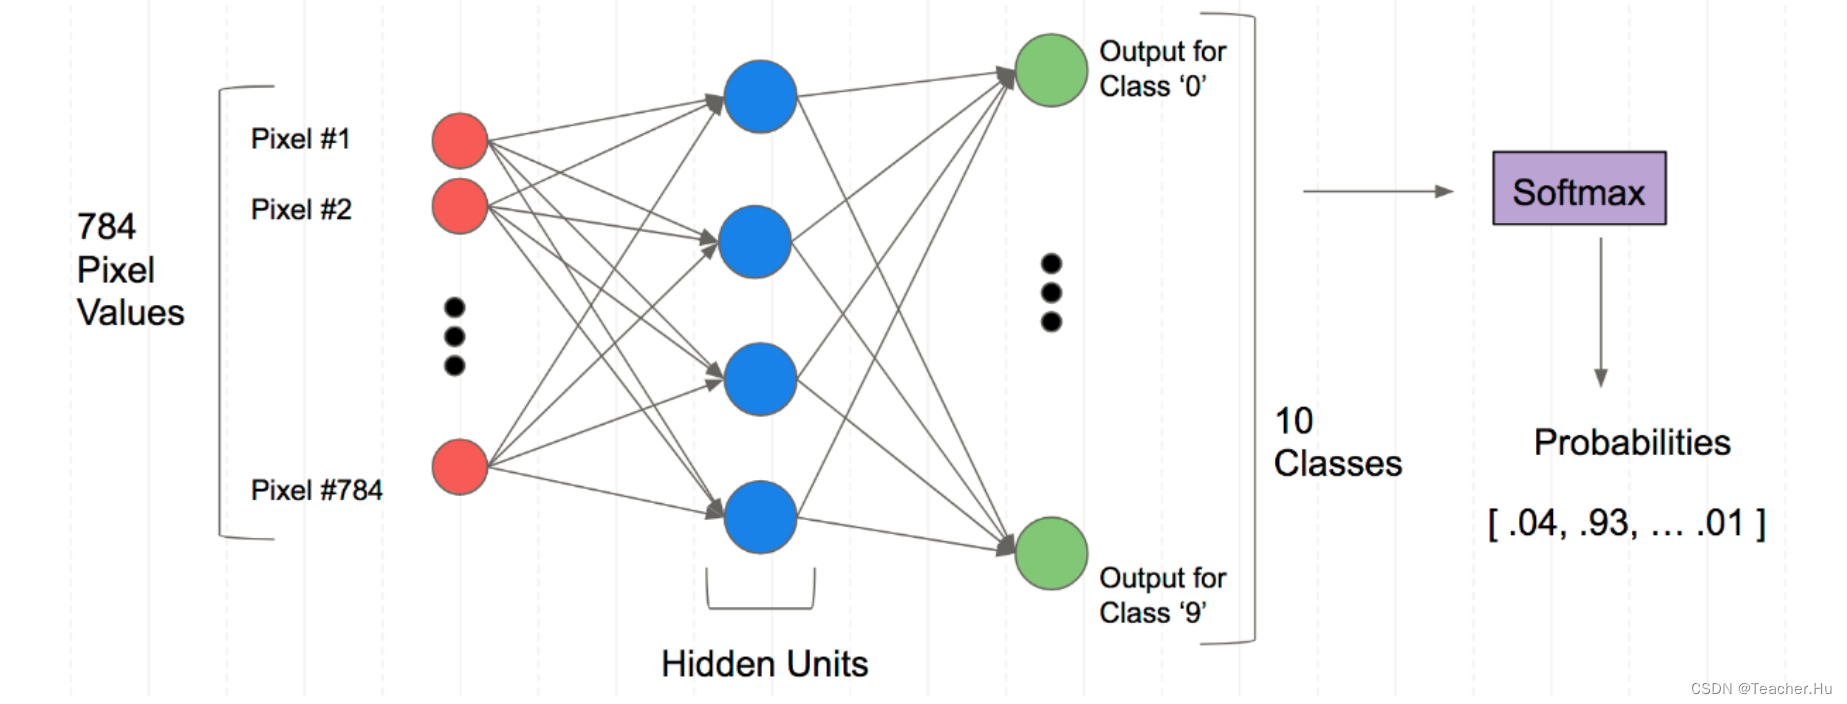
创建全连接神经网络
from torch import nn

class Mnist_NN(nn.Module):
    def __init__(self):
        super(Mnist_NN, self).__init__()
        self.hidden1 = nn.Linear(784, 512)
        self.hidden2 = nn.Linear(512, 256)
        self.hidden3 = nn.Linear(256, 128)
        self.out  = nn.Linear(128, 10)

    def forward(self, x):

        x = F.relu(self.hidden1(x))
        x = F.relu(self.hidden2(x))
        x = F.relu(self.hidden3(x))
        x = self.out(x)
        return x
打印模型信息
net = Mnist_NN()
print(net)
四、模型训练
设置模型相关的参数
from torch import optim
model = Mnist_NN()
loss_func = nn.CrossEntropyLoss()
optimizer =  optim.SGD(model.parameters(), lr=0.001)
steps = 25
加载训练数据
from torch.utils.data import TensorDataset
from torch.utils.data import DataLoader


bs = 64
train_ds = TensorDataset(x_train, y_train)
train_dl = DataLoader(train_ds, batch_size=bs, shuffle=True)

valid_ds = TensorDataset(x_valid, y_valid)
valid_dl = DataLoader(valid_ds, batch_size=bs * 2)
定义损失函数
def loss_batch(model, loss_func, xb, yb, opt=None):
    loss = loss_func(model(xb), yb)

    if opt is not None:
        loss.backward()
        opt.step()
        opt.zero_grad()

    return loss.item(), len(xb)
开始训练
import numpy as np

for step in range(steps):
    model.train()
    for xb, yb in train_dl:
        out = model(xb)
        loss = loss_func(out, yb)
        optimizer.zero_grad()
        loss.backward()
        optimizer.step()


    model.eval()  # 训练时让某些层起不起作用(比如:Dropout层)
    with torch.no_grad():
        losses, nums = zip(
            *[loss_batch(model, loss_func, xb, yb) for xb, yb in valid_dl]
        )
    val_loss = np.sum(np.multiply(losses, nums)) / np.sum(nums)
    print('当前step:'+str(step), '验证集损失:'+str(val_loss))
输出
当前step:0 验证集损失:2.2963927127838133
当前step:1 验证集损失:2.2887028968811034
当前step:2 验证集损失:2.2792457954406737
当前step:3 验证集损失:2.267001689529419
当前step:4 验证集损失:2.2504166416168214
当前step:5 验证集损失:2.22711929397583
当前step:6 验证集损失:2.1929620250701904
当前step:7 验证集损失:2.140264085006714
当前step:8 验证集损失:2.05466072807312
当前step:9 验证集损失:1.9159469118118286
当前step:10 验证集损失:1.7102276357650756
当前step:11 验证集损失:1.4532565486907958
当前step:12 验证集损失:1.2071141368865967
当前step:13 验证集损失:1.0184791828155517
当前step:14 验证集损失:0.881126785850525
当前step:15 验证集损失:0.7783988164901734
当前step:16 验证集损失:0.6989400283813476
当前step:17 验证集损失:0.6373923196792602
当前step:18 验证集损失:0.5898686556339264
当前step:19 验证集损失:0.5525099565029145
当前step:20 验证集损失:0.5229596675395966
当前step:21 验证集损失:0.4984101142883301
当前step:22 验证集损失:0.47771355481147765
当前step:23 验证集损失:0.4604728350639343
当前step:24 验证集损失:0.4456908803462982
五、模型保存和加载
# 只保存模型参数
# torch.save(net.state_dict(), 'network.pkl')
# 加载
# model = Mnist_NN()
# model.load_state_dict(torch.load('\network.pkl'))


# 保存
torch.save(model, 'network.pkl')
加载模型
model = torch.load('network.pkl')
print(model)
输出
Mnist_NN(
  (hidden1): Linear(in_features=784, out_features=1024, bias=True)
  (hidden2): Linear(in_features=1024, out_features=256, bias=True)
  (hidden3): Linear(in_features=256, out_features=128, bias=True)
  (out): Linear(in_features=128, out_features=10, bias=True)
)
六、测试模型效果
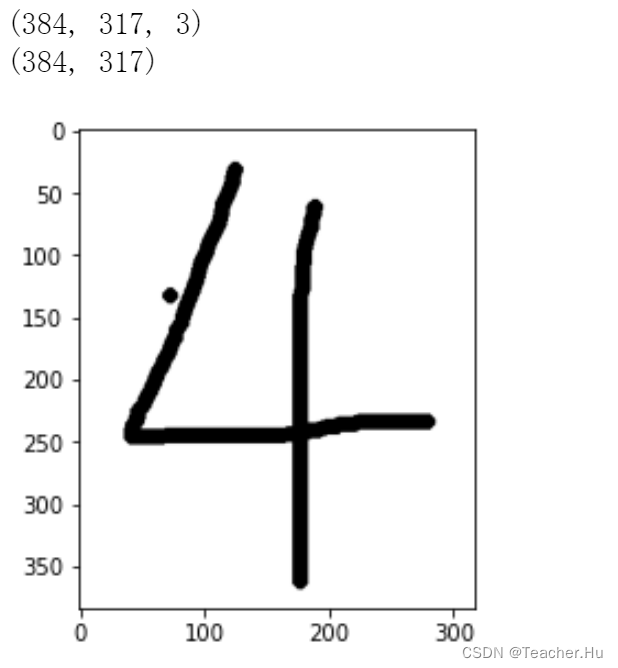
import cv2
import matplotlib.pyplot as plt

# 第一步:读取图片
img = cv2.imread('./data/test/4.png')
print(img.shape)

# 第二步:将图片转为灰度图
img = cv2.cvtColor(img, cv2.COLOR_BGR2GRAY)
print(img.shape)
plt.imshow(img,cmap='Greys')

# 第三步:将图片的底色和字的颜色取反
img = cv2.bitwise_not(img)
plt.imshow(img,cmap='Greys')

# 第四步:将底变成纯白色,将字变成纯黑色
img[img<=144]=0
img[img>140]=255  # 130

# 显示图片
plt.imshow(img,cmap='Greys')

# 第五步:将图片尺寸缩放为输入规定尺寸
img = cv2.resize(img,(28,28))

# 第六步:将数据类型转为float32
img = img.astype('float32')

# 第七步:数据正则化
img /= 255

img = img.reshape(1,784)
# 第八步:增加维度为输入的规定格式

_img = torch.from_numpy(img).float()
# _img = torch.from_numpy(img).unsqueeze(0)
预测结果
model.eval()
# 第九步:预测
outputs = model(_img)

# 第十步:输出结果
print(outputs.argmax().item())