RK3588通过IO命令操作寄存器的方法
文章目录
IO命令用法
kernel阶段使用的是IO命令来读写寄存器
io -v -1|2|4 -r|w [-l <len>] [-f <file>] <addr> [<value>]

    -v         Verbose, asks for confirmation
    -1|2|4     Sets memory access size in bytes (default byte)
    -l <len>   Length in bytes of area to access (defaults to
               one access, or whole file length)
    -r|w       Read from or Write to memory (default read)
    -f <file>  File to write on memory read, or
               to read on memory write
    <addr>     The memory address to access
    <val>      The value to write (implies -w)

Examples:
    io 0x1000                  Reads one byte from 0x1000
    io 0x1000 0x12             Writes 0x12 to location 0x1000
    io -2 -l 8 0x1000          Reads 8 words from 0x1000
    io -r -f dmp -l 100 200    Reads 100 bytes from addr 200 to file
    io -w -f img 0x10000       Writes the whole of file to memory

Note access size (-1|2|4) does not apply to file based accesses.
uboot阶段寄存器读写命令MD
功能:读写内存。
// 读操作
md - memory display
Usage: md [.b, .w, .l, .q] address [# of objects]

// 写操作
mw - memory write (fill)
Usage: mw [.b, .w, .l, .q] address value [count]
读操作。范例:显示 0x76000000 地址开始的连续 0x10 个数据。
=> md.l 0x76000000 0x10
76000000: fffffffe ffffffff ffffffff ffffffff    ................
76000010: ffffffdf ffffffff feffffff ffffffff    ................
76000020: ffffffff ffffffff ffffffff ffffffff    ................
76000030: ffffffff ffffffff ffffffff ffffffff    ................
写操作。范例:对 0x76000000 地址赋值为 0x1234;
=> mw.l 0x76000000 0xffff1234 // 高16位有mask
=> md.l 0x76000000 0x10       // 回读
76000000: ffff1234 ffffffff ffffffff ffffffff    ................
76000010: ffffffdf ffffffff feffffff ffffffff    ................
76000020: ffffffff ffffffff ffffffff ffffffff    ................
76000030: ffffffff ffffffff ffffffff ffffffff    ................
IO命令使用环境
IO命令需要依赖DEVMEM,而DEVMEM默认是关闭的,所以导致IO默认无法使用,如果调试需要使用IO命令可以按如下修改:
@ubuntu:~/rk3588_android12.0/$ vim mkcombinedroot/configs/android-11.config
如果是GO的产品则需要修改:
@ubuntu:~/rk3588_android12.0$ vim mkcombinedroot/configs/android-11-go.config
删除掉下面这行:
# CONFIG_DEVMEM is not set
如果要编译Android,则还需要修改如下代码
cd rk3588_android12.0/kernel/configs

diff --git a/android-5.10/android-base.config b/android-5.10/android-base.config
index 5de76f0..6dcdf86 100644
--- a/android-5.10/android-base.config
+++ b/android-5.10/android-base.config
@@ -2,7 +2,6 @@
 # CONFIG_ANDROID_LOW_MEMORY_KILLER is not set
 # CONFIG_ANDROID_PARANOID_NETWORK is not set
 # CONFIG_BPFILTER is not set
-# CONFIG_DEVMEM is not set
 # CONFIG_FHANDLE is not set
 # CONFIG_FW_CACHE is not set
 # CONFIG_IP6_NF_NAT is not set
diff --git a/s/android-4.19/android-base-conditional.xml b/s/android-4.19/android-base-conditional.xml
index c7de80c..fba1afa 100644
--- a/s/android-4.19/android-base-conditional.xml
+++ b/s/android-4.19/android-base-conditional.xml
@@ -17,10 +17,6 @@
 		<key>CONFIG_CPU_SW_DOMAIN_PAN</key>
 		<value type="bool">y</value>
 	</config>
-	<config>
-		<key>CONFIG_DEVKMEM</key>
-		<value type="bool">n</value>
-	</config>
 	<config>
 		<key>CONFIG_OABI_COMPAT</key>
 		<value type="bool">n</value>
@@ -77,10 +73,6 @@
 			<value type="bool">y</value>
 		</config>
 	</conditions>
-	<config>
-		<key>CONFIG_DEVKMEM</key>
-		<value type="bool">n</value>
-	</config>
 	<config>
 		<key>CONFIG_PAGE_TABLE_ISOLATION</key>
 		<value type="bool">y</value>
diff --git a/s/android-4.19/android-base.config b/s/android-4.19/android-base.config
index d2bb2ad..8f23882 100644
--- a/s/android-4.19/android-base.config
+++ b/s/android-4.19/android-base.config
@@ -2,7 +2,6 @@
 # CONFIG_ANDROID_LOW_MEMORY_KILLER is not set
 # CONFIG_ANDROID_PARANOID_NETWORK is not set
 # CONFIG_BPFILTER is not set
-# CONFIG_DEVMEM is not set
 # CONFIG_FHANDLE is not set
 # CONFIG_FW_CACHE is not set
 # CONFIG_IP6_NF_NAT is not set
diff --git a/s/android-5.10/android-base-conditional.xml b/s/android-5.10/android-base-conditional.xml
index aae1847..2dc3e25 100644
--- a/s/android-5.10/android-base-conditional.xml
+++ b/s/android-5.10/android-base-conditional.xml
@@ -17,10 +17,6 @@
 		<key>CONFIG_CPU_SW_DOMAIN_PAN</key>
 		<value type="bool">y</value>
 	</config>
-	<config>
-		<key>CONFIG_DEVKMEM</key>
-		<value type="bool">n</value>
-	</config>
 	<config>
 		<key>CONFIG_OABI_COMPAT</key>
 		<value type="bool">n</value>
@@ -101,10 +97,6 @@
 			<value type="bool">y</value>
 		</config>
 	</conditions>
-	<config>
-		<key>CONFIG_DEVKMEM</key>
-		<value type="bool">n</value>
-	</config>
 	<config>
 		<key>CONFIG_KFENCE</key>
 		<value type="bool">y</value>
diff --git a/s/android-5.10/android-base.config b/s/android-5.10/android-base.config
index d6e1f5a..d7078da 100644
--- a/s/android-5.10/android-base.config
+++ b/s/android-5.10/android-base.config
@@ -2,7 +2,6 @@
 # CONFIG_ANDROID_LOW_MEMORY_KILLER is not set
 # CONFIG_ANDROID_PARANOID_NETWORK is not set
 # CONFIG_BPFILTER is not set
-# CONFIG_DEVMEM is not set
 # CONFIG_FHANDLE is not set
 # CONFIG_FW_CACHE is not set
 # CONFIG_IP6_NF_NAT is not set
RK3588寄存器地址查看方法
RK3588的寄存器可以通过芯片的TRM手册进行查询。寄存器的地址是有 Operational Base + offset组成,比如GPIO2C这组GPIO的iomux寄存器的地址是:0XFD5F8000+0X0050=0XFD5F8050
寄存器的基地址在TRM的Address Mapping章节中描述
实例:通过IO命令查看GPIO的iomux状态
查看GPIO2C4的GPIO的功能,可以在TRM中搜索gpio2c4,等到如下信息
GPIO2C4 IOMUX的寄存器描述如下:
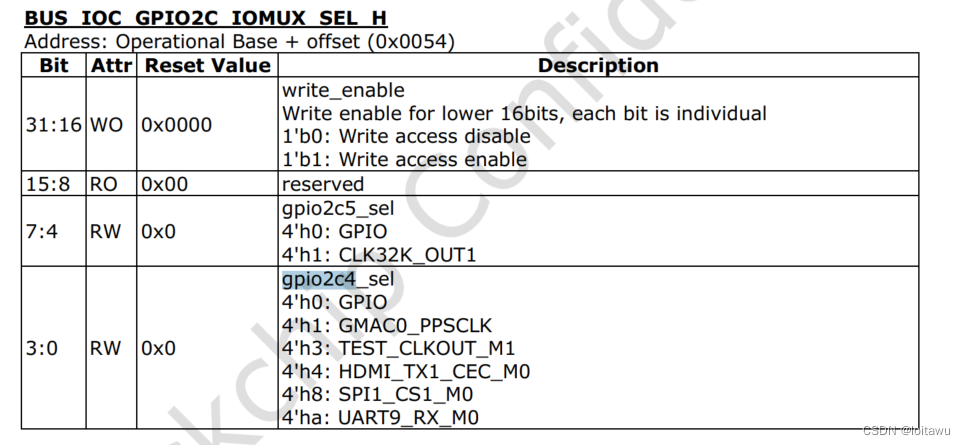
由上面搜索到的结果可以看出GPIO2C4的IOMUX是属于BUS_IOC,所以可以继续搜BUS_IOC,可以得到BUS_IOC的基地址:
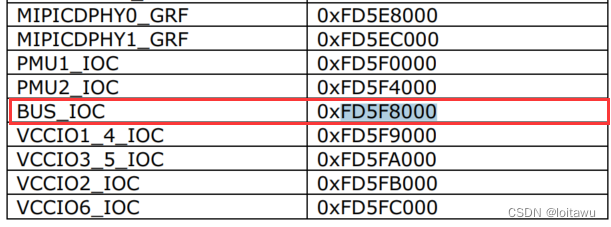
由上面的信息可以等到GPIO2C4的IOMUX的寄存器地址为:0XFD5F8000+0X0054=0XFD5F8054
通过IO命令读取该寄存器的值
rk3588_s:/ # io -4 -r 0XFD5F8054
fd5f8054:  00000000
实例:通过IO命令设置GPIO的iomux状态
通过IO命令写寄存器
将GPIO2C4的功能设置为UART9_RX_M0
rk3588_s:/ # io -4 -w 0XFD5F8054 0x000a000a   //设置0XFD5F8054寄存器的值为0x000a000a
rk3588_s:/ # io -4 -r 0XFD5F8054  //回读确认是否正确写入
fd5f8054:  0000000a