论文名称:
ViTAE: Vision Transformer Advanced by Exploring Intrinsic Inductive Bias
arxiv网址:
https://arxiv.org/abs/2106.03348
官方代码:
https://github.com/ViTAE-Transformer/ViTAE-Transformer
前言:
无意中在paperswithcode__image-classification-on-imagenet-real
看到ViTAE-H 以 644M大小参数量,取得91.2%Acc,效果排在前二(截至至2022-09-25)
固对此模型感到有点兴趣,因而产生了此文章。
读文章前几问:
- 研究的是什么?
- 具体的实现方法?
- 为什么这样做?
- 贡献以及局限性?
本文分为如下三部分
1.论文中部分片段阅读
2.模型架构大致讲解
3.模型的具体实现(取自官方github代码)
论文部分片段阅读
Abstract
1.作者首先夸 transformer架构可以很好处理长序列数据,主要原因是注意力机制的使用。
Transformers have shown great potential in various computer vision tasks owing to
their strong capability in modeling long-range dependency using the self-attention
mechanism
然后指出缺点:transformer架构缺乏 建模局部视觉结构和处理尺度变化能力。
导致transformer架构训练需要大量数据集和长时间训练,去学习IB能力。
IB: inductive bias (归纳偏置)
Vision transformer 相比 CNN,要少很多图像特有的归纳偏置。
CNN 的归纳偏置有多种,例如locality (局部性)和 translation equivariance(平移等变性)
locality :CNN用滑动窗口在图片上做卷积,距离近的物品 相关性越强。
translation equivariance : f(g(x))=g(f(x)) f: 平移 g:卷积 。无论先做平移还是先做卷积 , 最后结果一样。
Vision transformers treat an image as 1D sequence of visual tokens ,Lacking an intrinsic inductive bias (IB) in modeling local visual.
Alternatively, they require large-scale training data and longer training schedules to learn the IB implicitly.
然后作者提出ViTAE( Vision Transformer Advanced by Exploring intrinsic IB from convolutions) 模型
并指出,优点一: 金字塔特征提取模块有助于丰富不同尺度信息。
ViTAE has several spatial pyramid reduction modules to downsample and embed the input image into tokens with rich multi-scale context by using multiple convolutions with different dilation
rates.
优点二:卷积层与多头注意力机制并行(多分枝结构),融合了两者优点(IB 和 全局信息的关联性质)。
ViTAE has a convolution block in parallel to the multi-head self-attention module, whose features are fused and fed into the feed-forward network. Consequently, it has the intrinsic locality IB and is able to learn local features and global dependencies collaboratively
1. Introduction (讲故事背景)
第一大段:
作者谈及transformer,首先夸transformer在NLP领域的效果好,主要是其中的注意力机制,并引出transformer在CV方面的经典模型–ViT。最后指出ViT由于缺乏IB,导致需要大量数据集和大量训练时间。
第二大段:
作者谈及CNN,指出CNN具有IB(归纳偏置)的特性,进而具有如下优点:
1.擅于提取局部特征
Convolution that computes local correlation among neighbor pixels is good at extracting local features such as edges and corners.
2.CNN由于卷积的优势,可以提取多尺度的特征。
CNNs have a hierarchy structure to extract multi-scale features at different layers
同时,作者认为CNN也有个缺点:CNN不能很好处理远程依赖关系
然而这个缺点确是transformer的优点
CNNs are not well suited to model long-range dependencies , which is the key advantage of transformers
于是作者提出疑问:
是否可以通过利用CNN好的特性来提升transformer?
Can we improve vision transformers by leveraging the good properties of CNNs?
这也是这篇文章的大致意图(本文主要研究的是什么?)。
第三大段:
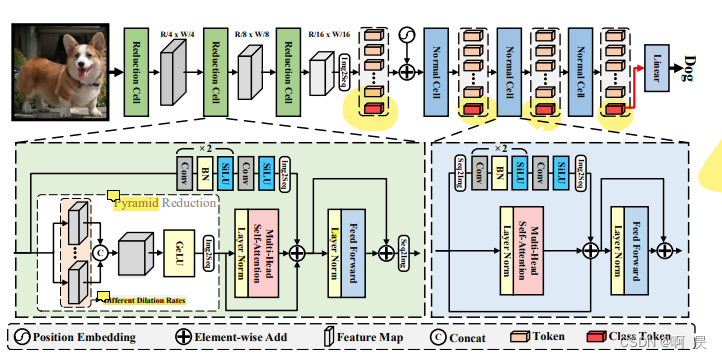
作者简要讲述ViTAE模型的两个主要组成: reduction cell (RC) and normal cell (NC)
并说明这两个的主要作用:
RC :用于对输入图像进行下采样并将其嵌入到具有丰富多尺度上下文的tokens中 (含图像金字塔)
NC :旨在联合建模tokens序列中的局部性和全局依赖性
ViTAE is a combination of two types of basic cells, i.e., reduction cell (RC) and normal cell (NC). RCs are used to downsample and embed the input images into tokens with rich multi-scale context while NCs aim to jointly model locality and global dependencies in the token sequence.
且这两个模块都与注意力机制和FFN做多分枝计算。
Moreover, these two types of cells share a simple basic structure, i.e., paralleled attention module and convolutional layers followed by a feed-forward network (FFN).
作者接着细讲
RC中含有图像金字塔模块(通过不同的dilation得到不同特征图然后进行concat,ps: 这个指标对应torch.nn.Conv2d中的 dilation超参数,后面会细讲),主要是获取不同感受野的特征图和进行图像下采样。
It is noteworthy that RC has an extrapyramid reduction module with atrous convolutions of different dilation rates to embed multi-scale context into tokens.
第四大段:
作者讲述此模型的三个贡献:
1.探究了局部性和尺度不变性对于transformer的影响(提升模型性能)。
First, we explore two types of intrinsic IB in transformers, i.e., scale invariance and locality, and demonstrate the effectiveness of this idea in improving the feature learning ability of transformers
2.提出了ViTAE模型,有较好的特征提取效果。
Second, we design a novel transformer architecture named ViTAE based on two new reduction and normal cells to intrinsically incorporate the above two IBs. The proposed ViTAE embeds multi-scale context into tokens and learns both local and long-range features
3.日常给出精确度指标,说明模型多好多好。
Third, ViTAE outperforms representative vision transformers regarding classification
accuracy, data efficiency, training efficiency, and generalization on downstream tasks. ViTAE achieves 75.3% and 82.0% top-1 accuracy on ImageNet with 4.8M and 23.6M parameters, respectively
5.Limitation and discussion
局限性1:
没有在大数据集上进行精度测试,只在ImageNet-1k上做了精度测试。
we have not scaled the ViTAE model and train it on large size dataset, e.g., ImageNet-21K . and JFT-300M .
局限性2:
在本文中只讨论了局部性和尺度不变性这两种归纳偏置,还有其他归纳偏置可以测试,讨论。
Besides, we only study two typical IBs in this paper. More kinds of IBs such as constituting
viewpoint invariance can be explored in the future study
6.Conclusion
1.提出了ViTAE模型以及内部主要架构:RC,NC。
In this paper, we re-design the transformer block by proposing two novel basic cells (reduction cells
and normal cells) to incorporate two types of intrinsic inductive bias (IB) into transformers, i.e. locality and scale-invariance, resulting in a simple yet effective vision transformer architecture named ViTAE
2.应当注重 inductive bias 对于transformer架构的影响
We hope that this study will provide valuable insights to the following studies of introducing intrinsic IB into vision transformers and understanding the impact of intrinsic and learned IBs.
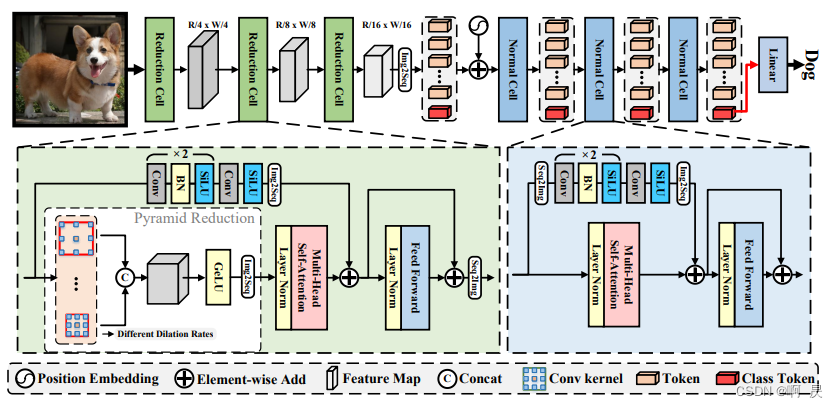
***模型架构大致讲解
论文中模型架构图
Reduction Cell (RC)
代码实现
分为如下6个小部分
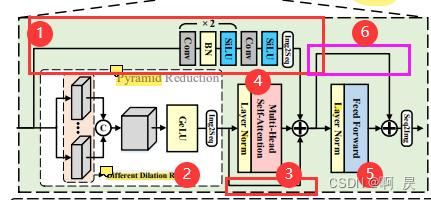
①区域:作者代码中称为PCM模块
②区域:作者代码中称为PRM模块
③区域:ShortCut
④区域: LayerNorm(LN)+ Mutil-Head Self-Atttention(MHSA)
⑤区域: LayerNorm(LN)+ Feed Forward(FFN)
⑥区域:ShortCut
详解:
①区域:作者代码中称为PCM模块
架构较为简单
2 *(Conv+Bn+Silu)+Conv+Silu + Img2Seq
Img2Seq:
即将X.shape做如下改变: N,C,H,W------>N,embed_size,C
详见Img2Seq代码实现
②区域:作者代码中称为PRM模块
由如下构成:pyramid reduction module(图像金字塔模块)+Concat +Gelu +Img2Seq
③区域:ShortCut
没什么好讲的。Concat时需要注意两个数据的 w,h。
④区域: LayerNorm(LN)+ Mutil-Head Self-Atttention(MHSA)
LN不做讲解,细致实现以及
原理可以问度娘
e.g. LayerNorm & BatchNorm的作用以及区别
Mutil-Head Self-Atttention(多头注意力机制)
注意力机制:注意力机制允许模型灵活地选取来自输入序列各部分的信息,以此提升模型性能。
公式:

其中Q: query (查询) , K:key (键) , V:value(值)。
最终可以基于这三个向量得到上下文向量Atten=softmax((QK^T)/√(d_k ))V,其中,d_k为K向量的维度。
而多头注意力机制,即是将输入数据分割成N个子数据,再对每个子数据进行多头注意力机制,最后进行N个子数据拼接即可。(其中N代表多头注意力的个数)
多头注意力在一定程度上可以防止模型过拟合,但也减少了长数据的内部关联。
本文中多头注意力机制代码实现
⑤区域: LayerNorm(LN)+ Feed Forward Network(FFN)
Feed Forward Network
具体实现是简单的线性层叠加。
⑥区域:ShortCut
补充:
最后的Seq2Img
即将X.shape做如下改变: N,embed_size,C------>N,C,H,W
Normal Cell (NC)
代码实现
分为如下5个小部分
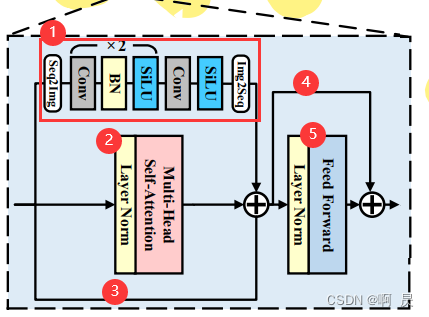
①区域:作者代码中称为PCM模块
②区域:LayerNorm(LN)+ Mutil-Head Self-Atttention(MHSA)
③区域:ShortCut
④区域:ShortCut
⑤区域:LayerNorm(LN)+ Feed Forward(FFN)
详解:
①区域:作者代码中称为PCM模块
架构较为简单
Seq2Img+2 *(Conv+Bn+Silu)+Conv+Silu + Img2Seq
其他区域和RC块类似。在此不再赘述。
代码实现
主要看官方代码中图片分类的代码:
https://github.com/ViTAE-Transformer/ViTAE-Transformer/tree/main/Image-Classification/vitae
且主要看ViTAE_Tiny架构
主要模型架构
- ViTAE_ViT_basic类 —>2
- BasicLayer类 —>3 , 4
- RC类
3.1 PCM模块
3.2 PRM模块
3.3 Token_transformer(或Token_performer)类
3.3.1 Attention模块
3.3.2 FFN模块
3.4 前向传播- NC类
4.1 PCM模块
4.2 Attention模块
4.3 FFN模块
4.4 前向传播- 分类头
ViTAE_Tiny架构
代码截取自:./Image-Classification/vitae/ViTAE.py#L25
def ViTAE_basic_Tiny(pretrained=False, **kwargs): # adopt performer for tokens to token
    model = ViTAE_ViT_basic(RC_tokens_type=['performer', 'performer', 'performer_less'], NC_tokens_type=['transformer', 'transformer', 'transformer'], stages=3, embed_dims=[64, 64, 128], token_dims=[64, 64, 256],
                            downsample_ratios=[4, 2, 2], NC_depth=[0, 0, 7], NC_heads=[1, 1, 4], RC_heads=[1, 1, 1], mlp_ratio=2., NC_group=[1, 1, 64], RC_group=[1, 1, 1], **kwargs)
    model.default_cfg = default_cfgs['ViTAE_basic_Tiny']
    if pretrained:
        load_pretrained(
            model, num_classes=model.num_classes, in_chans=kwargs.get('in_chans', 3))
    return model
代码调用ViTAE_ViT_basic类
ViTAE_ViT_basic类
ViTAE_ViT_basic 类实现在:./Image-Classification/vitae/vitmodules.py#L46
  class ViTAE_ViT_basic(nn.Module):
    def __init__(self, img_size=224, in_chans=3, stages=4, embed_dims=64, token_dims=64, downsample_ratios=[4, 2, 2, 2], kernel_size=[7, 3, 3, 3],
                RC_heads=[1, 1, 1, 1], NC_heads=4, dilations=[[1, 2, 3, 4], [1, 2, 3], [1, 2], [1, 2]],
                RC_op='cat', RC_tokens_type=['performer', 'transformer', 'transformer', 'transformer'], NC_tokens_type='transformer',
                RC_group=[1, 1, 1, 1], NC_group=[1, 32, 64, 64], NC_depth=[2, 2, 6, 2], mlp_ratio=4., qkv_bias=True, qk_scale=None, drop_rate=0.,
                attn_drop_rate=0., drop_path_rate=0., norm_layer=partial(nn.LayerNorm, eps=1e-6), num_classes=1000, class_token=False):
        super().__init__()
超参数解析:
stages : (RC+NC)的层数 (后续还会讲到)
downsample_ratios: 每个stage中对应的下采样倍率(RC模块用到)
RC_heads: RC中 多头注意力机制的 head个数
NC_heads: NC中 多头注意力机制的 head个数
dilations : 对应torch.nn.Conv2d() 中的超参数 (后续在PRM中详解)。例如:dilations[0](dilations[0]==[1,2,3,4] )代表第0个stage中的参数量, 代表有四个图像金字塔,每个金字塔中conv2d的dilations超参数分别为1,2,3,4
RC_op: 对应PRM模块后的特征融合方式。default为"cat" (拼接)
RC_tokens_type : 可选performer, performer_less, transformer,embedding, none.
performer : 使用T2T中的注意力机制(具体没看懂,希望有大佬讲解)
performer_less,embedding, none :PCM模块和attention模块变为 Identity模块
transformer: 使用经典transformer的多头注意力机制
NC_tokens_type:可选 transformer, performer, transformer_shallow
performer , transformer 与 NC_tokens_type类似
若带有"shallow": 修改NC中的PCM模块为 Conv+BN+Silu+Conv
RC_group : 每个stage下,PCM模块中 torch.nn.Conv2d超参数的设置
NC_group:同上
NC_depth :每个(RC +NC)模块中 NC的堆叠个数
mlp_ratio: 瓶颈结构中的放大系数(用于FFN模块和PCM模块),只用于影响NC模块。
注:在RC模块中此值永为1.0。
class ViTAE_ViT_basic(nn.Module):
   ##__init__ 初始化
   ##超参数的定义
   ##...
 for i in range(stages):
            startDpr = 0 if i==0 else self.NC_depth[i - 1]
            Layers.append(
                BasicLayer(img_size, in_chans, self.embed_dims[i], self.tokens_dims[i], self.downsample_ratios[i],
                self.kernel_size[i], self.RC_heads[i], self.NC_heads[i], self.dilaions[i], self.RC_op[i],
                self.RC_tokens_type[i], self.NC_tokens_type[i], self.RC_group[i], self.NC_group[i], self.NC_depth[i], dpr[startDpr:self.NC_depth[i]+startDpr],
                mlp_ratio=self.mlp_ratio[i], qkv_bias=self.qkv_bias[i], qk_scale=self.qk_scale[i], drop=self.drop[i], attn_drop=self.attn_drop[i],
                norm_layer=self.norm_layer[i], class_token=class_token)
            )
            img_size = img_size // self.downsample_ratios[i]
            in_chans = self.tokens_dims[i]
        self.layers = nn.ModuleList(Layers)

        # Classifier head
        self.head = nn.Linear(self.tokens_dims[-1], num_classes) if num_classes > 0 else nn.Identity()

        self.apply(self._init_weights)
调用BasicLayer类
BasicLayer类
代码实现:./Image-Classification/vitae/vitmodules.py#L10
class BasicLayer(nn.Module):
    def __init__(self, img_size=224, in_chans=3, embed_dims=64, token_dims=64, downsample_ratios=4, kernel_size=7, RC_heads=1, NC_heads=6, dilations=[1, 2, 3, 4],
                RC_op='cat', RC_tokens_type='performer', NC_tokens_type='transformer', RC_group=1, NC_group=64, NC_depth=2, dpr=0.1, mlp_ratio=4., qkv_bias=True,
                qk_scale=None, drop=0, attn_drop=0., norm_layer=nn.LayerNorm, class_token=False):
        super().__init__()
       ##... 超参数的定义
        if downsample_ratios > 1:
            self.RC = ReductionCell(img_size, in_chans, embed_dims, token_dims, downsample_ratios, kernel_size,
                            RC_heads, dilations, op=RC_op, tokens_type=RC_tokens_type, group=RC_group)
        else:
            self.RC = nn.Identity()
        self.NC = nn.ModuleList([
            NormalCell(token_dims, NC_heads, mlp_ratio=mlp_ratio, qkv_bias=qkv_bias, qk_scale=qk_scale, drop=drop, attn_drop=attn_drop,
                       drop_path=dpr[i] if isinstance(dpr, list) else dpr, norm_layer=norm_layer, class_token=class_token, group=NC_group, tokens_type=NC_tokens_type)
        for i in range(NC_depth)])
超参数和上面无差异,在此不做赘述
发现BasicLayer类中是调用RC+NC模块
传入RC模块中并没有 mlp_ratio这个超参数对应上文所说,这个值只影响NC模块
***注意
主要模型架构代码实现与论文中架构图的不同:
论文中是(RC+RC+RC) + (NC+NC+NC)…
而具体看代码可以发现是 (RC+NC)+(RC+NC)+(RC+NC)…
RC类
**RC架构图**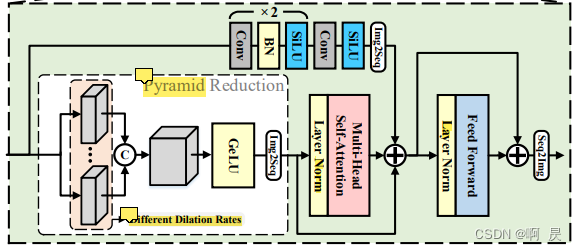
代码取自:./Image-Classification/vitae/ReductionCell.py#L66
RC类中内含PCM模块
class ReductionCell(nn.Module):
    def __init__(self, img_size=224, in_chans=3, embed_dims=64, token_dims=64, downsample_ratios=4, kernel_size=7,
                 num_heads=1, dilations=[1,2,3,4], share_weights=False, op='cat', tokens_type='performer', group=1,
                 drop=0., attn_drop=0., drop_path=0., mlp_ratio=1.0):
        super().__init__()
       ##超参数设置
       ##...

	   ##tokens_type选择决定PCM模块的定义
	   ##大部分会进入如下分支,其他分支请详看代码
        if tokens_type not in ['none', 'embedding']:        ##Tiny: performer  会进入这个分支
        ##PCM模块
            self.PCM = nn.Sequential(
                            nn.Conv2d(in_chans, embed_dims, kernel_size=(3, 3), stride=PCMStride[0], padding=(1, 1), groups=group),  # the 1st convolution
                            nn.SiLU(inplace=True),
                            nn.Conv2d(embed_dims, embed_dims, kernel_size=(3, 3), stride=PCMStride[1], padding=(1, 1), groups=group),  #
                            nn.BatchNorm2d(embed_dims),
                            nn.SiLU(inplace=True),
                            nn.Conv2d(embed_dims, token_dims, kernel_size=(3, 3), stride=PCMStride[2], padding=(1, 1), groups=group),  #
                            nn.SiLU(inplace=True))
			##PRM模块
            self.PRM = PRM(img_size=img_size, kernel_size=kernel_size, downsample_ratio=downsample_ratios, dilations=self.dilations,
                in_chans=in_chans, embed_dim=embed_dims, share_weights=share_weights, op=op)
            ##下采样 downsample_ratios 倍
            self.outSize = self.outSize // downsample_ratios

         ##... tokens_type 决定 atten模块的定义
         ##.. transformer模块, 此模块不进行细看,因为和经典transformer类似,详情请看官方代码
         if tokens_type == 'transformer':
            self.attn = Token_transformer(dim=in_chans, in_dim=token_dims, num_heads=num_heads, mlp_ratio=mlp_ratio, drop=drop, attn_drop=attn_drop, drop_path=drop_path)

        self.num_patches = (img_size // downsample_ratios) * (img_size // downsample_ratios)  # there are 3 sfot split, stride are 4,2,2 seperately
PRM模块
代码取自:./Image-Classification/vitae/ReductionCell.py#L12
class PRM(nn.Module):
    def __init__(self, img_size=224, kernel_size=4, downsample_ratio=4, dilations=[1,6,12], in_chans=3, embed_dim=64, share_weights=False, op='cat'):

        self.stride = downsample_ratio
        ##..初始化
        ##其他超参数 初始化

        if share_weights==False:##在这只看False情况   ##default
            self.convs = nn.ModuleList()
            for dilation in self.dilations:
                padding = math.ceil(((self.kernel_size-1)*dilation + 1 - self.stride) / 2)
                self.convs.append(nn.Sequential(*[nn.Conv2d(in_channels=in_chans, out_channels=embed_dim, kernel_size=self.kernel_size, \
                    stride=self.stride, padding=padding, dilation=dilation),
                    nn.GELU()]))

        if self.op == 'sum':
            self.out_chans = embed_dim
        elif op == 'cat': ##default
            self.out_chans = embed_dim * len(self.dilations)

    def forward(self, x):
        B, C, W, H = x.shape
        if self.share_weights==False: ##在这只看False情况   ##default
            y = self.convs[0](x).unsqueeze(dim=-1)
            for i in range(1, len(self.dilations)):
                _y = self.convs[i](x).unsqueeze(dim=-1)
                y = torch.cat((y, _y), dim=-1)  ##图像金字塔中特征进行堆叠
        B, C, W, H, N = y.shape ##B: batch , channel, W, H ,N_feature==len(dilations)
        if self.op == 'sum':
            y = y.sum(dim=-1).flatten(2).permute(0,2,1).contiguous()
        elif self.op == 'cat': ##default
            y = y.permute(0,4,1,2,3).flatten(3).reshape(B, N*C, W*H).permute(0,2,1).contiguous() ##B,C,W,H,N--->B,N,C,W,H--->B,embed,C'---> B,C',embed
        else:
            raise NotImplementedError('no such operation: {} for multi-levels!'.format(self.op))
        return y
在此涉及dilation 卷积, 读者可以先看下涉及dilation卷积的动画:dilation参数理解
看动画时,不难发现,NK=new_kernel_size=(k-1)*dilation+1
nn.Conv2d(in_channels=in_chans, out_channels=embed_dim, kernel_size=self.kernel_size, \
                    stride=self.stride, padding=padding, dilation=dilation)
假设:输入图片(Input 大小为I×I,卷积核(Filter)大小为K×K,步长(stride)为S,填充(Padding)的像素数为P,那卷积层输出(Output)的特征图大小为:
O=(I-K+2P)/S+1 (公式一)
padding在代码中为:(D= dilation)
padding = math.ceil(((self.kernel_size-1)*dilation + 1 - self.stride) / 2)
P= 上取整(((K-1)*D+1-S)/2)
将K= NK,P带入(公式一)
O=(I -[(K-1) × D + 1 ] + 【2 × (上取整(((K-1) × D + 1 - S) / 2)】)/S+1
O=(I- [(K-1) × D + 1 ] + [(K-1) × D + 1 - S])/ S+1
O= (I - S ) / S + 1
O=I / S
即输出图像大小=输入图像大小 / 下采样倍率
RC模块的前向传播
	def forward(self, x):
		convX = self.PCM(x)
        x = self.attn.attn(self.attn.norm1(PRM_x))
        convX = convX.permute(0, 2, 3, 1).view(*x.shape).contiguous() ###B,C,H,W --> B,H,W,C --->B,H*W,C  PS: C=token_dims
        x = x + convX
        x = x + self.attn.drop_path(self.attn.mlp(self.attn.norm2(x)))
***注意
如果你细心的看了论文中架构图,你会发现,是不是少了③区域的shortcut?
这是因为,作者将③区域的shortcut操作写进了 self.attn.attn()这个函数
Token_transformer
代码取自:./Image-Classification/vitae/token_transformer.py#L40
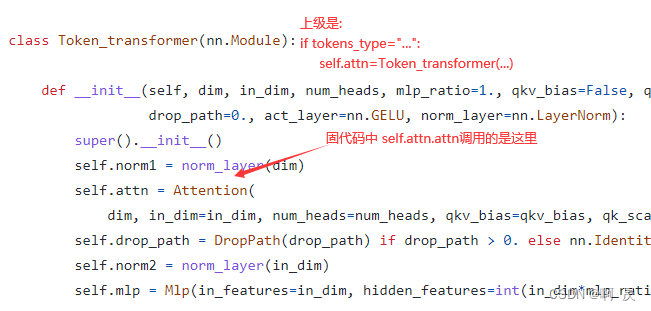
代码取自:./Image-Classification/vitae/token_transformer.py#L8
Token_transformer类中的attn
Attention
class Attention(nn.Module):
	def __init__():
	##..初始化
	def forward(self, x):
        ##..传统经典transformer的多头注意力机制, 在此不省略了,方便后续自己学习查看
         B, N, C = x.shape

        qkv = self.qkv(x).reshape(B, N, 3, self.num_heads, self.in_dim // self.num_heads).permute(2, 0, 3, 1, 4)
        q, k, v = qkv[0], qkv[1], qkv[2]

        attn = (q @ k.transpose(-2, -1)) * self.scale
        attn = attn.softmax(dim=-1)
        attn = self.attn_drop(attn)

        x = (attn @ v).transpose(1, 2).reshape(B, N, self.in_dim)
        x = self.proj(x)
        x = self.proj_drop(x)
        v = v.permute(0, 2, 1, 3).view(B, N, self.in_dim).contiguous()
        ##经典 transformer 是在这里直接 return v
        ##
        ## RC中③区域的shortcut 的特征融合
        x = v + x   # because the original x has different size with current x, use v to do skip connection
        return x
Img2Seq代码
##convX.shape() ===B,C,H,W
convX.permute(0, 2, 3, 1).view(*x.shape).contiguous() ###B,C,H,W --> B,H,W,C --->B,H*W,C
FFN模块
(即Token_transformer调用的MLP)
经典transformer的FFN层,不做过多赘述
代码取自:./Image-Classification/vitae/NormalCell.py#L10
class Mlp(nn.Module):
    def __init__(self, in_features, hidden_features=None, out_features=None, act_layer=nn.GELU, drop=0.):
        super().__init__()
        out_features = out_features or in_features
        hidden_features = hidden_features or in_features
        self.hidden_features = hidden_features
        self.fc1 = nn.Linear(in_features, hidden_features)
        self.act = act_layer()
        self.fc2 = nn.Linear(hidden_features, out_features)
        self.drop = nn.Dropout(drop)

    def forward(self, x):
        x = self.fc1(x)
        x = self.act(x)
        x = self.drop(x)
        x = self.fc2(x)
        x = self.drop(x)
        return x
NC类
代码取自:./Image-Classification/vitae/NormalCell.py#L56
内含FFN模块(self.MLP),PCM模块,Attention模块定义。
class NormalCell(nn.Module):
    def __init__(self, dim, num_heads, mlp_ratio=4., qkv_bias=False, qk_scale=None, drop=0., attn_drop=0.,
                drop_path=0., act_layer=nn.GELU, norm_layer=nn.LayerNorm, class_token=False, group=64, tokens_type='transformer'):
        super().__init__()
        self.norm1 = norm_layer(dim)
        self.class_token = class_token
        if 'transformer' in tokens_type:   ##default
            self.attn = Attention(
                dim, num_heads=num_heads, qkv_bias=qkv_bias, qk_scale=qk_scale, attn_drop=attn_drop, proj_drop=drop)
        elif 'performer' in tokens_type:
            self.attn = AttentionPerformer(
                dim, num_heads=num_heads, qkv_bias=qkv_bias, qk_scale=qk_scale, attn_drop=attn_drop, proj_drop=drop)
        self.drop_path = DropPath(drop_path) if drop_path > 0. else nn.Identity()
        self.norm2 = norm_layer(dim)
        mlp_hidden_dim = int(dim * mlp_ratio)
        self.mlp = Mlp(in_features=dim, hidden_features=mlp_hidden_dim, act_layer=act_layer, drop=drop) ##FFN模块
        if 'shallow' in tokens_type:
            self.PCM = nn.Sequential(
                            nn.Conv2d(dim, mlp_hidden_dim, 3, 1, 1, 1, group),
                            nn.BatchNorm2d(mlp_hidden_dim),
                            nn.SiLU(inplace=True),
                            nn.Conv2d(mlp_hidden_dim, dim, 3, 1, 1, 1, group)
                            )
        else:
            self.PCM = nn.Sequential(
                                nn.Conv2d(dim, mlp_hidden_dim, kernel_size=1, stride=1, padding=1, dilation=1, groups=group),
                                nn.BatchNorm2d(mlp_hidden_dim),
                                nn.SiLU(inplace=True),
                                nn.Conv2d(mlp_hidden_dim, dim, 3, 1, 1, 1, group),
                                nn.BatchNorm2d(dim),
                                nn.SiLU(inplace=True),
                                nn.Conv2d(dim, dim, 3, 1, 1, 1, group),
                                nn.SiLU(inplace=True),
                                )
当tokens_type="transformer"时,NC使用的注意力机制为传统transformer的多头注意力机制(与RC中的实现类似,不同点在于:NC的attention前向时没有和shortcut进行特征融合 NC的attention返回值)
NC前向传播
代码取自:./Image-Classification/vitae/NormalCell.py#L136
  def forward(self, x):
        b, n, c = x.shape
        if self.class_token:  ##如果有class_token的话
            n = n - 1
            wh = int(math.sqrt(n)) ##获得w,h 在这规定w==h
            convX = self.drop_path(self.PCM(x[:, 1:, :].view(b, wh, wh, c).permute(0, 3, 1, 2).contiguous()).permute(0, 2, 3, 1).contiguous().view(b, n, c))
            ##B,embed,C--->B,WH,WH,C--->B,C,WH,WH--->B,WH,WH,C---->B,embed,C
            x = x + self.drop_path(self.attn(self.norm1(x)))
            x[:, 1:] = x[:, 1:] + convX
        else:
            wh = int(math.sqrt(n))
            convX = self.drop_path(self.PCM(x.view(b, wh, wh, c).permute(0, 3, 1, 2).contiguous()).permute(0, 2, 3, 1).contiguous().view(b, n, c))
            x = x + self.drop_path(self.attn(self.norm1(x)))
            x = x + convX
        x = x + self.drop_path(self.mlp(self.norm2(x)))
        return x
Seq2Img
实现:(B,embed,C--->B,W,H,C--->B,C,W,H) ```python self.PCM(x[:, 1:, :].view(b, wh, wh, c).permute(0, 3, 1, 2).contiguous() ``` 熟悉RC模块后了解NC模块还是比较简单的。其中class_token参考自 Vit-Transformer
总模型架构的处理头
代码取自:
./Image-Classification/vitae/vitmodules.py#L95
 # Classifier head
        self.head = nn.Linear(self.tokens_dims[-1], num_classes) if num_classes > 0 else nn.Identity()
当然最后的分类特征处理有多种:
也可采用global avg pooling+Linear进行处理。
结尾
本人在写这篇博客的时候,发现在github上面已经有了ViTAE-V2(真卷啊)
orxiv:https://arxiv.org/abs/2202.10108
大致看了下有关模型架构的图,在最新ViTAE-V2的论文中
模型架构从
变为了
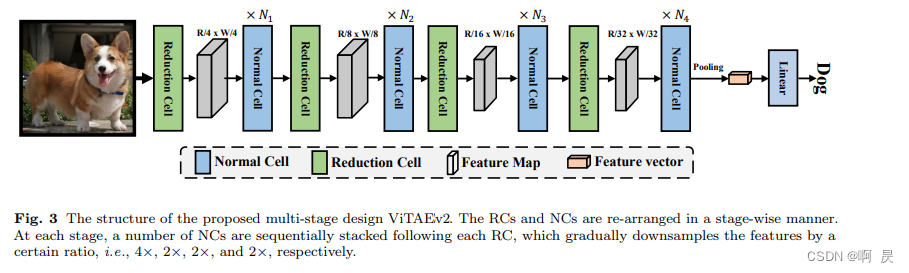
具体的本人还没有细看,不知道网络架构是不是从(RC+RC+RC)+(NC+NC+NC)的堆叠方式变成了(RC+NC(*N1))+(RC+NC(*N2))+(RC+NC(*N3))。
当时看代码还挺好奇,为什么不是按照前者的堆叠方式和论文(ViTAE)中的模型架构保持一致,原来已经参考v2版本进行了优化。
欢迎指正
因为本文主要是本人用来做的笔记,顺便进行知识巩固。如果本文对你有所帮助,那么本博客的目的就已经超额完成了。
本人英语水平、阅读论文能力、读写代码能力较为有限。有错误,恳请大佬指正,感谢。
PS:本人看论文比较随和,后续可能会偏向阅读目标跟踪(Object-Tracking)方向论文。
欢迎交流
邮箱:[email protected]