本文索引:
一、 关于龙书
相信很多看想要学习DirectX编程的小伙伴都有听说过龙书,也就是官方推出的《Introduction to 3D Game Programming with Directx 9》这本书,从DirectX9开始,龙书作为最权威、详尽的DirectX编程学习资料早已广受好评,到现在Directx编程接口已经出到DirectX12了,龙书也即将推出《Introduction to 3D Game Programming with Directx 12》,但本小菜发现在之前阅读《Introduction to 3D Game Programming with Directx 11》的时候按照书上的说明已经无法找到Directx的编程SDK包。在查找资料和摸索后发现现在的Directx配置早已没有那么麻烦,于是总结一下,把经验分享出来给大家参考。
二、 在vs2015u2环境下编写DirectX11程序
从win8发售开发,DirectX编程SDK包就已经集成在windows SDK包中,所以想要使用DirectX接口进行2D和3D编程的小伙伴发现没有地方可以下载像DirectX9那样的SDK包了,那么是不是一定要下载windows SDK包呢?微软在这方面也为推广自己的IDE编程工具VISUAL提供了便利。对的,只要使用的是visual studio2015以上的编程环境,都已经预先集成了windows SDK包,区别只是不同版本的IDE和操作系统能获取到的示例工程不太一样,一般更高的版本中能够获得更全面的示例工程。
以下为官方声明:
Starting with Windows 8, the DirectX SDK is included as part of the Windows SDK.
Use a free, Visual Studio Community 2015 with Update 2 client that already includes the latest Windows 10 developer tools to get started creating innovative and compelling Universal Windows apps and Classic Windows applications. These tools include universal app templates, a code editor, a powerful debugger, Windows Mobile emulators, rich language support, and more, all ready to use in production. Includes the latest Windows Standalone SDK and mobile emulator releases.
这里官方提到的操作系统是win10,但使用win8进行编程的童鞋也可以继续使用visual studio2015,和win10下编程是一样的(但最新的direct12是在win10中才有的)。
所以使用vs2015做开发的童鞋已经不用再配置任何东西了。
三、 关于MSDN帮助文档
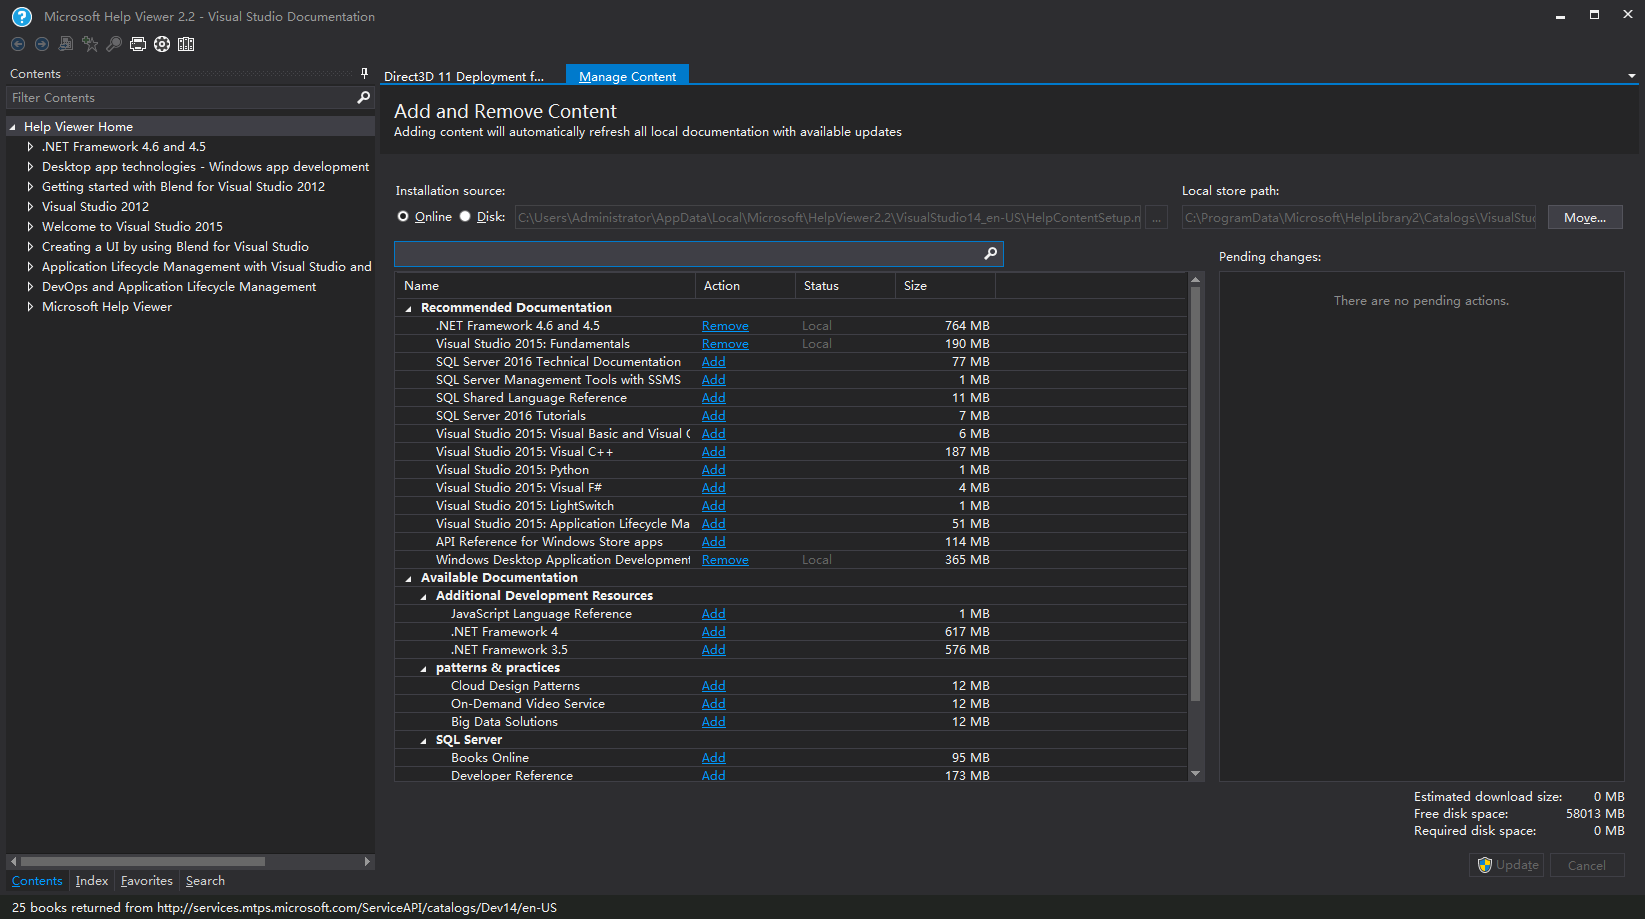
在VS2015中点击菜单栏“Help”->“Add and Remove Help Content”

打开“Microsoft Help View 2.0 - Visual Studio 2012文档”
单击“Recommended Documentation”=>“Windows Desktop Application Development”后面的”Add”链接,VS就会从服务器上将对应的帮助文档下载到本地。
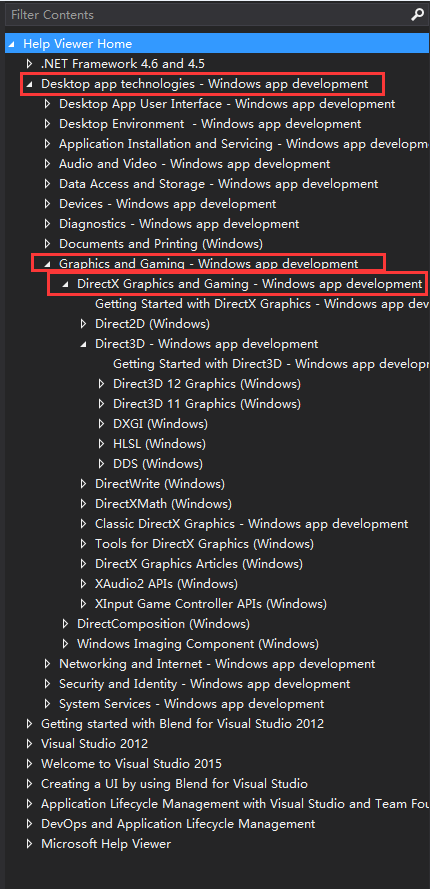
更新完成后,可以从以下路径找到DirectX的说明文档:
“Desktop app technologies - Windows app development”=>”Graphics and Gaming - Windows app development”=>”DirectX Graphics and Gaming - Windows app development”
四、 官方示例项目
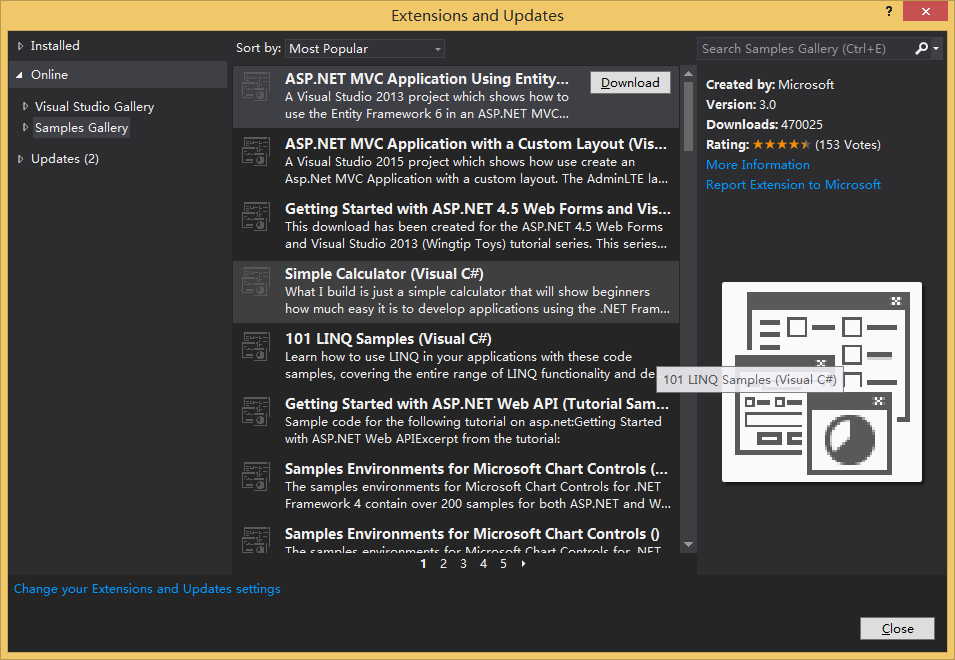
在VS2015菜单栏中依次点击”Tools”=>”Extensions and Updates”
在左侧点击”Online”=>”Samples Gallery”,左边将会展示出对应的线上示例项目列表,也可以直接在右上方的搜索框中搜索所想要的具体项目名。
找到所需要的示例项目后就可以直接点击项目后面的”Download”按钮下载项目到本地。
例如:
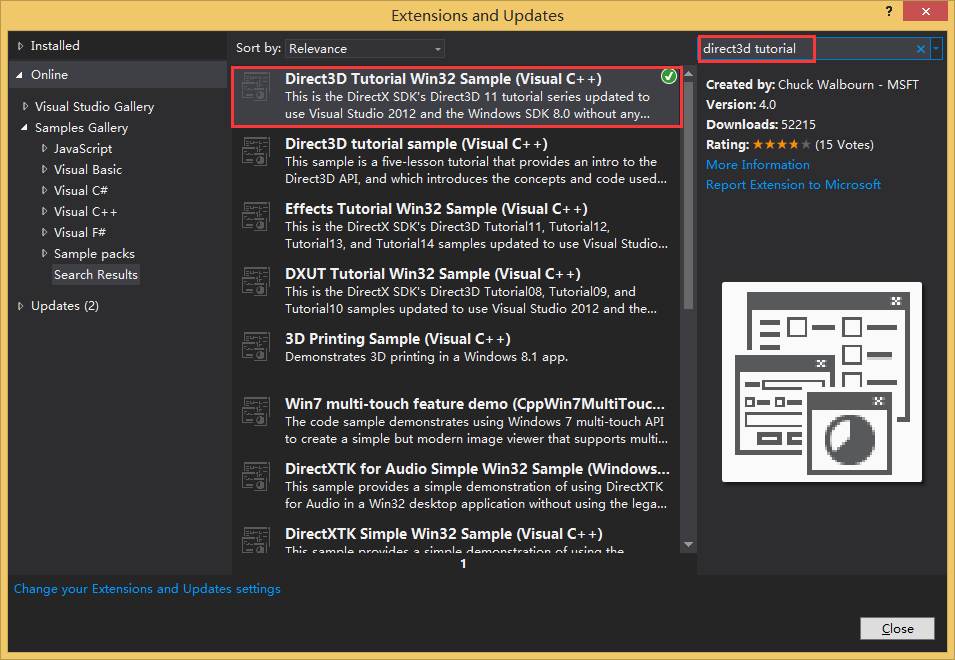
这个例子包含了一些最基本的接口使用,可以作为入门教程参考。
五、 自己尝试编写一个小项目
(1) 创建一个win32项目
在VS2015中依次点击菜单栏"File"=>"New"=>"Project"
- 1
- 2
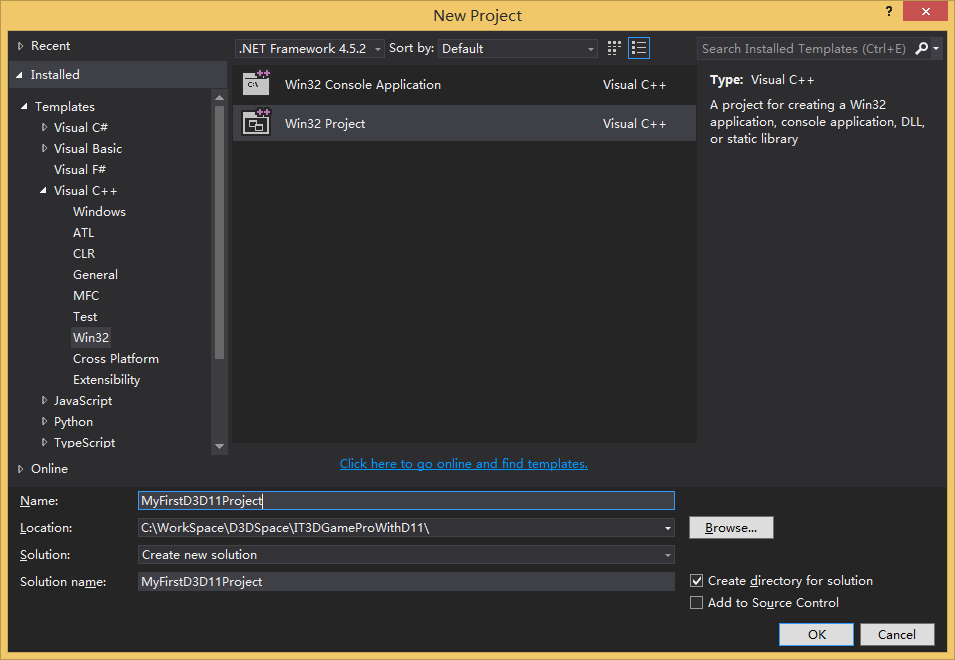
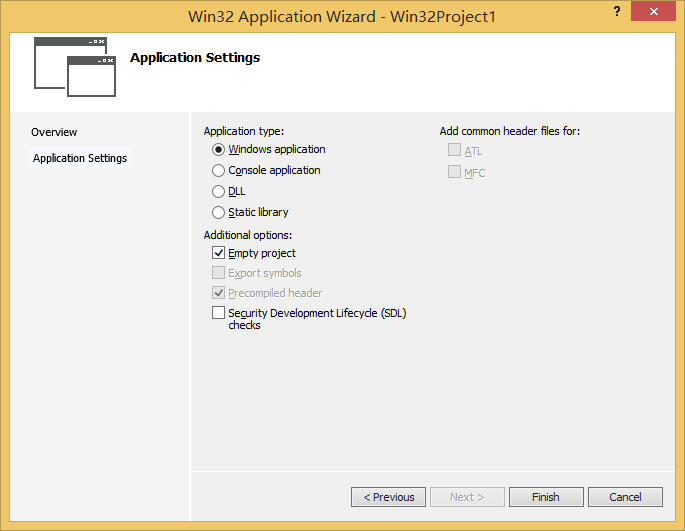
设置好项目名称和路径后点击确定,继续填写后续设置,完成创建。
(2) 配置依赖库
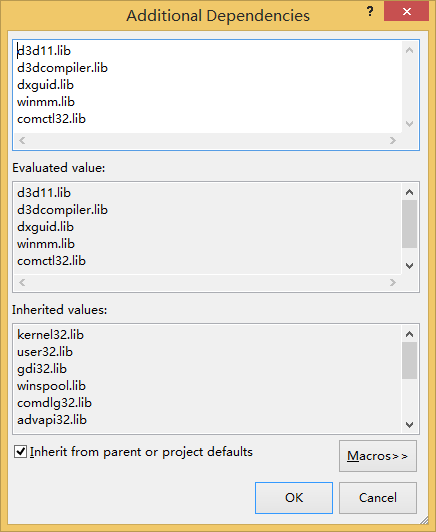
右键项目名,单击弹出菜单中的"Properties"
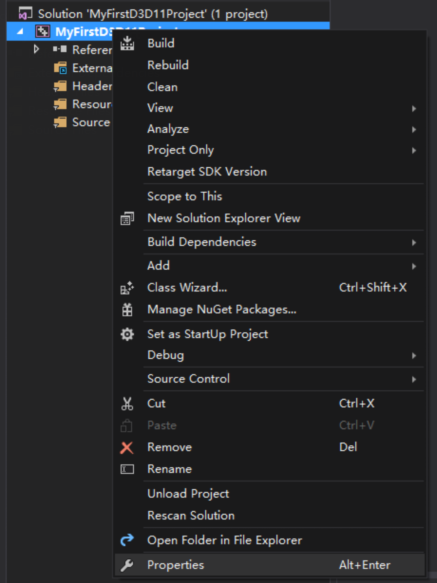
在左侧点击"Configuration Properties"=>"Linker"=>"Input",点击右边"Addtional Dependencis"下的Edit
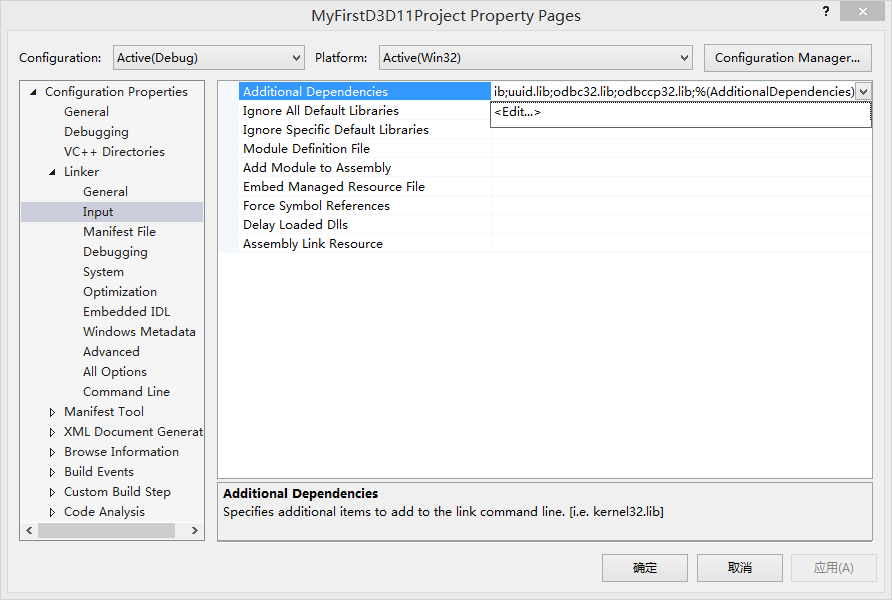
      添加以下依赖库名称:
           d3d11.lib
           d3dcompiler.lib
           dxguid.lib
           winmm.lib
           comctl32.lib
(3) 添加源文件
创建头文件"Release.h"和源文件"Tutorial01.cpp",源码如下:
Release.h
//{{NO_DEPENDENCIES}}
// Microsoft Visual C++ generated include file.
// Used by Tutorial01.rc
//

#define IDS_APP_TITLE           103

#define IDR_MAINFRAME           128
#define IDD_TUTORIAL1_DIALOG    102
#define IDD_ABOUTBOX            103
#define IDM_ABOUT               104
#define IDM_EXIT                105
#define IDI_TUTORIAL1           107
#define IDI_SMALL               108
#define IDC_TUTORIAL1           109
#define IDC_MYICON              2
#define IDC_STATIC              -1
// Next default values for new objects
//
#ifdef APSTUDIO_INVOKED
#ifndef APSTUDIO_READONLY_SYMBOLS

#define _APS_NO_MFC                 130
#define _APS_NEXT_RESOURCE_VALUE    129
#define _APS_NEXT_COMMAND_VALUE     32771
#define _APS_NEXT_CONTROL_VALUE     1000
#define _APS_NEXT_SYMED_VALUE       110
#endif
#endif
Tutorial01.cpp
//--------------------------------------------------------------------------------------
// File: Tutorial01.cpp
//
// This application demonstrates creating a Direct3D 11 device
//
// http://msdn.microsoft.com/en-us/library/windows/apps/ff729718.aspx
//
// THIS CODE AND INFORMATION IS PROVIDED "AS IS" WITHOUT WARRANTY OF
// ANY KIND, EITHER EXPRESSED OR IMPLIED, INCLUDING BUT NOT LIMITED TO
// THE IMPLIED WARRANTIES OF MERCHANTABILITY AND/OR FITNESS FOR A
// PARTICULAR PURPOSE.
//
// Copyright (c) Microsoft Corporation. All rights reserved.
//--------------------------------------------------------------------------------------
#include <windows.h>
#include <d3d11_1.h>
#include <directxcolors.h>
#include "resource.h"

using namespace DirectX;

//--------------------------------------------------------------------------------------
// Global Variables
//--------------------------------------------------------------------------------------
HINSTANCE               g_hInst = nullptr;
HWND                    g_hWnd = nullptr;
D3D_DRIVER_TYPE         g_driverType = D3D_DRIVER_TYPE_NULL;
D3D_FEATURE_LEVEL       g_featureLevel = D3D_FEATURE_LEVEL_11_0;
ID3D11Device*           g_pd3dDevice = nullptr;
ID3D11Device1*          g_pd3dDevice1 = nullptr;
ID3D11DeviceContext*    g_pImmediateContext = nullptr;
ID3D11DeviceContext1*   g_pImmediateContext1 = nullptr;
IDXGISwapChain*         g_pSwapChain = nullptr;
IDXGISwapChain1*        g_pSwapChain1 = nullptr;
ID3D11RenderTargetView* g_pRenderTargetView = nullptr;


//--------------------------------------------------------------------------------------
// Forward declarations
//--------------------------------------------------------------------------------------
HRESULT InitWindow( HINSTANCE hInstance, int nCmdShow );
HRESULT InitDevice();
void CleanupDevice();
LRESULT CALLBACK    WndProc( HWND, UINT, WPARAM, LPARAM );
void Render();


//--------------------------------------------------------------------------------------
// Entry point to the program. Initializes everything and goes into a message processing
// loop. Idle time is used to render the scene.
//--------------------------------------------------------------------------------------
int WINAPI wWinMain( _In_ HINSTANCE hInstance, _In_opt_ HINSTANCE hPrevInstance, _In_ LPWSTR lpCmdLine, _In_ int nCmdShow )
{
    UNREFERENCED_PARAMETER( hPrevInstance );
    UNREFERENCED_PARAMETER( lpCmdLine );

    if( FAILED( InitWindow( hInstance, nCmdShow ) ) )
        return 0;

    if( FAILED( InitDevice() ) )
    {
        CleanupDevice();
        return 0;
    }

    // Main message loop
    MSG msg = {0};
    while( WM_QUIT != msg.message )
    {
        if( PeekMessage( &msg, nullptr, 0, 0, PM_REMOVE ) )
        {
            TranslateMessage( &msg );
            DispatchMessage( &msg );
        }
        else
        {
            Render();
        }
    }

    CleanupDevice();

    return ( int )msg.wParam;
}


//--------------------------------------------------------------------------------------
// Register class and create window
//--------------------------------------------------------------------------------------
HRESULT InitWindow( HINSTANCE hInstance, int nCmdShow )
{
    // Register class
    WNDCLASSEX wcex;
    wcex.cbSize = sizeof( WNDCLASSEX );
    wcex.style = CS_HREDRAW | CS_VREDRAW;
    wcex.lpfnWndProc = WndProc;
    wcex.cbClsExtra = 0;
    wcex.cbWndExtra = 0;
    wcex.hInstance = hInstance;
    wcex.hIcon = LoadIcon( hInstance, ( LPCTSTR )IDI_TUTORIAL1 );
    wcex.hCursor = LoadCursor( nullptr, IDC_ARROW );
    wcex.hbrBackground = ( HBRUSH )( COLOR_WINDOW + 1 );
    wcex.lpszMenuName = nullptr;
    wcex.lpszClassName = L"TutorialWindowClass";
    wcex.hIconSm = LoadIcon( wcex.hInstance, ( LPCTSTR )IDI_TUTORIAL1 );
    if( !RegisterClassEx( &wcex ) )
        return E_FAIL;

    // Create window
    g_hInst = hInstance;
    RECT rc = { 0, 0, 800, 600 };
    AdjustWindowRect( &rc, WS_OVERLAPPEDWINDOW, FALSE );
    g_hWnd = CreateWindow( L"TutorialWindowClass", L"Direct3D 11 Tutorial 1: Direct3D 11 Basics",
                           WS_OVERLAPPED | WS_CAPTION | WS_SYSMENU | WS_MINIMIZEBOX,
                           CW_USEDEFAULT, CW_USEDEFAULT, rc.right - rc.left, rc.bottom - rc.top, nullptr, nullptr, hInstance,
                           nullptr );
    if( !g_hWnd )
        return E_FAIL;

    ShowWindow( g_hWnd, nCmdShow );

    return S_OK;
}


//--------------------------------------------------------------------------------------
// Called every time the application receives a message
//--------------------------------------------------------------------------------------
LRESULT CALLBACK WndProc( HWND hWnd, UINT message, WPARAM wParam, LPARAM lParam )
{
    PAINTSTRUCT ps;
    HDC hdc;

    switch( message )
    {
    case WM_PAINT:
        hdc = BeginPaint( hWnd, &ps );
        EndPaint( hWnd, &ps );
        break;

    case WM_DESTROY:
        PostQuitMessage( 0 );
        break;

        // Note that this tutorial does not handle resizing (WM_SIZE) requests,
        // so we created the window without the resize border.

    default:
        return DefWindowProc( hWnd, message, wParam, lParam );
    }

    return 0;
}


//--------------------------------------------------------------------------------------
// Create Direct3D device and swap chain
//--------------------------------------------------------------------------------------
HRESULT InitDevice()
{
    HRESULT hr = S_OK;

    RECT rc;
    GetClientRect( g_hWnd, &rc );
    UINT width = rc.right - rc.left;
    UINT height = rc.bottom - rc.top;

    UINT createDeviceFlags = 0;
#ifdef _DEBUG
    createDeviceFlags |= D3D11_CREATE_DEVICE_DEBUG;
#endif

    D3D_DRIVER_TYPE driverTypes[] =
    {
        D3D_DRIVER_TYPE_HARDWARE,
        D3D_DRIVER_TYPE_WARP,
        D3D_DRIVER_TYPE_REFERENCE,
    };
    UINT numDriverTypes = ARRAYSIZE( driverTypes );

    D3D_FEATURE_LEVEL featureLevels[] =
    {
        D3D_FEATURE_LEVEL_11_1,
        D3D_FEATURE_LEVEL_11_0,
        D3D_FEATURE_LEVEL_10_1,
        D3D_FEATURE_LEVEL_10_0,
    };
    UINT numFeatureLevels = ARRAYSIZE( featureLevels );

    for( UINT driverTypeIndex = 0; driverTypeIndex < numDriverTypes; driverTypeIndex++ )
    {
        g_driverType = driverTypes[driverTypeIndex];
        hr = D3D11CreateDevice( nullptr, g_driverType, nullptr, createDeviceFlags, featureLevels, numFeatureLevels,
                                D3D11_SDK_VERSION, &g_pd3dDevice, &g_featureLevel, &g_pImmediateContext );

        if ( hr == E_INVALIDARG )
        {
            // DirectX 11.0 platforms will not recognize D3D_FEATURE_LEVEL_11_1 so we need to retry without it
            hr = D3D11CreateDevice( nullptr, g_driverType, nullptr, createDeviceFlags, &featureLevels[1], numFeatureLevels - 1,
                                    D3D11_SDK_VERSION, &g_pd3dDevice, &g_featureLevel, &g_pImmediateContext );
        }

        if( SUCCEEDED( hr ) )
            break;
    }
    if( FAILED( hr ) )
        return hr;

    // Obtain DXGI factory from device (since we used nullptr for pAdapter above)
    IDXGIFactory1* dxgiFactory = nullptr;
    {
        IDXGIDevice* dxgiDevice = nullptr;
        hr = g_pd3dDevice->QueryInterface( __uuidof(IDXGIDevice), reinterpret_cast<void**>(&dxgiDevice) );
        if (SUCCEEDED(hr))
        {
            IDXGIAdapter* adapter = nullptr;
            hr = dxgiDevice->GetAdapter(&adapter);
            if (SUCCEEDED(hr))
            {
                hr = adapter->GetParent( __uuidof(IDXGIFactory1), reinterpret_cast<void**>(&dxgiFactory) );
                adapter->Release();
            }
            dxgiDevice->Release();
        }
    }
    if (FAILED(hr))
        return hr;

    // Create swap chain
    IDXGIFactory2* dxgiFactory2 = nullptr;
    hr = dxgiFactory->QueryInterface( __uuidof(IDXGIFactory2), reinterpret_cast<void**>(&dxgiFactory2) );
    if ( dxgiFactory2 )
    {
        // DirectX 11.1 or later
        hr = g_pd3dDevice->QueryInterface( __uuidof(ID3D11Device1), reinterpret_cast<void**>(&g_pd3dDevice1) );
        if (SUCCEEDED(hr))
        {
            (void) g_pImmediateContext->QueryInterface( __uuidof(ID3D11DeviceContext1), reinterpret_cast<void**>(&g_pImmediateContext1) );
        }

        DXGI_SWAP_CHAIN_DESC1 sd;
        ZeroMemory(&sd, sizeof(sd));
        sd.Width = width;
        sd.Height = height;
        sd.Format = DXGI_FORMAT_R8G8B8A8_UNORM;
        sd.SampleDesc.Count = 1;
        sd.SampleDesc.Quality = 0;
        sd.BufferUsage = DXGI_USAGE_RENDER_TARGET_OUTPUT;
        sd.BufferCount = 1;

        hr = dxgiFactory2->CreateSwapChainForHwnd( g_pd3dDevice, g_hWnd, &sd, nullptr, nullptr, &g_pSwapChain1 );
        if (SUCCEEDED(hr))
        {
            hr = g_pSwapChain1->QueryInterface( __uuidof(IDXGISwapChain), reinterpret_cast<void**>(&g_pSwapChain) );
        }

        dxgiFactory2->Release();
    }
    else
    {
        // DirectX 11.0 systems
        DXGI_SWAP_CHAIN_DESC sd;
        ZeroMemory(&sd, sizeof(sd));
        sd.BufferCount = 1;
        sd.BufferDesc.Width = width;
        sd.BufferDesc.Height = height;
        sd.BufferDesc.Format = DXGI_FORMAT_R8G8B8A8_UNORM;
        sd.BufferDesc.RefreshRate.Numerator = 60;
        sd.BufferDesc.RefreshRate.Denominator = 1;
        sd.BufferUsage = DXGI_USAGE_RENDER_TARGET_OUTPUT;
        sd.OutputWindow = g_hWnd;
        sd.SampleDesc.Count = 1;
        sd.SampleDesc.Quality = 0;
        sd.Windowed = TRUE;

        hr = dxgiFactory->CreateSwapChain( g_pd3dDevice, &sd, &g_pSwapChain );
    }

    // Note this tutorial doesn't handle full-screen swapchains so we block the ALT+ENTER shortcut
    dxgiFactory->MakeWindowAssociation( g_hWnd, DXGI_MWA_NO_ALT_ENTER );

    dxgiFactory->Release();

    if (FAILED(hr))
        return hr;

    // Create a render target view
    ID3D11Texture2D* pBackBuffer = nullptr;
    hr = g_pSwapChain->GetBuffer( 0, __uuidof( ID3D11Texture2D ), reinterpret_cast<void**>( &pBackBuffer ) );
    if( FAILED( hr ) )
        return hr;

    hr = g_pd3dDevice->CreateRenderTargetView( pBackBuffer, nullptr, &g_pRenderTargetView );
    pBackBuffer->Release();
    if( FAILED( hr ) )
        return hr;

    g_pImmediateContext->OMSetRenderTargets( 1, &g_pRenderTargetView, nullptr );

    // Setup the viewport
    D3D11_VIEWPORT vp;
    vp.Width = (FLOAT)width;
    vp.Height = (FLOAT)height;
    vp.MinDepth = 0.0f;
    vp.MaxDepth = 1.0f;
    vp.TopLeftX = 0;
    vp.TopLeftY = 0;
    g_pImmediateContext->RSSetViewports( 1, &vp );

    return S_OK;
}


//--------------------------------------------------------------------------------------
// Render the frame
//--------------------------------------------------------------------------------------
void Render()
{
    // Just clear the backbuffer
    g_pImmediateContext->ClearRenderTargetView( g_pRenderTargetView, Colors::MidnightBlue );
    g_pSwapChain->Present( 0, 0 );
}


//--------------------------------------------------------------------------------------
// Clean up the objects we've created
//--------------------------------------------------------------------------------------
void CleanupDevice()
{
    if( g_pImmediateContext ) g_pImmediateContext->ClearState();

    if( g_pRenderTargetView ) g_pRenderTargetView->Release();
    if( g_pSwapChain1 ) g_pSwapChain1->Release();
    if( g_pSwapChain ) g_pSwapChain->Release();
    if( g_pImmediateContext1 ) g_pImmediateContext1->Release();
    if( g_pImmediateContext ) g_pImmediateContext->Release();
    if( g_pd3dDevice1 ) g_pd3dDevice1->Release();
    if( g_pd3dDevice ) g_pd3dDevice->Release();
}
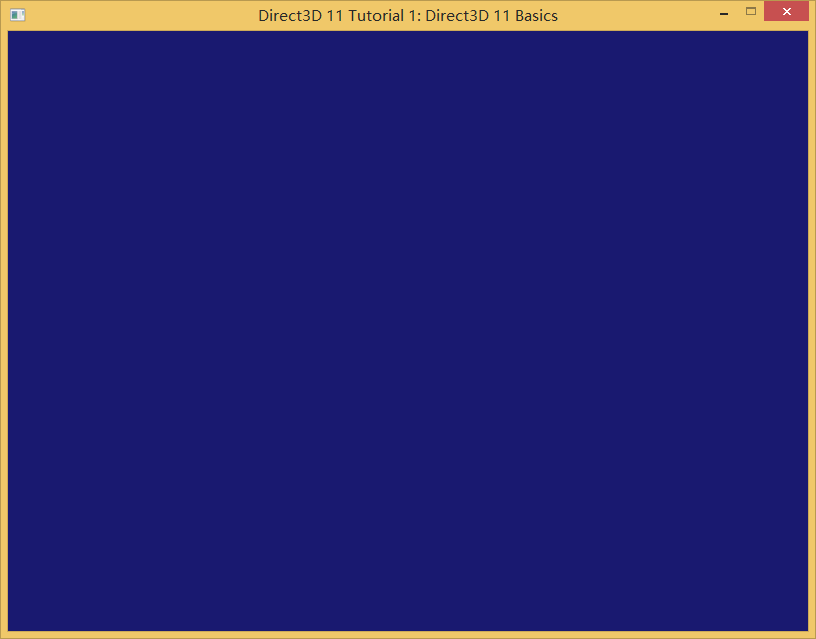
(4) 完成
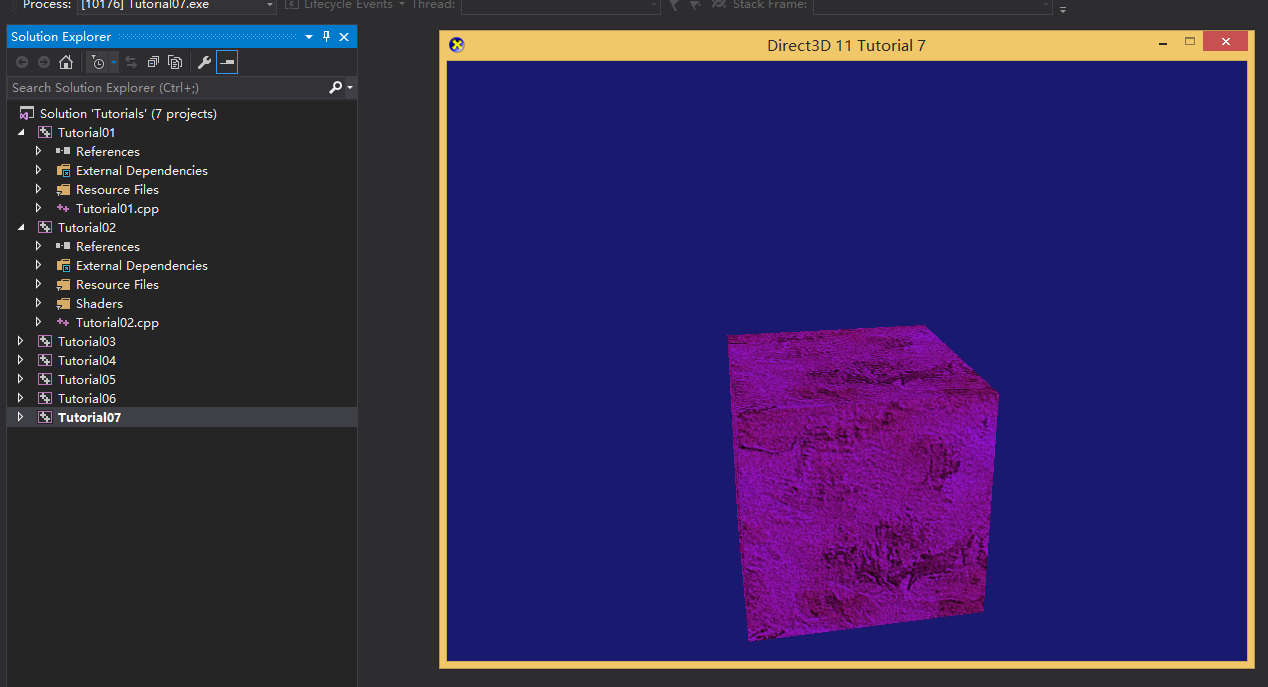
按F5键即可编译并运行项目,最终效果如下:
六、 总结
-
目前在VS2015 IDE中编写DirectX11程序已经不用安装SDK包,只要简单的将所以来LIB库配置到项目中即可。
-
(更新于2016.05.05)龙书11中的示例项目尝试过目前是不能运行的,因为在win8系统发布以后微软不仅将directx的SDK包集合到win SDK中,将directx11直接集成到操作系统中,同时,也对DIRECT编程所依赖的一些库文件做了大量修改,而龙书11中的示例项目大部分是基于之前独立的DX11SDK_Jun10.exe和win7这个环境的,因此想要运行这些示例项目需要根据情况将所依赖接口更新到目前版本。
关于DirectX里的一些组件说明,请参考这篇官方说明。