文章目录
本篇文章主要讲述了如何用预训练好的图像分类模型完成单张图片的预测、视频文件的预测和实时摄像头画面预测。接下来让我们开始我们图像世界的探索之旅吧!
安装配置环境
以下部分为Linux版本特有的命令,Windows可以直接复制链接进行下载。
# !pip install numpy pandas matplotlib requests tqdm opencv-python pillow gc -i https://pypi.tuna.tsinghua.edu.cn/simple
!pip install numpy pandas matplotlib requests tqdm opencv-python pillow

# 下载安装Pytorch
!pip3 install torch torchvision torchaudio --extra-index-url https://download.pytorch.org/whl/cu113

# 安装mmcv -full
!pip install mmcv-full -f https://download.openmmlab.com/mmcv/dist/cu113/torch1.10.0/index.html

# 安装文字字体
!wget https://zihao-openmmlab.obs.cn-east-3.myhuaweicloud.com/20220716-mmclassification/dataset/SimHei.ttf
下载 ImageNet 1000类别信息
!wget https://zihao-openmmlab.obs.cn-east-3.myhuaweicloud.com/20220716-mmclassification/dataset/meta_data/imagenet_class_index.csv
创建目录
import os
# 存放测试图片
os.mkdir('test_img')

# 存放结果文件
os.mkdir('output')
下载测试文件
Linux下可以运行一下代码下载文件
# 下载测试图像文件 至 test_img 文件夹

!wget https://zihao-openmmlab.obs.cn-east-3.myhuaweicloud.com/20220716-mmclassification/test/watermelon1.jpg -O test_img/watermelon1.jpg
!wget https://zihao-openmmlab.obs.cn-east-3.myhuaweicloud.com/20220716-mmclassification/test/banana1.jpg -O test_img/banana1.jpg
!wget https://zihao-openmmlab.obs.cn-east-3.myhuaweicloud.com/20220716-mmclassification/test/cat1.jpg -O test_img/cat1.jpg

# 哈士奇,来源:https://www.pexels.com/zh-cn/photo/2853130/
!wget https://zihao-openmmlab.obs.cn-east-3.myhuaweicloud.com/20220716-mmclassification/test/husky1.jpeg -O test_img/husky1.jpeg

# 猫狗,来源:https://unsplash.com/photos/ouo1hbizWwo
!wget https://zihao-openmmlab.obs.cn-east-3.myhuaweicloud.com/20220716-mmclassification/test/cat_dog.jpg -O test_img/cat_dog.jpg

!wget https://zihao-openmmlab.obs.cn-east-3.myhuaweicloud.com/20220716-mmclassification/test/video_2.mp4 -O test_img/video_2.mp4
Windows下复制一下链接下载即可
# 下载测试图像文件 至 test_img 文件夹

https://zihao-openmmlab.obs.cn-east-3.myhuaweicloud.com/20220716-mmclassification/test/watermelon1.jpg
https://zihao-openmmlab.obs.cn-east-3.myhuaweicloud.com/20220716-mmclassification/test/banana1.jpg
https://zihao-openmmlab.obs.cn-east-3.myhuaweicloud.com/20220716-mmclassification/test/cat1.jpg
# 哈士奇,来源:https://www.pexels.com/zh-cn/photo/2853130/
https://zihao-openmmlab.obs.cn-east-3.myhuaweicloud.com/20220716-mmclassification/test/husky1.jpeg

# 猫狗,来源:https://unsplash.com/photos/ouo1hbizWwo
https://zihao-openmmlab.obs.cn-east-3.myhuaweicloud.com/20220716-mmclassification/test/cat_dog.jpg

https://zihao-openmmlab.obs.cn-east-3.myhuaweicloud.com/20220716-mmclassification/test/video_2.mp4
ImageNet预训练图像分类模型预测单张图像-英文
import os
import cv2
import pandas as pd
import numpy as np
import torch
import matplotlib.pyplot as plt
%matplotlib inline

# 有 GPU 就用 GPU,没有就用 CPU
device = torch.device('cuda:0' if torch.cuda.is_available() else 'cpu')
载入预训练图像分类模型
我们这里使用pytorch自带的已经预训练好的resnet18模型
from torchvision import models
# 载入预训练图像分类模型
model = models.resnet18(pretrained=True)
# model = models.resnet152(pretrained=True)
model = model.eval()
model = model.to(device)
图像预处理
from torchvision import transforms

# 测试集图像预处理-RCTN:缩放裁剪、转 Tensor、归一化
from torchvision import transforms

# 测试集图像预处理-RCTN:缩放裁剪、转 Tensor、归一化
test_transform = transforms.Compose([transforms.Resize(256),#缩放成256×256
                                     transforms.CenterCrop(224),#截出一个224×224
                                     transforms.ToTensor(),
                                     transforms.Normalize(
                                         mean=[0.485, 0.456, 0.406],
                                         std=[0.229, 0.224, 0.225])#进行归一化,数值根据经验得到的
                                    ])
载入一张测试图像
img_path = 'test_img/cat_dog.jpg'
# 用 pillow 载入
from PIL import Image
img_pil = Image.open(img_path)
img_pil
np.array(img_pil).shape

(1560, 2340, 3)
这张图片是1560×2340像素的三通道图片
执行图像分类预测
input_img = test_transform(img_pil) # 预处理
input_img.shape
torch.Size([3, 224, 224])
input_img = input_img.unsqueeze(0).to(device)
input_img.shape
得到一张三通道224×224的图片,只有这个形式的照片可以传入模型进行训练
torch.Size([1, 3, 224, 224])
得到所有类别的 logit 预测分数
# 执行前向预测,得到所有类别的 logit 预测分数
pred_logits = model(input_img)
将这1000个类别的预测分数通过softmax操作进行归一化,得到预测为每个类别的概率
import torch.nn.functional as F
pred_softmax = F.softmax(pred_logits, dim=1) # 对 logit 分数做 softmax 运算
pred_softmax.shape
预测结果分析
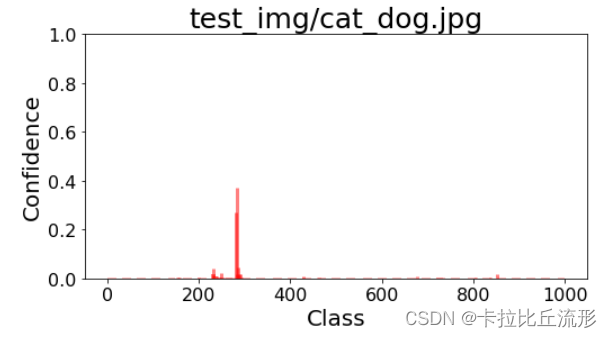
各类别置信度柱状图
plt.figure(figsize=(8,4))

x = range(1000)
y = pred_softmax.cpu().detach().numpy()[0]

ax = plt.bar(x, y, alpha=0.5, width=0.3, color='yellow', edgecolor='red', lw=3)
plt.ylim([0, 1.0]) # y轴取值范围
# plt.bar_label(ax, fmt='%.2f', fontsize=15) # 置信度数值

plt.xlabel('Class', fontsize=20)
plt.ylabel('Confidence', fontsize=20)
plt.tick_params(labelsize=16) # 坐标文字大小
plt.title(img_path, fontsize=25)

plt.show()
取置信度最大的 n 个结果
n = 10
top_n = torch.topk(pred_softmax, n)
top_n
torch.return_types.topk( values=tensor([[0.3733, 0.2683, 0.0451,
0.0413, 0.0227, 0.0198, 0.0183, 0.0171, 0.0152,
0.0118]], grad_fn=), indices=tensor([[282, 281, 285, 231, 249, 287, 283, 852, 291, 232]]))
# 解析出类别
pred_ids = top_n[1].cpu().detach().numpy().squeeze()
pred_ids
array([282, 281, 285, 231, 249, 287, 283, 852, 291, 232], dtype=int64)
# 解析出置信度
confs = top_n[0].cpu().detach().numpy().squeeze()
confs
array([0.3732724 , 0.2683452 , 0.0450662 , 0.04129088, 0.02274127,
0.0197675 , 0.01831976, 0.01714958, 0.01518197, 0.0118369 ],
dtype=float32)
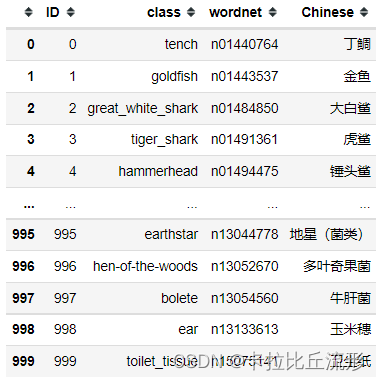
载入ImageNet 1000图像分类标签
ImageNet 1000类别中文释义:https://github.com/ningbonb/imagenet_classes_chinese
df = pd.read_csv('imagenet_class_index.csv')
df
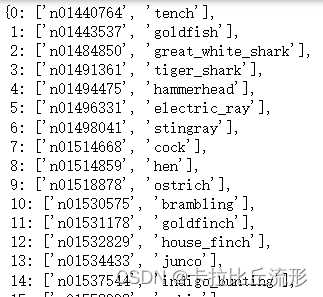
将表格信息转换为键值对的形式
idx_to_labels = {

    }
for idx, row in df.iterrows():
    idx_to_labels[row['ID']] = [row['wordnet'], row['class']]#形成ID:[wordnet,class]的键值对
idx_to_labels
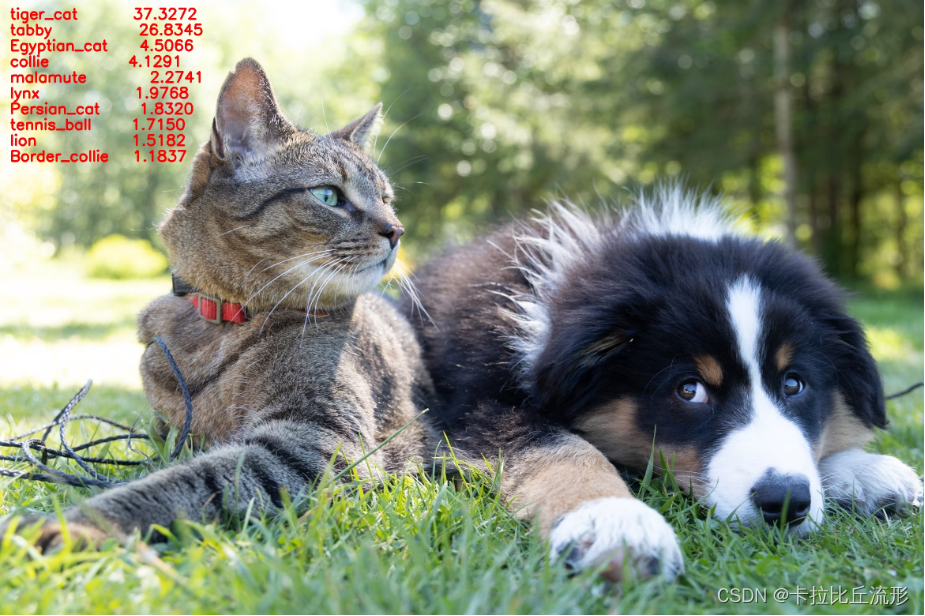
图像分类结果写在原图上
# 用 opencv 载入原图
img_bgr = cv2.imread(img_path)
for i in range(n):
    class_name = idx_to_labels[pred_ids[i]][1] # 获取类别名称
    confidence = confs[i] * 100 # 获取置信度
    text = '{:<15} {:>.4f}'.format(class_name, confidence)
    print(text)

    # !图片,添加的文字,左上角坐标,字体,字号,bgr颜色,线宽
    img_bgr = cv2.putText(img_bgr, text, (25, 50 + 40 * i), cv2.FONT_HERSHEY_SIMPLEX, 1.25, (0, 0, 255), 3)

# 保存图像
cv2.imwrite('output/img_pred.jpg', img_bgr)

# 载入预测结果图像
img_pred = Image.open('output/img_pred.jpg')
img_pred
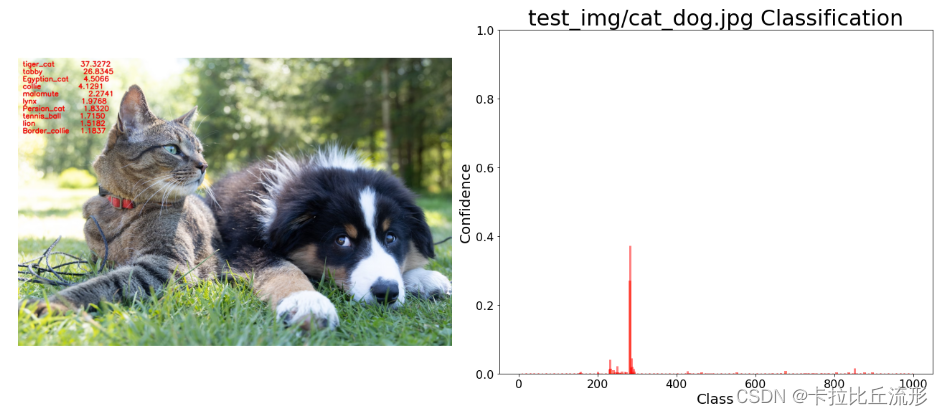
图像和柱状图一起显示
fig = plt.figure(figsize=(18,8))

# 绘制左图-预测图
ax1 = plt.subplot(1,2,1)
ax1.imshow(img_pred)
ax1.axis('off')#关闭所有坐标轴线、刻度标记和标签

# 绘制右图-柱状图
ax2 = plt.subplot(1,2,2)
x = df['ID']
y = pred_softmax.cpu().detach().numpy()[0]
ax2.bar(x, y, alpha=0.5, width=0.3, color='yellow', edgecolor='red', lw=3)

plt.ylim([0, 1.0]) # y轴取值范围
plt.title('{} Classification'.format(img_path), fontsize=30)
plt.xlabel('Class', fontsize=20)
plt.ylabel('Confidence', fontsize=20)
ax2.tick_params(labelsize=16) # 坐标文字大小

plt.tight_layout()
fig.savefig('output/预测图+柱状图.jpg')
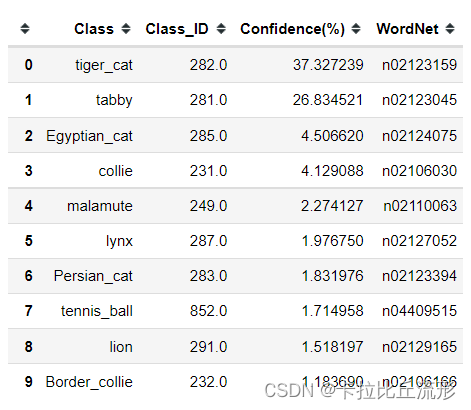
预测结果表格输出
pred_df = pd.DataFrame() # 预测结果表格
for i in range(n):
    class_name = idx_to_labels[pred_ids[i]][1] # 获取类别名称
    label_idx = int(pred_ids[i]) # 获取类别号
    wordnet = idx_to_labels[pred_ids[i]][0] # 获取 WordNet
    confidence = confs[i] * 100 # 获取置信度
    pred_df = pred_df.append({

    'Class':class_name, 'Class_ID':label_idx, 'Confidence(%)':confidence, 'WordNet':wordnet}, ignore_index=True) # 预测结果表格添加一行
display(pred_df) # 展示预测结果表格
ImageNet预训练图像分类模型预测单张图像-中文
## 设置matplotlib中文字体
# windows操作系统
import matplotlib as plt
plt.rcParams['font.sans-serif']=['SimHei']  # 用来正常显示中文标签
plt.rcParams['axes.unicode_minus']=False  # 用来正常显示负号
# Mac操作系统,参考 https://www.ngui.cc/51cto/show-727683.html
# 下载 simhei.ttf 字体文件
# !wget https://zihao-openmmlab.obs.cn-east-3.myhuaweicloud.com/20220716-mmclassification/dataset/SimHei.ttf
# # Linux操作系统,例如 云GPU平台:https://featurize.cn/?s=d7ce99f842414bfcaea5662a97581bd1
# # 如果遇到 SSL 相关报错,重新运行本代码块即可
# !wget https://zihao-openmmlab.obs.cn-east-3.myhuaweicloud.com/20220716-mmclassification/dataset/SimHei.ttf -O /environment/miniconda3/lib/python3.7/site-packages/matplotlib/mpl-data/fonts/ttf/SimHei.ttf
# !rm -rf /home/featurize/.cache/matplotlib
# import matplotlib
# matplotlib.rc("font",family='SimHei') # 中文字体

## 导入pillow中文字体
from PIL import ImageFont, ImageDraw
# 导入中文字体,指定字号
font = ImageFont.truetype('SimHei.ttf', 32)

## 导入工具包
import os
import cv2
from PIL import Image, ImageFont, ImageDraw

import numpy as np
import pandas as pd
import matplotlib.pyplot as plt
%matplotlib inline

import torch
from torchvision import models
import torch.nn.functional as F
from torchvision import transforms

# 有 GPU 就用 GPU,没有就用 CPU
device = torch.device('cuda:0' if torch.cuda.is_available() else 'cpu')
print('device', device)
预训练图像分类模型
# 载入预训练图像分类模型
model = models.resnet18(pretrained=True)
# model = models.resnet152(pretrained=True)
model = model.eval()
model = model.to(device)
载入ImageNet 1000图像分类中文标签
df = pd.read_csv('imagenet_class_index.csv')
idx_to_labels = {

    }
for idx, row in df.iterrows():
    idx_to_labels[row['ID']] = [row['wordnet'], row['Chinese']]
图像预处理
# 测试集图像预处理-RCTN:缩放裁剪、转 Tensor、归一化
test_transform = transforms.Compose([transforms.Resize(256),
                                     transforms.CenterCrop(224),
                                     transforms.ToTensor(),
                                     transforms.Normalize(
                                         mean=[0.485, 0.456, 0.406],
                                         std=[0.229, 0.224, 0.225])
                                    ])
载入一张测试图像
# img_path = 'test_img/banana1.jpg'
# img_path = 'test_img/husky1.jpeg'
# img_path = 'test_img/watermelon1.jpg'
img_path = 'test_img/cat_dog.jpg'
img_pil = Image.open(img_path) # 用 pillow 载入
img_pil

执行图像分类预测
input_img = test_transform(img_pil).unsqueeze(0).to(device) # 预处理
pred_logits = model(input_img) # 执行前向预测,得到所有类别的 logit 预测分数
pred_softmax = F.softmax(pred_logits, dim=1) # 对 logit 分数做 softmax 运算
预测结果分析
各类别置信度柱状图
plt.figure(figsize=(8,4))
x = range(1000)
y = pred_softmax.cpu().detach().numpy()[0]

ax = plt.bar(x, y, alpha=0.5, width=0.3, color='yellow', edgecolor='red', lw=3)
plt.ylim([0, 1.0]) # y轴取值范围
# plt.bar_label(ax, fmt='%.2f', fontsize=15) # 置信度数值

plt.title(img_path, fontsize=30)
plt.xlabel('类别', fontsize=20)
plt.ylabel('置信度', fontsize=20)
plt.tick_params(labelsize=16) # 坐标文字大小

plt.show()

取置信度最大的 n 个结果
n = 10
top_n = torch.topk(pred_softmax, n) # 取置信度最大的 n 个结果
pred_ids = top_n[1].cpu().detach().numpy().squeeze() # 解析出类别
confs = top_n[0].cpu().detach().numpy().squeeze() # 解析出置信度
图像分类结果写在原图上
draw = ImageDraw.Draw(img_pil)
for i in range(n):
    class_name = idx_to_labels[pred_ids[i]][1] # 获取类别名称
    confidence = confs[i] * 100 # 获取置信度
    text = '{:<15} {:>.4f}'.format(class_name, confidence)
    print(text)
    # 文字坐标,中文字符串,字体,rgba颜色
    draw.text((50, 100 + 50 * i), text, font=font, fill=(255, 0, 0, 1))
img_pil
# 保存图像
img_pil.save('output/img_pred.jpg')
山猫,虎猫           37.3272
虎斑猫             26.8345
埃及猫             4.5066
牧羊犬             4.1291
雪橇犬,阿拉斯加爱斯基摩狗   2.2741
猞猁,山猫           1.9768
波斯猫             1.8320
网球              1.7150
狮子              1.5182
边境牧羊犬           1.1837

图像和柱状图一起显示
fig = plt.figure(figsize=(18,6))

# 绘制左图-预测图
ax1 = plt.subplot(1,2,1)
ax1.imshow(img_pil)
ax1.axis('off')

# 绘制右图-柱状图
ax2 = plt.subplot(1,2,2)
x = df['ID']
y = pred_softmax.cpu().detach().numpy()[0]
ax2.bar(x, y, alpha=0.5, width=0.3, color='yellow', edgecolor='red', lw=3)
plt.ylim([0, 1.0]) # y轴取值范围
plt.xlabel('类别', fontsize=20)
plt.ylabel('置信度', fontsize=20)
ax2.tick_params(labelsize=16) # 坐标文字大小

plt.title('{} 图像分类预测结果'.format(img_path), fontsize=30)

plt.tight_layout()
fig.savefig('output/预测图+柱状图.jpg')

预测结果表格输出
pred_df = pd.DataFrame() # 预测结果表格
for i in range(n):
    class_name = idx_to_labels[pred_ids[i]][1] # 获取类别名称
    label_idx = int(pred_ids[i]) # 获取类别号
    wordnet = idx_to_labels[pred_ids[i]][0] # 获取 WordNet
    confidence = confs[i] * 100 # 获取置信度
    pred_df = pred_df.append({

    'Class':class_name, 'Class_ID':label_idx, 'Confidence(%)':confidence, 'WordNet':wordnet}, ignore_index=True) # 预测结果表格添加一行
display(pred_df) # 展示预测结果表格
| Class | Class_ID | Confidence(%) | WordNet | |
|---|---|---|---|---|
| 0 | 山猫,虎猫 | 282.0 | 37.327239 | n02123159 |
| 1 | 虎斑猫 | 281.0 | 26.834521 | n02123045 |
| 2 | 埃及猫 | 285.0 | 4.506620 | n02124075 |
| 3 | 牧羊犬 | 231.0 | 4.129088 | n02106030 |
| 4 | 雪橇犬,阿拉斯加爱斯基摩狗 | 249.0 | 2.274127 | n02110063 |
| 5 | 猞猁,山猫 | 287.0 | 1.976750 | n02127052 |
| 6 | 波斯猫 | 283.0 | 1.831976 | n02123394 |
| 7 | 网球 | 852.0 | 1.714958 | n04409515 |
| 8 | 狮子 | 291.0 | 1.518197 | n02129165 |
| 9 | 边境牧羊犬 | 232.0 | 1.183690 | n02106166 |
ImageNet预训练图像分类模型预测视频文件-英文
import os
import time
import shutil
import tempfile
from tqdm import tqdm

import cv2
from PIL import Image

import numpy as np
import pandas as pd
import matplotlib.pyplot as plt
%matplotlib inline
plt.rcParams['axes.unicode_minus']=False  # 用来正常显示负号
plt.rcParams['font.sans-serif']=['SimHei']  # 用来正常显示中文标签
import gc

import torch
import torch.nn.functional as F
from torchvision import models

import mmcv

# 有 GPU 就用 GPU,没有就用 CPU
device = torch.device('cuda:0' if torch.cuda.is_available() else 'cpu')
print('device:', device)

# 后端绘图,不显示,只保存
import matplotlib
matplotlib.use('Agg')
载入预训练图像分类模型
model = models.resnet18(pretrained=True)
model = model.eval()
model = model.to(device)
载入ImageNet 1000图像分类标签
df = pd.read_csv('imagenet_class_index.csv')
idx_to_labels = {

    }
for idx, row in df.iterrows():
    idx_to_labels[row['ID']] = [row['wordnet'], row['class']]
图像预处理
from torchvision import transforms

# 测试集图像预处理-RCTN:缩放裁剪、转 Tensor、归一化
test_transform = transforms.Compose([transforms.Resize(256),
                                     transforms.CenterCrop(224),
                                     transforms.ToTensor(),
                                     transforms.Normalize(
                                         mean=[0.485, 0.456, 0.406],
                                         std=[0.229, 0.224, 0.225])
                                    ])
图像分类预测函数
def pred_single_frame(img, n=5):
    '''
    输入摄像头画面bgr-array,输出前n个图像分类预测结果的图像bgr-array
    '''
    img_bgr = img
    img_rgb = cv2.cvtColor(img, cv2.COLOR_BGR2RGB) # BGR 转 RGB
    img_pil = Image.fromarray(img_rgb) # array 转 pil
    input_img = test_transform(img_pil).unsqueeze(0).to(device) # 预处理
    pred_logits = model(input_img) # 执行前向预测,得到所有类别的 logit 预测分数
    pred_softmax = F.softmax(pred_logits, dim=1) # 对 logit 分数做 softmax 运算

    top_n = torch.topk(pred_softmax, n) # 取置信度最大的 n 个结果
    pred_ids = top_n[1].cpu().detach().numpy().squeeze() # 解析出类别
    confs = top_n[0].cpu().detach().numpy().squeeze() # 解析出置信度

    # 在图像上写字
    for i in range(n):
        class_name = idx_to_labels[pred_ids[i]][1] # 获取类别名称
        confidence = confs[i] * 100 # 获取置信度
        text = '{:<15} {:>.4f}'.format(class_name, confidence)

        # !图片,添加的文字,左上角坐标,字体,字号,bgr颜色,线宽
        img_bgr = cv2.putText(img_bgr, text, (25, 50 + 40 * i), cv2.FONT_HERSHEY_SIMPLEX, 1.25, (0, 0, 255), 3)

    return img_bgr, pred_softmax
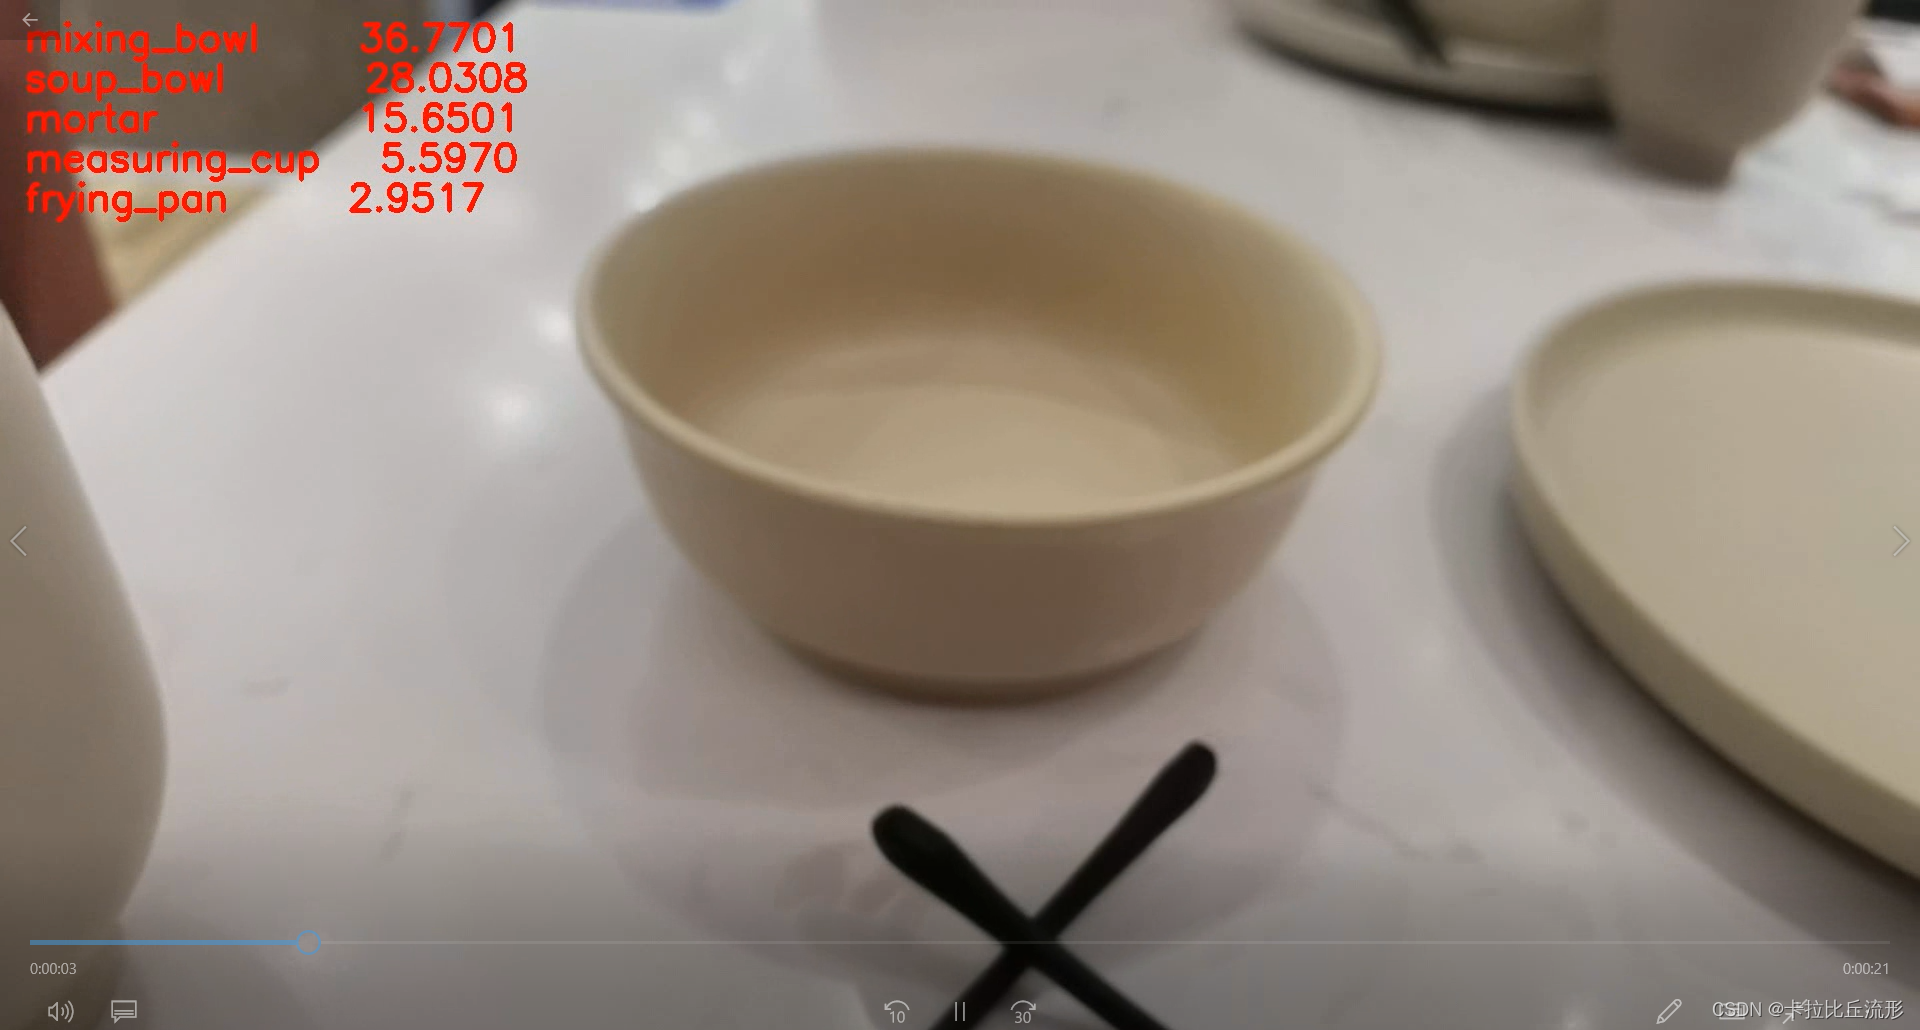
视频预测
输入输出视频路径
input_video = 'test_img/video_2.mp4'
可视化方案一:原始图像+预测结果文字
# 创建临时文件夹,存放每帧结果
temp_out_dir = time.strftime('%Y%m%d%H%M%S')
os.mkdir(temp_out_dir)
print('创建文件夹 {} 用于存放每帧预测结果'.format(temp_out_dir))
# 读入待预测视频
imgs = mmcv.VideoReader(input_video)

prog_bar = mmcv.ProgressBar(len(imgs))

# 对视频逐帧处理
for frame_id, img in enumerate(imgs):

    ## 处理单帧画面
    img, pred_softmax = pred_single_frame(img, n=5)

    # 将处理后的该帧画面图像文件,保存至 /tmp 目录下
    cv2.imwrite(f'{

      temp_out_dir}/{

      frame_id:06d}.jpg', img)

    prog_bar.update() # 更新进度条

# 把每一帧串成视频文件
mmcv.frames2video(temp_out_dir, 'output/output_pred.mp4', fps=imgs.fps, fourcc='mp4v')

shutil.rmtree(temp_out_dir) # 删除存放每帧画面的临时文件夹
print('删除临时文件夹', temp_out_dir)
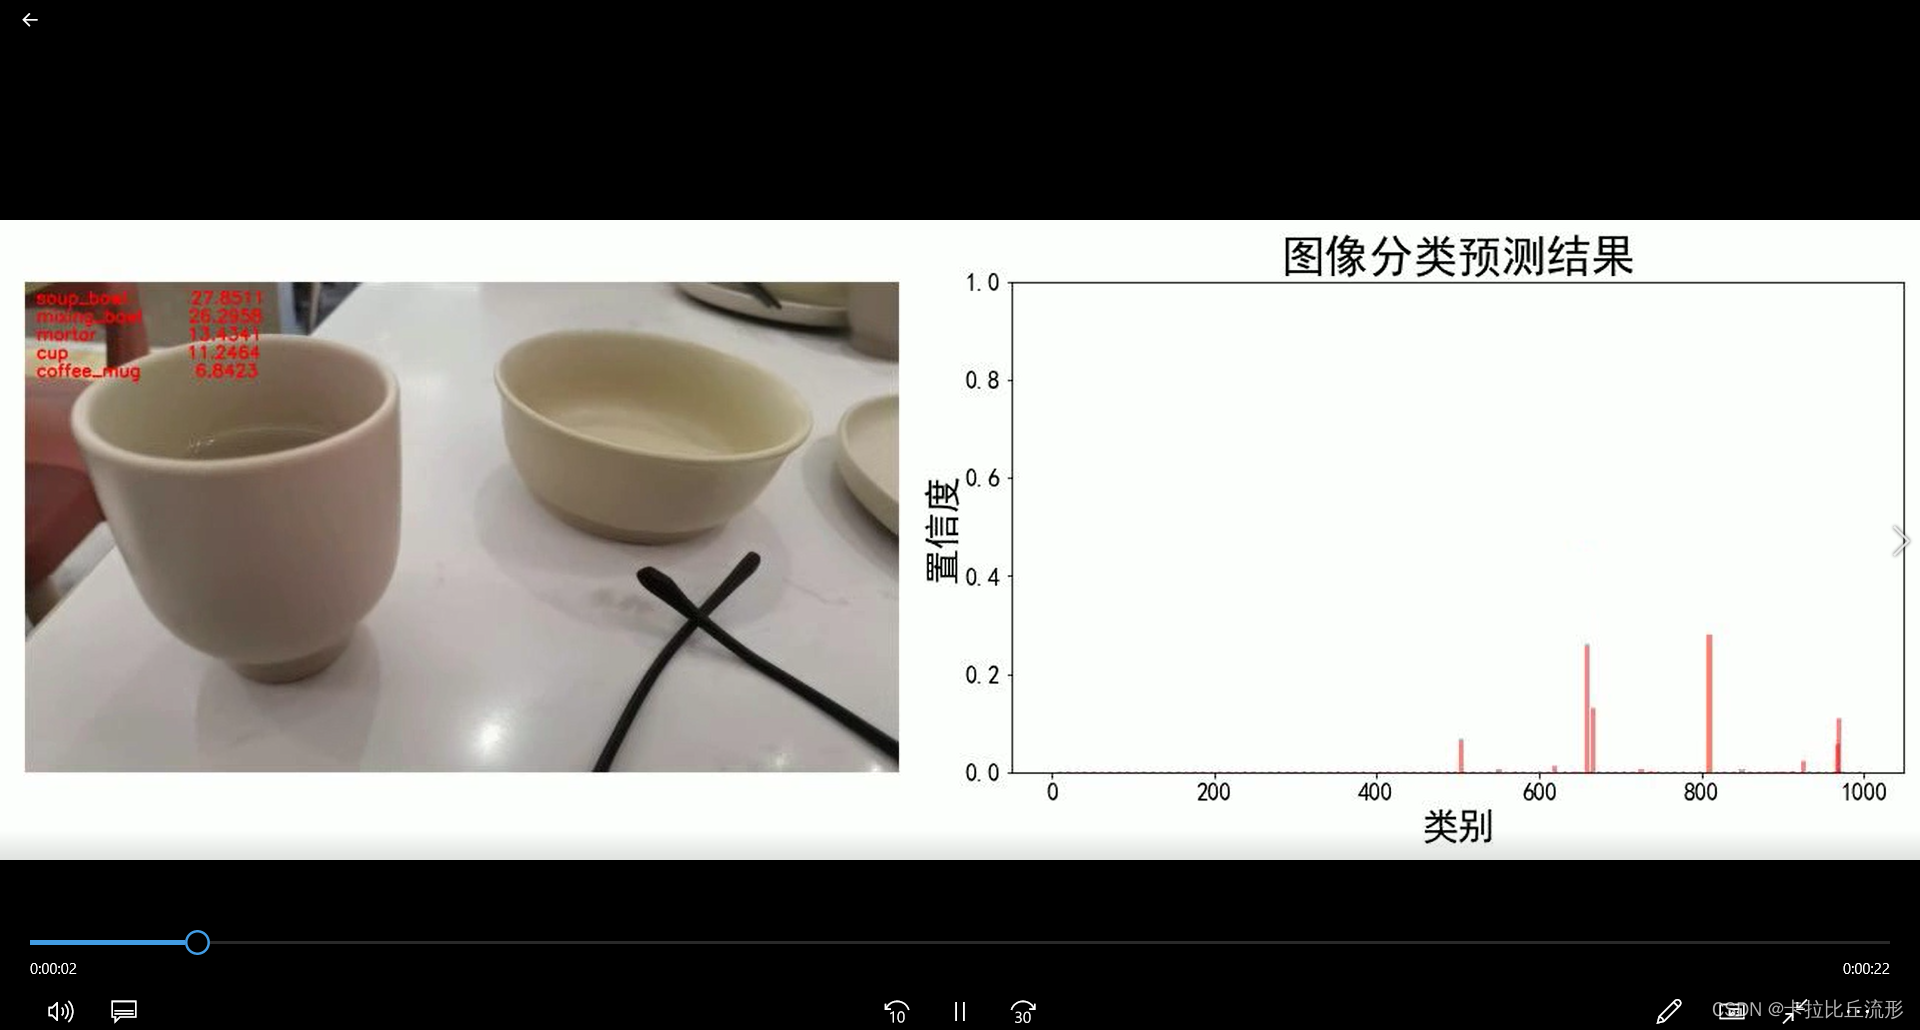
可视化方案二:原始图像+预测结果文字+各类别置信度柱状图
def pred_single_frame_bar(img):
    '''
    输入pred_single_frame函数输出的bgr-array,加柱状图,保存
    '''
    img = cv2.cvtColor(img, cv2.COLOR_BGR2RGB) # BGR 转 RGB
    fig = plt.figure(figsize=(18,6))
    # 绘制左图-视频图
    ax1 = plt.subplot(1,2,1)
    ax1.imshow(img)
    ax1.axis('off')
    # 绘制右图-柱状图
    ax2 = plt.subplot(1,2,2)
    x = range(1000)
    y = pred_softmax.cpu().detach().numpy()[0]
    ax2.bar(x, y, alpha=0.5, width=0.3, color='yellow', edgecolor='red', lw=3)
    plt.xlabel('类别', fontsize=20)
    plt.ylabel('置信度', fontsize=20)
    ax2.tick_params(labelsize=16) # 坐标文字大小
    plt.ylim([0, 1.0]) # y轴取值范围
    plt.xlabel('类别',fontsize=25)
    plt.ylabel('置信度',fontsize=25)
    plt.title('图像分类预测结果', fontsize=30)

    plt.tight_layout()
    fig.savefig(f'{

      temp_out_dir}/{

      frame_id:06d}.jpg')
    # 释放内存
    fig.clf()
    plt.close()
    gc.collect()

# 创建临时文件夹,存放每帧结果
temp_out_dir = time.strftime('%Y%m%d%H%M%S')
os.mkdir(temp_out_dir)
print('创建文件夹 {} 用于存放每帧预测结果'.format(temp_out_dir))

# 读入待预测视频
imgs = mmcv.VideoReader(input_video)

prog_bar = mmcv.ProgressBar(len(imgs))

# 对视频逐帧处理
for frame_id, img in enumerate(imgs):

    ## 处理单帧画面
    img, pred_softmax = pred_single_frame(img, n=5)
    img = pred_single_frame_bar(img)

    prog_bar.update() # 更新进度条

# 把每一帧串成视频文件
mmcv.frames2video(temp_out_dir, 'output/output_bar.mp4', fps=imgs.fps, fourcc='mp4v')

shutil.rmtree(temp_out_dir) # 删除存放每帧画面的临时文件夹
print('删除临时文件夹', temp_out_dir)
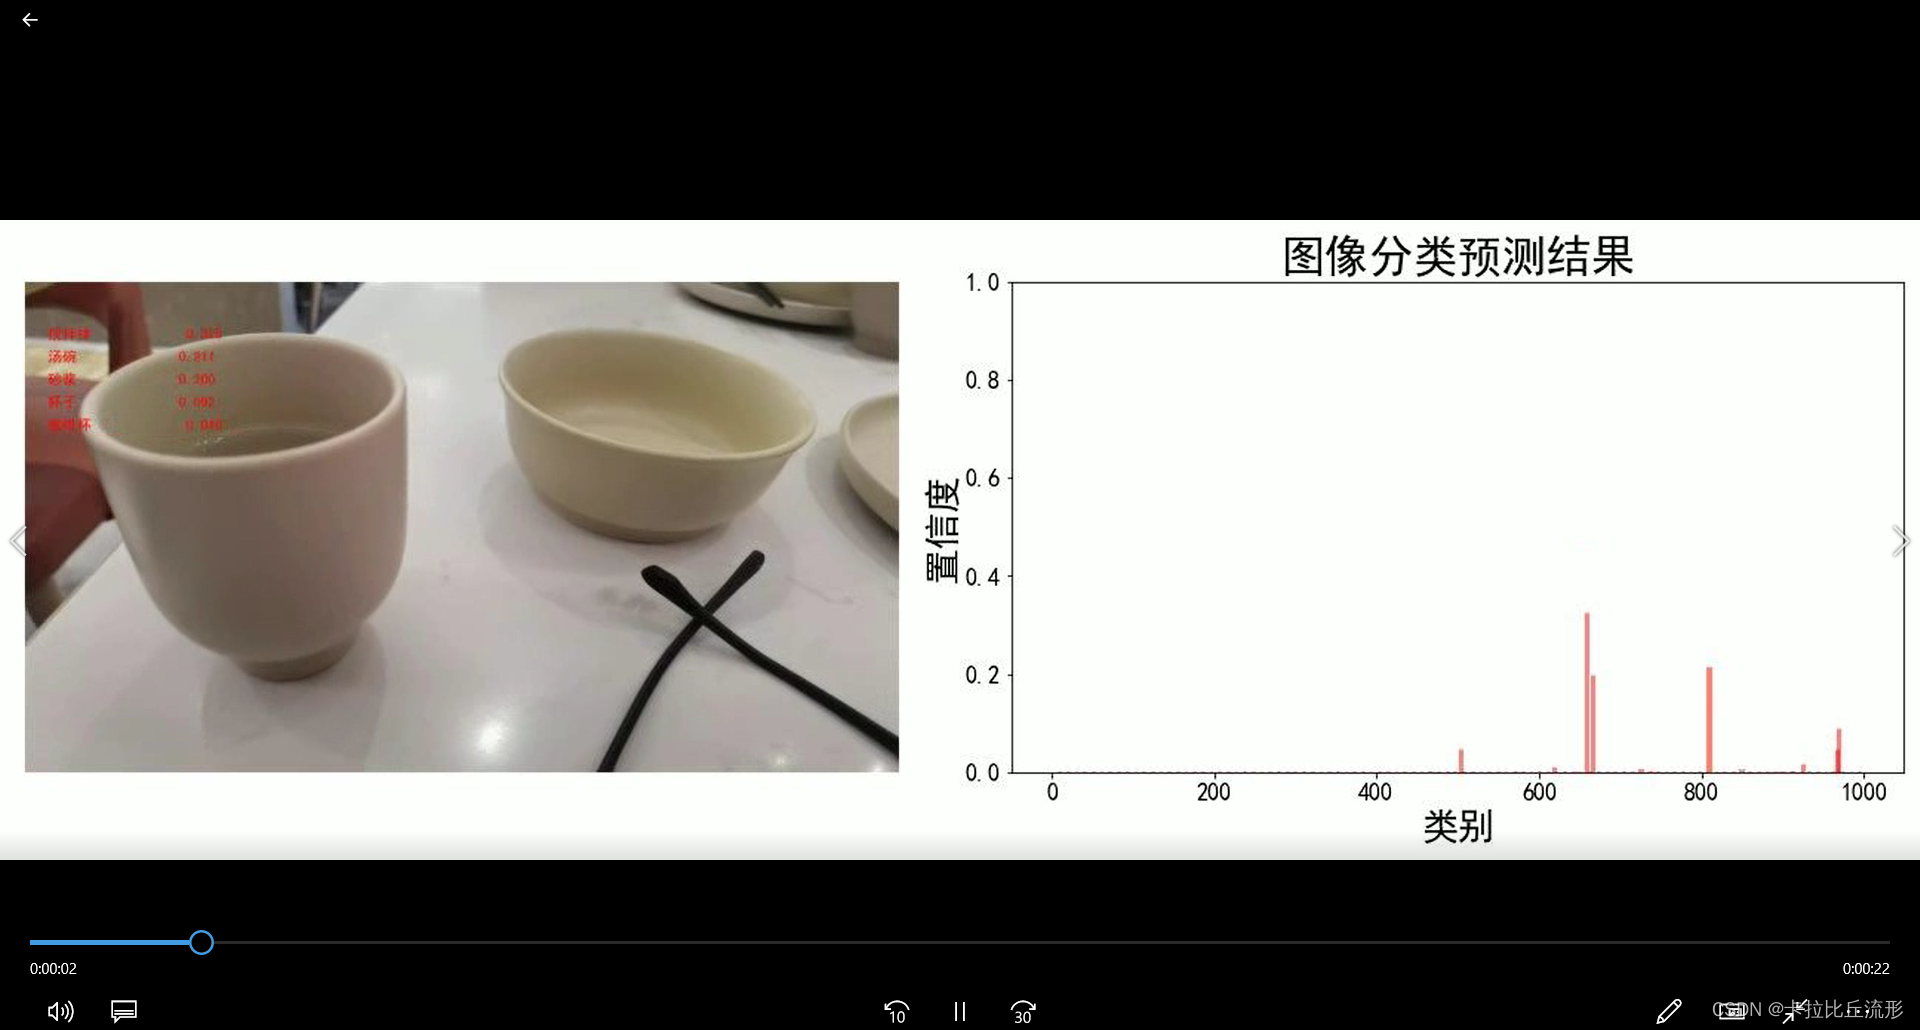
ImageNet预训练图像分类模型预测视频文件-中文
使用 ImageNet 预训练图像分类模型,对视频文件执行预测。
## 设置Matplotlib中文字体
# windows操作系统
import matplotlib as plt
plt.rcParams['font.sans-serif']=['SimHei']  # 用来正常显示中文标签
plt.rcParams['axes.unicode_minus']=False  # 用来正常显示负号

# Mac操作系统,参考 https://www.ngui.cc/51cto/show-727683.html
# 下载 simhei.ttf 字体文件
# !wget https://zihao-openmmlab.obs.cn-east-3.myhuaweicloud.com/20220716-mmclassification/dataset/SimHei.ttf

# # Linux操作系统,例如 云GPU平台:https://featurize.cn/?s=d7ce99f842414bfcaea5662a97581bd1
# # 如果遇到 SSL 相关报错,重新运行本代码块即可
# !wget https://zihao-openmmlab.obs.cn-east-3.myhuaweicloud.com/20220716-mmclassification/dataset/SimHei.ttf -O /environment/miniconda3/lib/python3.7/site-packages/matplotlib/mpl-data/fonts/ttf/SimHei.ttf
# !rm -rf /home/featurize/.cache/matplotlib
# import matplotlib
# matplotlib.rc("font",family='SimHei') # 中文字体

## 导入pillow中文字体
from PIL import ImageFont, ImageDraw
# 导入中文字体,指定字号
font = ImageFont.truetype('SimHei.ttf', 32)

## 导入工具包
import os
import time
import shutil
import tempfile
from tqdm import tqdm
import cv2
from PIL import Image

import numpy as np
import pandas as pd
import matplotlib.pyplot as plt
%matplotlib inline
plt.rcParams['axes.unicode_minus']=False  # 用来正常显示负号
plt.rcParams['font.sans-serif']=['SimHei']  # 用来正常显示中文标签
import gc

import torch
import torch.nn.functional as F
from torchvision import models

import mmcv


# 有 GPU 就用 GPU,没有就用 CPU
device = torch.device('cuda:0' if torch.cuda.is_available() else 'cpu')
print('device:', device)

# 后端绘图,不显示,只保存
import matplotlib
matplotlib.use('Agg')
载入预训练图像分类模型
model = models.resnet18(pretrained=True)
model = model.eval()
model = model.to(device)
载入ImageNet 1000图像分类标签
df = pd.read_csv('imagenet_class_index.csv')
idx_to_labels = {

    }
for idx, row in df.iterrows():
    idx_to_labels[row['ID']] = [row['wordnet'], row['Chinese']]
图像预处理
from torchvision import transforms

# 测试集图像预处理-RCTN:缩放裁剪、转 Tensor、归一化
test_transform = transforms.Compose([transforms.Resize(256),
                                     transforms.CenterCrop(224),
                                     transforms.ToTensor(),
                                     transforms.Normalize(
                                         mean=[0.485, 0.456, 0.406],
                                         std=[0.229, 0.224, 0.225])
                                    ])
图像分类预测函数
def pred_single_frame(img, n=5):
    '''
    输入摄像头画面bgr-array,输出前n个图像分类预测结果的图像bgr-array
    '''
    img_rgb = cv2.cvtColor(img, cv2.COLOR_BGR2RGB) # BGR 转 RGB
    img_pil = Image.fromarray(img_rgb) # array 转 pil
    input_img = test_transform(img_pil).unsqueeze(0).to(device) # 预处理
    pred_logits = model(input_img) # 执行前向预测,得到所有类别的 logit 预测分数
    pred_softmax = F.softmax(pred_logits, dim=1) # 对 logit 分数做 softmax 运算

    top_n = torch.topk(pred_softmax, n) # 取置信度最大的 n 个结果
    pred_ids = top_n[1].cpu().detach().numpy().squeeze() # 解析出类别
    confs = top_n[0].cpu().detach().numpy().squeeze() # 解析出置信度

    # 在图像上写字
    draw = ImageDraw.Draw(img_pil)
    # 在图像上写字
    for i in range(len(confs)):
        pred_class = idx_to_labels[pred_ids[i]][1]
        text = '{:<15} {:>.3f}'.format(pred_class, confs[i])
        # 文字坐标,中文字符串,字体,rgba颜色
        draw.text((50, 100 + 50 * i), text, font=font, fill=(255, 0, 0, 1))

    img_bgr = cv2.cvtColor(np.array(img_pil), cv2.COLOR_RGB2BGR) # RGB转BGR

    return img_bgr, pred_softmax
视频预测
输入输出视频路径
input_video = 'test_img/video_2.mp4'
可视化方案一:原始图像+预测结果文字
# 创建临时文件夹,存放每帧结果
temp_out_dir = time.strftime('%Y%m%d%H%M%S')
os.mkdir(temp_out_dir)
print('创建文件夹 {} 用于存放每帧预测结果'.format(temp_out_dir))
# 读入待预测视频
imgs = mmcv.VideoReader(input_video)

prog_bar = mmcv.ProgressBar(len(imgs))

# 对视频逐帧处理
for frame_id, img in enumerate(imgs):

    ## 处理单帧画面
    img, pred_softmax = pred_single_frame(img, n=5)

    # 将处理后的该帧画面图像文件,保存至 /tmp 目录下
    cv2.imwrite(f'{

      temp_out_dir}/{

      frame_id:06d}.jpg', img)

    prog_bar.update() # 更新进度条

# 把每一帧串成视频文件
mmcv.frames2video(temp_out_dir, 'output/output_pred2.mp4', fps=imgs.fps, fourcc='mp4v')

shutil.rmtree(temp_out_dir) # 删除存放每帧画面的临时文件夹
print('删除临时文件夹', temp_out_dir)

可视化方案二:原始图像+预测结果文字+各类别置信度柱状图
def pred_single_frame_bar(img):
    '''
    输入pred_single_frame函数输出的bgr-array,加柱状图,保存
    '''
    img = cv2.cvtColor(img, cv2.COLOR_BGR2RGB) # BGR 转 RGB
    fig = plt.figure(figsize=(18,6))
    # 绘制左图-视频图
    ax1 = plt.subplot(1,2,1)
    ax1.imshow(img)
    ax1.axis('off')
    # 绘制右图-柱状图
    ax2 = plt.subplot(1,2,2)
    x = range(1000)
    y = pred_softmax.cpu().detach().numpy()[0]
    ax2.bar(x, y, alpha=0.5, width=0.3, color='yellow', edgecolor='red', lw=3)
    plt.xlabel('类别', fontsize=20)
    plt.ylabel('置信度', fontsize=20)
    ax2.tick_params(labelsize=16) # 坐标文字大小
    plt.ylim([0, 1.0]) # y轴取值范围
    plt.xlabel('类别',fontsize=25)
    plt.ylabel('置信度',fontsize=25)
    plt.title('图像分类预测结果', fontsize=30)

    plt.tight_layout()
    fig.savefig(f'{

      temp_out_dir}/{

      frame_id:06d}.jpg')
    # 释放内存
    fig.clf()
    plt.close()
    gc.collect()

# 创建临时文件夹,存放每帧结果
temp_out_dir = time.strftime('%Y%m%d%H%M%S')
os.mkdir(temp_out_dir)
print('创建文件夹 {} 用于存放每帧预测结果'.format(temp_out_dir))

# 读入待预测视频
imgs = mmcv.VideoReader(input_video)

prog_bar = mmcv.ProgressBar(len(imgs))

# 对视频逐帧处理
for frame_id, img in enumerate(imgs):

    ## 处理单帧画面
    img, pred_softmax = pred_single_frame(img, n=5)
    img = pred_single_frame_bar(img)

    prog_bar.update() # 更新进度条

# 把每一帧串成视频文件
mmcv.frames2video(temp_out_dir, 'output/output_bar2.mp4', fps=imgs.fps, fourcc='mp4v')

shutil.rmtree(temp_out_dir) # 删除存放每帧画面的临时文件夹
print('删除临时文件夹', temp_out_dir)
ImageNet预训练图像分类模型预测摄像头实时画面-英文
使用 ImageNet 预训练图像分类模型,预测摄像头实时画面。
本代码需在连接摄像头的本地运行。
import os

import numpy as np
import pandas as pd

import cv2 # opencv-python
from PIL import Image # pillow
from tqdm import tqdm # 进度条

import matplotlib.pyplot as plt
%matplotlib inline

import torch
import torch.nn.functional as F
from torchvision import models

# 有 GPU 就用 GPU,没有就用 CPU
device = torch.device('cuda:0' if torch.cuda.is_available() else 'cpu')
print('device:', device)
载入预训练图像分类模型
model = models.resnet18(pretrained=True)
model = model.eval()
model = model.to(device)
载入ImageNet 1000图像分类标签
ImageNet 1000类别中文释义:https://github.com/ningbonb/imagenet_classes_chinese
df = pd.read_csv('imagenet_class_index.csv')
idx_to_labels = {

    }
for idx, row in df.iterrows():
    idx_to_labels[row['ID']] = row['class']
图像预处理
from torchvision import transforms

# 测试集图像预处理-RCTN:缩放裁剪、转 Tensor、归一化
test_transform = transforms.Compose([transforms.Resize(256),
                                     transforms.CenterCrop(224),
                                     transforms.ToTensor(),
                                     transforms.Normalize(
                                         mean=[0.485, 0.456, 0.406],
                                         std=[0.229, 0.224, 0.225])
                                    ])
获取摄像头的一帧画面
# 导入opencv-python
import cv2
import time
# 获取摄像头,传入0表示获取系统默认摄像头
cap = cv2.VideoCapture(1)
# 打开cap
cap.open(0)
time.sleep(1)
success, img_bgr = cap.read()
# 关闭摄像头
cap.release()
# 关闭图像窗口
cv2.destroyAllWindows()
img_rgb = cv2.cvtColor(img_bgr, cv2.COLOR_BGR2RGB) # BGR转RGB
img_pil = Image.fromarray(img_rgb)
img_pil

input_img = test_transform(img_pil).unsqueeze(0).to(device) # 预处理
input_img.shape
torch.Size([1, 3, 224, 224])
得到置信度最大的五个结果
pred_logits = model(input_img) # 执行前向预测,得到所有类别的 logit 预测分数
pred_softmax = F.softmax(pred_logits, dim=1) # 对 logit 分数做 softmax 运算
n = 5
top_n = torch.topk(pred_softmax, n) # 取置信度最大的 n 个结果
confs = top_n[0].cpu().detach().numpy().squeeze()
confs
array([0.8217465 , 0.08967547, 0.00665209, 0.00427488, 0.00403459],dtype=float32)
pred_ids = top_n[1].cpu().detach().numpy().squeeze()
pred_ids
array([700, 999, 419, 929, 686], dtype=int64)
for i in range(len(confs)):
    pred_class = idx_to_labels[pred_ids[i]]
    text = '{:<15} {:>.3f}'.format(pred_class, confs[i])

    # 图片,添加的文字,左上角坐标,字体,字体大小,颜色,线宽,线型
    img_bgr = cv2.putText(img_bgr, text, (50, 80 + 80 * i), cv2.FONT_HERSHEY_SIMPLEX, 2.5, (0, 0, 255), 5, cv2.LINE_AA)

img_rgb = cv2.cvtColor(img_bgr, cv2.COLOR_BGR2RGB) # BGR转RGB
plt.imshow(img_rgb)
plt.show()

调用摄像头获取每帧
处理单帧画面的函数(英文)
# 处理帧函数
def process_frame(img):

    '''
    输入摄像头拍摄画面bgr-array,输出图像分类预测结果bgr-array
    '''

    # 记录该帧开始处理的时间
    start_time = time.time()

    img_rgb = cv2.cvtColor(img, cv2.COLOR_BGR2RGB) # BGR转RGB
    img_pil = Image.fromarray(img_rgb) # array 转 PIL
    input_img = test_transform(img_pil).unsqueeze(0).to(device) # 预处理
    pred_logits = model(input_img) # 执行前向预测,得到所有类别的 logit 预测分数
    pred_softmax = F.softmax(pred_logits, dim=1) # 对 logit 分数做 softmax 运算

    top_n = torch.topk(pred_softmax, 5) # 取置信度最大的 n 个结果
    pred_ids = top_n[1].cpu().detach().numpy().squeeze() # 解析预测类别
    confs = top_n[0].cpu().detach().numpy().squeeze() # 解析置信度

    # 在图像上写字
    for i in range(len(confs)):
        pred_class = idx_to_labels[pred_ids[i]]
        text = '{:<15} {:>.3f}'.format(pred_class, confs[i])

        # 图片,添加的文字,左上角坐标,字体,字体大小,颜色,线宽,线型
        img = cv2.putText(img, text, (50, 160 + 80 * i), cv2.FONT_HERSHEY_SIMPLEX, 1, (0, 0, 255), 3, cv2.LINE_AA)

    # 记录该帧处理完毕的时间
    end_time = time.time()
    # 计算每秒处理图像帧数FPS
    FPS = 1/(end_time - start_time)
    # 图片,添加的文字,左上角坐标,字体,字体大小,颜色,线宽,线型
    img = cv2.putText(img, 'FPS  '+str(int(FPS)), (50, 80), cv2.FONT_HERSHEY_SIMPLEX, 2, (255, 0, 255), 4, cv2.LINE_AA)

    return img
# 调用摄像头逐帧实时处理模板
# 不需修改任何代码,只需修改process_frame函数即可
# 导入opencv-python
import cv2
import time

# 获取摄像头,传入0表示获取系统默认摄像头
cap = cv2.VideoCapture(1)

# 打开cap
cap.open(0)

# 无限循环,直到break被触发
while cap.isOpened():
    # 获取画面
    success, frame = cap.read()
    if not success:
        print('Error')
        break

    ## !!!处理帧函数
    frame = process_frame(frame)

    # 展示处理后的三通道图像
    cv2.imshow('my_window',frame)

    if cv2.waitKey(1) in [ord('q'),27]: # 按键盘上的q或esc退出(在英文输入法下)
        break

# 关闭摄像头
cap.release()

# 关闭图像窗口
cv2.destroyAllWindows()
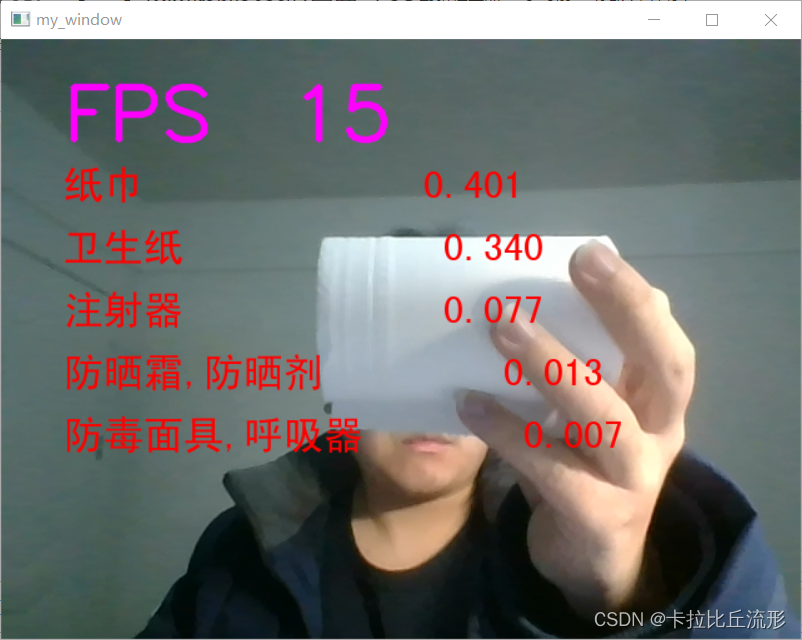
我们可以实时的对摄像头的画面进行预测

ImageNet预训练图像分类模型预测摄像头实时画面-中文
使用 ImageNet 预训练图像分类模型,预测摄像头实时画面。
本代码需在连接摄像头的本地运行。
import os

import numpy as np
import pandas as pd

import cv2 # opencv-python
from PIL import Image, ImageFont, ImageDraw
from tqdm import tqdm # 进度条

import matplotlib.pyplot as plt
%matplotlib inline

import torch
import torch.nn.functional as F
from torchvision import models

# 有 GPU 就用 GPU,没有就用 CPU
device = torch.device('cuda:0' if torch.cuda.is_available() else 'cpu')
print('device:', device)

## 导入中文字体
# 下载中文字体文件
# !wget https://zihao-openmmlab.obs.cn-east-3.myhuaweicloud.com/20220716-mmclassification/dataset/SimHei.ttf

# 导入中文字体,指定字号
font = ImageFont.truetype('SimHei.ttf', 32)
载入预训练图像分类模型
model = models.resnet18(pretrained=True)
model = model.eval()
model = model.to(device)
载入ImageNet 1000图像分类标签
ImageNet 1000类别中文释义:https://github.com/ningbonb/imagenet_classes_chinese
# 载入ImageNet 1000图像分类标签
df = pd.read_csv('imagenet_class_index.csv')
idx_to_labels = {

    }
for idx, row in df.iterrows():
    idx_to_labels[row['ID']] = row['Chinese']
图像预处理
from torchvision import transforms

# 测试集图像预处理-RCTN:缩放裁剪、转 Tensor、归一化
test_transform = transforms.Compose([transforms.Resize(256),
                                     transforms.CenterCrop(224),
                                     transforms.ToTensor(),
                                     transforms.Normalize(
                                         mean=[0.485, 0.456, 0.406],
                                         std=[0.229, 0.224, 0.225])
                                    ])
获取摄像头的一帧画面
# 导入opencv-python
import cv2
import time

# 获取摄像头,传入0表示获取系统默认摄像头
cap = cv2.VideoCapture(1)
# 打开cap
cap.open(0)
time.sleep(1)

success, img_bgr = cap.read()

# 关闭摄像头
cap.release()

# 关闭图像窗口
cv2.destroyAllWindows()
img_rgb = cv2.cvtColor(img_bgr, cv2.COLOR_BGR2RGB) # BGR转RGB
img_pil = Image.fromarray(img_rgb)
img_pil

input_img = test_transform(img_pil).unsqueeze(0).to(device) # 预处理
pred_logits = model(input_img) # 执行前向预测,得到所有类别的 logit 预测分数
pred_softmax = F.softmax(pred_logits, dim=1) # 对 logit 分数做 softmax 运算

n = 5
top_n = torch.topk(pred_softmax, n) # 取置信度最大的 n 个结果
pred_ids = top_n[1].cpu().detach().numpy().squeeze() # 解析出类别
confs = top_n[0].cpu().detach().numpy().squeeze() # 解析出置信度

draw = ImageDraw.Draw(img_pil)
# 在图像上写字
for i in range(len(confs)):
    pred_class = idx_to_labels[pred_ids[i]]
    text = '{:<15} {:>.3f}'.format(pred_class, confs[i])
    # 文字坐标,中文字符串,字体,rgba颜色
    draw.text((50, 100 + 50 * i), text, font=font, fill=(255, 0, 0, 1))
img = np.array(img_pil) # PIL 转 array

plt.imshow(img)
plt.show()

调用摄像头获取每帧
处理单帧画面的函数(中文)
# 处理帧函数
def process_frame(img):

    # 记录该帧开始处理的时间
    start_time = time.time()

    img_rgb = cv2.cvtColor(img, cv2.COLOR_BGR2RGB) # BGR转RGB
    img_pil = Image.fromarray(img_rgb) # array 转 PIL
    input_img = test_transform(img_pil).unsqueeze(0).to(device) # 预处理
    pred_logits = model(input_img) # 执行前向预测,得到所有类别的 logit 预测分数
    pred_softmax = F.softmax(pred_logits, dim=1) # 对 logit 分数做 softmax 运算

    top_n = torch.topk(pred_softmax, 5) # 取置信度最大的 n 个结果
    pred_ids = top_n[1].cpu().detach().numpy().squeeze() # 解析预测类别
    confs = top_n[0].cpu().detach().numpy().squeeze() # 解析置信度

    # 使用PIL绘制中文
    draw = ImageDraw.Draw(img_pil)
    # 在图像上写字
    for i in range(len(confs)):
        pred_class = idx_to_labels[pred_ids[i]]
        text = '{:<15} {:>.3f}'.format(pred_class, confs[i])
        # 文字坐标,中文字符串,字体,bgra颜色
        draw.text((50, 100 + 50 * i),  text, font=font, fill=(255, 0, 0, 1))
    img = np.array(img_pil) # PIL 转 array
    img = cv2.cvtColor(img, cv2.COLOR_RGB2BGR) # RGB转BGR

    # 记录该帧处理完毕的时间
    end_time = time.time()
    # 计算每秒处理图像帧数FPS
    FPS = 1/(end_time - start_time)
    # 图片,添加的文字,左上角坐标,字体,字体大小,颜色,线宽,线型
    img = cv2.putText(img, 'FPS  '+str(int(FPS)), (50, 80), cv2.FONT_HERSHEY_SIMPLEX, 2, (255, 0, 255), 4, cv2.LINE_AA)
    return img
# 调用摄像头逐帧实时处理模板
# 不需修改任何代码,只需修改process_frame函数即可

# 导入opencv-python
import cv2
import time

# 获取摄像头,传入0表示获取系统默认摄像头
cap = cv2.VideoCapture(1)

# 打开cap
cap.open(0)

# 无限循环,直到break被触发
while cap.isOpened():
    # 获取画面
    success, frame = cap.read()
    if not success:
        print('Error')
        break

    ## !!!处理帧函数
    frame = process_frame(frame)

    # 展示处理后的三通道图像
    cv2.imshow('my_window',frame)

    if cv2.waitKey(1) in [ord('q'),27]: # 按键盘上的q或esc退出(在英文输入法下)
        break

# 关闭摄像头
cap.release()

# 关闭图像窗口
cv2.destroyAllWindows()
总结
本篇文章主要介绍了用预训练模型进行图像分类预测的步骤以及三个应用场景,包括对单张图片的预测、视频文件的预测和摄像头实时画面的预测。无论是针对哪种任务,都要载入预训练好的图像分类模型、对图像进行预处理。
- 针对单张图片的预测任务,可以利用预训练的模型得到所有类别的预测概率,从而选择概率最大的类别
- 针对视频文件的预测任务,我们需要对视频逐帧处理(图像分类任务),再把每一帧串成视频文件
- 摄像头实时画面预测任务,和视频文件的预测任务类似,只不过是通过摄像头得到每一帧的画面
我们使用的预训练模型是resnet18模型,我们可以使用其它的模型来提高预测的准确率。https://github.com/open-mmlab/mmclassification