
异步编排CompletableFuture
查询商品详情页的逻辑非常复杂,数据的获取都需要远程调用,必然需要花费更多的时间。
假如商品详情页的每个查询,需要如下标注的时间才能完成
// 1. 获取sku的基本信息 0.5s

// 2. 获取sku的图片信息 0.5s

// 3. 获取sku的促销信息 TODO 1s

// 4. 获取spu的所有销售属性 1s

// 5. 获取规格参数组及组下的规格参数 TODO 1.5s

// 6. spu详情 TODO 1s
那么,用户需要6.5s后才能看到商品详情页的内容。很显然是不能接受的。
如果有多个线程同时完成这6步操作,也许只需要1.5s即可完成响应。
java8提供了基于FutureTask+Callable封装的一个类:CompletableFuture,提供了函数式编程的能力,可以通过回调的方式处理计算结果,同时还可以将多个有任务前后依赖关系的任务使用队列按顺序执行
使用Callable接口,可以返回子线程执行的结果和异常 ,可以优化查询商品详情的业务方法,但是使用繁琐
===============
CompletableFuture 实现了Future接口,可以获取任务执行的结果 或者任务执行的状态
CompletableFuture 实现了 CompletionStage接口,可以对多个任务进行编排,控制任务按什么顺序执行
//java.util.concurrent.CompletableFuture
public class CompletableFuture<T> implements Future<T>, CompletionStage<T> {

}
1、初始化执行异步任务
CompletableFuture 提供了四个静态方法来创建异步任务。
static CompletableFuture<Void> runAsync(Runnable runnable) public static CompletableFuture<Void> runAsync(Runnable runnable, Executor executor) public static <U> CompletableFuture<U> supplyAsync(Supplier<U> supplier) public static <U> CompletableFuture<U> supplyAsync(Supplier<U> supplier, Executor executor)没有指定Executor的方法会使用ForkJoinPool.commonPool() 作为它的线程池执行异步代码。如果指定线程池,则使用指定的线程池运行
runAsync方法不支持返回值
//1、初始化执行异步任务:
//1.1 使用默认的线程池(ForkJoinPool#commonPool()) 执行异步任务 不需要参数也不返回结果
CompletableFuture.runAsync(()->{
    System.out.println(Thread.currentThread().getName()+" 1 ");
});
//1.2 使用指定线程池执行异步任务
Executor executor = Executors.newFixedThreadPool(3);
CompletableFuture.runAsync(()->{
    System.out.println(Thread.currentThread().getName()+" 2 ");
},executor);
运行结果:

supplyAsync可以支持返回值
 //1.3初始化执行异步任务
 CompletableFuture<String> future = CompletableFuture.supplyAsync(() -> {
     System.out.println(Thread.currentThread().getName() + "3");
     return "芭比Q";
 });
 //阻塞获取异步任务的结果
 System.out.println(future.get());
运行结果

2、CompletableFuture串行执行
串行化:需要前后关联的任务,如某个任务需要使用另一个任务的返回结果
方法不以Async结尾,意味着Action使用相同的线程执行,
方法以Async结尾可能会使用其他线程执行(如果是使用相同的线程池,也可能会被同一个线程选中执行)
thenRun:不需要使用上一个任务的结果,也不返回结果 ,使用上一个任务的线程执行
thenRunAsync:不需要使用上一个任务的结果,也不返回结果,不一定使用上一个任务的线程
CompletableFuture.supplyAsync(()->{
    System.out.println(Thread.currentThread().getName()+" 一鸣惊人" + new Date());
    try {
        Thread.sleep(1000);
    } catch (InterruptedException e) {
        e.printStackTrace();
    }
    return "芭比 Q";
})
        //串行化方法1:thenRun   不需要使用上一个任务的结果,也不返回结果  ,使用上一个任务的线程执行
        .thenRun(()->{
            System.out.println(Thread.currentThread().getName()+" 俩全其美" + new Date());
            try {
                Thread.sleep(1000);
            } catch (InterruptedException e) {
                e.printStackTrace();
            }
        })
        //串行化方法2:thenRunAsync  不需要使用上一个任务的结果,也不返回结果,不一定使用上一个任务的线程
        .thenRunAsync(()->{
            System.out.println(Thread.currentThread().getName()+" 三阳开泰" + new Date());
        });
System.in.read();
运行结果,达到了串行执行的目的

thenAcceptAsync:需要使用上一个任务的结果 自己没有返回结果
thenApplyAsync:接收上一个任务的结果 自己也返回结果
CompletableFuture.supplyAsync(()->{
    System.out.println(Thread.currentThread().getName()+" 一鸣惊人" + new Date());
    try {
        Thread.sleep(1000);
    } catch (InterruptedException e) {
        e.printStackTrace();
    }
    return "芭比 Q";
})
        //串行化方法3: thenApplyAsync 接收上一个任务的结果 自己也返回结果
        .thenApplyAsync((r1)->{ //r代表上一个任务的结果
            System.out.println(Thread.currentThread().getName()+" 俩全其美" + new Date());
            System.out.println("r1:"+r1);
            try {
                Thread.sleep(1000);
            } catch (InterruptedException e) {
                e.printStackTrace();
            }
            return "大冤种";
        })
        //串行化方法4:thenAcceptAsync  需要使用上一个任务的结果 自己没有返回结果
        .thenAcceptAsync((r2)->{
            System.out.println(Thread.currentThread().getName()+" 三阳开泰" + new Date());
            System.out.println("r2:"+r2);
        });
System.in.read();
运行结果

3、计算完成时方法
当CompletableFuture的计算结果完成,或者抛出异常的时候,可以执行特定的Action。主要是下面的方法:
public CompletableFuture<T> whenComplete(BiConsumer<? super T,? super Throwable> action);
public CompletableFuture<T> whenCompleteAsync(BiConsumer<? super T,? super Throwable> action);
public CompletableFuture<T> whenCompleteAsync(BiConsumer<? super T,? super Throwable> action, Executor executor);

public CompletableFuture<T> exceptionally(Function<Throwable,? extends T> fn);whenComplete可以处理正常和异常的计算结果,exceptionally处理异常情况
exceptionally 上一个任务有异常时会执行并返回一个默认值,上一个任务没有异常不会执行
CompletableFuture.supplyAsync(() -> {
    System.out.println(Thread.currentThread().getName() + " 3 " + new Date());
    try {
        Thread.sleep(1000);
    } catch (InterruptedException e) {
        e.printStackTrace();
    }
    int i = 1 / 0;
    return "大变活人";
})
        //计算完成时方法:exceptionally  上一个任务有异常时会执行并返回一个默认值, 上一个任务没有异常不会执行
        .exceptionally((e) -> {
            System.out.println(Thread.currentThread().getName() + " e " + new Date());
            System.out.println(e);
            return "有异常--小心爆炸";
        })
        .thenAcceptAsync((u) -> {
            System.out.println(Thread.currentThread().getName() + " 4 " + new Date() + " u: " + u);
        });
System.in.read();
有异常时测试结果,运行结果
如下,注释掉这一行异常代码
上一个任务没有异常时,运行结果:


whenCompleteAsync 可以接受上一个任务返回的结果或者异常
CompletableFuture.supplyAsync(() -> {
    System.out.println(Thread.currentThread().getName() + " 3 " + new Date());
    try {
        Thread.sleep(1000);
    } catch (InterruptedException e) {
        e.printStackTrace();
    }
    int i = 1 / 0;
    return "大变活人";
})
//计算完成时:whenCompleteAsync 可以接受上一个任务返回的结果或者异常
.whenCompleteAsync((u,e)->{
    System.out.println("异常:"+ e);
    System.out.println("结果:"+ u);
});
System.in.read();
有异常时,运行结果,,有异常走不到return了,所以返回结果是null
注释掉异常,再测试
运行结果


4、组合任务
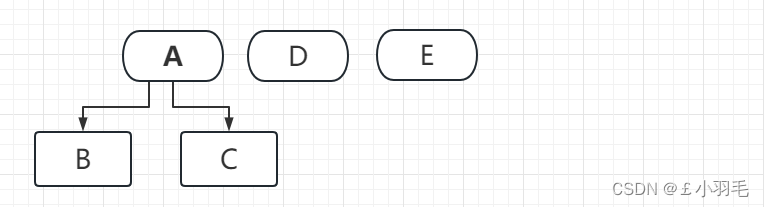
多任务并行串行组合执行
A,D,E并行
B,C并行,且B、C在A执行完成后执行
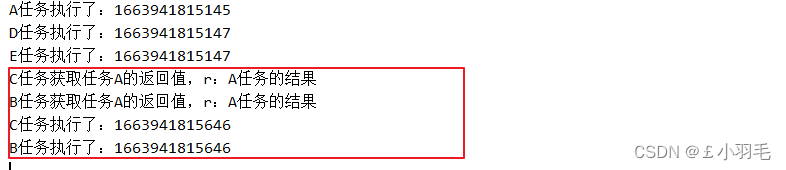
@Test
void contextLoads() throws IOException {
    CompletableFuture<String> ac = CompletableFuture.supplyAsync(() -> {
        System.out.println("A任务执行了:" + System.currentTimeMillis());
        try {
            Thread.sleep(500);
        } catch (InterruptedException e) {
            e.printStackTrace();
        }
        return "A任务的结果";
    });
    //B,C并行,且B、C在A执行完成后执行
    ac.thenAcceptAsync((r)->{
        System.out.println("B任务获取任务A的返回值,r:"+r);
        System.out.println("B任务执行了:" + System.currentTimeMillis());
    });
    ac.thenAcceptAsync((r)->{
        System.out.println("C任务获取任务A的返回值,r:"+r);
        System.out.println("C任务执行了:" + System.currentTimeMillis());
    });
    //D,E和 A并行执行
    CompletableFuture.runAsync(() -> {
        System.out.println("D任务执行了:" + System.currentTimeMillis());
    });
    CompletableFuture.runAsync(()->{
        System.out.println("E任务执行了:"+ System.currentTimeMillis());
    });
    System.in.read();
}
运行结果:
5、allOf 等待所有任务完成
anyOf:只要有一个任务完成
 CompletableFuture<String> a = CompletableFuture.supplyAsync(() -> {
     System.out.println("A任务执行了:" + System.currentTimeMillis());
     try {
         Thread.sleep(500);
     } catch (InterruptedException e) {
         e.printStackTrace();
     }
     return "A任务的结果";
 });
 //B,C并行,且B、C在A执行完成后执行
 CompletableFuture<Void> b = a.thenAcceptAsync((u) -> {
     System.out.println("B任务执行了:" + u + " , " + System.currentTimeMillis());
     try {
         Thread.sleep(500);
     } catch (InterruptedException e) {
         e.printStackTrace();
     }
 });
 CompletableFuture<Void> c = a.thenAcceptAsync((u) -> {
     System.out.println("C任务执行了:" + u + " , " + System.currentTimeMillis());
 });
 //D,E 和 A并行执行
 CompletableFuture<Void> d = CompletableFuture.runAsync(() -> {
     System.out.println("D任务执行了:" + System.currentTimeMillis());
 });
 CompletableFuture<Void> e = CompletableFuture.runAsync(() -> {
     System.out.println("E任务执行了:" + System.currentTimeMillis());
 });
 //CompletableFuture.allOf 多个任务都完成后才可以继续执行,像一个栅栏
 CompletableFuture.allOf(a,b,c,d,e).get();
 System.out.println("所有任务都执行结束了...."+ new Date());
 System.in.read();
运行结果

6、异步编排优化-商品详情页
商品详情呢是根据skuId查询好多好多数据,都要去远程服务调用别的服务查询,非常的慢。。
假如商品详情页的每个查询,需要如下标注的时间才能完成
// 1. 获取sku的基本信息 0.5s
// 2. 获取sku的图片信息 0.5s
// 3. 获取sku的促销信息 TODO 1s
// 4. 获取spu的所有销售属性 1s
// 5. 获取规格参数组及组下的规格参数 TODO 1.5s
// 6. spu详情 TODO 1s那么,用户需要6.5s后才能看到商品详情页的内容。很显然是不能接受的。
所以使用异步编排优化查询效率
@GetMapping("{skuId}.html")
public String load(@PathVariable("skuId")Long skuId,Model model){
    ItemVo itemVo = this.itemService.load(skuId);
    model.addAttribute("itemVo",itemVo);
    return "item";
}
自定义线程池+抽取参数
1、抽取参数到配置文件
在application.yml中,自定义键如下:(抽取阿里云参数的时候也用过)
pool:
  params:
    corePoolSize: 20
    maxmumPoolSize: 100
    keepAliveTime: 60
    workQueueSize: 100
2、编写配置绑定类
@Data
@ConfigurationProperties("pool.params")
@Component
public class PoolProperties {
    Integer corePoolSize;
    Integer  maxmumPoolSize;
    Integer  keepAliveTime;
    Integer workQueueSize;
}
3、使用配置类注入线程池对象
@Configuration
public class ThreadPoolConfig {
    @Autowired
    PoolProperties poolProperties;

    @Bean
    public ThreadPoolExecutor executor(){
        return new ThreadPoolExecutor(
                poolProperties.getCorePoolSize(),
                poolProperties.maxmumPoolSize,
                poolProperties.getKeepAliveTime(), TimeUnit.SECONDS,
                new ArrayBlockingQueue<>(poolProperties.getWorkQueueSize()),
                Executors.defaultThreadFactory()
        );
    }
}
4、在代码中使用
@SpringBootTest
class Spingboot01ApplicationTests {

    @Autowired
    ThreadPoolExecutor executor;

    @Test
    void contextLoads() throws IOException {
        System.out.println(executor);
    }
}
运行结果:注入成功

nginx页面静态化
1、页面静态化
目前存在的问题
Redis适合数据规模比较小的情况。假如数据量比较大,例如我们的商品详情页。每个页面如果10kb,100万商品,就是10GB空间,对内存占用比较大。此时就给缓存系统带来极大压力,如果缓存崩溃,接下来倒霉的就是数据库了
什么是页面静态化
静态化是指把动态生成的HTML页面变为静态内容持久化,以后用户的请求到来,直接访问静态页面,不再经过服务的渲染;同时如果有些操作需要更新页面对应的数据,可以删除静态化的html文件
页面静态化:比较适合大规模且相对变化不太频繁的数据。例如:商品详情页
页面静态化和缓存比较
网页静态化技术和缓存技术都可以提高服务器的并发能力,并降低数据库的并发压力。
二者又有很大不同:
存放位置不同:页面静态化存储到硬盘,缓存存储到内存。
原理不同:页面静态化利用静态页面访问速度远高于动态页面的速度;缓存利用内存访问速度远大于硬盘的访问速度。
适用场景不同:
页面静态化:比较适合大规模且相对变化不太频繁的数据。例如:商品详情页、秒杀。
缓存:比较适合数据规模相对较小,并发相对比较频繁的场景。例如:首页三级分类、库存等
2、如何生成静态页面到本地
目前,静态化页面都是通过模板引擎(如Thymeleaf )来生成,而后保存到nginx服务器来部署
只要引入thymeleaf启动器,springboot就会初始化TemplateEngine对象。
<dependency>
    <groupId>org.springframework.boot</groupId>
    <artifactId>spring-boot-starter-thymeleaf</artifactId>
</dependency>TemplateEngine就是thymeleaf页面静态化的模板引擎类,使用方式如下:
@Autowired
private TemplateEngine templateEngine;

templateEngine.process(String template, IContext context, Writer writer);
代码中使用如下
在输出时,我们可以指定输出的目的地,如果目的地是Response的流,那就是网络响应。如果目的地是本地文件,那就实现静态化了。
//参数1:模板页面,生成静态化页面的 html模板页面(item.html)
String pageName="item";
//参数2:上下文对象,用来给模板页面共享数据(类似Model)
Context context = new Context();
context.setVariable("itemVo",itemVo);
//参数3:输出流 目的地,需要使用skuId作为页面的名称,skuId唯一
PrintWriter writer = new PrintWriter("E:\\"+itemVo.getSkuId()+".html");
templateEngine.process(pageName,context,writer);
3、通过nginx访问静态页面
1.创建目录存放静态化文件

2.在nginx配置文件中添加如下配置:
nginx判断一个文件是不是不存在
server {
    listen       80;
    server_name  item.gmall.com;

    proxy_set_header Host $Host;

    location / {
        # 先访问静态页面
        root /opt/html;
        # 如果静态页面不存在,则访问代理服务器。动态加载页面
        if (!-f $request_filename){
            #172.16.116.10:8888 是本机网关
            proxy_pass http://172.16.116.10:8888;
            break;
        }
    }
}
以后skuId数据被修改删除时 如果影响到了nginx的静态化页面内容,需要删除nginx缓存的静态化的页面(io)