"对A,我还剩一张牌啦!"
"呃。。。要不起"

周六(12-03),早上刷到印度的三相神。梵天,毗湿奴,湿婆,看来很多个相关的视频介绍,结果睡觉(不管是在床上还是在桌子上)的时候,脑子里都是创造与毁灭。。。
周末(12-11),放纵得看了一天de恐怖末日小说(林叔护体),后来我知道为啥自己管不住自己了。少了一样东西,所以有了那样东西,我才能认真去完成这篇博客
周末(12-17,12-18)俩天被洗脑了,看了好几个主播的“鸭鹅杀”。脑子里总是那一句:“叼得一发言:叼的一认为.....,对是不对”
Vue CLI
Vue CLI 是一个基于 Vue.js 进行快速开发的完整系统(脚手架)
参考官网:介绍 | Vue CLI
CLI (@vue/cli) 是一个全局安装的 npm 包,提供了终端里的 vue 命令。它可以通过 vue create 快速搭建一个新项目,或者直接通过 vue serve 构建新想法的原型。你也可以通过 vue ui 通过一套图形化界面管理你的所有项目。
1.安装vue cli
在这之前,确保安装了Node(推荐 v10 以上)
npm install -g @vue/cli验证它是否安装成功
vue --version如下:则安装成功

2.创建项目
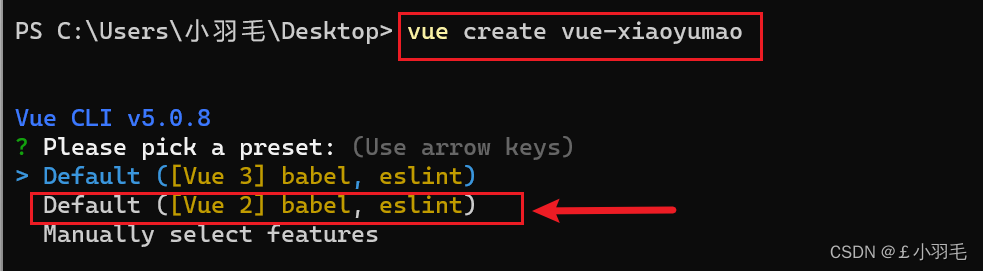
vue create 项目名
vue create vue-xiaoyumao
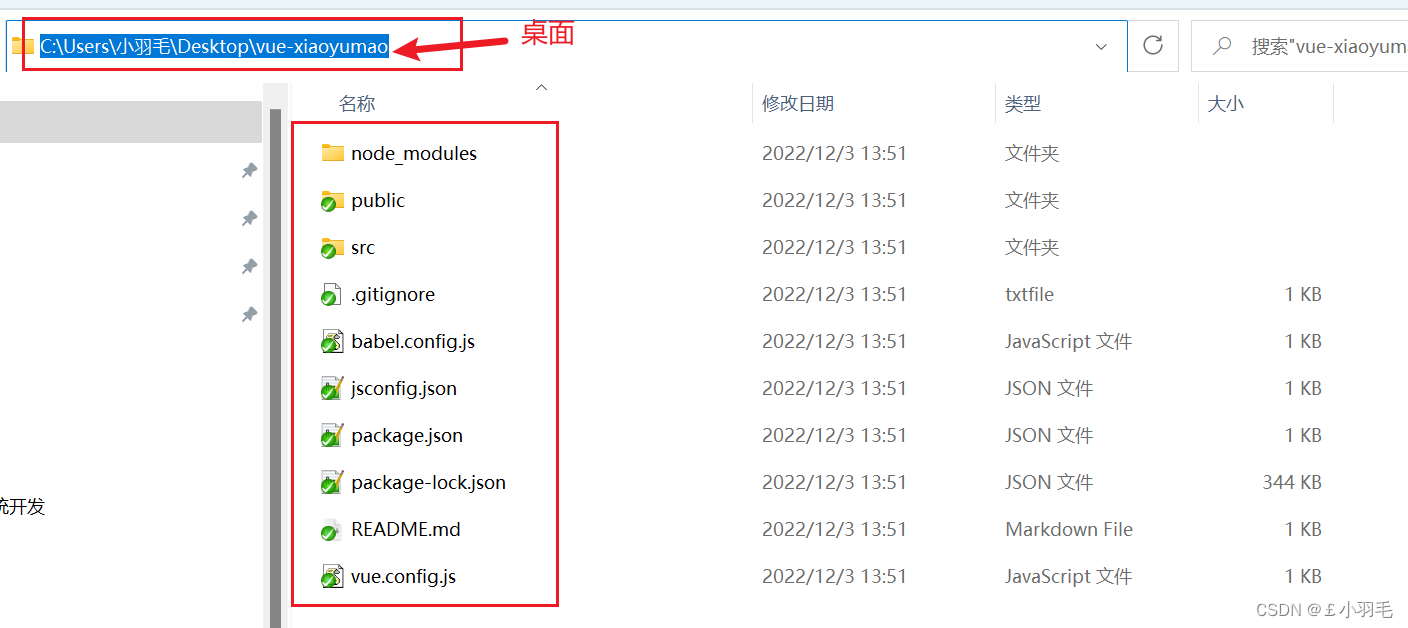
选择vue2 ,回车,完成后就会在桌面生成一个文件夹
3.项目目录结构分析
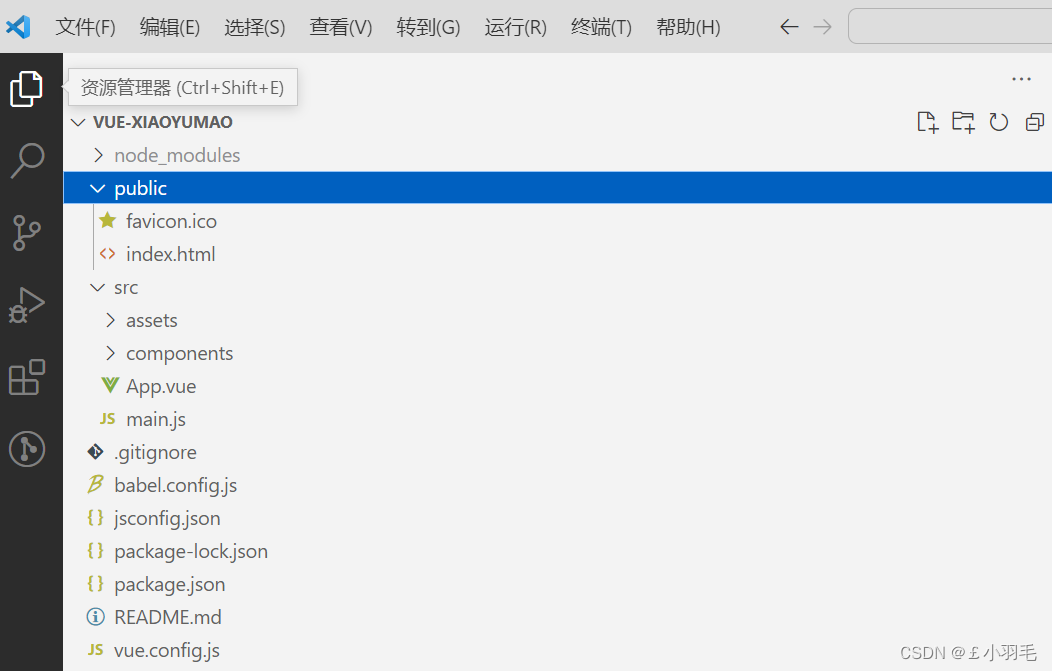
使用VsCode打开
main.js 是 npm run serve 的开端
import Vue from 'vue'
import App from './App.vue'

Vue.config.productionTip = false

new Vue({
  render: h => h(App),
}).$mount('#app')
index.html
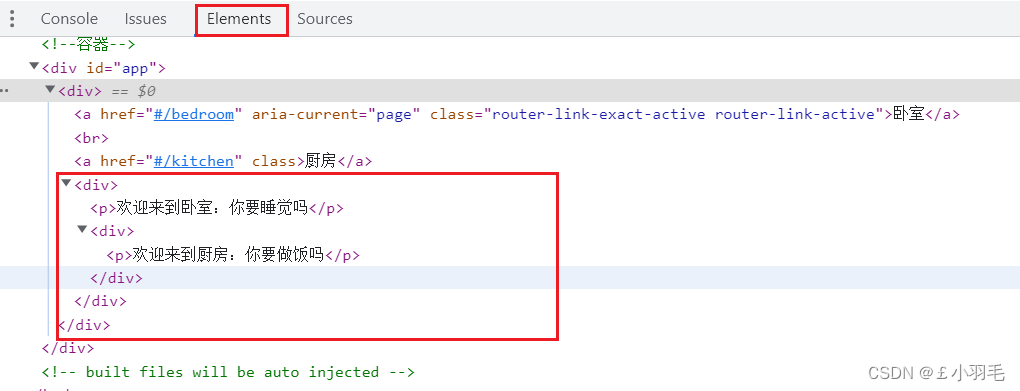
<!DOCTYPE html>
<html lang="">
  <head>
    <meta charset="utf-8">
    <meta http-equiv="X-UA-Compatible" content="IE=edge">
    <!--开启移动端的理想视口-->
    <meta name="viewport" content="width=device-width,initial-scale=1.0">
    <!--配置页签图标-->
    <link rel="icon" href="<%= BASE_URL %>favicon.ico">
    <!--配置网页标题-->
    <title><%= htmlWebpackPlugin.options.title %></title>
  </head>
  <body>
    <!--当浏览器不支持js时noscript中的元素就会被渲染 -->
    <noscript>
      <strong>We're sorry but <%= htmlWebpackPlugin.options.title %> doesn't work properly without JavaScript enabled. Please enable it to continue.</strong>
    </noscript>
    <!--容器-->
    <div id="app"></div>
    <!-- built files will be auto injected -->
  </body>
</html>
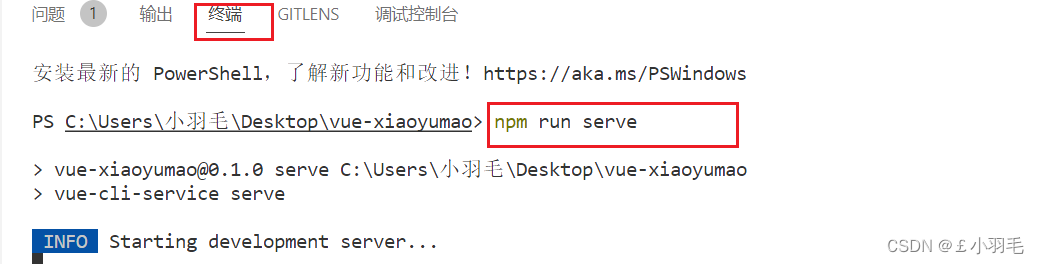
4.npm run serve 启动项目
打开终端,执行 npm run serve 命令
补充:npm run build 命令会生成最纯粹的js,css,html
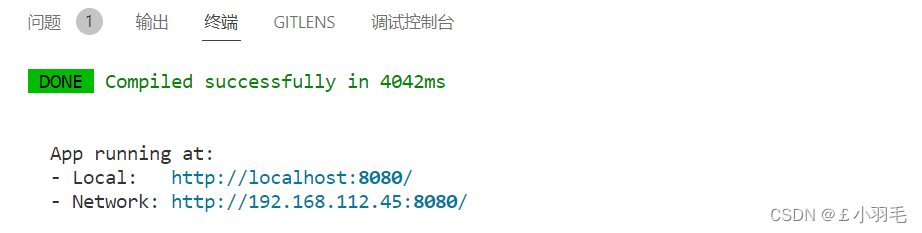
最后的效果
ctrl+单击网址(哪个都行),出现如下页面就欧克了

接下来换成我们自己写的组件进行渲染
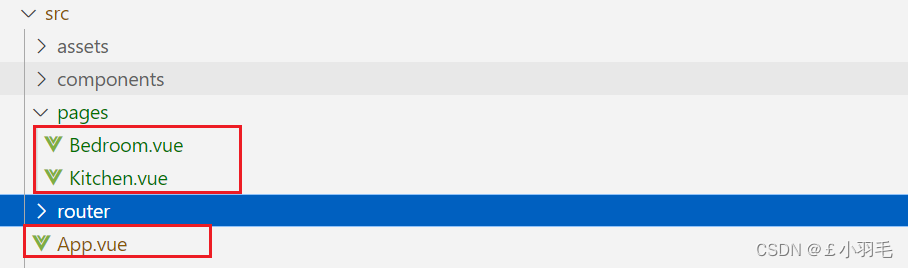
新建pages目录,下面建2个.vue文件
新增Bedroom.vue
<template>
  <div>
    <p>{

    { msg }}</p>
  </div>
</template>

<script>
export default {
  // eslint-disable-next-line vue/multi-word-component-names
  name: "Bedroom",
  data() {
    return {
      msg: "欢迎来到卧室:你要睡觉吗",
    };
  },
};
</script>
新增Kitchen.vue
<template>
  <div>
    <p>{

    { msg }}</p>
  </div>
</template>

<script>
export default {
  // eslint-disable-next-line vue/multi-word-component-names
  name: "Kitchen",
  data() {
    return {
      msg: '欢迎来到厨房:你要做饭吗',
    };
  },
};
</script>
修改App.vue,引入我们自定义的2个组件并注册使用。如下:
<template>
  <div id="app">
    <Bedroom />
    <Kitchen />
  </div>
</template>

<script>
import Bedroom from "./pages/Bedroom.vue";
import Kitchen from "./pages/Kitchen.vue";
export default {
  name: "App",
  components: {
    Bedroom,
    Kitchen,
  },
};
</script>
页面打开后,渲染效果如下:

组件component
1、组件概念
模块化(只针对js文件)请参考:
22-08-02 西安 尚医通(02)Vscode、ES6、nodejs、npm、Bable转码器、js模块化、webpack_£小羽毛的博客-CSDN博客_尚医通 nodejs 实现
组件的定义
实现应用中局部功能代码(js,css,html)和资源的集合
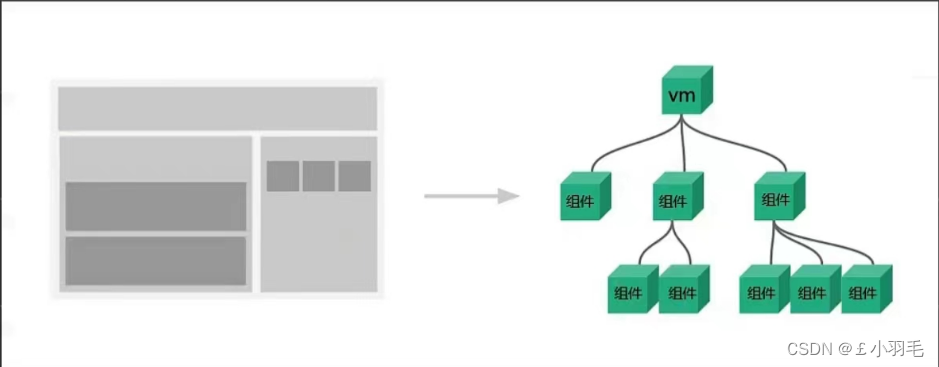
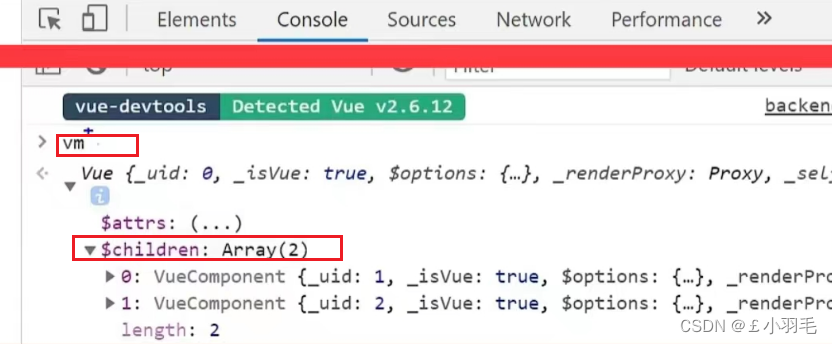
从上图得出2点结论:
1.所有的组件都要听大哥vm的指挥
2.组件可以产生嵌套
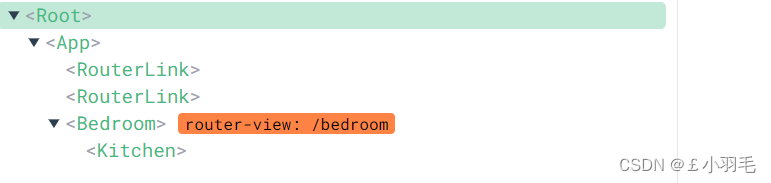
2、组件嵌套
在单文件组件Bedroom.vue种引入Kitchen组件并使用:
<!--Bedroom组件内容--> <template> <div> <p>{ { msg }}</p> <kitchen/> </div> </template> <script> import Kitchen from './Kitchen.vue'; export default { components: { Kitchen }, // eslint-disable-next-line vue/multi-word-component-names name: "Bedroom", data() { return { msg: "欢迎来到卧室:你要睡觉吗", }; }, }; </script> --------------------------------- <!--Kitchen组件内容--> <template> <div> <p>{ { msg }}</p> </div> </template> <script> export default { // eslint-disable-next-line vue/multi-word-component-names name: "Kitchen", data() { return { msg: '欢迎来到厨房:你要做饭吗', }; }, }; </script>打开vue开发者工具,直观效果"组件嵌套"
页面显示效果:
光标放在Bedroom标签:
光标放在Kitchen标签上:
实际上在源码里:
div元素没有特定的含义,一般和CSS一同使用。用于对内容块设置样式属性。浏览器会在其前后显示折行。


VM非常省心,只管理app组件(约定)
3、VueComponent(简称VC)
VueComponent的实例对象,以后简称vc(也可称之为:组件实例对象)。
Vue的实例对象,以后简称vm。
组件本质
1、Bedroom组件本质是一个名为VueComponent的构造函数,且不是程序员定义的,是Vue.extend生成的。
2、我们只需要写<Bedroom/>或<Bedroom></Bedroom>,Vue解析时会帮我们创建Bedroom组件的实例对象,即Vue帮我们执行的:new VueComponent(options).3.特别注意:每次调用Vue.extend,返回的都是一个全新的VueComponent!!!!
关于this指向:
(1)组件配置中:
data函数、methods中的函数、watch中的函数、computed中的函数它们的this均是vc【VueComponent实例对象】
(2)new Vue(options)配置中:
data函数、methods中的函数、watch中的函数、computed中的函数它们的this均是【Vue实例对象】
vm管理着vc
vm能通过el决定为哪个容器服务,vc不行,只能跟着大哥vm混
vc中,data必须是一个函数,vm中可以是data函数也可以是data对象
组件通信
1.父传子props
让组件接收外部传过来的数据
接收数据:
第一种方式(只接收):props:['name']
第二种方式(限制数据类型):props:{name:String}
第三种方式(限制类型、限制必要性、指定默认值):
props:{
name:{
type:String, //类型
required:true, //必要性
default:'JOJO' //默认值
}
}
2.子传父this.$emit
触发自定义事件:this.$emit('atguigu',数据)
3.this.$refs
应用在html标签上获取的是真实DOM元素,应用在组件标签上获取的是组件实例对象(vc)
使用方式:
打标识:<h1 ref="xxx"></h1> 或 <School ref="xxx"></School>
获取:this.$refs.xxx
SlOT插槽
1.默认插槽
先弄一个基本效果
创建Category.vue
<template>
  <div class="category">
    <h3>{

    {title}}分类</h3>
    <ul>
      <li v-for="(item,index) in listData" :key="index">{

    {item}}</li>
    </ul>
  </div>
</template>

<script>
export default {
  name: "Category",
  props:['listData','title']
};
</script>

<style>
.category {
  background-color: aqua;
  width: 200px;
  height: 300px;
}
h3{
    text-align: center;
    background-color: burlywood;
}
</style>
在App.vue中引入并使用Category.vue
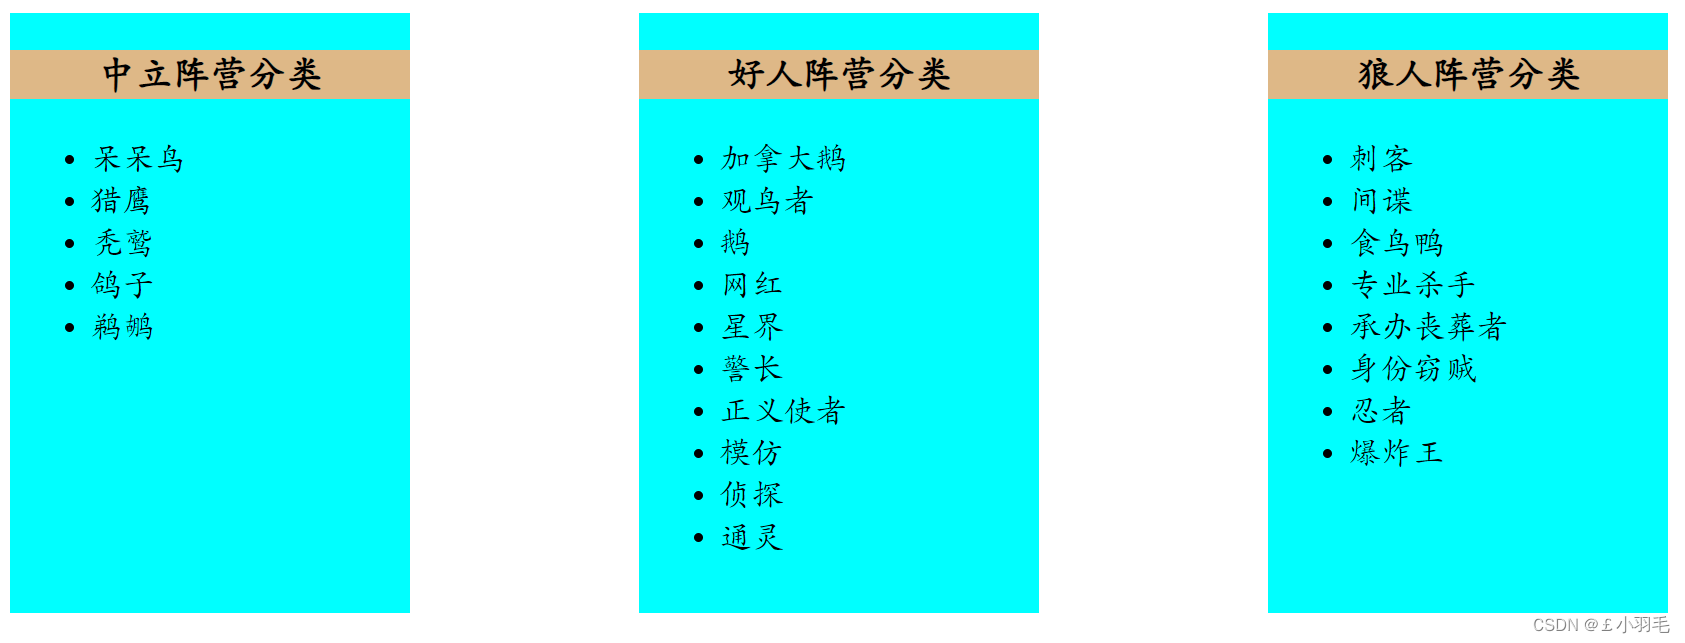
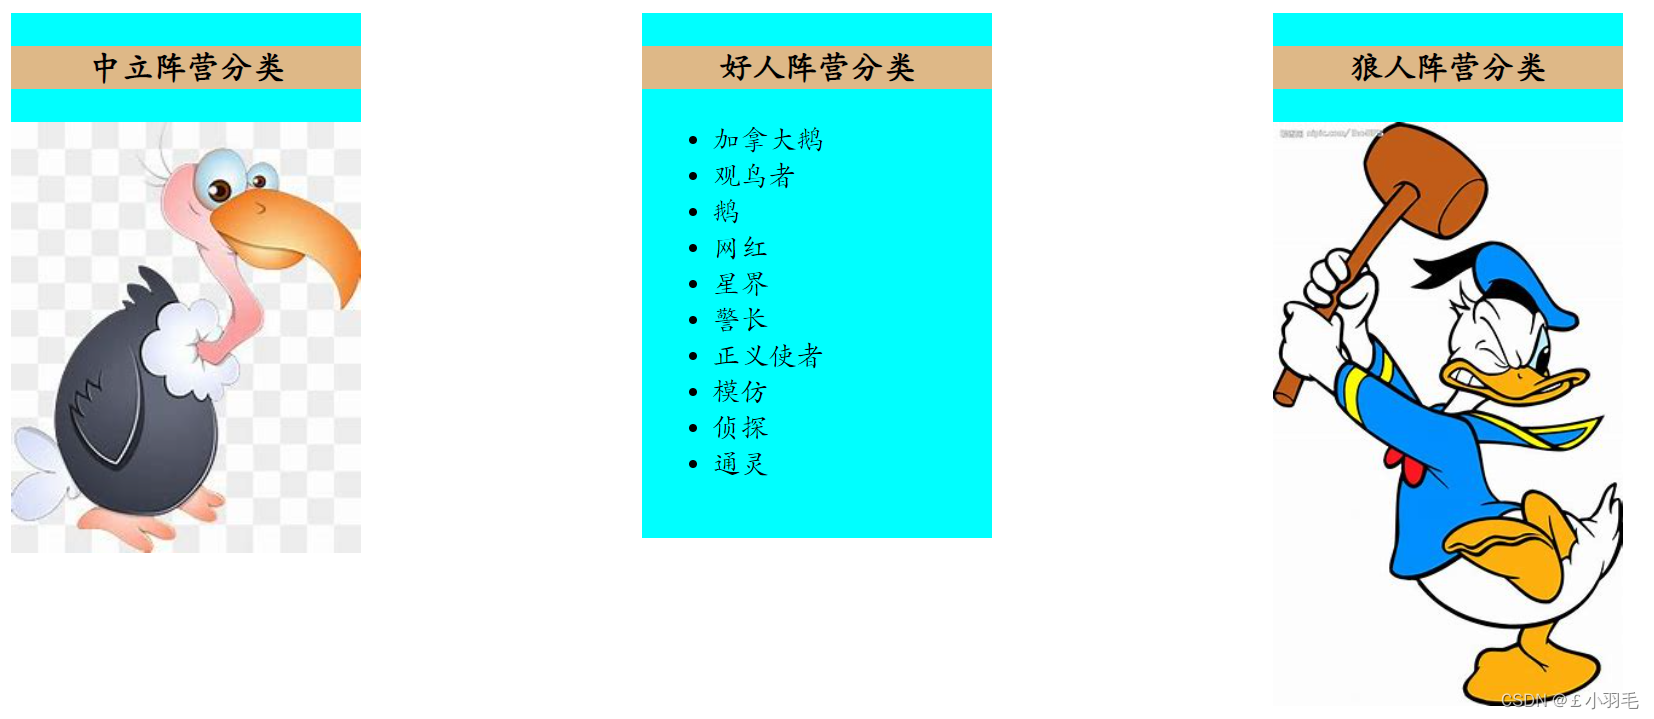
<template>
  <div id="app" class="container">
    <Category title="中立阵营" :listData="zhongli" />
    <Category title="好人阵营" :listData="haoren" />
    <Category title="狼人阵营" :listData="lang" />
  </div>
</template>

<script>
import Category from "./components/Category.vue";

export default {
  name: "App",
  components: {
    Category,
  },
  data() {
    return {
      zhongli: ["呆呆鸟", "猎鹰", "秃鹫", "鸽子", "鹈鹕"],
      haoren: [
        "加拿大鹅",
        "观鸟者",
        "鹅",
        "网红",
        "星界",
        "警长",
        "正义使者",
        "模仿",
        "侦探",
        "通灵",
      ],
      lang: [
        "刺客",
        "间谍",
        "食鸟鸭",
        "专业杀手",
        "承办丧葬者",
        "身份窃贼",
        "忍者",
        "爆炸王",
      ],
    };
  },
};
</script>
<style >
.container {
  display: flex;
  justify-content: space-around;
}
</style>
页面效果:
接着我们开始引入插槽
在Category.vue中做改变,加<slot>标签
<template>
  <div class="category">
    <h3>{

    {title}}分类</h3>
    <!-- 定义一个插槽,等别的组件填充 -->
    <slot>我是插槽的默认值,当没有传递具体结构,我会出现</slot>
  </div>
</template>

<script>
export default {
  name: "Category",
  props:['title']
};
</script>

<style>
.category {
  background-color: aqua;
  width: 200px;
  height: 300px;
}
h3{
    text-align: center;
    background-color: burlywood;
}
</style>
在App.vue中使用<Category>时给插槽传入具体的结构和数据
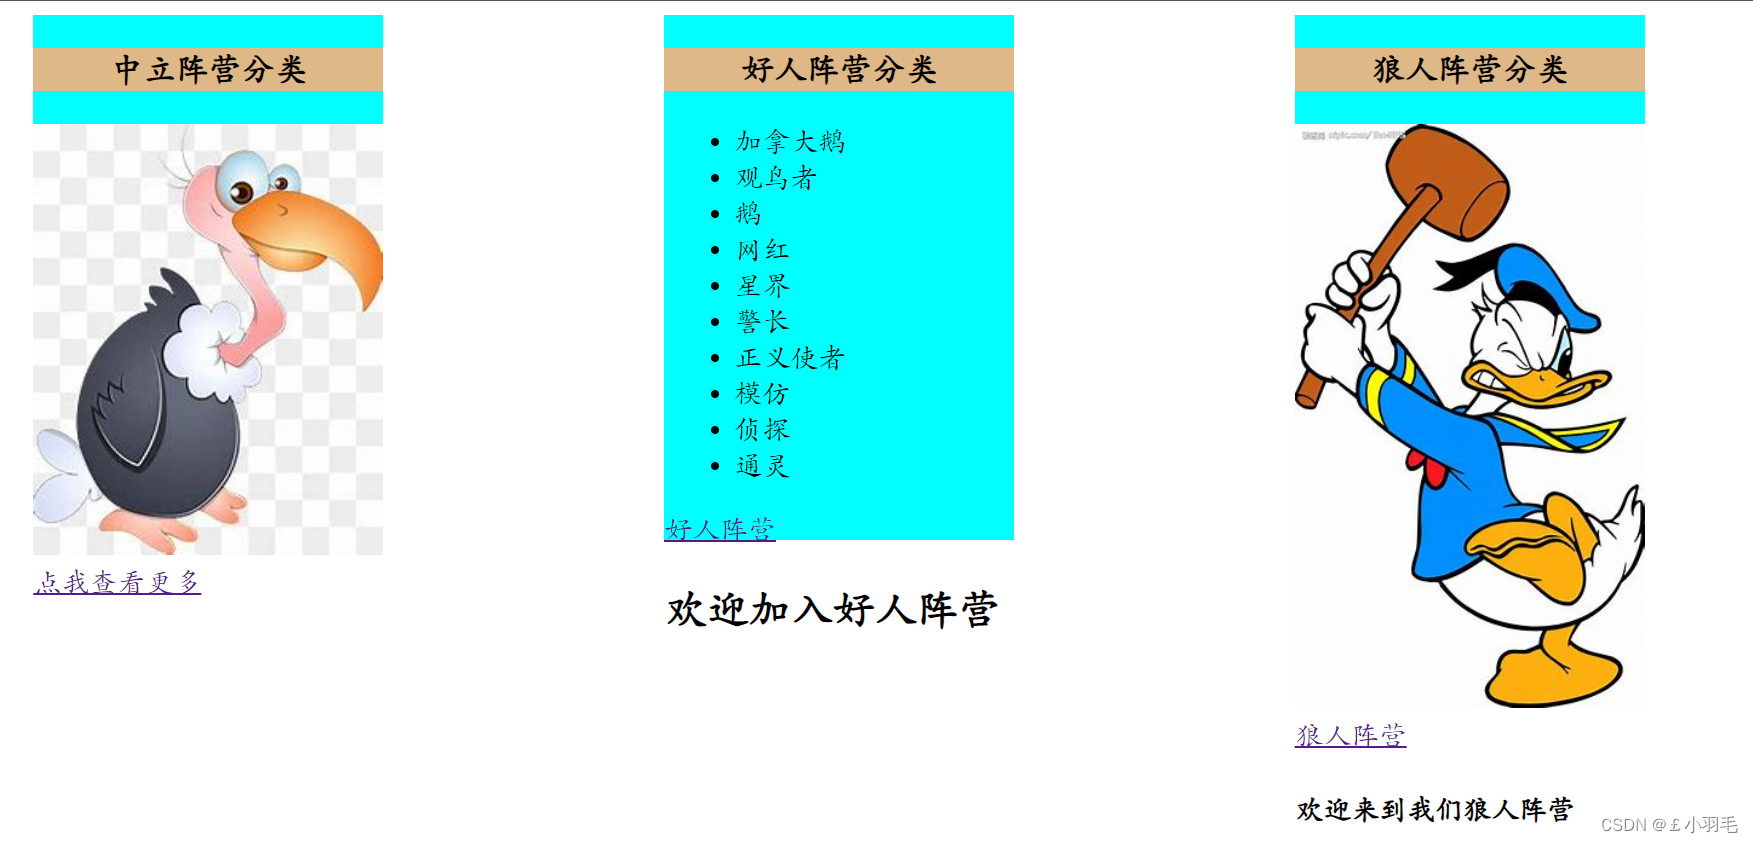
<template>
  <div id="app" class="container">
    <Category title="中立阵营" :listData="zhongli">
      <img src="./static/image/zhongli.jpg" />
    </Category>
    <Category title="好人阵营" :listData="haoren">
      <ul>
        <li v-for="(item, index) in haoren" :key="index">{

    { item }}</li>
      </ul>
    </Category>
    <Category title="狼人阵营" :listData="lang">
      <img src="./static/image/lang.jpg" />
    </Category>
  </div>
</template>

<script>
import Category from "./components/Category.vue";

export default {
  name: "App",
  components: {
    Category,
  },
  data() {
    return {
      zhongli: ["呆呆鸟", "猎鹰", "秃鹫", "鸽子", "鹈鹕"],
      haoren: [
        "加拿大鹅",
        "观鸟者",
        "鹅",
        "网红",
        "星界",
        "警长",
        "正义使者",
        "模仿",
        "侦探",
        "通灵",
      ],
      lang: [
        "刺客",
        "间谍",
        "食鸟鸭",
        "专业杀手",
        "承办丧葬者",
        "身份窃贼",
        "忍者",
        "爆炸王",
      ],
    };
  },
};
</script>
<style >
.container {
  display: flex;
  justify-content: space-around;
}
img{
 width:100%
}
</style>
页面效果:
2.具名插槽
在Category.vue中做改变,name属性给插槽起名字
<template> <div class="category"> <h3>{ {title}}分类</h3> <!-- 定义一个插槽,等别的组件填充 --> <slot name="center">我是插槽的默认值,当没有传递具体结构,我会出现1</slot> <slot name="footer">我是插槽的默认值,当没有传递具体结构,我会出现2</slot> </div> </template>在App.vue中,slot属性指定填充哪个插槽
<template>
  <div id="app" class="container">
    <Category title="中立阵营" :listData="zhongli">
      <img slot="center" src="./static/image/zhongli.jpg" />
      <a slot="footer" href="">点我查看更多</a>
    </Category>
    <Category title="好人阵营" :listData="haoren">
      <ul slot="center">
        <li v-for="(item, index) in haoren" :key="index">{

    { item }}</li>
      </ul>
      <div slot="footer">
        <a href="">好人阵营</a>
        <h2>欢迎加入好人阵营</h2>
      </div>
    </Category>
    <Category title="狼人阵营" :listData="lang">
      <img slot="center" src="./static/image/lang.jpg" />
      <template slot="footer">
        <a href="">狼人阵营</a>
        <h4>欢迎来到我们狼人阵营</h4>
      </template>
    </Category>
  </div>
</template>
效果如下:
如果使用template包裹,可以有新的写法
<!-- 旧的写法如下 --> <Category title="狼人阵营" :listData="lang"> <img slot="center" src="./static/image/lang.jpg" /> <template slot="footer"> <a href="">狼人阵营</a> <h4>欢迎来到我们狼人阵营</h4> </template> </Category>新的写法:注意v-slot只能写在组件的<template>
    <Category title="狼人阵营" :listData="lang">
      <img slot="center" src="./static/image/lang.jpg" />
      <template v-slot:footer>
        <a href="">狼人阵营</a>
        <h4>欢迎来到我们狼人阵营</h4>
      </template>
    </Category>
区别:

3.作用域插槽
数据和结构不在一块
数据放在Category.vue中
<template> <div class="category"> <h3>{ {title}}</h3> <!-- 定义一个插槽,等别的组件填充 sanxianshen会传给插槽的使用者--> <slot :sanxianshen="sanxianshen">我是插槽的默认内容</slot> </div> </template> <script> export default { name: "Category", props:['title'], data(){ return{ sanxianshen: ["大天湿婆", "梵天", "毗湿奴"] } } }; </script> <style> .category { background-color: aqua; width: 200px; height: 300px; } h3{ text-align: center; background-color: burlywood; } </style>在App.vue中接收到插槽传上来的数据。使用template包裹并且使用scope属性
<template>
  <div id="app" class="container">
    <Category title="印度三相神">
      <!-- 必须要用template包裹才能拿到插槽给的数据 -->
      <template scope="India">
        {

    {India}}
      </template>
      </Category>
  </div>
</template>

<script>
import Category from "./components/Category.vue";

export default {
  name: "App",
  components: {
    Category,
  },
  data() {
    return {}
  },
};
</script>
<style >
.container {
  display: flex;
  justify-content: space-around;
}
img {
  width: 100%;
}
</style>
页面效果:
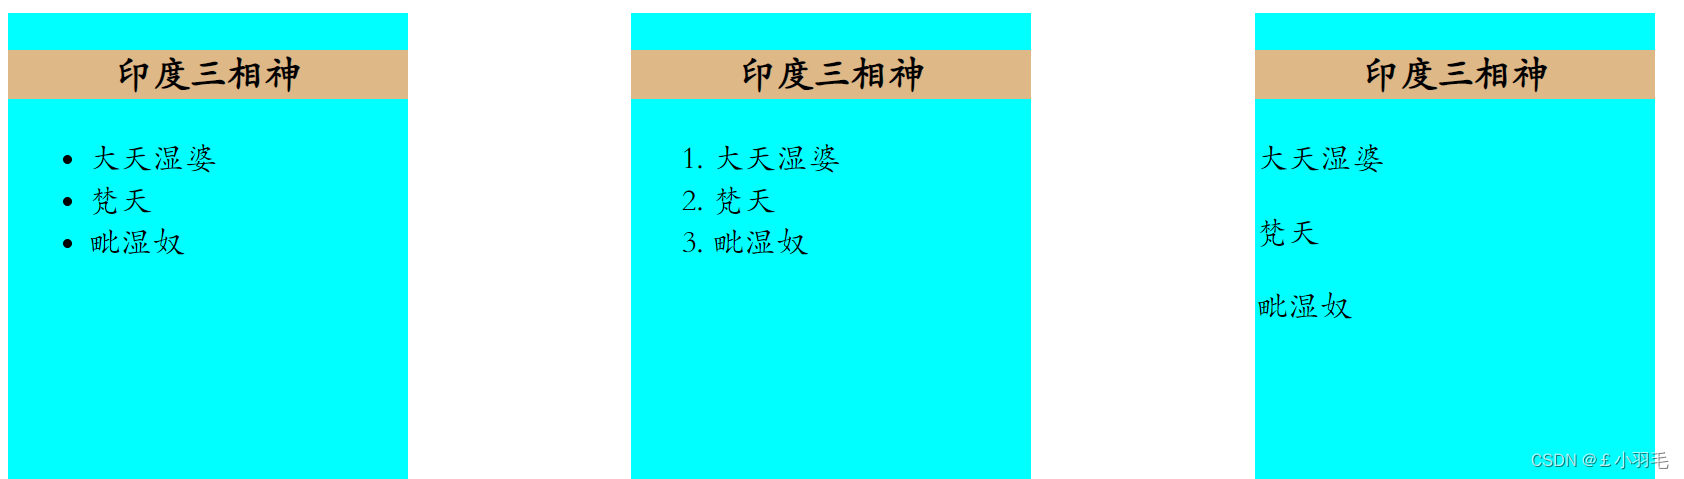
在App.vue中展示数据的时候,使用不同的样式展示(无序列表,有序列表,p标签)
<template>
  <div id="app" class="container">
    <Category title="印度三相神">
      <!-- 必须要用template包裹才能拿到插槽给的数据 -->
      <template scope="India">
        <ul>
          <li v-for="(item, index) in India.sanxianshen" :key="index">{

    { item }}</li>
        </ul>
      </template>
    </Category>
    <Category title="印度三相神">
      <template scope="India">
        <ol>
          <li v-for="(item, index) in India.sanxianshen" :key="index">{

    { item }}</li>
        </ol>
      </template>
    </Category>
    <Category title="印度三相神">
      <template scope="India">
        <p v-for="(item, index) in India.sanxianshen" :key="index">{

    { item }}</p>
      </template>
    </Category>
  </div>
</template>

当然还可以使用ES6的解构赋值,看起来更好看
<template>
  <div id="app" class="container">
    <Category title="印度三相神">
      <!-- ES6解构赋值 -->
      <template scope="{sanxianshen}">
        <ul>
          <li v-for="(item, index) in sanxianshen" :key="index">{

   { item }}</li>
        </ul>
      </template>
    </Category>
    <!-- 使用slot-scope,是新的api -->
    <Category title="印度三相神">
      <template slot-scope="{sanxianshen}">
        <ol>
          <li v-for="(item, index) in sanxianshen" :key="index">{

   { item }}</li>
        </ol>
      </template>
    </Category>
  </div>
</template>
路由Vue Router
1.路由route和路由器router概述
路由route是一组key-value的对应关系;多个路由需要经过路由器的管理
对应在vue中就是 路径与组件的映射成为路由
路由器router时时刻刻检测路径变化
2.使用路由后有哪些变化
vue-router是vue的一个插件库,专门用来实现spa应用(单页面web应用),即整个页面只有一个完成的页面。
vue-router相比之前的多页面(多个html)的区别
1.点击页面中的导航链接不会刷新页面
2.做页面的局部更新,数据需要通过ajax请求获取

3.创建路由器/引入路由器
npm install vue-router --save后续可能会报错:vue_router__WEBPACK_IMPORTED_MODULE_2__.default is not a constructor
解决办法:卸载原本的vue-router,指定安装版本
npm uninstall vue-router
npm install vue-router@3
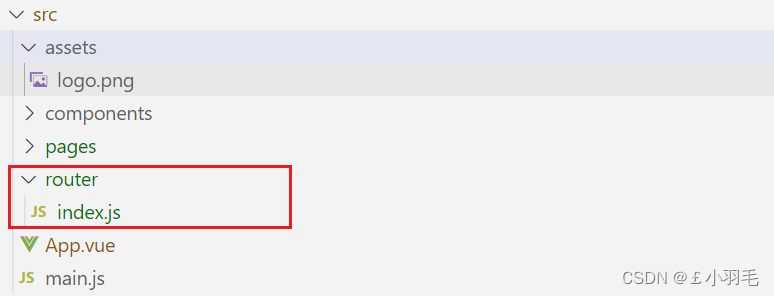
router/index.js创建路由器
新建router文件夹
在index.js中写入如下内容
//该文件专门用于创建整个应用的路由器
import VueRouter from "vue-router";

//创建并暴露一个路由器
export default new VueRouter({
  routes: [
    {
      path: "/bedroom",
      component: () => {
        import("../pages/Bedroom");
      },
    },
    {
      path: "/kitchen",
      component: () => {
        import("../pages/Kitchen");
      },
    },
  ],
});
main.js配置路由器
在main.js中添加内容如下
//引入Vue
import Vue from 'vue'
//引入App
import App from './App.vue'
//引入VueRouter
import VueRouter from 'vue-router'
//引入路由器
import router from './router'

//关闭vue的生产提示
Vue.config.productionTip = false

//应用插件
Vue.use(VueRouter);
new Vue({
  router:router,
  render: h => h(App),
}).$mount('#app')
4.router-link/rouer-view使用路由器
router-link实现点击不同的导航,路径发生变化
<router-link>:该标签是一个vue-router中已经内置的组件,他会被渲染成一个<a>标签。
router-link属性介绍 to:用于指定跳转的路径 tag:tag可以指定<router-link>之后渲染成什么组件,比如我们下面的代码会被渲染成一个<li>元素,而不是<a> 。 如:<router-link to='/home' tag='li'><router-view>:该标签会根据当前的路径,动态渲染出不同的组件。
在App.vue中,修改为如下内容
<template>
  <div id="app">
    <div>
      <!--vue中借助router-link 实现路由的切换 -->
      <router-link to="/bedroom">卧室</router-link>
      <br/>
      <router-link to="/kitchen">厨房</router-link>
      <!--指定组件的呈现位置-->
      <router-view></router-view>
    </div>
  </div>
</template>

<script>
export default {
  name: "App",
  components: {},
};
</script>
在页面的效果:
点击卧室
点击厨房:


5.路由参数query和params
params要在path设置占位
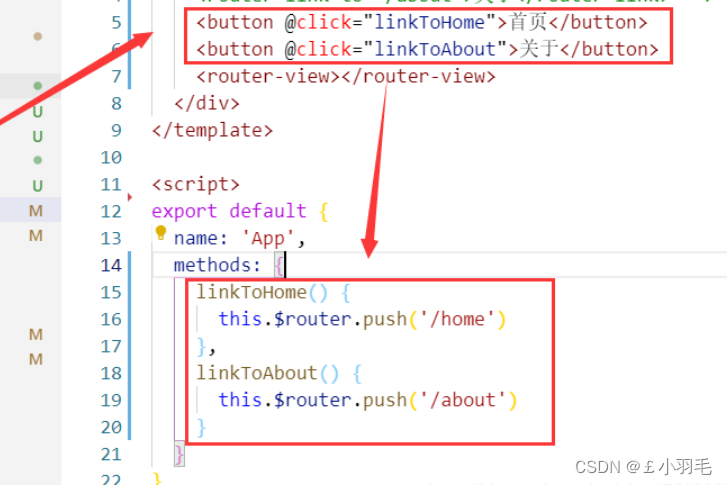
6.编程式路由导航
不借助<router-link>实现路由跳转,让路由跳转更加灵活
this.$router.push({

})


this.$router.replace({

})

this.$router.forward()//前进
this.$router.back()//后退
this.$router.go()
路由缓存
路由切走之后,再切回来。数据就没了,因为组件会销毁和重新挂载
7.路由器的2种工作模式
路由器的默认工作模式是hash
hash模式
1.对于一个url来说,什么是hash值?#及其后面的内容就是hash值。
2.hash值不会包含在HTTP请求中,即:hash值不会随着http请求发给服务器。3.hash模式
1.地址中永远带着#号,不美观。
2.若以后将地址通过第三方手机app分享,若app校验严格,则地址会被标记为不合法。
3.兼容性较好
history模式
1.地址干净,美观。
2.兼容性和hash模式相比略差。
3.应用部署上线时需要后端人员支持,解决刷新页面服务端404的问题。
VueX 多组件共享数据
VueX不属于任何一个组件,它不在app里
vuex定义:专门在Vue中实现集中式状态(数据)管理的一个vue插件
1、纯vue版实现求和案例
创建组件Count.vue
<template>
  <div>
    <h1>当前求和为:{

    { sum }}</h1>
    <select v-model.number="n">
      <option value="1">1</option>
      <option value="2">2</option>
      <option value="3">3</option>
    </select>
    <button @click="increment">+</button>
    <button @click="decrement">-</button>
    <button @click="incrementOdd">当前求和为奇数再加</button>
    <button @click="incrementWait">等一等再加</button>
  </div>
</template>

<script>
export default {
  name: "Count",
  data() {
    return {
      n: 1, //用户选择的数字
      sum: 0, //当前的和
    };
  },
  methods: {
    increment() {
        this.sum+=this.n
    },
    decrement() {
        this.sum-=this.n
    },
    incrementOdd() {
        if(this.sum%2){
            this.sum+=this.n
        }
    },
    incrementWait() {
        setTimeout(() => {
            this.sum+=this.n
        }, 500);
    },
  },
};
</script>

<style>
button {
  margin-left: 5px;
}
</style>
在App.vue中引入Count.vue
<template>
  <div id="app">
    <count />
  </div>
</template>

<script>
import Count from "./components/Count.vue";

export default {
  name: "App",
  components: {
    Count,
  },
};
</script>
页面效果:

说实话,我写完觉得也没啥大的毛病啊,看看vuex能做什么优化呢
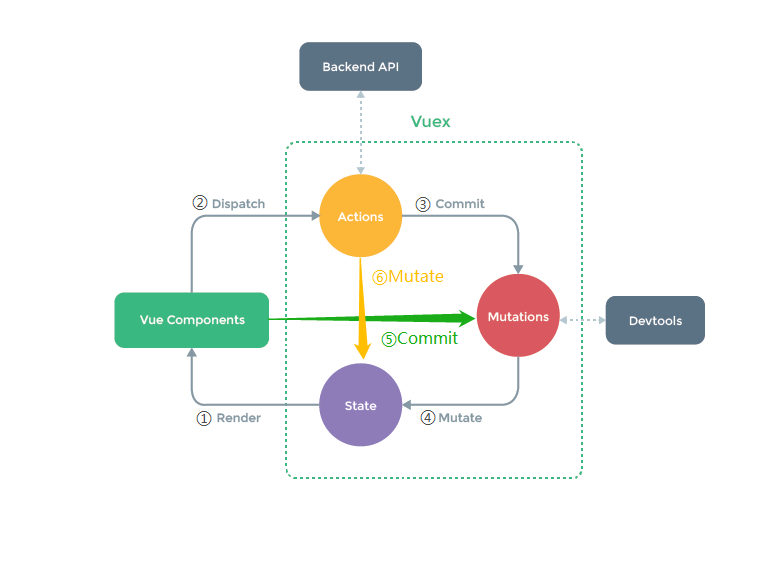
2、Vuex工作原理图
Backend API:不知道加几去action后端问问,要是知道加几可以vc直接commit
工作对象
state:状态,用于存储对象数据
Actions:行为,用于保存方法的行为,可以包含异步操作
Mutations:转变,用于提交行为的结果,不可以包含异步操作
Getters:类似于在store中的计算属性
Modules:模块,将store分割成不同的模块,每个模块有自己的state、actions、mutationsstore.dispatch store.commit state、Actions、Mutations这三个都要经过store管理工作原理
Render:vue组件中可以读取state中的数据(对应工作原理图中的①这一条线)
Dispatch:调用store中的dispatch方法,由vue组件派发给Actions执行,Actions可以继续给自身派发,也可以调用异步方法(Backend API)(对应工作原理图中的②这一条线)
Commit:调用store中的commit方法,由Actions提交给Mutations执行,也可以直接由组件提交(对应工作原理图中的③⑤这两条线)
Mutate:Actions、Mutations中更改state中的数据,不需要手动执行,由api直接调用。一般是Mutations调用,在此处调用,可以被开发者工具(Devtools)直接监控,由Actions调用时,不被监控。(对应工作原理图中的④⑥这两条线)
3、创建并引入store
因为我们使用的是vue2,对应就要安装vuex3
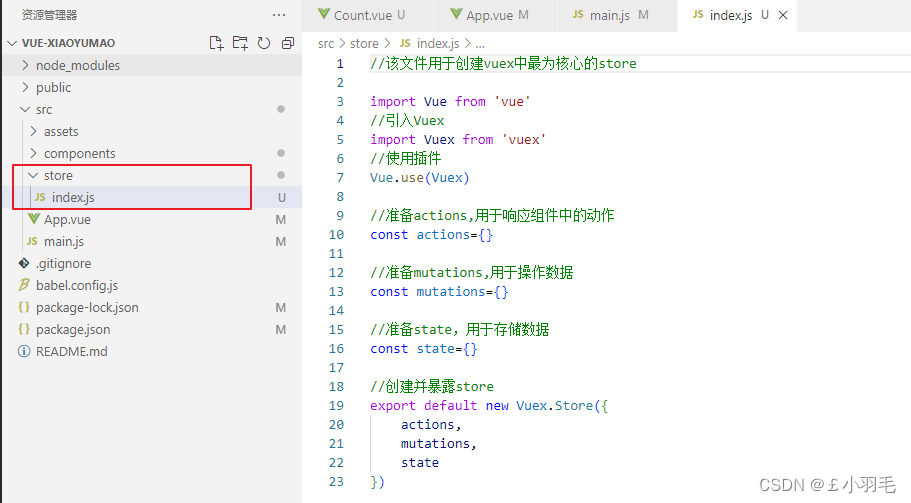
npm i vuex@3创建store目录,并在其下创建index.js
index.js文件内容如下
import Vue from 'vue'
//引入Vuex
import Vuex from 'vuex'
//使用插件
Vue.use(Vuex)

//准备actions,用于响应组件中的动作
const actions={}

//准备mutations,用于操作数据
const mutations={}

//准备state,用于存储数据
const state={}

//创建并暴露store
export default new Vuex.Store({
    actions,
    mutations,
    state
})
============
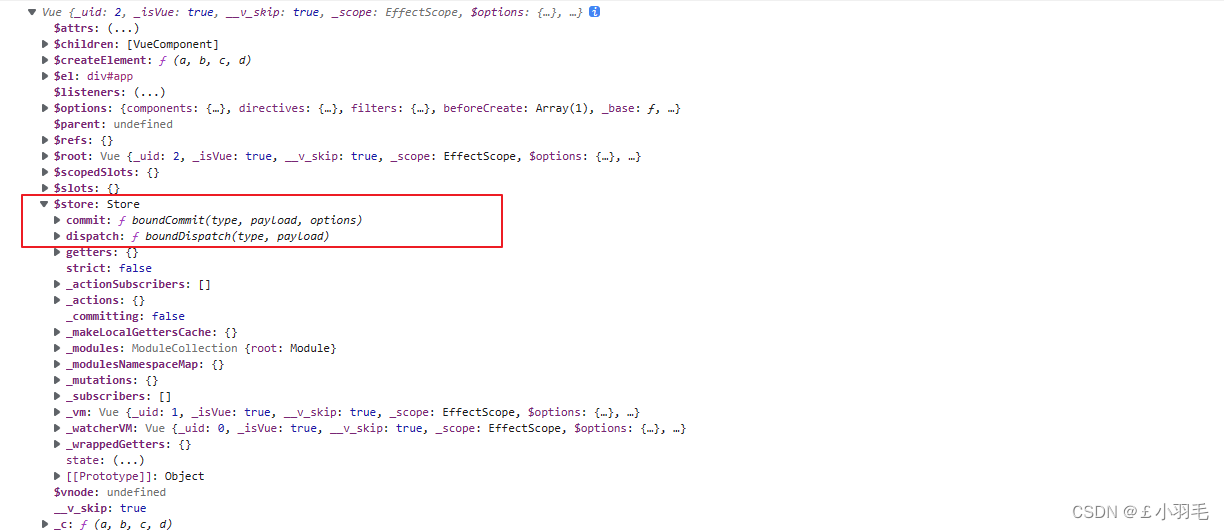
在main.js引入vuex插件,并在创建vm时传入store
import Vue from 'vue'
import App from './App.vue'
//引入store
import store from './store'

//关闭vue的生产提示
Vue.config.productionTip = false

//创建vm
const vm=new Vue({
  store,
  render: h => h(App),
}).$mount('#app')
console.log(vm)
打开控制台就可以看到$store
4、使用Vuex对求和案例改造
改造store目录下的index.js
//该文件用于创建vuex中最为核心的store

import Vue from 'vue'
//引入Vuex
import Vuex from 'vuex'
//使用插件
Vue.use(Vuex)

//准备actions,用于响应组件中的动作
const actions={
    'jia':function(context,value){
      //context上下文对象,可以理解为mini版store
      console.log('actions中的jia被调用了',context,value)
      context.commit('JIA',value)
    },
    'jian':function(context,value){
        //context上下文对象,可以理解为mini版store
        console.log('actions中的jian被调用了',context,value)
        context.commit('JIAN',value)
      }
}

//准备mutations,用于操作数据
const mutations={
    'JIA':function(state,value){
        console.log('mutations中的JIA被调用了',state,value)
        state.sum+=value
      },
      'JIAN':function(state,value){
        console.log('mutations中的JIAN被调用了',state,value)
        state.sum-=value
      }
}

//准备state,用于存储数据
const state={
    sum:0
}

//创建并暴露store
export default new Vuex.Store({
    actions,
    mutations,
    state
})
======改造Conut.vue
<template>
  <div>
    <!--模板中可以直接使用vc中的数据,不用写this.-->
    <h1>当前求和为:{

    { $store.state.sum }}</h1>
    <select v-model.number="n">
      <option value="1">1</option>
      <option value="2">2</option>
      <option value="3">3</option>
    </select>
    <button @click="increment">+</button>
    <button @click="decrement">-</button>
    <button @click="incrementOdd">当前求和为奇数再加</button>
    <button @click="incrementWait">等一等再加</button>
  </div>
</template>

<script>
export default {
  name: "Count",
  data() {
    return {
      n: 1//用户选择的数字
    };
  },
  methods: {
    increment() {
        this.$store.dispatch('jia',this.n)
    },
    decrement() {
        this.$store.dispatch('jian',this.n)
    },
    incrementOdd() {
        if(this.$store.state.sum%2){
            this.$store.dispatch('jia',this.n)
        }
    },
    incrementWait() {
        setTimeout(() => {
           this.$store.dispatch('jia',this.n)
        }, 500);
    },
  },
};
</script>

<style>
button {
  margin-left: 5px;
}
</style>
此时效果就和原来的一样了,每个按钮都生效
可以做优化,没有业务逻辑可以跳过actions,在组件里使用commit方法而不是dispatch。

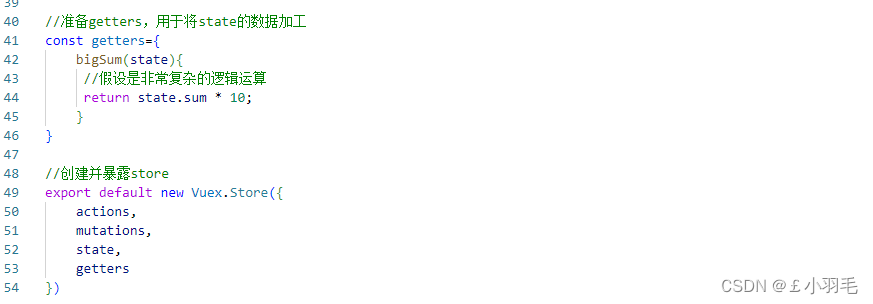
5、store中的getters配置项
当state中的数据需要经过加工后再使用,可以使用getters加工(适合逻辑复杂并需要被复用)
getters配置项
在Count.vue中使用
<h1>当前求和为:{

    { $store.state.sum }}</h1>
<h1>当前求和放大10倍为:{

    { $store.getters.bigSum }}</h1>

computed和watch
计算属性computed
vue认为data里写的就是属性,计算属性放在computed
计算属性要求把计算的整个过程配置成一个对象
get的return返回值是什么,计算属性的值就是什么
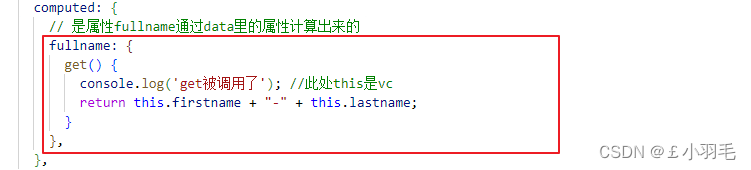
对App.vue做内容修改
<template>
  <div id="app">
    <div>
      姓: <input type="text" v-model="firstname" /> <br />
      名: <input type="text" v-model="lastname" /> <br />
      全名: <span>{

    { fullname }}</span>
    </div>
  </div>
</template>

<script>
export default {
  name: "App",
  components: {},
  data() {
    return {
      firstname: "小",
      lastname: "羽毛",
    };
  },
  computed: {
    // 是属性fullname通过data里的属性计算出来的
    fullname: {
      get() {
        console.log('get被调用了'); //此处this是vc
        return this.firstname + "-" + this.lastname;
      },
    },
  },
};
</script>
界面效果:
打开vue开发者工具,就能看到哪些是计算属性了

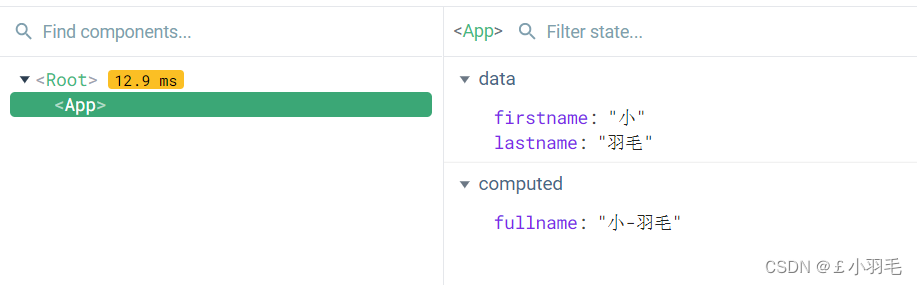
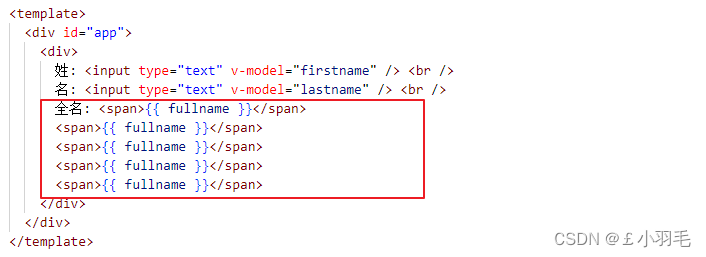
再看看这个效果,猜猜get被调用了几次,由于computed的缓存机制,get方法只被调用了一次
get方法调用时机总结:
1.初次读取fullname时,get会被调用。
2.所依赖的数据发生变化时,get会被调用。
依赖指的就是它是通过谁计算出来的,它就依赖谁。
set方法是可以不写的,在计算属性发生改变时会调set方法,入参就是改变后的值
  computed: {
    // 是属性fullname通过data里的属性计算出来的
    fullname: {
      get() {
        console.log('get被调用了'); //此处this是vc
        return this.firstname + "-" + this.lastname;
      },
      set(value){
      //value是改变后的值
      console.log('set被调用了',value)
      const arr=value.split('-')
      this.firstname=arr[0]
      this.lastname=arr[1]
      }
    },
  },
计算属性简写形式如下,
要求只有computed里只有get,没有set修改
原来的计算属性:
简写后
  computed: {
    // 是属性fullname通过data里的属性计算出来的
    fullname() {
      return this.firstname + "-" + this.lastname;
    },
  },