Apollomap模块入门
一、map 生成流程
百度高精地图数据格式采用(XML)文件格式的数据组织方式,根据(XML)文件生成base_map.bin文件,进而生成routing_map和sin_map。工具的代码在modules/map/tools中,调用bazel-bin目录下的可执行文件。
• base_map是最完整的地图,包含所有道路和车道几何形状和标识。其他版本的地图均基于base_map生成。
• routing_map包含base_map中车道的拓扑结构,可以有以下命令生成:
dir_name=modules/map/data/demo # example map directory./scripts/generate_routing_topo_graph.sh --map_dir(src dir) ${dir_name}(des dir)
//该脚本是map模块中的tool工具的使用。在babel-bin下找到他的可执行文件
--------------------------------------应用举例
bash scripts/generate_routing_topo_graph.sh --map_dir=/apollo/modules/map/data/apollo_map /apollo/modules/map/data/apollo_map
• sim_map是一个适用于Dreamview视觉可视化,基于base_map的轻量版本。减少了数据密度,以获得更好的运行时性能。可以由以下命令生成:
dir_name=modules/map/data/demo # example map directory
bazel-bin/modules/map/tools/sim_map_generator --map_dir=${dir_name} --output_dir=${dir_name}
--------------------------------------应用举例
bazel-bin/modules/map/tools/sim_map_generator
--map_dir=/apollo/modules/map/data/apollo_map
--output_dir=/apollo/modules/map/data/apollo_map
map tool工具使用
modules/map/tools/proto_map_generator.cc由XML文件生成.bin和.txt文件。
bazel-bin/modules/map/tools/proto_map_generator
--map_dir=/apollo/modules/map/data/apollo_map_test
--output_dir=/apollo/modules/map/data/apollo_map_test
modules/map/tools/map_tool.cc由生成的bin或者txt文件进行地图偏移,生成新的bin和txt文件。
bazel-bin/modules/map/tools/map_tool --map_dir=/apollo/modules/map/data/apollo_map_test --output_dir=/apollo/modules/map/data/apollo_map_test/offset
modules/map/tools/sim_map_generator.cc用于生成由dreamview前端显示的下采样地图的地图工具,也就是生成sim_map
modules/map/tools/quaternion_euler.cc四元数转欧拉角
modules/map/tools/map_xysl.cc车道点之间的相互转换,xy->sl 、sl->xy 或者xy->lane 等
modules/map/tools/refresh_default_end_way_point.cc假设在我们的终点的绝对值(x,y,z)仍然正确的情况下改变了通道信息。 然后我们可以在新地图上找到最近的点作为新的终点。
modules/map/tools/map_datachecker该文件还不知道能干啥,编译的时候缺少一个grpc的文件,grpc是一个谷歌开源库,是一种(Remote Procedure Call Protocol),需要把这个库安装一下才能使用.
安装方法:grpc c++ helloworld 例子 实例解析
------构建服务器
bazel build //modules/map/tools/map_datachecker/server:map_datachecker_server
------构建客户端
bazel build //modules/map/tools/map_datachecker/client:map_datachecker_client
二、map 介绍
Apollo地图格式对 OpenDRIVE 都有哪些改动,改动的原因或初衷是什么,改动有什么优势?
OpenDRIVE本身设计面向的应用是仿真器,自动驾驶需要更多的信息OpenDRIVE并没有完全提供,所以我们对OpenDRIVE的标准做了部分改动和扩展。
主要改动和扩展了以下几个方面:一是地图元素形状的表述方式。以车道边界为例,标准OpenDRIVE采用基于Reference Line的曲线方程和偏移的方式来表达边界形状,而Apollo OpenDrive采用绝对坐标序列的方式描述边界形状;**二是元素类型的扩展。**例如新增了对于禁停区、人行横道、减速带等元素的独立描述;**三是扩展了对于元素之间相互关系的描述。**比如新增了junction与junction内元素的关联关系等;除此之外还有一些配合无人驾驶算法的扩展,比如增加了车道中心线到真实道路边界的距离、停止线与红绿灯的关联关系等。改动和扩展后的规格在实现上更加的简单,同时也兼顾了无人驾驶的应用需求
Apollo地图规范
格式
百度高精地图数据格式采用(XML)文件格式的数据组织方式,是基于国际通用的OpenDrive规范,并根据百度自动驾驶业务需求拓展修改而成。
Apollo高精地图文件的整体结构如下所示:
坐标
百度高精地图坐标采用WGS84经纬度坐标表示。WGS84为一种大地坐标系,也是目前广泛使用的GPS全球卫星定位系统使用的坐标系。
Status CoordinateConvertTool::CoordiateConvert(const double longitude,
                                               const double latitude,
                                               const double height_ellipsoid,
                                               double* utm_x, double* utm_y,
                                               double* utm_z) {


  CHECK_NOTNULL(utm_x);
  CHECK_NOTNULL(utm_y);
  CHECK_NOTNULL(utm_z);
  if (!pj_from_ || !pj_to_) {


    std::string err_msg = "no transform param";
    return Status(apollo::common::ErrorCode::HDMAP_DATA_ERROR, err_msg);
  }

  double gps_longitude = longitude;
  double gps_latitude = latitude;
  double gps_alt = height_ellipsoid;

  if (pj_is_latlong(pj_from_)) {


    gps_longitude *= DEG_TO_RAD;
    gps_latitude *= DEG_TO_RAD;
    gps_alt = height_ellipsoid;
  }

  if (0 != pj_transform(pj_from_, pj_to_, 1, 1, &gps_longitude, &gps_latitude,
                        &gps_alt)) {


    std::string err_msg = "fail to transform coordinate";
    return Status(apollo::common::ErrorCode::HDMAP_DATA_ERROR, err_msg);
  }

  if (pj_is_latlong(pj_to_)) {


    gps_longitude *= RAD_TO_DEG;
    gps_latitude *= RAD_TO_DEG;
  }

  *utm_x = gps_longitude;
  *utm_y = gps_latitude;
  *utm_z = gps_alt;

  return Status::OK();
}
车道
道路的reference line 存储在ID为0的车道中,其他车道只存储当前车道的一个边界。例如,reference line右侧的车道只存储车道的右侧边界。
车道 ID 的命名规则:
• lane section 内唯一
• 数值连续的
• reference line 所在 lane 的 ID 为 0
• reference line 左侧 lane 的 ID 向左侧依次递增 (正t轴方向)
• reference line 右侧 lane 的 ID 向右侧依次递减(负 t 轴方向)
• reference line 必须定义在 center 节点内
车道总数目没有限制。Reference line 自身必须为 Lane 0。
路口区域
基本的原理比较简单,路口区域用Junction结构表达。在Junction内,incoming Road通过Connecting Roads与out-going道路相连。下图展示了一个比较复杂的路口:
高精度地图在Apollo的存在形式
在Apollo发布的Docker镜像中,也包含了地图的部分。Apollo在启动时,你可以按照如下方式为启动的镜像挂载地图:
bash docker/scripts/dev_start.sh --map sunnyvale_big_loop
如果不指定挂载的地图,默认挂载以下地图:
• map_volume-sunnyvale_big_loop-latest
• map_volume-sunnyvale_loop-latest
[外链图片转存失败(img-ne26syyW-1568785146609)(。/images/map_sunnyvalue.jpg)]
一段道路的相关自动驾驶地图可以放置在如下结构的目录中:
sunnyvale_big_loop
├── background.jpg
├── background.png
├── base_map.bin
├── base_map.lb1
├── base_map.txt
├── base_map.xml               # Defined by FLAGS_base_map_filename
├── default_end_way_point.txt  # Defined by FLAGS_end_way_point_filename
├── grid_map
├── local_map
├── map.json
├── routing_map.bin            # Defined by FLAGS_routing_map_filename
├── routing_map.txt
├── sim_map.bin                # Defined by FLAGS_sim_map_filename
├── sim_map.txt
└── speed_control.pb.txt
可以将可用地图文件名指定为备选列表:
–base_map_filename=“base.xml|base.bin|base.txt”
然后Apollo会找到第一个可用的文件加载。一般来说,按照以下扩展顺序加载:
x.xml # An OpenDrive formatted map.
x.bin # A binary pb map.
x.txt # A text pb map.
base_map, routing_map和sim_map之间的差异
• base_map是最完整的地图,包含所有道路和车道几何形状和标识。其他版本的地图均基于base_map生成。
• routing_map包含base_map中车道的拓扑结构,可以有以下命令生成:
• dir_name=modules/map/data/demo # example map directory./scripts/generate_routing_topo_graph.sh --map_dir ${dir_name}
• //该脚本是map模块中的tool工具的使用。在babel-bin下找到他的可执行文件
•
• --------------------------------------应用举例
•
bash scripts/generate_routing_topo_graph.sh --map_dir=/apollo/modules/map/data/apollo_map /apollo/modules/map/data/apollo_map
•
• sim_map是一个适用于Dreamview视觉可视化,基于base_map的轻量版本。减少了数据密度,以获得更好的运行时性能。可以由以下命令生成:
•
dir_name=modules/map/data/demo # example map directorybazel-bin/modules/map/tools/sim_map_generator --map_dir=${dir_name} --output_dir=${dir_name}
•
• --------------------------------------应用举例
• bazel-bin/modules/map/tools/sim_map_generator
• --map_dir=/apollo/modules/map/data/apollo_map
• --output_dir=/apollo/modules/map/data/apollo_map
高精地图在Apollo中的流转形式
xml格式的地图见modules/map/data/sunnyvale_big_loop/base_map.xml文件。那接下来我们就看下从XML解析到proto的过程。
XML解析为Proto
主要是由方法opendrive_adapter.cc中的以下方法解析并读取:
modules/map/hd_map/opendrive_adapter.cc
`OpendriveAdapter::LoadData(const std::string& filename,apollo::hdmap::Map* pb_map)`
解析的过程主要分为以下四个过程:
1、根目录
2、header
3、道路
4、路口
等节点的获取,具体的方法可以参考。
系统内格式
不管原始数据格式为什么,在Apollo内部的数据地图的格式为proto。以下为Apollo高精地图的对象定义:
modules/map/proto/map.proto
// This message defines how we project the ellipsoidal Earth surface to a plane.message Projection { // PROJ.4 setting: // "+proj=tmerc +lat_0={origin.lat} +lon_0={origin.lon} +k={scale_factor} +ellps=WGS84 +no_defs" optional string proj = 1;}message Header { optional bytes version = 1; optional bytes date = 2; optional Projection projection = 3;//坐标系转换 optional bytes district = 4; optional bytes generation = 5; optional bytes rev_major = 6; optional bytes rev_minor = 7; optional double left = 8; optional double top = 9; optional double right = 10; optional double bottom = 11; optional bytes vendor = 12;}message Map { optional Header header = 1; repeated Crosswalk crosswalk = 2;// 人行道 repeated Junction junction = 3;//路口区域 repeated Lane lane = 4;//车道 repeated StopSign stop_sign = 5;//停止线 repeated Signal signal = 6;//信号灯 repeated YieldSign yield = 7;//让路标志 repeated Overlap overlap = 8;//重叠区域 repeated ClearArea clear_area = 9;//禁停区域 repeated SpeedBump speed_bump = 10;//减速带 repeated Road road = 11;//道路}
其中重点介绍车道与路口部分。
如前文所述,Apollo高精度地图OpenDrive采用绝对坐标序列的方式描述边界形状,依次为基础生成直线或类似直线的对象:
modules/map/proto/map_geometry.proto
// Polygon, not necessary convex.message Polygon { repeated apollo.common.PointENU point = 1;}// Straight line segment.message LineSegment { repeated apollo.common.PointENU point = 1;}// Generalization of a line.message CurveSegment { oneof curve_type { LineSegment line_segment = 1; } optional double s = 6; // start position (s-coordinate) optional apollo.common.PointENU start_position = 7; optional double heading = 8; // start orientation optional double length = 9;}// An object similar to a line but that need not be straight.message Curve { repeated CurveSegment segment = 1;}
道路Road
modules/map/proto/mao_road.proto
message BoundaryEdge { optional Curve curve = 1; enum Type { UNKNOWN = 0; NORMAL = 1; LEFT_BOUNDARY = 2; RIGHT_BOUNDARY = 3; }; optional Type type = 2;}message BoundaryPolygon { repeated BoundaryEdge edge = 1;}// boundary with holesmessage RoadBoundary { optional BoundaryPolygon outer_polygon = 1; // if boundary without hole, hole is null repeated BoundaryPolygon hole = 2;}message RoadROIBoundary { optional Id id = 1; repeated RoadBoundary road_boundaries = 2;}// road section defines a road cross-section, At least one section must be defined in order to// use a road, If multiple road sections are defined, they must be listed in order along the roadmessage RoadSection { optional Id id = 1; // lanes contained in this section repeated Id lane_id = 2; // boundary of section optional RoadBoundary boundary = 3;}// The road is a collection of traffic elements, such as lanes, road boundary etc.// It provides general information about the road.message Road { optional Id id = 1; repeated RoadSection section = 2; // if lane road not in the junction, junction id is null. optional Id junction_id = 3;}
车道Lane
modules/map/proto/mao_lane.proto
message LaneBoundaryType { enum Type { UNKNOWN = 0; DOTTED_YELLOW = 1; DOTTED_WHITE = 2; SOLID_YELLOW = 3; SOLID_WHITE = 4; DOUBLE_YELLOW = 5; CURB = 6; }; // Offset relative to the starting point of boundary optional double s = 1; // support multiple types repeated Type types = 2;}message LaneBoundary { optional Curve curve = 1; optional double length = 2; // indicate whether the lane boundary exists in real world optional bool virtual = 3; // in ascending order of s repeated LaneBoundaryType boundary_type = 4;}// Association between central point to closest boundary.message LaneSampleAssociation { optional double s = 1; optional double width = 2;}// A lane is part of a roadway, that is designated for use by a single line of vehicles.// Most public roads (include highways) have more than two lanes.message Lane { optional Id id = 1; // Central lane as reference trajectory, not necessary to be the geometry central. optional Curve central_curve = 2; // Lane boundary curve. optional LaneBoundary left_boundary = 3; optional LaneBoundary right_boundary = 4; // in meters. optional double length = 5; // Speed limit of the lane, in meters per second. optional double speed_limit = 6; repeated Id overlap_id = 7; // All lanes can be driving into (or from). repeated Id predecessor_id = 8; repeated Id successor_id = 9; // Neighbor lanes on the same direction. repeated Id left_neighbor_forward_lane_id = 10; repeated Id right_neighbor_forward_lane_id = 11; enum LaneType { NONE = 1; CITY_DRIVING = 2; BIKING = 3; SIDEWALK = 4; PARKING = 5; }; optional LaneType type = 12; enum LaneTurn { NO_TURN = 1; LEFT_TURN = 2; RIGHT_TURN = 3; U_TURN = 4; }; optional LaneTurn turn = 13; repeated Id left_neighbor_reverse_lane_id = 14; repeated Id right_neighbor_reverse_lane_id = 15; optional Id junction_id = 16; // Association between central point to closest boundary. repeated LaneSampleAssociation left_sample = 17; repeated LaneSampleAssociation right_sample = 18; enum LaneDirection { FORWARD = 1; BACKWARD = 2; BIDIRECTION = 3; } optional LaneDirection direction = 19; // Association between central point to closest road boundary. repeated LaneSampleAssociation left_road_sample = 20; repeated LaneSampleAssociation right_road_sample = 21;}
路口Junction
对于路口区域的描述
modules/map/proto/map_junction.proto
// An junction is the junction at-grade of two or more roads crossing.message Junction { optional Id id = 1; optional Polygon polygon = 2; repeated Id overlap_id = 3;}
Proto格式地图的使用
这个时候的的地图格式,可以为Apollo中的多个模块,或者统一的方法所使用。
获取高精度地图元素
对地图的操作方法
有了原始从xml格式到protobuf的数据之后,就可以访问这些高精地图的元素,Apollo高精地图提供如下的方法获取元素:
提供高精地图元素获取的方法实现类:
apollo::hdmap::HDMapImpl,详见apollo::hdmap::HDMapImpl Class Reference
LoadMapFromFile (const std::string &map_filename) 从本地文件加载地图
GetLaneById (const Id &id) const
GetJunctionById (const Id &id) const
GetSignalById (const Id &id) const
GetCrosswalkById (const Id &id) const
GetStopSignById (const Id &id) const
GetYieldSignById (const Id &id) const
GetClearAreaById (const Id &id) const
GetSpeedBumpById (const Id &id) const
GetOverlapById (const Id &id) const
GetRoadById (const Id &id) const
// 在确定范围获取所有车道
GetLanes (const apollo::common::PointENU &point, double distance, std::vector< LaneInfoConstPtr > *lanes) const
// 在确定范围获取所有路口区域
GetJunctions (const apollo::common::PointENU &point, double distance, std::vector< JunctionInfoConstPtr > *junctions) const
// 在确定范围内获取所有人行道
GetCrosswalks (const apollo::common::PointENU &point, double distance, std::vector< CrosswalkInfoConstPtr > *crosswalks) const
// 获取确定范围的所有信号灯
GetSignals (const apollo::common::PointENU &point, double distance, std::vector< SignalInfoConstPtr > *signals) const
// 获取确定范围内的所有停止标识
GetStopSigns (const apollo::common::PointENU &point, double distance, std::vector< StopSignInfoConstPtr > *stop_signs) const
// 获取确定范围内的所有避让标识
GetYieldSigns (const apollo::common::PointENU &point, double distance, std::vector< YieldSignInfoConstPtr > *yield_signs) const
// 获取确定范围内的所有禁止停车标识
GetClearAreas (const apollo::common::PointENU &point, double distance, std::vector< ClearAreaInfoConstPtr > *clear_areas) const
// 获取确定范围内的所有减速带
GetSpeedBumps (const apollo::common::PointENU &point, double distance, std::vector< SpeedBumpInfoConstPtr > *speed_bumps) const
// 获取确定范围内的所有道路
GetRoads (const apollo::common::PointENU &point, double distance, std::vector< RoadInfoConstPtr > *roads) const
// 获取从目标点的最近车道
GetNearestLane (const apollo::common::PointENU &point, LaneInfoConstPtr *nearest_lane, double *nearest_s, double *nearest_l) const
// 判断车辆姿态,获取在一定范围内最近的车道
GetNearestLaneWithHeading (const apollo::common::PointENU &point, const double distance, const double central_heading, const double max_heading_difference, LaneInfoConstPtr *nearest_lane, double *nearest_s, double *nearest_l) const
// 判断车辆姿态,获取所有车道
GetLanesWithHeading (const apollo::common::PointENU &point, const double distance, const double central_heading, const double max_heading_difference, std::vector< LaneInfoConstPtr > *lanes) const
// 获取确定范围内的所有道路和路口边界
GetRoadBoundaries (const apollo::common::PointENU &point, double radius, std::vector< RoadROIBoundaryPtr > *road_boundaries, std::vector< JunctionBoundaryPtr > *junctions) const
// 如果有两个与一条停止线相关的信号,则在车道上的某个范围内前进最近的信号,返回两个信号。
GetForwardNearestSignalsOnLane (const apollo::common::PointENU &point, const double distance, std::vector< SignalInfoConstPtr > *signals) const
获取元素实例
modules/planning/reference_line/reference_line_provider.cc
bool ReferenceLineProvider::GetReferenceLinesFromRelativeMap(
const relative_map::MapMsg &relative_map,
std::list *reference_line,
std::listhdmap::RouteSegments *segments) {
if (relative_map.navigation_path_size() <= 0) {
return false;
}
auto *hdmap = HDMapUtil::BaseMapPtr();
for (const auto path_pair : relative_map.navigation_path()) {
const auto &lane_id = path_pair.first;
const auto &path_points = path_pair.second.path().path_point();
// 从高精地图中获取对应车道
auto lane_ptr = hdmap->GetLaneById(hdmap::MakeMapId(lane_id));
RouteSegments segment;
segment.emplace_back(lane_ptr, 0.0, lane_ptr->total_length());
segment.SetCanExit(true);
segment.SetId(lane_id);
segment.SetNextAction(routing::FORWARD);
segment.SetIsOnSegment(true);
segment.SetStopForDestination(false);
segment.SetPreviousAction(routing::FORWARD);
segments->emplace_back(segment);
std::vector ref_points;
for (const auto &path_point : path_points) {
ref_points.emplace_back(
MapPathPoint{Vec2d{path_point.x(), path_point.y()},
path_point.theta(),
LaneWaypoint(lane_ptr, path_point.s())},
path_point.kappa(), path_point.dkappa(), 0.0, 0.0);
}
reference_line->emplace_back(ref_points.begin(), ref_points.end());
}
return true;
}
使用其他地图
- 更改全局 flagfile: modules/common/data/global_flagfile.txt 这是所有模块的基本flag文件,保持了整体系统的统一。
- 作为flag标记传递,这样只影响单个进程:
–map_dir=/path/to/your/map - 覆盖模块所属的flag文件,生成位置:modules/**/conf/ * .conf明显地,这个文件也只影响单个模块:
–flagfile=modules/common/data/global_flagfile.txt
–map_dir=/path/to/your/map
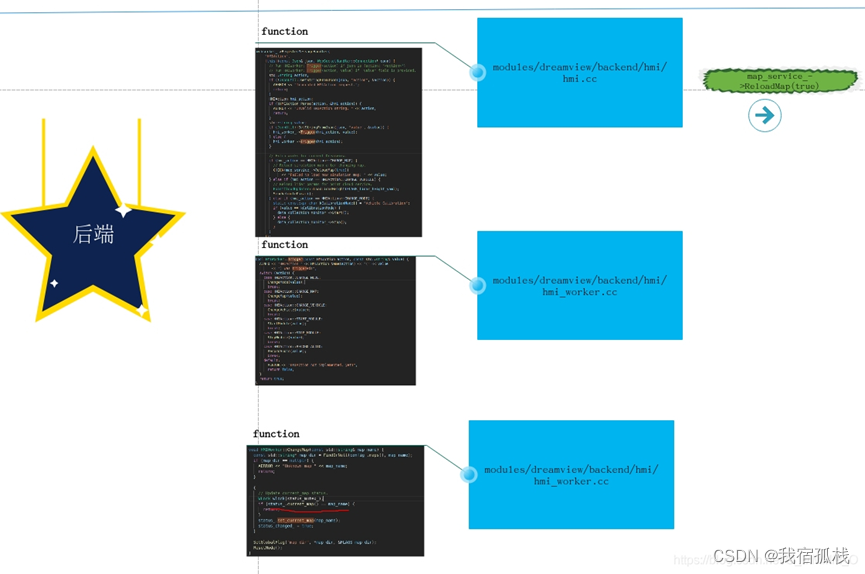
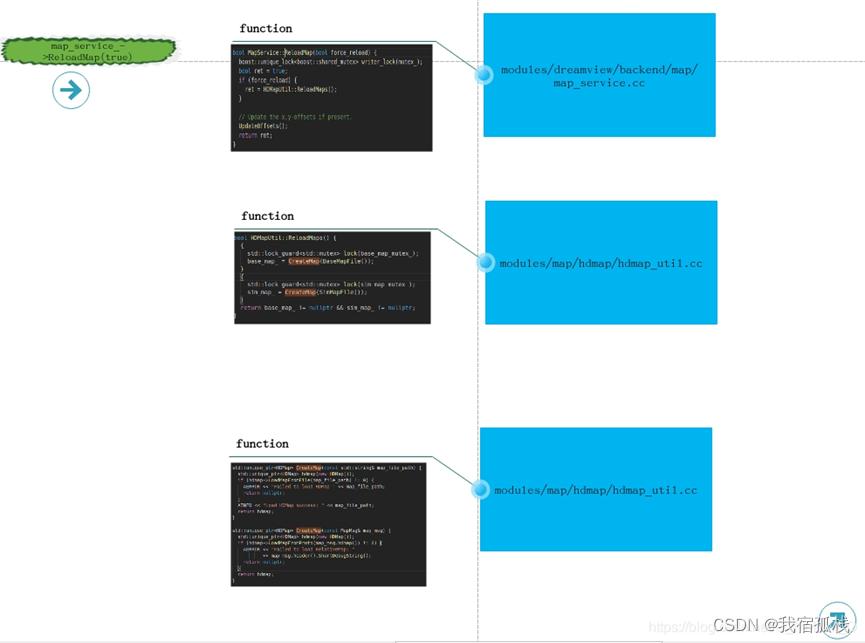
DreamView调用map流程
前端

后端