一、基于菲涅尔反射的物体描边
1.1 基于内边缘发光的方式
内边缘发光本身的局限性就不说了。
Shader "Custom/Test0"
{
    Properties
    {
        _MainColor("主颜色",Color)=(0,0,0,1)

        _OutlineColor("描边颜色",Color)=(1,1,1,1)
        _OutlineGlowPow("描边等级",Range(0,5))=2
        _OutlineStrength("描边强度",Range(0,4))=1

    }
    SubShader
    {

        Pass
        {
            CGPROGRAM
            #pragma vertex vert
            #pragma fragment frag
            #include "UnityCG.cginc"
            #include "UnityLightingCommon.cginc"
            float4 _MainColor;
            fixed4 _OutlineColor;
            fixed _OutlineGlowPow;
            fixed _OutlineStrength;

            struct a2v
            {
                float4 vertex:POSITION;
                float3 normal:NORMAL;
            };

            struct v2f
            {
                float4 pos:SV_POSITION;
                float3 normal:TEXCOORD0;
                float3 worldPos:TEXCOORD1;
            };


            v2f vert(a2v v)
            {
                v2f o;

                o.pos = UnityObjectToClipPos(v.vertex);
                o.normal = UnityObjectToWorldNormal(v.normal);
                o.worldPos = mul(unity_ObjectToWorld, v.vertex);

                return o;
            }

            fixed4 frag(v2f i):SV_Target
            {
                i.normal = normalize(i.normal);
                fixed3 ambient = UNITY_LIGHTMODEL_AMBIENT.rgb;

                fixed3 worldNormal = normalize(i.normal);

                fixed3 worldLight = normalize(_WorldSpaceLightPos0.xyz);

                fixed3 diffuse = _LightColor0.rgb * _MainColor.rgb *
                    (dot(worldLight, worldNormal) * 0.5 + 0.5)+ambient;
                float3 viewDir = normalize(UnityWorldSpaceViewDir(i.worldPos)); normalize(_WorldSpaceCameraPos.xyz - i.worldPos.xyz);
                //越边缘,值越大
                float fresnel = pow(1 - saturate(dot(i.normal, viewDir)), _OutlineGlowPow) * _OutlineStrength;

                fixed3 color = lerp(diffuse, _OutlineColor, fresnel);

                return fixed4(color, 1);
            }
            ENDCG
        }

    }
}
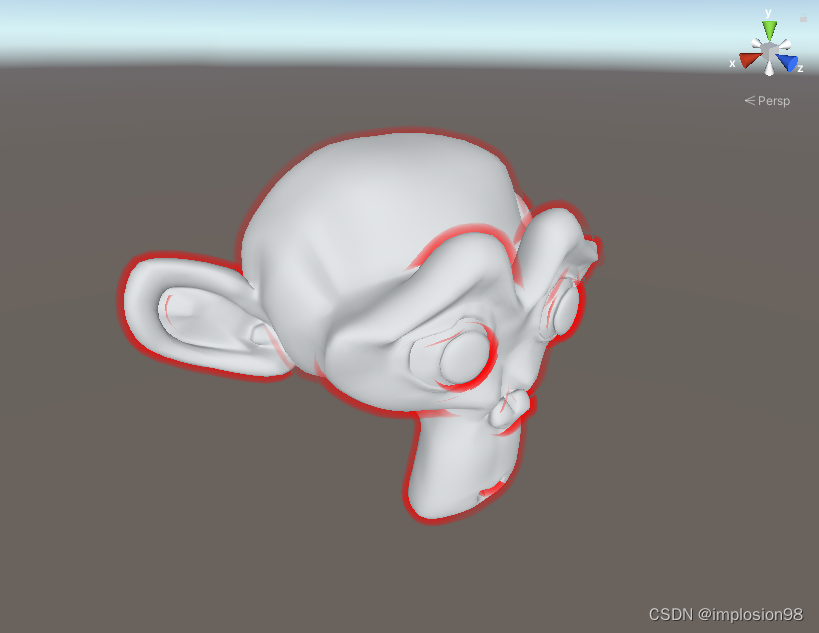
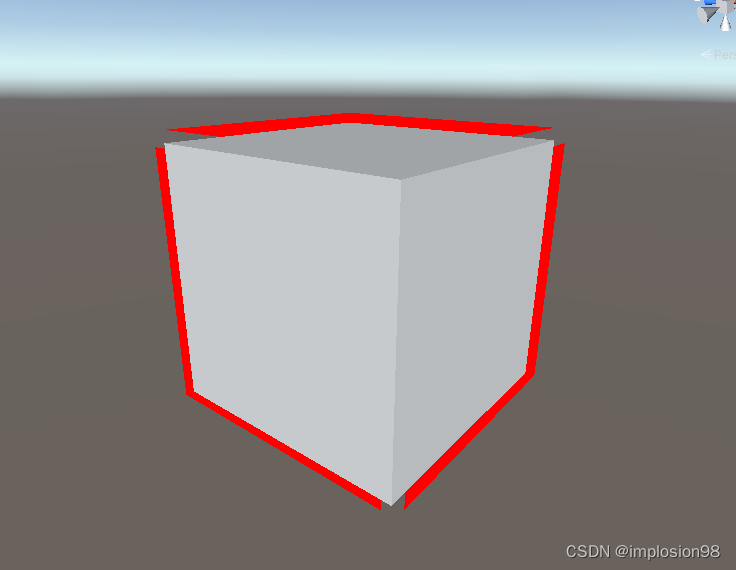
可以看到,基本上模型的每个边缘都上了色,这有区别于我们接下来说的其他描边效果。至于说整体偏红,主要是模型没任何贴图什么的毕竟白色*其他颜色的结果只会是其他颜色,而且用一张遮罩纹理也可以解决问题。
1.2 基于外边缘发光的方式
Shader "Custom/Test0"
{
    Properties
    {
        _MainColor("主颜色",Color)=(0,0,0,1)

        _HaloColor("外光晕颜色",Color)=(1,1,1,1)
        _HaloArea("外光晕范围",Range(0,2))=1
        _HaloPow("外光晕等级",Range(0,3))=1
        _HaloStrength("外光晕强度",Range(0,4))=1
    }
    SubShader
    {
        //第一个Pass实现内发光,或者说边缘发光
        Pass
        {
            Tags
            {
                "LightMode"="ForwardBase"
            }

            CGPROGRAM
            #pragma vertex vert
            #pragma fragment frag
            #include "UnityCG.cginc"
            #include "UnityLightingCommon.cginc"
            fixed4 _MainColor;

            struct a2v
            {
                float4 vertex:POSITION;
                float3 normal:NORMAL;
            };

            struct v2f
            {
                float4 pos:SV_POSITION;
                float3 worldNormal :COLOR;
            };

            v2f vert(a2v v)
            {
                v2f o;

                o.pos = UnityObjectToClipPos(v.vertex);

                o.worldNormal = UnityObjectToWorldNormal(v.normal);

                return o;
            }

            fixed4 frag(v2f i):SV_Target
            {
                fixed3 ambient = UNITY_LIGHTMODEL_AMBIENT.rgb;

                fixed3 worldNormal = normalize(i.worldNormal);

                fixed3 worldLight = normalize(_WorldSpaceLightPos0.xyz);

                fixed3 diffuse = _LightColor0.rgb * _MainColor.rgb *
                    (dot(worldLight, worldNormal) * 0.5 + 0.5);
                return fixed4(ambient + diffuse, 1);
            }
            ENDCG
        }
        Pass
        {
            //剔除正面,防止外边缘遮住原模型,并不是所有的都需要剔除正面,比如袖子什么的
            //那个需要开启深度模板什么的,暂时还没学到
            Cull Front
            //混合用于控制外边缘强度
            Blend SrcAlpha OneMinusSrcAlpha
            //ZWrite off  这个用于外边缘叠加和其他物体叠加时可能会产生的透明边界的情形
            CGPROGRAM
            #pragma vertex vert
            #pragma fragment frag
            #include "UnityCG.cginc"
            fixed4 _HaloColor;
            fixed _HaloPow;
            fixed _HaloArea;
            fixed _HaloStrength;

            struct a2v
            {
                float4 vertex:POSITION;
                float3 normal:NORMAL;
            };

            struct v2f
            {
                float4 pos:SV_POSITION;
                float3 normal:TEXCOORD0;
                float4 worldPos:TEXCOORD1;
            };


            v2f vert(a2v v)
            {
                v2f o;
                o.normal = UnityObjectToWorldNormal(v.normal);
                v.vertex.xyz += v.normal * _HaloArea;
                o.pos = UnityObjectToClipPos(v.vertex);
                o.worldPos = mul(unity_ObjectToWorld, v.vertex);
                return o;
            }

            fixed4 frag(v2f i):SV_Target
            {
                i.normal = normalize(i.normal);
                //和Pass一不一样,原因是我们要把背面当正面渲染,所以视角方向要相反
                float3 viewDir = normalize(i.worldPos.xyz - _WorldSpaceCameraPos.xyz);
                //边缘仍然使用菲涅尔判断,只是和检测方式内边缘不同
                float fresnel = pow(saturate(dot(i.normal, viewDir)), _HaloPow) * _HaloStrength;
                return fixed4(_HaloColor.rgb, fresnel);
            }
            ENDCG
        }
    }
}
二、 基于模型扩充的描边
实现原理也很简单,就是模型扩充渲染一下,原模型渲染一下,结果一叠加,啪,就成了,但是要注意原模型一定要盖着扩充模型。不过说着简单,但还有很多要注意的点。
2.1 不关闭深度写入但使用正面剔除
Shader "Custom/Test0"
{
    Properties
    {
        _MainColor("主颜色",Color)=(0,0,0,1)

        _OutlineColor("描边颜色",Color)=(1,1,1,1)
        _OutlineArea("描边区域",Range(0,0.2))=2
        _OutlineStrength("描边强度",Range(0,1))=1

    }
    SubShader
    {
        Tags{"Queue"="Overlay"}
        //模型扩充渲染
        Pass
        {
            Cull Front
            //ZWrite off
            CGPROGRAM
            #pragma vertex vert
            #pragma fragment frag
            #include "UnityCG.cginc"
            float4 _MainColor;
            fixed4 _OutlineColor;
            fixed _OutlineArea;
            fixed _OutlineStrength;

            struct a2v
            {
                float4 vertex:POSITION;
                float3 normal:NORMAL;
            };

            struct v2f
            {
                float4 pos:SV_POSITION;
            };


            v2f vert(a2v v)
            {
                v2f o;
                v.vertex.xyz+=v.normal*_OutlineArea;
                o.pos = UnityObjectToClipPos(v.vertex);
                return o;
            }

            fixed4 frag():SV_Target
            {
                return _OutlineColor*_OutlineStrength;
            }
            ENDCG
        }
        //正常漫反射光照
        Pass
        {
            Tags
            {
                "LightMode"="ForwardBase"
            }
            CGPROGRAM
            #pragma vertex vert
            #pragma fragment frag
            #include "UnityCG.cginc"
            #include "UnityLightingCommon.cginc"
            fixed4 _MainColor;

            struct a2v
            {
                float4 vertex:POSITION;
                float3 normal:NORMAL;
            };

            struct v2f
            {
                float4 pos:SV_POSITION;
                float3 worldNormal :COLOR;
            };

            v2f vert(a2v v)
            {
                v2f o;

                o.pos = UnityObjectToClipPos(v.vertex);

                o.worldNormal = UnityObjectToWorldNormal(v.normal);

                return o;
            }

            fixed4 frag(v2f i):SV_Target
            {
                fixed3 ambient = UNITY_LIGHTMODEL_AMBIENT.rgb;

                fixed3 worldNormal = normalize(i.worldNormal);

                fixed3 worldLight = normalize(_WorldSpaceLightPos0.xyz);

                fixed3 diffuse = _LightColor0.rgb * _MainColor.rgb *
                    (dot(worldLight, worldNormal) * 0.5 + 0.5);
                return fixed4(ambient + diffuse, 1);
            }
            ENDCG
        }

    }
}
2.2 关闭深度写入和剔除的方式
Shader "Custom/Test0"
{
    Properties
    {
        _MainColor("主颜色",Color)=(0,0,0,1)

        _OutlineColor("描边颜色",Color)=(1,1,1,1)
        _OutlineArea("描边区域",Range(0,0.2))=2
        _OutlineStrength("描边强度",Range(0,1))=1

    }
    SubShader
    {
        //模型扩充渲染
        Pass
        {
            ZWrite off
            CGPROGRAM
            #pragma vertex vert
            #pragma fragment frag
            #include "UnityCG.cginc"
            float4 _MainColor;
            fixed4 _OutlineColor;
            fixed _OutlineArea;
            fixed _OutlineStrength;

            struct a2v
            {
                float4 vertex:POSITION;
                float3 normal:NORMAL;
            };

            struct v2f
            {
                float4 pos:SV_POSITION;
            };


            v2f vert(a2v v)
            {
                v2f o;
                v.vertex.xyz+=v.normal*_OutlineArea;
                o.pos = UnityObjectToClipPos(v.vertex);
                return o;
            }

            fixed4 frag():SV_Target
            {
                return _OutlineColor*_OutlineStrength;
            }
            ENDCG
        }
        Pass
        {
            Tags
            {
                "LightMode"="ForwardBase"
            }
            CGPROGRAM
            #pragma vertex vert
            #pragma fragment frag
            #include "UnityCG.cginc"
            #include "UnityLightingCommon.cginc"
            fixed4 _MainColor;

            struct a2v
            {
                float4 vertex:POSITION;
                float3 normal:NORMAL;
            };

            struct v2f
            {
                float4 pos:SV_POSITION;
                float3 worldNormal :COLOR;
            };

            v2f vert(a2v v)
            {
                v2f o;

                o.pos = UnityObjectToClipPos(v.vertex);

                o.worldNormal = UnityObjectToWorldNormal(v.normal);

                return o;
            }

            fixed4 frag(v2f i):SV_Target
            {
                fixed3 ambient = UNITY_LIGHTMODEL_AMBIENT.rgb;

                fixed3 worldNormal = normalize(i.worldNormal);

                fixed3 worldLight = normalize(_WorldSpaceLightPos0.xyz);

                fixed3 diffuse = _LightColor0.rgb * _MainColor.rgb *
                    (dot(worldLight, worldNormal) * 0.5 + 0.5);
                return fixed4(ambient + diffuse, 1);
            }
            ENDCG
        }

    }
}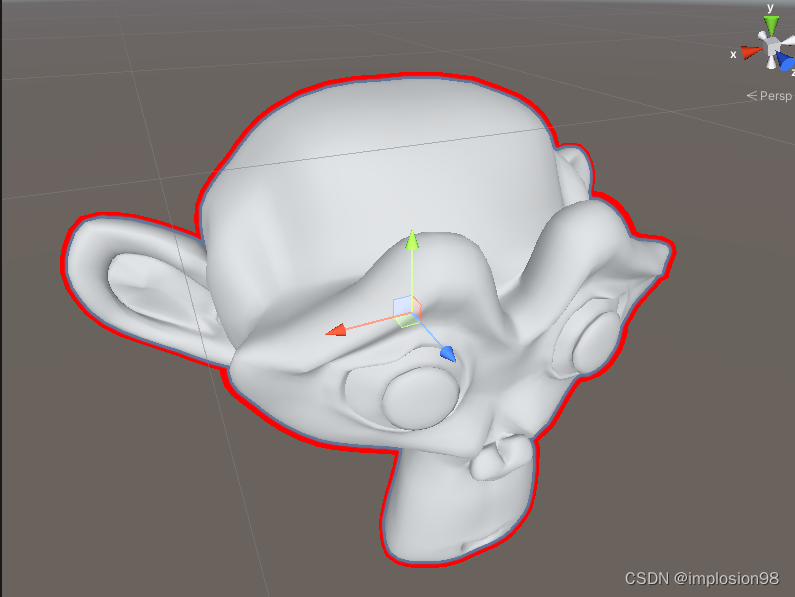
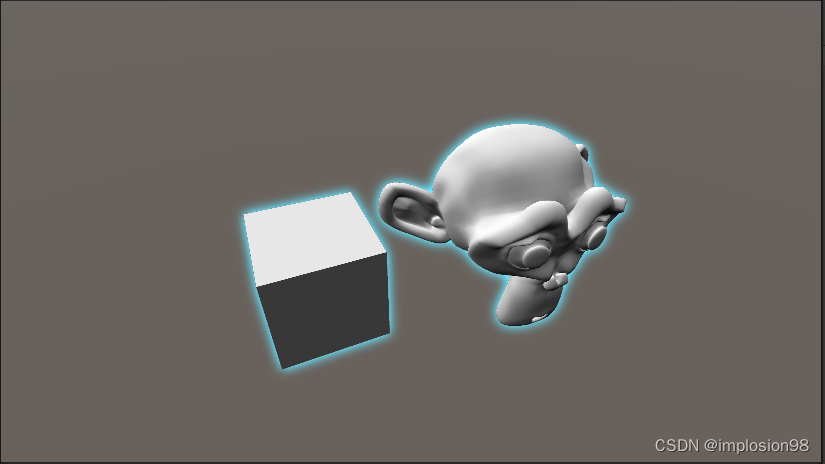
可以看到,只是在模型周围才有描边效果,至于说周围那条淡蓝色的细边缘,那是Unity自带的选中物体时的描边效果。
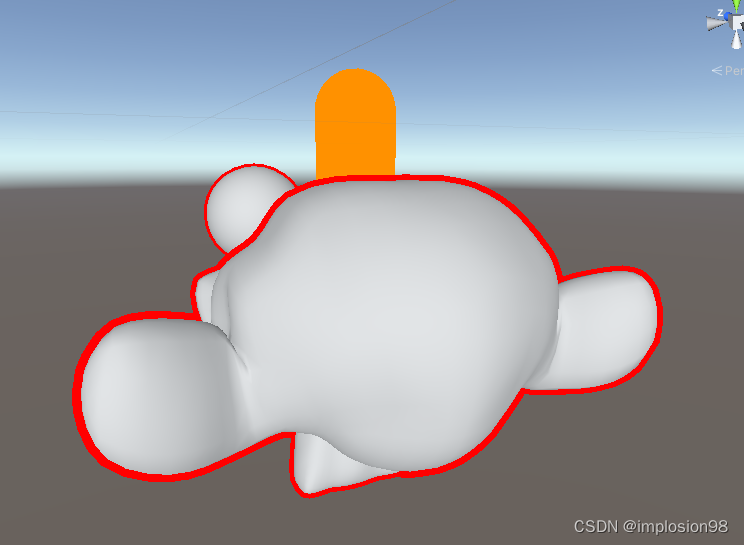
关闭深度写入有一个问题就是描边本身会被其他物体阻挡,从而破坏描边效果。
2.3 使用渲染队列的关闭深度写入的方式
Shader "Custom/Test0"
{
    Properties
    {
        _MainColor("主颜色",Color)=(0,0,0,1)

        _OutlineColor("描边颜色",Color)=(1,1,1,1)
        _OutlineArea("描边区域",Range(0,0.2))=2
        _OutlineStrength("描边强度",Range(0,1))=1

    }
    SubShader
    {
        Tags{"Queue"="Overlay"}
        //模型扩充渲染
        Pass
        {
            ZWrite off
            CGPROGRAM
            #pragma vertex vert
            #pragma fragment frag
            #include "UnityCG.cginc"
            float4 _MainColor;
            fixed4 _OutlineColor;
            fixed _OutlineArea;
            fixed _OutlineStrength;

            struct a2v
            {
                float4 vertex:POSITION;
                float3 normal:NORMAL;
            };

            struct v2f
            {
                float4 pos:SV_POSITION;
            };


            v2f vert(a2v v)
            {
                v2f o;
                v.vertex.xyz+=v.normal*_OutlineArea;
                o.pos = UnityObjectToClipPos(v.vertex);
                return o;
            }

            fixed4 frag():SV_Target
            {
                return _OutlineColor*_OutlineStrength;
            }
            ENDCG
        }
        //正常漫反射光照
        Pass
        {
            Tags
            {
                "LightMode"="ForwardBase"
            }
            CGPROGRAM
            #pragma vertex vert
            #pragma fragment frag
            #include "UnityCG.cginc"
            #include "UnityLightingCommon.cginc"
            fixed4 _MainColor;

            struct a2v
            {
                float4 vertex:POSITION;
                float3 normal:NORMAL;
            };

            struct v2f
            {
                float4 pos:SV_POSITION;
                float3 worldNormal :COLOR;
            };

            v2f vert(a2v v)
            {
                v2f o;

                o.pos = UnityObjectToClipPos(v.vertex);

                o.worldNormal = UnityObjectToWorldNormal(v.normal);

                return o;
            }

            fixed4 frag(v2f i):SV_Target
            {
                fixed3 ambient = UNITY_LIGHTMODEL_AMBIENT.rgb;

                fixed3 worldNormal = normalize(i.worldNormal);

                fixed3 worldLight = normalize(_WorldSpaceLightPos0.xyz);

                fixed3 diffuse = _LightColor0.rgb * _MainColor.rgb *
                    (dot(worldLight, worldNormal) * 0.5 + 0.5);
                return fixed4(ambient + diffuse, 1);
            }
            ENDCG
        }

    }
}
很明显,结果正确。
2.4 基于模板测试的描边效果
也是两个Pass,第一个Pass把扩充后的模型模板值写进去,第二个Pass按原模型把更大的模板值更过即可,描边效果上面这个一样,就不演示了。
三、 一些问题
以上是几个大写法,但这几个大写法都有些小问题,一是描边效果近大远小,一个是少顶点的描边使用扩充顶点和剔除正面都会出现的描边不贴合模型本身,
3.1 问题一的优化
至于实现,大致就是将法线转换到投影空间下,这时候就能得出来,投影空间下的偏移值,在返回来加到顶点偏移上就行。
Shader "Custom/Test0"
{
    Properties
    {
        _MainColor("主颜色",Color)=(0,0,0,1)

        _OutlineColor("描边颜色",Color)=(1,1,1,1)
        _OutlineArea("描边区域",Range(0,0.2))=2
        _OutlineStrength("描边强度",Range(0,1))=1

    }
    SubShader
    {
        Tags{"Queue"="Overlay"}
        //模型扩充渲染
        Pass
        {
            ZWrite off
            CGPROGRAM
            #pragma vertex vert
            #pragma fragment frag
            #include "UnityCG.cginc"
            float4 _MainColor;
            fixed4 _OutlineColor;
            fixed _OutlineArea;
            fixed _OutlineStrength;

            struct a2v
            {
                float4 vertex:POSITION;
                float3 normal:NORMAL;
            };

            struct v2f
            {
                float4 pos:SV_POSITION;
            };


            v2f vert(a2v v)
            {
                v2f o;
                float3 normal1=mul(unity_MatrixITMV,v.normal);
                float3 normal2=TransformViewToProjection(normal1);
                o.pos = UnityObjectToClipPos(v.vertex);
                o.pos.xy+=normal2.xy*_OutlineArea;
                return o;
            }

            fixed4 frag():SV_Target
            {
                return _OutlineColor*_OutlineStrength;
            }
            ENDCG
        }
        //正常漫反射光照
        Pass
        {
            Tags
            {
                "LightMode"="ForwardBase"
            }

            CGPROGRAM
            #pragma vertex vert
            #pragma fragment frag
            #include "UnityCG.cginc"
            #include "UnityLightingCommon.cginc"
            fixed4 _MainColor;

            struct a2v
            {
                float4 vertex:POSITION;
                float3 normal:NORMAL;
            };

            struct v2f
            {
                float4 pos:SV_POSITION;
                float3 worldNormal :COLOR;
            };

            v2f vert(a2v v)
            {
                v2f o;

                o.pos = UnityObjectToClipPos(v.vertex);

                o.worldNormal = UnityObjectToWorldNormal(v.normal);

                return o;
            }

            fixed4 frag(v2f i):SV_Target
            {
                fixed3 ambient = UNITY_LIGHTMODEL_AMBIENT.rgb;

                fixed3 worldNormal = normalize(i.worldNormal);

                fixed3 worldLight = normalize(_WorldSpaceLightPos0.xyz);

                fixed3 diffuse = _LightColor0.rgb * _MainColor.rgb *
                    (dot(worldLight, worldNormal) * 0.5 + 0.5);
                return fixed4(ambient + diffuse, 1);
            }
            ENDCG
        }

    }
}
结果:效果不展示了,变化有点小,但还是有的。
4.2 问题二:
我们上面写的全是根据法线偏移,一旦少顶点就会出现这样的结果,解决办法也很简单,沿顶点方向偏移即可。
Shader "Custom/Test0"
{
    Properties
    {
        _MainColor("主颜色",Color)=(0,0,0,1)

        _OutlineColor("描边颜色",Color)=(1,1,1,1)
        _OutlineArea("描边区域",Range(0,0.2))=2
        _OutlineStrength("描边强度",Range(0,1))=1

    }
    SubShader
    {
        Tags{"Queue"="Overlay"}
        //模型扩充渲染
        Pass
        {
            ZWrite off
            CGPROGRAM
            #pragma vertex vert
            #pragma fragment frag
            #include "UnityCG.cginc"
            float4 _MainColor;
            fixed4 _OutlineColor;
            fixed _OutlineArea;
            fixed _OutlineStrength;

            struct a2v
            {
                float4 vertex:POSITION;
                float3 normal:NORMAL;
            };

            struct v2f
            {
                float4 pos:SV_POSITION;
            };


            v2f vert(a2v v)
            {
                v2f o;
                v.vertex.xyz+=v.vertex.xyz*_OutlineArea;
                o.pos = UnityObjectToClipPos(v.vertex);
                return o;
            }

            fixed4 frag():SV_Target
            {
                return _OutlineColor*_OutlineStrength;
            }
            ENDCG
        }
        //正常漫反射光照
        Pass
        {
            Tags
            {
                "LightMode"="ForwardBase"
            }

            CGPROGRAM
            #pragma vertex vert
            #pragma fragment frag
            #include "UnityCG.cginc"
            #include "UnityLightingCommon.cginc"
            fixed4 _MainColor;

            struct a2v
            {
                float4 vertex:POSITION;
                float3 normal:NORMAL;
            };

            struct v2f
            {
                float4 pos:SV_POSITION;
                float3 worldNormal :COLOR;
            };

            v2f vert(a2v v)
            {
                v2f o;

                o.pos = UnityObjectToClipPos(v.vertex);

                o.worldNormal = UnityObjectToWorldNormal(v.normal);

                return o;
            }

            fixed4 frag(v2f i):SV_Target
            {
                fixed3 ambient = UNITY_LIGHTMODEL_AMBIENT.rgb;

                fixed3 worldNormal = normalize(i.worldNormal);

                fixed3 worldLight = normalize(_WorldSpaceLightPos0.xyz);

                fixed3 diffuse = _LightColor0.rgb * _MainColor.rgb *
                    (dot(worldLight, worldNormal) * 0.5 + 0.5);
                return fixed4(ambient + diffuse, 1);
            }
            ENDCG
        }

    }
}

四、屏幕后处理实现方式
后处理基于高斯模糊,而且整个过程基本是对渲染纹理的处理,第一步先渲染需要描边的物体(这里涉及到摄像机分层渲染, 然后进行高斯模糊,再和原图片做减法,留下只有模糊过的轮廓,再和整体图像做混合。
脚本:
using System;
using System.Collections;
using System.Collections.Generic;
using UnityEngine;
using UnityEngine.Serialization;

[ExecuteInEditMode]
public class RenderImage : MonoBehaviour
{
    //用于渲染需要描边层的摄像机
    private GameObject cameraSecond;

    [Header("是否开启描边效果")] public bool isOutline = true;

    [Header("用于描边层提取的Shader")]public Shader shader0;
    [Header("实现描边的Shader")] public Shader shader1;

    private Camera _camera;
    private RenderTexture _cSRenderTexture;

    private Material _material;

    [Header("迭代次数")] [Range(0, 10)] public int iterations = 3;

    [Header("模糊范围")] [Range(0.2f, 20f)] public float blurArea = 0.6f;

    [Header("降采样")] [Range(1, 8)] private int downSample = 2;

    private void Awake()
    {

        cameraSecond = GameObject.Find("cameraSecond");
        cameraSecond.transform.SetParent(this.transform.parent);
        _camera = cameraSecond.GetComponent<Camera>();
        _material = new Material(shader1);
    }

    //在这个摄像机渲染之前,先把描边层的渲染了
    private void OnPreRender()
    {
        _cSRenderTexture = CustomDownSample(_cSRenderTexture);
        _camera.targetTexture = _cSRenderTexture;
        //着色器替换,使用shader0中的RenderType类型的SubShader进行渲染
        _camera.RenderWithShader(shader0, "RenderType");

    }

    private void OnRenderImage(RenderTexture src, RenderTexture dest)
    {
        if (_material != null&& isOutline )
        {

            int rtW = src.width / downSample;
            int rtH = src.height / downSample;

            RenderTexture buffer0 = RenderTexture.GetTemporary(rtW, rtH);

            buffer0.filterMode = FilterMode.Bilinear;

            Graphics.Blit(_cSRenderTexture, buffer0);
            //不停的模糊处理
            for (int i = 0; i < iterations; i++)
            {
                _material.SetFloat("_BlurArea", 1.0f + i * blurArea);

                RenderTexture buffer1 = RenderTexture.GetTemporary(rtW, rtH);
                //第一个Pass用于横向模糊
                Graphics.Blit(buffer0, buffer1, _material, 0);

                RenderTexture.ReleaseTemporary(buffer0);

                buffer0 = buffer1;

                buffer1 = RenderTexture.GetTemporary(rtW, rtH);
                //第二个Pass用于纵向模糊
                Graphics.Blit(buffer0, buffer1, _material, 1);

                RenderTexture.ReleaseTemporary(buffer0);

                buffer0 = buffer1;
            }

            //原图像做减法,提取出边缘
            //此时buffer0中存放着模糊处理后的区域
            _material.SetTexture("_SecondTex", buffer0);
            RenderTexture buffer2 = RenderTexture.GetTemporary(rtW, rtH);
            //第三个Pass用于获取只包含边缘的纹理
            Graphics.Blit(_cSRenderTexture, buffer2, _material, 2);
            RenderTexture.ReleaseTemporary(buffer0);
            buffer0 = buffer2;


            //最后和该摄像机进行混合
            _material.SetTexture("_SecondTex",buffer0);
            Graphics.Blit(src, dest, _material, 3);
            RenderTexture.ReleaseTemporary(buffer0);
        }
        else
        {
            Graphics.Blit(src, dest);
        }
        cameraSecond.SetActive(true);
    }

    private RenderTexture CustomDownSample(RenderTexture rT)
    {
        //把上一帧的申请空间先释放了
        RenderTexture.ReleaseTemporary(rT);
        rT = RenderTexture.GetTemporary(Screen.width / downSample, Screen.height / downSample);
        return rT;
    }
}
Shader:
用于描边层提取的Shader:
Shader "Custom/Test1"
{
    Properties
    {
        //_OutlineColor("描边颜色",Color)=(1,0,1,1)
    }
    //用于着色器替换
    SubShader
    {
        Tags
        {
            "RenderType"="Opaque"
        }
        Pass
        {
            CGPROGRAM
            #pragma vertex vert
            #pragma fragment frag
            #include "UnityCG.cginc"
            fixed4 _OutlineColor;

            struct a2v
            {
                float4 vertex:POSITION;
            };

            struct v2f
            {
                float4 pos:SV_POSITION;
            };

            v2f vert(a2v v)
            {
                v2f o;
                o.pos = UnityObjectToClipPos(v.vertex);
                return o;
            }

            fixed4 frag():SV_Target
            {
               //描边颜色在物体材质上调
               return _OutlineColor;
            }
            ENDCG
        }
    }
}
要描边的物体Shader:
Shader "Custom/Test2"
{
    Properties
    {
        _MainColor("主颜色",Color)=(0,0,0,1)
        _OutlineColor("描边颜色",Color)=(1,1,1,1)
    }
    SubShader
    {
        Tags
        {
            "RenderType"="Opaque"
        }
        //正常漫反射光照
        Pass
        {
            Tags
            {
                "LightMode"="ForwardBase"
            }
            CGPROGRAM
            #pragma vertex vert
            #pragma fragment frag
            #include "UnityCG.cginc"
            #include "UnityLightingCommon.cginc"
            fixed4 _MainColor;

            struct a2v
            {
                float4 vertex:POSITION;
                float3 normal:NORMAL;
            };

            struct v2f
            {
                float4 pos:SV_POSITION;
                float3 worldNormal :COLOR;
            };

            v2f vert(a2v v)
            {
                v2f o;

                o.pos = UnityObjectToClipPos(v.vertex);

                o.worldNormal = UnityObjectToWorldNormal(v.normal);

                return o;
            }

            fixed4 frag(v2f i):SV_Target
            {
                fixed3 ambient = UNITY_LIGHTMODEL_AMBIENT.rgb;

                fixed3 worldNormal = normalize(i.worldNormal);

                fixed3 worldLight = normalize(_WorldSpaceLightPos0.xyz);

                fixed3 diffuse = _LightColor0.rgb * _MainColor.rgb *
                    (dot(worldLight, worldNormal) * 0.5 + 0.5);
                return fixed4(ambient + diffuse, 1);
            }
            ENDCG
        }
    }


}
真正的重头戏:
Shader "Custom/Test0"
{
    Properties
    {
        _MainTex("渲染纹理",2D)="white"{}
        _SecondTex("",2D)="white"{}
        _BlurArea("模糊范围",float)=1.0
    }
    SubShader
    {
        //类似C++的头文件,可以减少重复代码
        CGINCLUDE
        #include "UnityCG.cginc"

        sampler2D _MainTex;
        float4 _MainTex_TexelSize;
        float _BlurArea;

        struct a2v
        {
            float4 vertex:POSITION;
            float2 texcoord:TEXCOORD0;
        };

        struct v2f
        {
            float4 pos:SV_POSITION;
            float2 uv[5]:TEXCOORD0;
        };

        v2f vertVertical(a2v v)
        {
            v2f o;
            o.pos = UnityObjectToClipPos(v.vertex);
            //将纹理坐标计算放在顶点着色器中,由于传递是线性插值,所以并不会影响结果
            o.uv[0] = v.texcoord;
            o.uv[1] = v.texcoord + float2(0, _MainTex_TexelSize.y * 1.0) * _BlurArea;
            o.uv[2] = v.texcoord - float2(0, _MainTex_TexelSize.y * 1.0) * _BlurArea;
            o.uv[3] = v.texcoord + float2(0, _MainTex_TexelSize.y * 2.0) * _BlurArea;
            o.uv[4] = v.texcoord - float2(0, _MainTex_TexelSize.y * 2.0) * _BlurArea;

            return o;
        }

        v2f vertHorizontal(a2v v)
        {
            v2f o;
            o.pos = UnityObjectToClipPos(v.vertex);
            //注意这里是x方向的偏移
            o.uv[0] = v.texcoord;
            o.uv[1] = v.texcoord + float2(_MainTex_TexelSize.x * 1.0, 0) * _BlurArea;
            o.uv[2] = v.texcoord - float2(_MainTex_TexelSize.x * 1.0, 0) * _BlurArea;
            o.uv[3] = v.texcoord + float2(_MainTex_TexelSize.x * 2.0, 0) * _BlurArea;
            o.uv[4] = v.texcoord - float2(_MainTex_TexelSize.x * 2.0, 0) * _BlurArea;

            return o;
        }

        fixed4 frag_Blur(v2f i):SV_Target
        {
            float weight[3] = {0.4026, 0.2442, 0.0545};
            fixed3 color = tex2D(_MainTex, i.uv[0]) * weight[0];
            //权重计算
            for (int j = 1; j < 3; j++)
            {
                color += tex2D(_MainTex, i.uv[j * 2 - 1]) * weight[j];
                color += tex2D(_MainTex, i.uv[j * 2]) * weight[j];
            }
            return fixed4(color, 1);
        }
        ENDCG

        //用于横向模糊
        Pass
        {
            NAME "GAUSSIAN_VERTICAL"
            CGPROGRAM
            #pragma vertex vertHorizontal
            #pragma fragment frag_Blur
            ENDCG
        }
        //用于纵向模糊
        Pass
        {
            NAME "GAUSSIAN_HORIZONTAL"
            CGPROGRAM
            #pragma vertex vertVertical
            #pragma fragment frag_Blur
            ENDCG
        }
        //用于提取模糊后的边缘
        Pass
        {
            CGPROGRAM
            #pragma vertex vert
            #pragma fragment frag
            //存放着模糊后的纹理
            sampler2D _SecondTex;
            struct a2v_1
            {
                float4 vertex:POSITION;
                float2 texcoord:TEXCOORD0;
            };

            struct v2f_1
            {
                float4 pos:SV_POSITION;
                float2 uv:TEXCOORD0;
            };
            v2f_1 vert(a2v_1 v)
            {
                v2f_1 o;
                o.pos=UnityObjectToClipPos(v.vertex);
                o.uv=v.texcoord;
                return o;
            }
            fixed4 frag(v2f_1 i):SV_Target
            {
                fixed3 texResult1=tex2D(_MainTex,i.uv);
                fixed3 texResult2=tex2D(_SecondTex,i.uv);
                return fixed4(texResult2-texResult1,1);
            }
            ENDCG
        }
        //用于混合原图像
        Pass
        {
            CGPROGRAM
            #pragma vertex vert
            #pragma fragment frag
            //存放着提取后的纹理
            sampler2D _SecondTex;
            struct a2v_1
            {
                float4 vertex:POSITION;
                float2 texcoord:TEXCOORD0;
            };

            struct v2f_1
            {
                float4 pos:SV_POSITION;
                float2 uv:TEXCOORD0;
            };
            v2f_1 vert(a2v_1 v)
            {
                v2f_1 o;
                o.pos=UnityObjectToClipPos(v.vertex);
                o.uv=v.texcoord;
                return o;
            }
            fixed4 frag(v2f_1 i):SV_Target
            {
                fixed3 texResult1=tex2D(_MainTex,i.uv);
                fixed3 texResult2=tex2D(_SecondTex,i.uv);
                return fixed4(texResult2+texResult1,1);
            }
            ENDCG

        }
    }
}
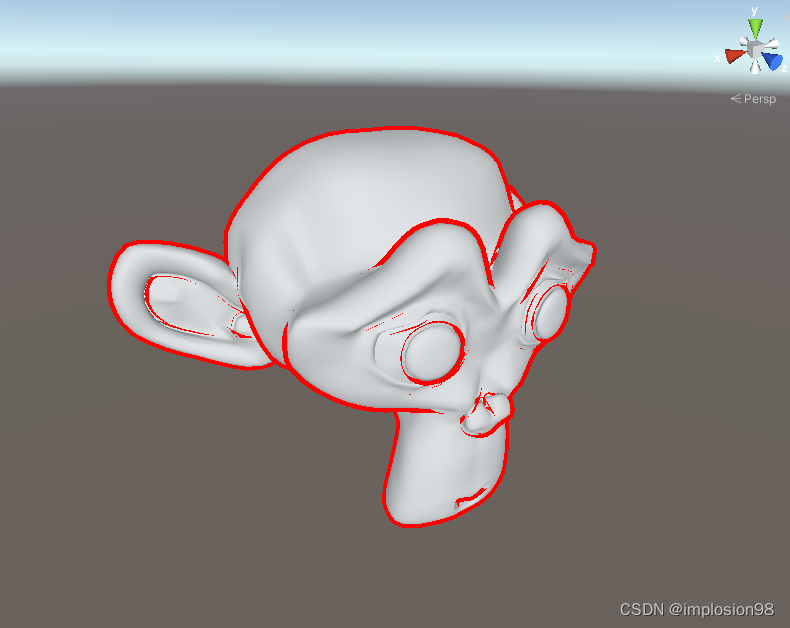
效果很不错,而且这个描边还是有点渐变的味。
五、基于深度纹理的实现
UnityShader基础(八)——深度纹理与法线纹理_implosion98的博客-CSDN博客
六、还有可以基于自定义边缘风格化渲染,很离谱。