使用百里香叶的春季启动上传和下载示例。在本文中,我们将学习如何从数据库上传和下载文件。此外,我们将看到如何显示数据库中的图像。

上传和下载图像是任何应用程序的重要组成部分之一。众所周知,我们使用 Spring Boot 使开发过程变得简单。因此,在这里我们将创建一个示例来从数据库上传和下载文件。我们将在视图层使用百里香叶模板。Spring Data JPA 将在数据访问层使用。这里的关系数据库是MYSQL。
使用百里香叶的春季启动上传和下载文件示例
在此示例中,我们将创建一个视图,在其中查看如何上传和下载文件。
第 1 步:打开 IDE STS-弹簧工具套件
第 2 步:转到 Spring 入门项目>文件。
步骤3: 现在,填写如下所示的所有字段,然后单击下一步。

步骤4: 现在,添加百里香叶,春季数据JPA,龙目岛和春季网络的依赖项,然后单击下一步>完成。
现在,等待一段时间,您的项目结构将准备就绪。转到pom.xml文件,您将看到将自动添加以下依赖项
<dependencies>
  <dependency>
   <groupId>org.springframework.boot</groupId>
   <artifactId>spring-boot-starter-data-jpa</artifactId>
  </dependency>
  <dependency>
   <groupId>org.springframework.boot</groupId>
   <artifactId>spring-boot-starter-thymeleaf</artifactId>
  </dependency>
  <dependency>
   <groupId>org.springframework.boot</groupId>
   <artifactId>spring-boot-starter-web</artifactId>
  </dependency>
  <dependency>
   <groupId>mysql</groupId>
   <artifactId>mysql-connector-java</artifactId>
   <scope>runtime</scope>
  </dependency>
  <dependency>
   <groupId>org.projectlombok</groupId>
   <artifactId>lombok</artifactId>
   <optional>true</optional>
  </dependency>
  <dependency>
   <groupId>org.springframework.boot</groupId>
   <artifactId>spring-boot-starter-test</artifactId>
   <scope>test</scope>
  </dependency>
 </dependencies>
在 MYSQL 中创建数据库
mysql> create database db_demo;
配置应用程序。属性文件
# change the port
server.port=8888
#Database Configrations
spring.datasource.url=jdbc:mysql://localhost:3306/db_demo
spring.datasource.driver-class-name=com.mysql.cj.jdbc.Driver
spring.datasource.username=root
spring.datasource.password=root
spring.jpa.database-platform = org.hibernate.dialect.MySQL8Dialect
spring.jpa.generate-ddl=true
spring.jpa.hibernate.ddl-auto = update

#Multipart
spring.servlet.multipart.enabled=true
spring.servlet.multipart.file-size-threshold=2KB
spring.servlet.multipart.max-file-size=200MB
spring.servlet.multipart.max-request-size=215MB- spring.jpa.hibernate.ddl-auto设置为更新,以便我们将要进行的任何更改都将反映在架构中。
- spring.datasource.url 用于设置 MYSQL DB 的 URL。
- spring.datasource.username 用于设置 username 和 spring。 datasource. password用于设置密码。
- spring.datasource.driver-class-name 用于设置驱动程序类名。
- spring.jpa.show-sql 设置为 true 以显示 Hibernate 生成的 SQL。
- spring.jpa.properties.hibernate.dialect 用于为所选数据库生成更好的 SQL。
- spring.jpa.properties.hibernate.format_sql设置为 true 以格式化 SQL 查询。
- server.port 设置为 8888。
- spring.servlet.multipart.enabled 设置为 true 以提供对 multipart 的支持。
- spring.servlet.multipart.file-size-threshold用于设置文件的最大大小。在阈值大小之后,文件将被写入光盘。
- spring.servlet.multipart.max-file-size 表示最大文件大小。
- spring.servlet.multipart.max-request-size 表示总请求大小。
创建模型类
Student.java
package com.example.thymeleaf.model;

import javax.persistence.Entity;
import javax.persistence.GeneratedValue;
import javax.persistence.GenerationType;
import javax.persistence.Id;
import javax.persistence.Table;

import lombok.AllArgsConstructor;
import lombok.Getter;
import lombok.NoArgsConstructor;
import lombok.Setter;

@Entity
@Table(name = "student")
@Setter
@Getter
@AllArgsConstructor
@NoArgsConstructor
public class Student {

 @Id
 @GeneratedValue(strategy = GenerationType.IDENTITY)
 private long id;
 private String profilePicture;
 private long size;
 private byte [] content;
}- @Entity用于批注类以指示它们是 JPA 实体。
- @Table批注用于指定应与实体映射的表的名称。
- @Id注释用于主键。
- 我使用龙目岛库删除了样板代码。如果您想知道什么是龙目岛,请查看这篇文章 https://codedec.com/tutorials/how-to-configure-lombok-into-eclipse/
在数据库中,它将像这样显示
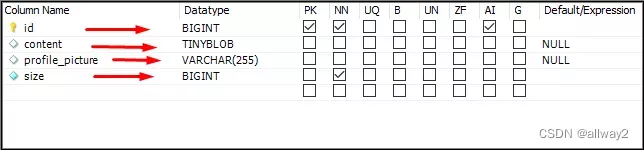
现在,使用 MYSQL 工作台将 TinyBLOB 数据类型更改为中等 Blob。
创建存储库接口
这里的存储库是 DAO 层,它执行所有数据库操作。创建 StudentRepository 接口,该接口将扩展 JPARepository<ClassName, ID>。
package com.example.thymeleaf.repository;

import org.springframework.data.jpa.repository.JpaRepository;

import com.example.thymeleaf.model.Student;

public interface StudentRepository extends JpaRepository<Student, Long> {

}
创建服务图层
在这里,创建三种方法来保存学生信息、检索学生信息和按 id 获取学生信息。
StudentService.java
package com.example.thymeleaf.service;

import java.util.List;
import java.util.Optional;

import org.springframework.beans.factory.annotation.Autowired;
import org.springframework.stereotype.Service;

import com.example.thymeleaf.model.Student;
import com.example.thymeleaf.repository.StudentRepository;

@Service
public class StudentService {

 @Autowired
 private StudentRepository repository;
 public Student createStudent(Student student) {
  return repository.save(student);

 }
 public List<Student> getAllStudent(){
  return repository.findAll();

 }

 public Optional<Student> findStudentById(long id){
  return repository.findById(id);
 }
}
创建控制器类
对网页的请求将由控制器类中的处理程序方法使用 @GetMapping 处理。
package com.example.thymeleaf.controller;

import java.io.IOException;
import java.util.List;
import java.util.Optional;

import javax.servlet.ServletException;
import javax.servlet.ServletOutputStream;
import javax.servlet.http.HttpServletResponse;

import org.springframework.beans.factory.annotation.Autowired;
import org.springframework.data.repository.query.Param;
import org.springframework.stereotype.Controller;
import org.springframework.ui.Model;
import org.springframework.web.bind.annotation.GetMapping;
import org.springframework.web.bind.annotation.PathVariable;
import org.springframework.web.bind.annotation.PostMapping;
import org.springframework.web.bind.annotation.RequestParam;
import org.springframework.web.bind.annotation.ResponseBody;
import org.springframework.web.multipart.MultipartFile;

import com.example.thymeleaf.model.Student;
import com.example.thymeleaf.service.StudentService;
import com.sun.xml.txw2.Document;

@Controller
public class StudentController {

 @Autowired
 private StudentService service;
 @GetMapping("/")
 public String home(Model model) {
  List<Student> list =  service.getAllStudent();
  model.addAttribute("list", list);
  return "index";
 }
 @PostMapping("/upload")
 public String fileUpload(@RequestParam("file") MultipartFile file,  Model model) throws IOException {
 Student student = new Student();
  String fileName = file.getOriginalFilename();
  student.setProfilePicture(fileName);
  student.setContent(file.getBytes());
  student.setSize(file.getSize());
  service.createStudent(student);
  model.addAttribute("success", "File Uploaded Successfully!!!");
  return "index";

 }


 @GetMapping("/downloadfile")
 public void downloadFile(@Param("id") Long id , Model model, HttpServletResponse response) throws IOException {
  Optional<Student> temp = service.findStudentById(id);
  if(temp!=null) {
   Student student = temp.get();
   response.setContentType("application/octet-stream");
   String headerKey = "Content-Disposition";
   String headerValue = "attachment; filename = "+student.getProfilePicture();
   response.setHeader(headerKey, headerValue);
   ServletOutputStream outputStream = response.getOutputStream();
   outputStream.write(student.getContent());
   outputStream.close();
  }
 }

 @GetMapping("/image")
 public void showImage(@Param("id") Long id, HttpServletResponse response, Optional<Student> student)
   throws ServletException, IOException {

  student = service.findStudentById(id);
  response.setContentType("image/jpeg, image/jpg, image/png, image/gif, image/pdf");
  response.getOutputStream().write(student.get().getContent());
  response.getOutputStream().close();
 }
}@Controller注释将学生控制器类标记为请求处理程序。现在让我们打破上面的代码并理解它。
将文件上传到数据库
- 首先,在 home() 方法中,从数据库中获取学生列表并将其显示在 index.html 页面上。
- 将 /upload 请求映射到 fileUpload() 方法。在其中,使用Multipart获取文件并检索文件信息,例如文件名,文件大小。
- 将这些字段设置为学生实体,并调用服务类的创建 Student() 方法。
@PostMapping("/upload")
 public String fileUpload(@RequestParam("file") MultipartFile file,  Model model) throws IOException {
 Student student = new Student();
  String fileName = file.getOriginalFilename();
  student.setProfilePicture(fileName);
  student.setContent(file.getBytes());
  student.setSize(file.getSize());
  service.createStudent(student);
  model.addAttribute("success", "File Uploaded Successfully!!!");
  return "index";

 }
从数据库下载文件
- 将 GET '/downloadfile' 请求映射到 downloadFile() 方法。在其中,首先,获取学生的ID。
- 在响应标头中添加内容处置。
- 将内容类型添加为应用程序/八位字节流。
@GetMapping("/downloadfile")
 public void downloadFile(@Param("id") Long id , Model model, HttpServletResponse response) throws IOException {
  Optional<Student> temp = service.findStudentById(id);
  if(temp!=null) {
   Student student = temp.get();
   response.setContentType("application/octet-stream");
   String headerKey = "Content-Disposition";
   String headerValue = "attachment; filename = "+student.getProfilePicture();
   response.setHeader(headerKey, headerValue);
   ServletOutputStream outputStream = response.getOutputStream();
   outputStream.write(student.getContent());
   outputStream.close();
  }
 }
显示数据库中的文件
- 将 GET '/image' 请求映射到 showImage() 方法。在其中,首先,获取学生的ID。
- 将内容类型添加为图像/jpeg、图像/jpg、图像/png、图像/gif、图像/pdf。
@GetMapping("/image")
 public void showImage(@Param("id") Long id, HttpServletResponse response, Optional<Student> student)
   throws ServletException, IOException {

  student = service.findStudentById(id);
  response.setContentType("image/jpeg, image/jpg, image/png, image/gif, image/pdf");
  response.getOutputStream().write(student.get().getContent());
  response.getOutputStream().close();
 }
使用百里香叶创建视图
转到 src/main/resources/template 文件夹并创建一个 index.html 文件。现在在寄存器中.html文件确保添加以下代码:
要了解如何迭代百里香叶中的对象列表,请查看这篇文章 使用 Spring 引导在百里香叶中迭代列表
<!DOCTYPE html>
<html xmlns:th="www.thymeleaf.org">
<head>
<link rel="stylesheet" href="https://cdnjs.cloudflare.com/ajax/libs/font-awesome/4.7.0/css/font-awesome.min.css">
<meta charset="ISO-8859-1">
<title>File Upload & Download</title>
<!-- CSS only -->
<link
 href="https://cdn.jsdelivr.net/npm/[email protected]/dist/css/bootstrap.min.css"
 rel="stylesheet"
 integrity="sha384-KyZXEAg3QhqLMpG8r+8fhAXLRk2vvoC2f3B09zVXn8CA5QIVfZOJ3BCsw2P0p/We"
 crossorigin="anonymous">
<!-- JavaScript Bundle with Popper -->
<script
 src="https://cdn.jsdelivr.net/npm/[email protected]/dist/js/bootstrap.bundle.min.js"
 integrity="sha384-U1DAWAznBHeqEIlVSCgzq+c9gqGAJn5c/t99JyeKa9xxaYpSvHU5awsuZVVFIhvj"
 crossorigin="anonymous"></script>
</head>
<body style="background-color: #f0f4c3">
 <div class="container text-center">
  <div>
   <h1>Spring Boot File Upload & Download</h1>
  </div>
   <div class="card" style="width: 18rem;" align="center">
      <div class="card-body" align="center">
        <h2 class="card-title">File Upload</h2>
        <h6 class="text-success">[[${success}]]</h6>
        <div class="mb-3">
          <form th:action="@{/upload}" method="post" enctype="multipart/form-data">
            <input
              class="form-control" name="file" type="file" id="formFile"><br />
            <input type="submit" value="Upload" class="btn btn-warning">
          </form>
        </div>
      </div>
     </div>
     <div class="container mt-5">
      <div class="card">
  <div class="card-body">
  <div class="row">
  <th:block th:each="studList: ${list}">
    <div class="col-sm-3">
     <div> <a th:href="@{'/downloadfile?id=' + ${studList.id}}"><i class="fa fa-download"></i></a></div>
     <div><img th:src="@{'/image?id='+ ${studList.id}}" width="100px" height="50px"></div>
 <div>[[${studList.profilePicture}]]</div>
 <div>([[${studList.size}]]) B</div>
    </div>
   </th:block>
  </div>
</div>
  </div>
</div>

 </div>
</body>
</html>
现在,运行 UploadAndDownloadApplication 并转到 localhost:8888 并查看以下输出。

通过这种方式,我们学会了如何从/向数据库上传、下载和显示图像。