使用百里香叶的春季启动上传和下载示例。在本文中,我们将学习如何从数据库上传和下载文件。

上传和下载文件是任何应用程序的重要组成部分之一。众所周知,我们使用 Spring Boot 使开发过程变得简单。因此,在这里我们将创建一个示例来从数据库上传和下载文件。我们将在视图层使用百里香叶模板。Spring Data JPA 将在数据访问层使用。这里的关系数据库是MYSQL。
使用百里香叶的春季启动上传和下载文件示例
在此示例中,我们将创建一个视图,在其中查看如何上传和下载文件。
第 1 步:打开 IDE STS-弹簧工具套件
第 2 步:转到 Spring 入门项目>文件。
步骤3: 现在,填写如下所示的所有字段,然后单击下一步。
步骤4: 现在,添加百里香叶,春季数据JPA,龙目岛和春季网络的依赖项,然后单击下一步>完成。
现在,等待一段时间,您的项目结构将准备就绪。转到pom.xml文件,您将看到将自动添加以下依赖项
<project xmlns="http://maven.apache.org/POM/4.0.0" xmlns:xsi="http://www.w3.org/2001/XMLSchema-instance"
         xsi:schemaLocation="http://maven.apache.org/POM/4.0.0 http://maven.apache.org/xsd/maven-4.0.0.xsd">
    <modelVersion>4.0.0</modelVersion>
    <parent>
        <groupId>org.springframework.boot</groupId>
        <artifactId>spring-boot-starter-parent</artifactId>
        <version>2.7.6</version>
        <relativePath/> <!-- lookup parent from repository -->
    </parent>
    <groupId>upload.download</groupId>
    <artifactId>springboot-thymeleaf-mysql-upload-download-files</artifactId>
    <version>1.0-SNAPSHOT</version>
    <packaging>jar</packaging>

    <name>springboot-thymeleaf-mysql-upload-download-files</name>
    <url>http://localhost:8080</url>

    <properties>
        <project.build.sourceEncoding>UTF-8</project.build.sourceEncoding>
        <maven.compiler.source>1.8</maven.compiler.source>
        <maven.compiler.target>1.8</maven.compiler.target>
    </properties>

    <dependencies>
        <dependency>
            <groupId>org.springframework.boot</groupId>
            <artifactId>spring-boot-starter-data-jpa</artifactId>
        </dependency>
        <dependency>
            <groupId>org.springframework.boot</groupId>
            <artifactId>spring-boot-starter-thymeleaf</artifactId>
        </dependency>
        <dependency>
            <groupId>org.springframework.boot</groupId>
            <artifactId>spring-boot-starter-web</artifactId>
        </dependency>

        <dependency>
            <groupId>mysql</groupId>
            <artifactId>mysql-connector-java</artifactId>
            <scope>runtime</scope>
        </dependency>
        <dependency>
            <groupId>javax.xml.bind</groupId>
            <artifactId>jaxb-api</artifactId>
            <version>2.4.0-b180830.0359</version>
        </dependency>

    </dependencies>

    <build>
        <plugins>
            <plugin>
                <groupId>org.springframework.boot</groupId>
                <artifactId>spring-boot-maven-plugin</artifactId>
            </plugin>
        </plugins>
    </build>
</project>
在 MYSQL 中创建数据库
mysql> create database updownload;
配置应用程序。属性文件
spring.jpa.hibernate.ddl-auto=update
spring.datasource.url=jdbc:mysql://localhost:3306/updownload?autoReconnect=true&useSSL=false&useUnicode=true&characterEncoding=UTF-8&serverTimezone=Asia/Shanghai
spring.datasource.username=root
spring.datasource.password=root

#Multipart
spring.servlet.multipart.enabled=true
spring.servlet.multipart.file-size-threshold=2KB
spring.servlet.multipart.max-file-size=200MB
spring.servlet.multipart.max-request-size=215MB- spring.jpa.hibernate.ddl-auto设置为更新,以便我们将要进行的任何更改都将反映在架构中。
- spring.datasource.url 用于设置 MYSQL DB 的 URL。
- spring.datasource.username 用于设置 username 和 spring。 datasource. password用于设置密码。
- spring.datasource.driver-class-name 用于设置驱动程序类名。
- spring.jpa.show-sql 设置为 true 以显示 Hibernate 生成的 SQL。
- spring.jpa.properties.hibernate.dialect 用于为所选数据库生成更好的 SQL。
- spring.jpa.properties.hibernate.format_sql设置为 true 以格式化 SQL 查询。
- server.port 设置为 8888。
- spring.servlet.multipart.enabled 设置为 true 以提供对 multipart 的支持。
- spring.servlet.multipart.file-size-threshold用于设置文件的最大大小。在阈值大小之后,文件将被写入光盘。
- spring.servlet.multipart.max-file-size 表示最大文件大小。
- spring.servlet.multipart.max-request-size 表示总请求大小。
创建模型类
FileEntity .java
package upload.download.entity;

import javax.persistence.*;

@Entity
@Table(name = "file_table")
public class FileEntity {
    @Id
    @GeneratedValue(strategy = GenerationType.AUTO)
    @Column(name = "file_id")
    private Long fileId;

    @Column(name = "file_name")
    private String fileName;

    @Column(name = "file_type")
    private String fileType;
    @Lob
    @Column(name = "file_byte")
    private byte[] fileByte;

    public FileEntity() {
    }

    public FileEntity(String fileName, String fileType, byte[] fileByte) {
        this.fileName = fileName;
        this.fileType = fileType;
        this.fileByte = fileByte;
    }

    public Long getId() {
        return fileId;
    }

    public void setId(Long id) {
        this.fileId = id;
    }

    public String getFileName() {
        return fileName;
    }

    public void setFileName(String fileName) {
        this.fileName = fileName;
    }

    public String getFileType() {
        return fileType;
    }

    public void setFileType(String fileType) {
        this.fileType = fileType;
    }

    public byte[] getFileByte() {
        return fileByte;
    }

    public void setFileByte(byte[] fileByte) {
        this.fileByte = fileByte;
    }
}
FileInfo.java
package upload.download.entity;

public class FileInfo {

    private String fileInfoName;
    private String fileURL;

    public FileInfo() {
    }

    public FileInfo(String fileInfoName, String fileURL) {
        this.fileInfoName = fileInfoName;
        this.fileURL = fileURL;
    }

    public String getFileInfoName() {
        return fileInfoName;
    }

    public void setFileInfoName(String fileInfoName) {
        this.fileInfoName = fileInfoName;
    }

    public String getFileURL() {
        return fileURL;
    }

    public void setFileURL(String fileURL) {
        this.fileURL = fileURL;
    }
}
- @Entity用于批注类以指示它们是 JPA 实体。
- @Table批注用于指定应与实体映射的表的名称。
- @Id注释用于主键。
- 我使用龙目岛库删除了样板代码。如果您想知道什么是龙目岛,请查看这篇文章 https://codedec.com/tutorials/how-to-configure-lombok-into-eclipse/
在数据库中,它将像这样显示

现在,使用 MYSQL 工作台将 TinyBLOB 数据类型更改为LongBlob。
创建存储库接口
这里的存储库是 DAO 层,它执行所有数据库操作。创建 FileEntityRepository 接口,该接口将扩展 JPARepository<ClassName, ID>。
package upload.download.repository;

import org.springframework.data.jpa.repository.JpaRepository;
import org.springframework.data.jpa.repository.config.EnableJpaRepositories;
import org.springframework.stereotype.Repository;
import upload.download.entity.FileEntity;

@Repository
@EnableJpaRepositories
public interface FileEntityRepository extends JpaRepository<FileEntity, Long> {
    FileEntity findByFileName(String fileName);
}
创建控制器类
对网页的请求将由控制器类中的处理程序方法使用 @GetMapping 处理。
package upload.download.controller;

import org.springframework.beans.factory.annotation.Autowired;
import org.springframework.stereotype.Controller;
import org.springframework.ui.Model;
import org.springframework.web.bind.annotation.GetMapping;
import org.springframework.web.bind.annotation.PostMapping;
import org.springframework.web.bind.annotation.RequestParam;
import org.springframework.web.multipart.MultipartFile;
import upload.download.entity.FileEntity;
import upload.download.repository.FileEntityRepository;

import java.util.ArrayList;
import java.util.List;

@Controller
public class UploadController {

    @Autowired
    private FileEntityRepository fileEntityRepository;


    /**
     * Get index page
     *
     * @return index
     */

    @GetMapping("/")
    public String getIndexFilePage() {
        return "index";
    }

    @PostMapping("/")
    public String uploadFiles(@RequestParam("files") MultipartFile[] multipartFiles, Model model) {
        List<String> listFileNames = new ArrayList<>();

        try {
            List<FileEntity> storeFiles = new ArrayList<>();

            for (MultipartFile file : multipartFiles) {
                FileEntity fileEntity = fileEntityRepository.findByFileName(file.getOriginalFilename());

                if (fileEntity != null) {
                    fileEntity.setFileByte(file.getBytes());
                } else {
                    fileEntity = new FileEntity(file.getOriginalFilename(), file.getContentType(), file.getBytes());
                }
                listFileNames.add(file.getOriginalFilename());
                storeFiles.add(fileEntity);
            }

            // save all files
            fileEntityRepository.saveAll(storeFiles);

            // successfully message after uploaded
            model.addAttribute("message", "Files uploaded successfully!");
            model.addAttribute("files", listFileNames);
        } catch (Exception e) {
            // fail message for unsupported file or max size
            model.addAttribute("message", "Fail");
            model.addAttribute("files", listFileNames);
        }
        return "index";
    }
}
package upload.download.controller;

import org.springframework.beans.factory.annotation.Autowired;
import org.springframework.http.HttpHeaders;
import org.springframework.http.ResponseEntity;
import org.springframework.stereotype.Controller;
import org.springframework.ui.Model;
import org.springframework.web.bind.annotation.GetMapping;
import org.springframework.web.bind.annotation.PathVariable;
import org.springframework.web.servlet.mvc.method.annotation.MvcUriComponentsBuilder;
import upload.download.entity.FileEntity;
import upload.download.entity.FileInfo;
import upload.download.repository.FileEntityRepository;

import java.util.List;
import java.util.stream.Collectors;

@Controller
public class DownloadController {

    @Autowired
    private FileEntityRepository fileEntityRepository;

    /**
     * Get and display file stored in the database.
     *
     * @return download-file page
     */

    @GetMapping("/download/files")
    public String getListOfFiles(Model model) {
        List<FileInfo> fileInfoList = fileEntityRepository.findAll()
                .stream()
                .map(fileEntity -> {
                            String fileInfoName = fileEntity.getFileName();
                            String fileURL = MvcUriComponentsBuilder
                                    .fromMethodName(
                                            DownloadController.class,
                                            "downloadFile",
                                            fileEntity.getFileName())
                                    .build()
                                    .toString();
                            return new FileInfo(fileInfoName, fileURL);
                        }
                ).collect(Collectors.toList());


        model.addAttribute("files", fileInfoList);
        return "download-file";
    }

    /**
     * Get file to download.
     *
     * @return file from database to be downloaded
     */

    @GetMapping("/download/files/{fileInfoName}")
    public ResponseEntity<byte[]> downloadFile(@PathVariable String fileInfoName) {
        FileEntity downloadFileEntity = fileEntityRepository.findByFileName(fileInfoName);
        return ResponseEntity.ok()
                .header(HttpHeaders.CONTENT_DISPOSITION,
                        "attachment; filename=\"" + downloadFileEntity.getFileName() + "\"")
                .body(downloadFileEntity.getFileByte());
    }
}
@Controller注释将学生控制器类标记为请求处理程序。现在让我们打破上面的代码并理解它。
使用百里香叶创建视图
转到 src/main/resources/template 文件夹并创建一个 index.html 文件。现在在寄存器中.html文件确保添加以下代码:
要了解如何迭代百里香叶中的对象列表,请查看这篇文章 使用 Spring 引导在百里香叶中迭代列表
<!DOCTYPE html>
<html lang="en" xmlns:th="http://www.thymeleaf.org">
<head>
<meta charset="UTF-8">
<title>Spring Boot - Thymeleaf - MySQL| Upload -- Download -- Files</title>
<link rel="stylesheet" type="text/css" href="/css/style.css">
</head>
<body>
<div id="wrapper">
<div id="navigator">
<!-- Navigator -->
<nav>
<div class="navbar">
<div class="navbar-banner"><a class="white" href="/"><img src="" alt="Logo"></a></div>
<div class="nav-links"></div>
</div>
</nav>
</div>
<div class="upload-download-card">
<h2 style="text-align: center">Spring Thymeleaf MySQL |
<a class="button-style-1" href="/">Upload</a>
<a class="button-style-1" href="/download/files">Download</a>
</h2>
<hr style="width: 90%; height: 2px; background-color: black;">
<div>
<form method="POST" enctype="multipart/form-data" id="fileUploadForm">
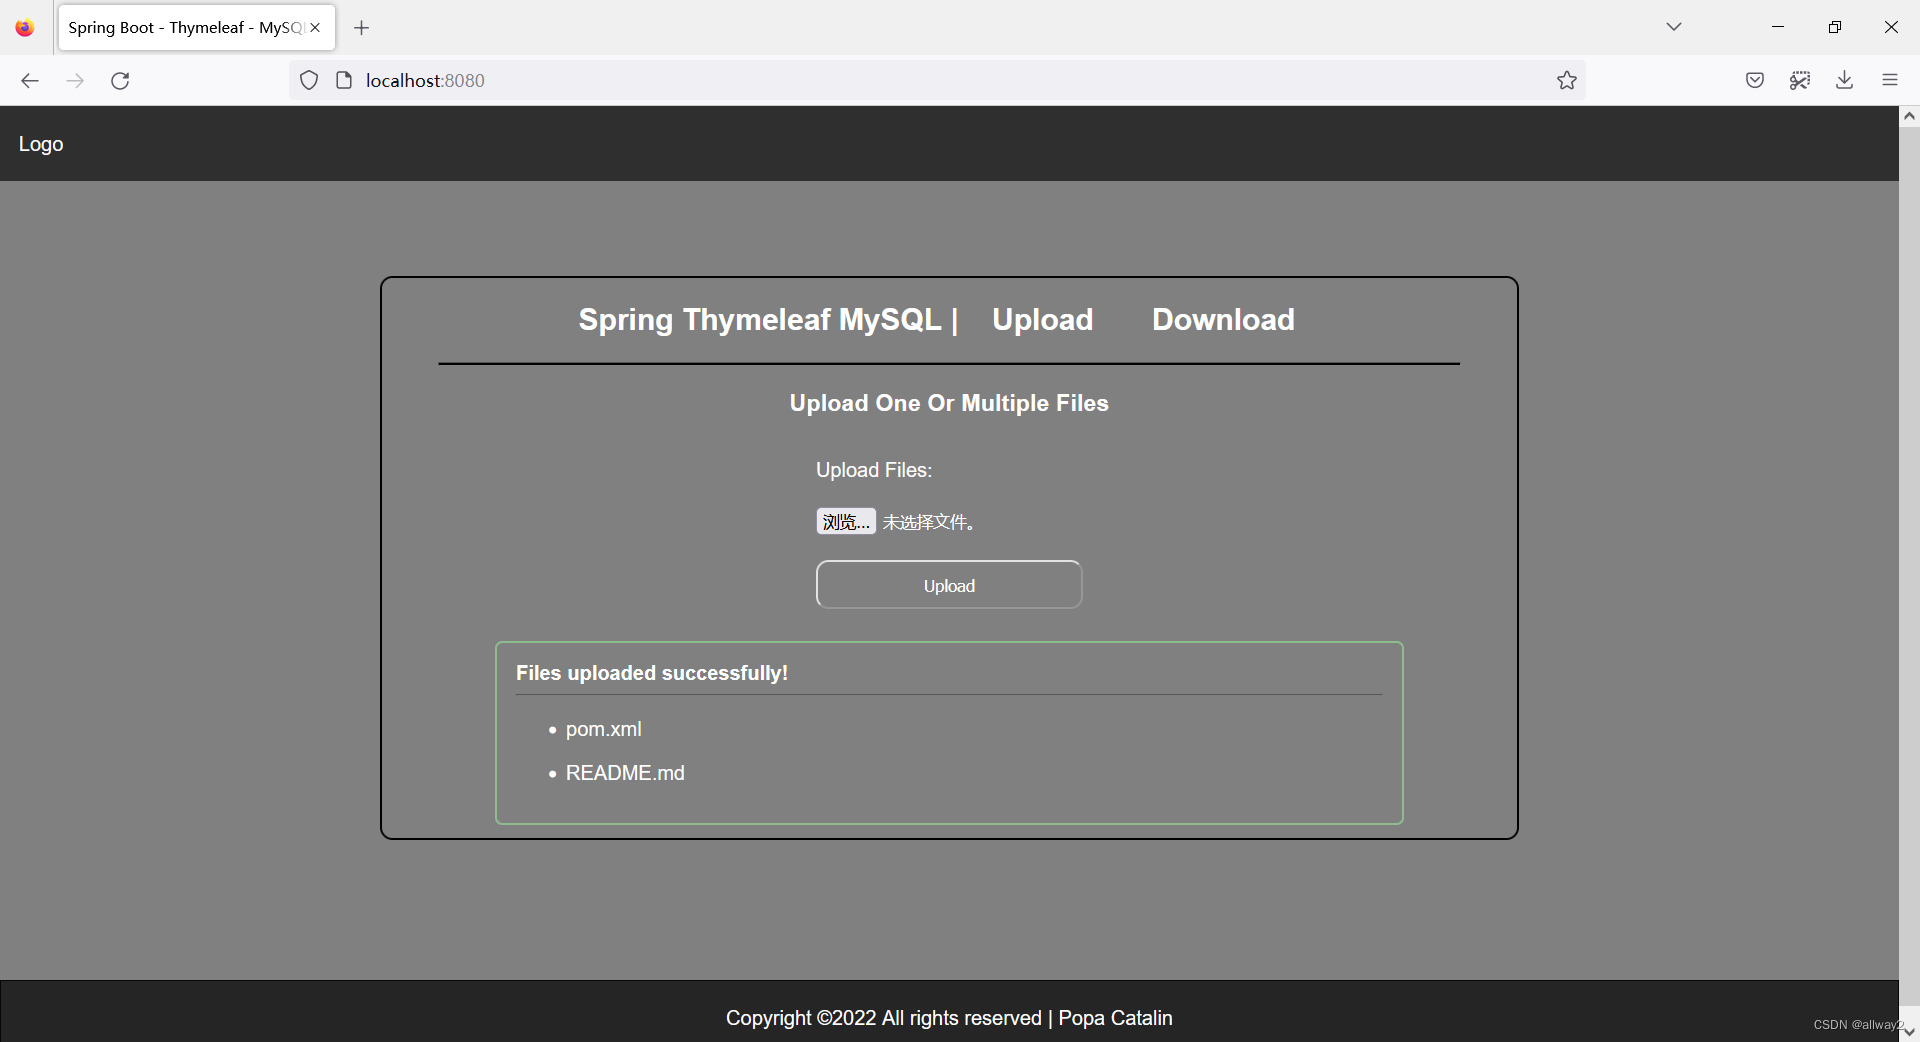
<h3 style="text-align: center">Upload One Or Multiple Files</h3>
<div id="upload-group">
<label for="files">Upload Files:</label>
<input type="file" id="files" placeholder="Upload Multiple Files" name="files" multiple>
<button type="submit" class="button-style-1" id="btnSubmit">Upload</button>
</div>
</form>
<div>
<!-- Message Success|Fail-->
<div class="message-card" th:if="${message}">
<strong><span th:text="${message}"/></strong>
<hr>
<ul th:each="filename: ${files}">
<li><span th:text="${filename}"/></li>
</ul>
</div>
</div>
</div>
</div>
</div>
<footer id="footer">
<div id="footer-content">
<p>Copyright ©2022 All rights reserved |</p>
<p title="Popa Catalin"> Popa Catalin</p>
</div>
</footer>
</body>
</html><!DOCTYPE html>
<html lang="en" xmlns:th="http://www.thymeleaf.org">
<head>
<meta charset="UTF-8">
<title>Spring Boot - Thymeleaf - MySQL| Upload -- Download -- Files</title>
<link rel="stylesheet" type="text/css" href="/css/style.css">
<link rel="stylesheet" type="text/css" href="/css/table.css">
</head>
<body>
<div id="wrapper">
<div id="navigator">
<!-- Navigator -->
<nav>
<div class="navbar">
<div class="navbar-banner"><a class="white" href="/"><img src="" alt="Logo"></a></div>
<div class="nav-links"></div>
</div>
</nav>
</div>
<div class="upload-download-card">
<h2 style="text-align: center">Spring Thymeleaf MySQL |
<a class="button-style-1" href="/">Upload</a>
<a class="button-style-1" href="/download/files">Download</a>
</h2>
<hr style="width: 90%; height: 2px; background-color: black;">
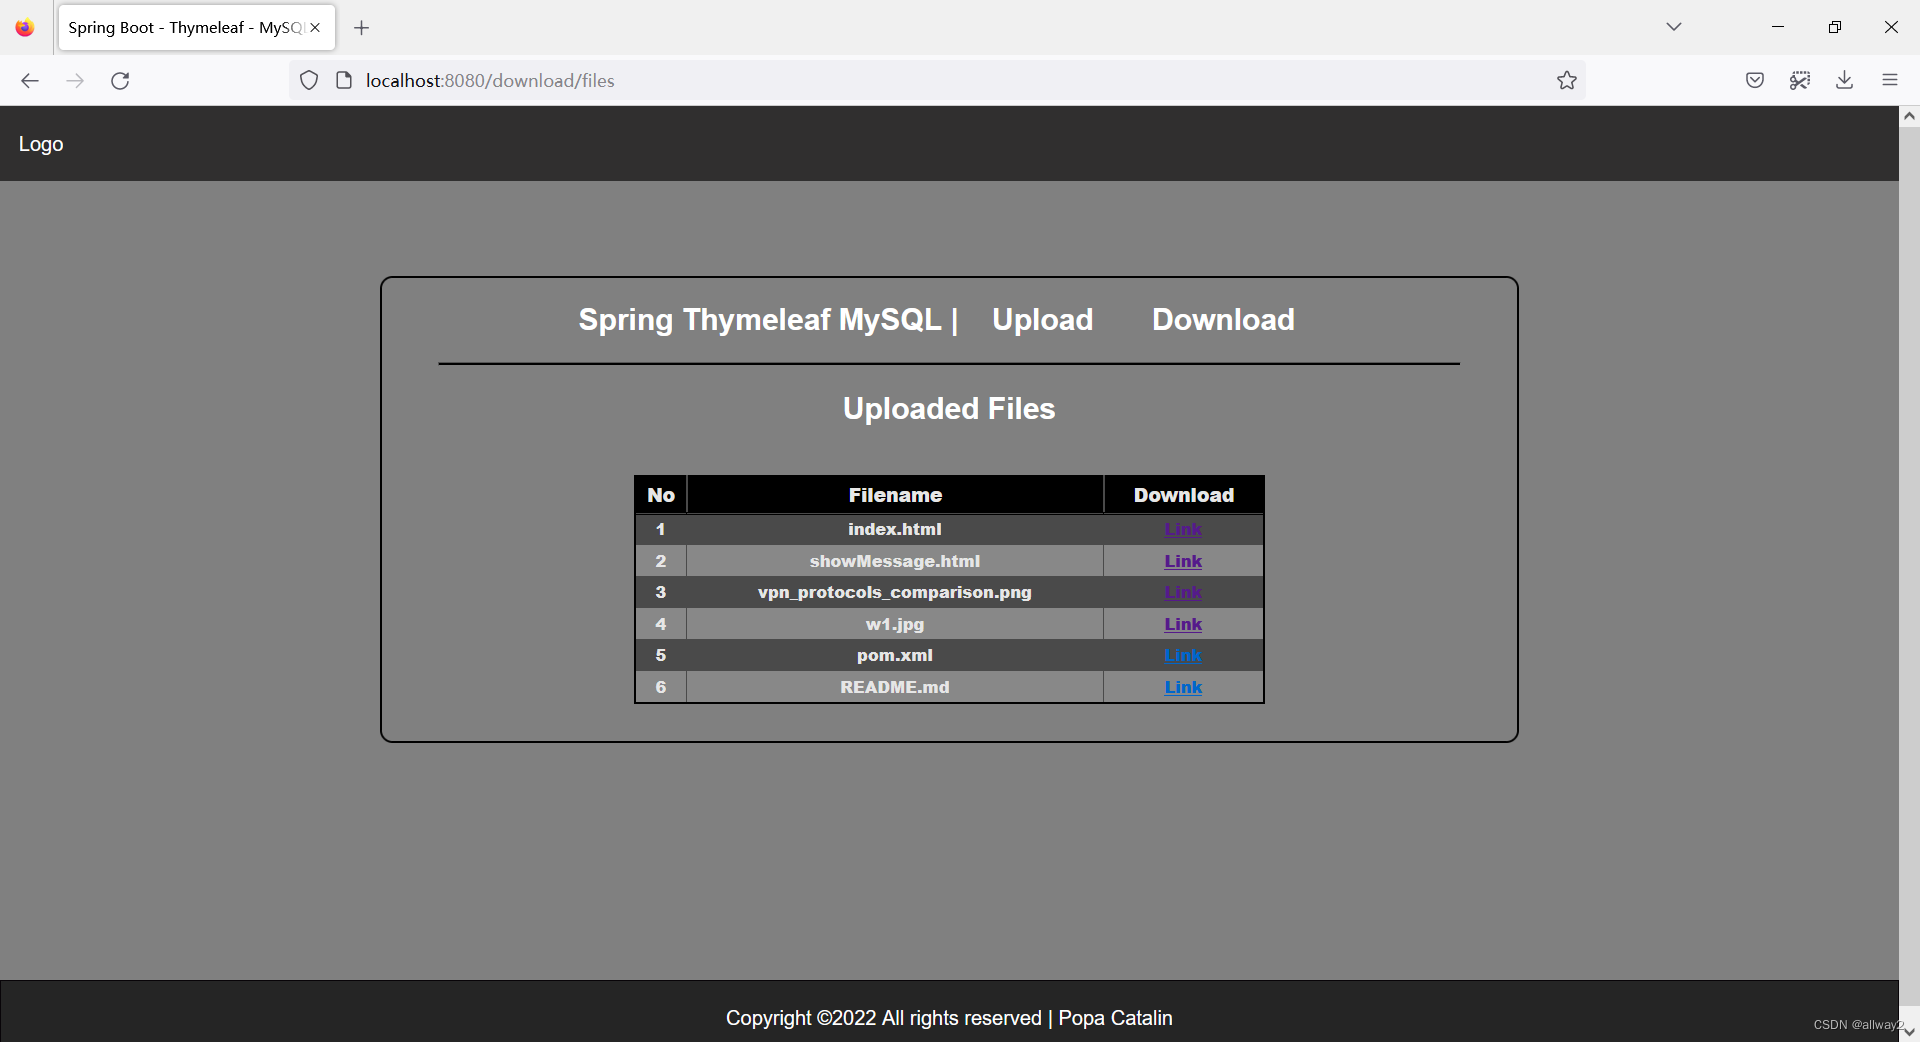
<div class="download-group">
<h2 style="text-align: center">Uploaded Files</h2>
<div class="table-container">
<table class="customTable">
<thead>
<tr>
<th>No</th>
<th>Filename</th>
<th>Download</th>
</tr>
</thead>
<tbody>
<tr th:each="files, rowStat: ${files}">
<tr th:each="file, rowStat: ${files}">
<td th:text="${rowStat.count}">1</td>
<td th:text="${file.fileInfoName}">File-Name</td>
<td><a class="download-button" th:href="${file.fileURL}">Link</a></td>
</tr>
</tbody>
</table>
</div>
</div>
</div>
</div>
<footer id="footer">
<div id="footer-content">
<p>Copyright ©2022 All rights reserved |</p>
<p title="Popa Catalin"> Popa Catalin</p>
</div>
</footer>
</body>
</html>现在,运行 UploadAndDownloadApplication 并转到 localhost:8888 并查看以下输出。

通过这种方式,我们学会了如何从/向数据库上传、下载文件。