===========================freemarker===================================
freemarker 官网:https://freemarker.apache.org/
freemarker starter:
1 <dependency>
2     <groupId>org.springframework.boot</groupId>
3     <artifactId>spring-boot-starter-freemarker</artifactId>
4     <version>1.5.15.RELEASE</version>
5 </dependency>
note:
1、可以使用freemarker的starer来构建web MVC应用
2、spring MVC支持使用freemarker
3、FreeMarkerViewResolver的id是"freeMarkerViewResolver"
4、可以通过外部配置改变资源的加载路径,我们可以使用spring.freemarker.templateLoaderPath来自定义,但是默认的路径是"classpath:/templates/"
5、freemarker文件的前缀和后缀同样可以通过外部配置来改变,我们可以用spring.freemarker.prefix和spring.freemarker.suffix来自定义,但是默认的前缀和后缀分别是空和“.ftl”。(4和5也可以通过配置bean来覆盖默认配置)
6、关注类org.springframework.boot.autoconfigure.freemarker.FreeMarkerAutoConfiguration
7、如果想通过不用重启容器而达到重新加载模板,我们可以配置spring.freemarker.cache = false
8、freemaker可以覆盖spring boot的错误提示页面,只要在“classpath:/templates/”下创建名为“error.ftl”的ftl模板文件。
9、spring boot中freemarker配置项
 1 spring.freemarker.cache=false # 启用模板缓存。
 2
 3 spring.freemarker.charset=UTF-8 # 模板编码。
 4
 5 spring.freemarker.content-type=text/html # Content-Type的值
 6
 7 spring.freemarker.enabled=true # 开启MVC视图解析
 8
 9 spring.freemarker.prefix= # 在构建URL时添加前缀到视图名称之前。
10
11 spring.freemarker.suffix=.ftl # 模板文件的后缀名称。
12
13 spring.freemarker.template-loader-path=classpath:/templates/ #以逗号分隔的模板路径列表。
11、此版本的spring boot依赖的freemarker依赖
1 <dependency>
2     <groupId>org.apache</groupId>
3     <artifactId>freemarker</artifactId>
4     <version>2.3.28</version>
5 </dependency>
12、freemarker常用语法
pojo属性的获取:定义了pojo,使用Map存储pojo
${pojo.attribute}


循环中各个值的获取:定义了List,使用Map存储List
<#list targetList as littleList>
   ${littleList.attribute}
</#list>


循环下标的获取:定义了List,使用Map存储List
<#list targetList as littleList>
    ${littleList_index}
   ${littleList.attribute}
</#list>


if的使用:定义了List,使用Map存储List
<#list targetList as littleList>
 <#if littleList_index%2 == 0>
1
<#else>
2
</#if>
   ${littleList.attribute}
</#list>


日期处理:定义了日期date,使用Map存储日期
注意:日期在freemaker中显示时需要转换为String
${date?date}  格式 xx-xx-xx
${date?time} 格式 xx:xx:xx
${date?datetime} 格式 xx-xx-xx xx:xx:xx
注意:我们可以自定格式
${date?string('yy/MM/dd HH:mm:ss')}


null值的处理:定义了变量var,使用Map存储var
${var!”defaultValue”}
或者使用<#if>判断
<#if var??>
var不是Null,var=${var}
<#else>
var是null
</#if>


添加页眉页脚:定义了另一个freemaker文件other.ftl
<#include “other.ftl”>
===========================Thymeleaf===================================
thymeleaf 官网:https://www.thymeleaf.org
thymeleaf starter:
1 <dependency>
2     <groupId>org.springframework.boot</groupId>
3     <artifactId>spring-boot-starter-thymeleaf</artifactId>
4     <version>1.5.15.RELEASE</version>
5 </dependency>
note:
1、可以使用 thymeleaf 的starer来构建web MVC应用
2、spring MVC支持使用 thymeleaf
3、ThymeleafViewResolver 的id是"thymeleafViewResolver"
4、freemarker文件的前缀和后缀同样可以通过外部配置来改变,我们可以用spring.thymeleaf.prefix和spring.thymeleaf.suffix来自定义,但是默认的前缀和后缀分别是“classpath:/templates/”和“.html”。
5、关注类org.springframework.boot.autoconfigure.thymeleaf.ThymeleafAutoConfiguration
6、如果想通过不用重启容器而达到重新加载模板,我们可以配置spring.thymeleaf.cache = false
7、通过上面的starter启用的thymeleaf的版本是2.1,如果想要使用thymeleaf 3.0以上版本,需要做如下的配置:
前提是项目正在使用spring-boot-starter-parent,在pom.xml中的properties标签中配置thymeleaf.version和thymeleaf-layout-dialect.version属性覆盖2.1版本
1 <properties>
2  <thymeleaf.version>3.0.2.RELEASE</thymeleaf.version>
3  <thymeleaf-layout-dialect.version>2.1.1</thymeleaf-layout-dialect.version>
4 </properties>
为避免出现关于不推荐使用HTML 5模板模式的警告消息以及正在使用的HTML模板模式,我们可以在配置文件做一点配置来消除这些警告。配置文件application.properties的配置:
1 spring.thymeleaf.mode: HTML
8、thymeleaf可以覆盖spring boot的错误提示页面,只要在“classpath:/templates/”下创建名为“error.html”的html模板文件。
9、spring boot中thymeleaf配置项
 1 # THYMELEAF (ThymeleafAutoConfiguration)
 2 spring.thymeleaf.cache=true # 启用模板缓存。
 3
 4 spring.thymeleaf.content-type=text/html # Content-Type配置。
 5
 6 spring.thymeleaf.enabled=true # 启动MVC Thymeleaf 视图解析。
 7
 8 spring.thymeleaf.encoding=UTF-8 # 设置模板的编码。
 9
10 spring.thymeleaf.mode=HTML5 # 配置模板使用的模板模式。
11
12 spring.thymeleaf.prefix=classpath:/templates/ # 在构建URL时添加前缀到视图名称之前。
13
14 spring.thymeleaf.suffix=.html # 模板文件的后缀名称。
15
16 spring.thymeleaf.view-names= # 以逗号分隔的可以解析的视图名称列表。
10、此版本的spring boot依赖的thymeleaf依赖
1 <dependency>
2     <groupId>org.thymeleaf</groupId>
3     <artifactId>thymeleaf</artifactId>
4     <version>2.1.6.RELEASE</version>
5 </dependency>
6
7 <dependency>
8     <groupId>org.thymeleaf</groupId>
9     <artifactId>thymeleaf-spring4</artifactId>
10    <version>2.16.RELEASE</version>
11 </dependency>
11、thymeleaf的使用
1)引入thymeleaf的DTD和xmlns命名空间,否则thymeleaf的语法将不会在html模板文件上生效。html文件的配置:
 1 <!DOCTYPE html SYSTEM "http://www.thymeleaf.org/dtd/xhtml1-strict-thymeleaf-4.dtd">  <!--very important!-->
 2
 3 <html xmlns="http://www.w3.org/1999/xhtml"
 4       xmlns:th="http://www.thymeleaf.org">  <!--very important!-->
 5
 6     <head></head>
 7
 8     <body>
 9            <p text:th=#{blog.welcome}>welcome my blog!</p>
10      </body>
11
12 </html>
2)、注释
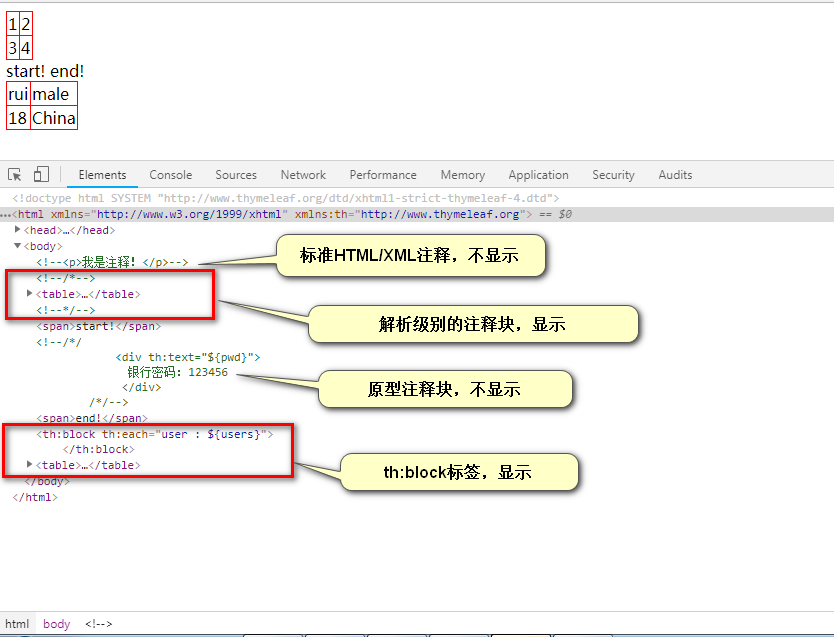
①标准的html/xml注释
1 <!-- <p>我是注释!</p> -->
②Thymeleaf 解析级别的注释块,可以放置标签,直接用chrome浏览器打开时,可以看到注释中的效果,但是当Thymeleaf在处理时,注释块会被移除。
 1 <!--/*-->
 2    <table>
 3       <tr>
 4        <td>1</td> <td>2</td>
 5       </tr>
 6
 7       <tr>
 8        <td>3</td> <td>4</td>
 9       </tr>
10     </table>
11 <!--*/-->
③Thymeleaf 原型注释块,可以放置标签,直接用chrome浏览器打开时,看不到标签的效果,但是当Thymeleaf在处理时,注释块中的标签会看成是正常的,<!--/*/ 和 /*/-->会被移除。
1 <span>start!</span>
2 <!--/*/
3   <div th:text="${pwd}">
4     银行密码:123456
5   </div>
6 /*/-->
7 <span>end!</span>
④th:block 标签:<th:bllock></th:block>,直接用chrome浏览器打开时,会看到一个2x2表格,即一个默认user的信息,它不是从数据库中取出的信息。当Thymeleaf处理时,会动态生成多个user的信息。
 1 <table border="1px solid red">
 2   <th:block th:each="user : ${users}">
 3     <tr>
 4         <td th:text="${user.name}">rui</td>
 5         <td th:text="${user.sex}">male</td>
 6     </tr>
 7     <tr>
 8         <td th:text="${user.age}">18</td>
           <td th:text="${user.address}">China</td>
 9     </tr>
10   </th:block>
11 </table>
chrome浏览器运行效果:
3)用到过的语法
下面四个搭配${}使用,需要用双引号括起来

th:text = "${}" 文本,浏览器会忽略它

th:each = "item : ${Object}"  item === 迭代变量   ${Object} =====迭代表达式
th:each的更多内容参考 :https://www.thymeleaf.org/doc/tutorials/2.1/usingthymeleaf.html#iteration

th:if = "${}" ==== 如果
th:unless = "${}" =====如果不
假设有个需求要判断某个容器不为空,可以有两种方式:
th:if="${not #lists.isEmpty(store)}" === th:unless="${#lists.isEmpty(store)}"


下面三个搭配使用
th:fragment="fragmentName" ==== 其他模板,并命名为"fragmentName"
th:include=" templateName :: fragmentName"  =====将片段的内容包含到主标签中,主标签还是原来的标签
th:replace=" templateName :: fragmentName"  ====== 将片段标签替换主标签,主标签变成片段的标签
更多例子可参考:https://www.thymeleaf.org/doc/tutorials/2.1/usingthymeleaf.html#template-layout


下面两个搭配@{}使用,需要使用双引号括起来
th:src = "@{}"    图片路径等
th:href = "@{}"  跳转链接等
th:href用法小结:
<a th:href="@{/find/page(pageNum=${pageInfo.pageNum},pageSize=${pageInfo.pageSize})}">
与jsp的写法相比,简短许多。
注意几个地方:
1,上下文 =====> /
2,?符号 =====> ()
3,&符号 =====> ,

${}  变量表达式
@{} URL表达式
#{}  消息表达式,可以作提取国际化信息用


内置对象   对象的方法
#lists   isEmpty()
thymeleaf 和spring boot整合的几个问题
①DTD引入的话,工程报错??? dtd文件引错,应该是:thymeleaf-spring4-4.dtd
②路径的配置??? 图片,css。浏览器无法访问,报406,500状态码。
改造成不用th:src="@{}",th:href="@{}"配置路径,直接配置src和href,浏览器无法访问,报406,500状态码
org.springframework.web.HttpMediaTypeNotAcceptableException: Could not find acceptable representation.
原因是静态资源文件命名的时候带有error关键字,改成1.png和1.css,可以访问到
final note:
参考资料:spring-boot-reference.pdf (spring boot 1.5.15)