目录
(1条消息) Pytorch框架的学习(1)_An efforter的博客-CSDN博客
(1条消息) Pytorch框架的学习(2)_An efforter的博客-CSDN博客
1.Tensor的组合/拼接
- torch.cat(seq, dim=0, out=None):按照已经存在的维度进行拼接
- torch.stack(seq, dim=0, out=None):按照新的维度进行拼接
- torch.gather(input, dim, index, out=None):在指定维度上按照索引赋值输出tensor
torch.cat(seq, dim=0, out=None):按照已经存在的维度进行拼接
import torch
a= torch . zeros ( (2,4))
b = torch. ones ( (2,4))
out = torch.cat( ( a,b ),dim=0 )
print(out)
out = torch.cat( ( a,b ),dim=1)
print(out)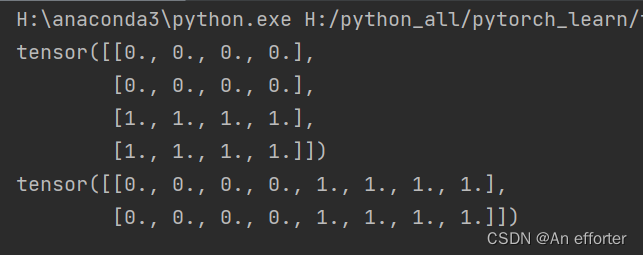
torch.stack(seq, dim=0, out=None):按照新的维度进行拼接
a = torch. linspace(1,6,6 ).view(2,3)
b = torch.linspace(7,12,6 ).view(2,3)
print(a)
print(b)
out = torch.stack( ( a, b), dim=0)
print(out)
print(out.shape)  #结果变成了三维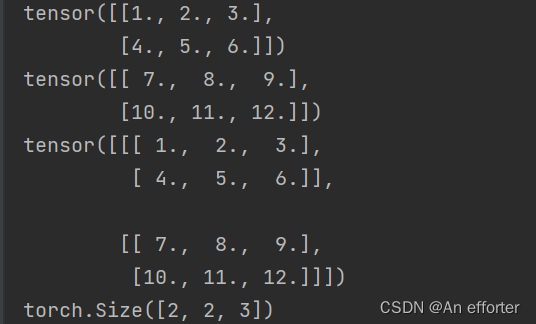
2.Tensor的切片
- torch.chunk(tensor, chunks, dim=0)︰按照某个维度平均分块(最后一个可能小于平均值)
- torch.split(tensor, split_size_or_sections, dim=0):按照某个维度依照第二个参数给出的list或者int进行分割tensor
torch.chunk(tensor, chunks, dim=0)︰按照某个维度平均分块(最后一个可能小于平均值)
import torch
a=torch.rand(3,4)
out=torch.chunk(a,2,dim=0)
print(out[0],out[0].shape)
print(out[1],out[1].shape)
print("------------------------------")
#一维与二维
out1=torch.chunk(a,2,dim=1)
print(out1[0],out1[0].shape)
print(out1[1],out1[1].shape)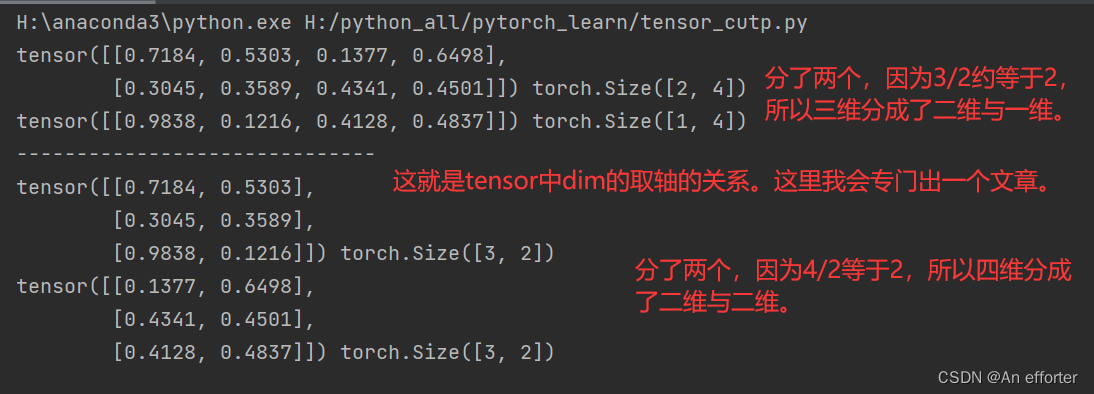
torch.split(tensor, split_size_or_sections, dim=0):按照某个维度依照第二个参数给出的list或者int进行分割tensor
out2=torch.split(a,2,dim=0)
print(out2[0],out2[0].shape)
print(out2[1],out2[1].shape)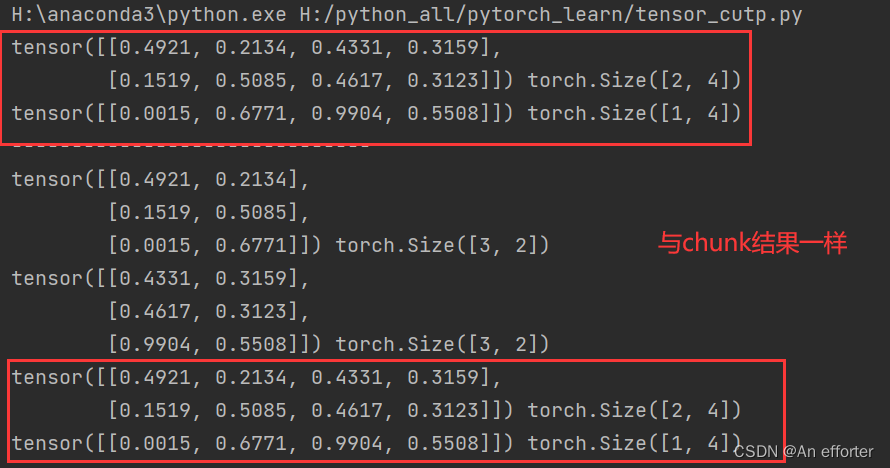
这里是按照int数来切分的,1,3,6.
import torch
a=torch.rand(10,4)
out3=torch.split(a,[1,3,6],dim=0)
for t in out3:
    print(t,t.shape)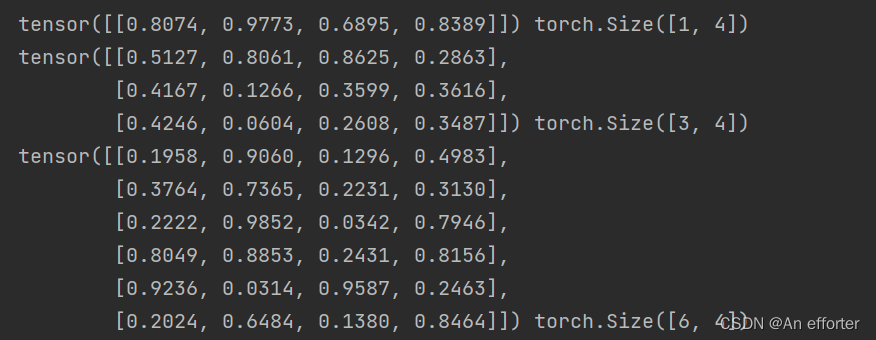
3.Tensor的变形操作
- torch.reshape(input, shape)
- torch.t(input):只针对2D tensor转置
- torch.transpose(input, dim0, dim1):交换两个维度
- torch.squeeze(input, dim=None, out=None):去除那些维度大小为1的维度
- torch.unbind(tensor, dim=0):去除某个维度
- torch.unsqueeze(input, dim, out=None):在指定位置添加维度
- torch.flip(input, dims):按照给定维度翻转张量
- torch.rot90(input, k, dims):按照指定维度和旋转次数进行张量旋转
torch.reshape(input, shape)
torch.t(input):只针对2D tensor转置
import torch

a=torch.rand(3,2)
print(a)
#重新换行列,但是保持值得个数
out=torch.reshape(a,(1,6))
print(out)
#对于2D进行转置
print(torch.t(out))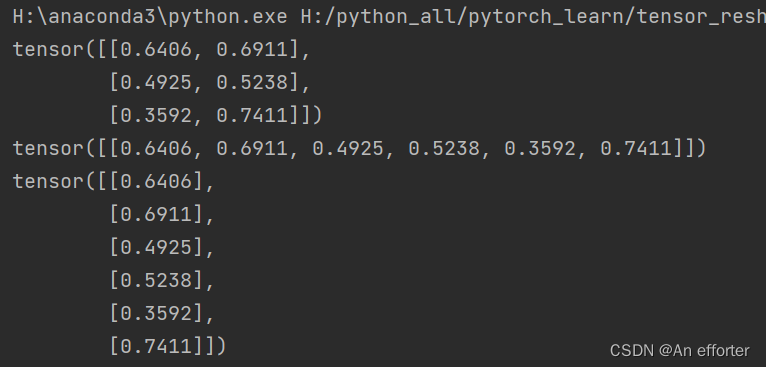
torch.transpose(input, dim0, dim1):交换两个维度
这里维数的转换关系,一定要清楚,不清楚别看,浪费时间。先去整理好张量与维数的关系。关注我,有空时候,我专门出一篇。
b=torch.rand(1,2,3)  #这里是一个2*3的矩阵
#注意注意,这里一定注意,知道维数的转换关系。
out1 = torch.transpose(b,0,1)  #转换之后变成了两个 1*3的矩阵,是不是就是三维矩阵
print(b,b.shape)
print(out1,out1.shape)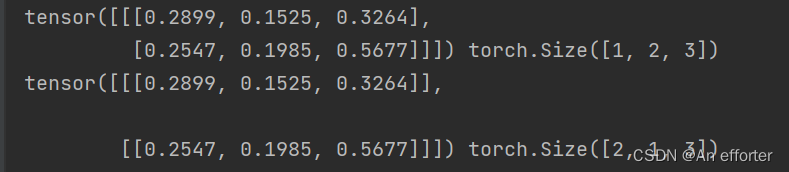
torch.squeeze(input, dim=None, out=None):去除那些维度大小为1的维度
torch.unsqueeze(input, dim, out=None):在指定位置添加维度
out2=torch.squeeze(a)
print(out2)
print(out2.shape)
out3=torch.unsqueeze(a,-1)
print(out3)
print(out3.shape)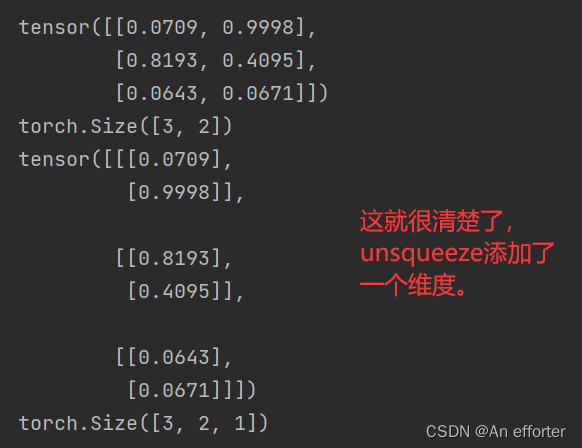
torch.unbind(tensor, dim=0):去除某个维度
这里是把三维[3,2,1],也就是三个2*1的矩阵,unbind函数dim=0,就是从0轴去除,那就变成了三个独立的2*1的矩阵,可以换成1维与二维德,多尝试一下,一定要清楚tensor与dim的关系。我自己也好晕,多写代码,多输出。
out4=torch.unbind(out3,dim=0)
print(out4)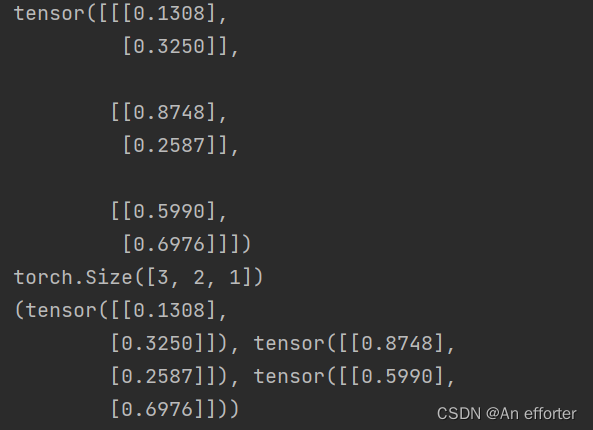
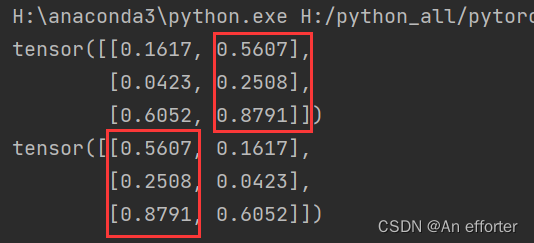
torch.flip(input, dims):按照给定维度翻转张量
import torch

a=torch.rand(3,2)
print(a)
print(torch.flip(a,dims=[0]))   #换成1轴,在下面
这是对于0轴的翻转(看清楚):
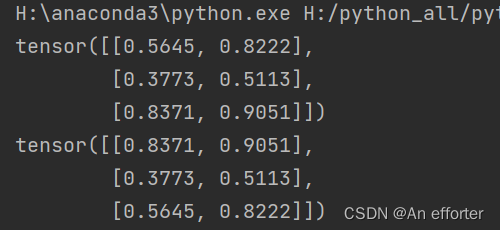
这是对于1轴的翻转(看清楚):
torch.rot90(input, k, dims):按照指定维度和旋转次数进行张量旋转:
k默认就是1,k=0与k=4是不变的。如果是-1,那就是顺时针旋转一下

4.Tensor的填充操作
- 定义Tensor,并填充指定的数值
torch.full((2,3),3.14)
tensor([[ 3.14,3.14,3.14],[ 3.14,3.14,3.14])
很简单就是先设定 2*3的矩阵,全部填充3.14。
5.Tensor的频谱操作(傅里叶变换)
- torch.fft(input,signal_ndim, normalized=False) :傅里叶变换
- torch.ifft(input, signal_ndim, normalized=False):短时傅里叶变换
- torch.rfft(input, signal_ndim, normalized=False, onesided=True):长时傅里叶变换
- torch.irfft(input, signal_ndim, normalized=False, onesided=True):傅里叶反变换
- torch.stft(signa, frame_length, hop,...):傅里叶快反变换
6.Pytorch简单编程技巧
模型的保存/加载
- torch.saves(state, dir)保存/序列化
- torch.load(dir)加载模型
并行化
- torch.get_num_threads():获得用于并行化CPU操作的OpenMP线程数
- torch.set_num_threads(int):设定用于并行化CPU操作的OpenMP线程数
分布式
- python在默认情况下只使用一个GPU,在多个GPU的情况下就需要使用pytorch提供的DataParallel
- 单机多卡
- 多机多卡
Tensor on GPU
- 用方法to()可以将Tensor在CPU和GPU(需要硬件支持)之间相互移动
如下示例代码:
if torch.cuda.is_available():
device = torch.device(" cuda")# GPU
y = torch.ones_like(x, device=device) #直接创建一个在GPU上的Tensor = x.to(device)
#等价于.to("cuda")
z=x +y
print(z)
print(z.to("cpu", torch.double))
# to()还可以同时更改数据类型
out=out.to(torch.device("cuda")) #调用到gpu上面去运行
print("gpu:",out.is_cuda)
flip=torch.flip(out,dims=[0]) #在0轴上作出反转,所以图片是反的
out=out.to(torch.device("cpu")) #调用到gpu上面去运行
print("gpu:",out.is_cuda)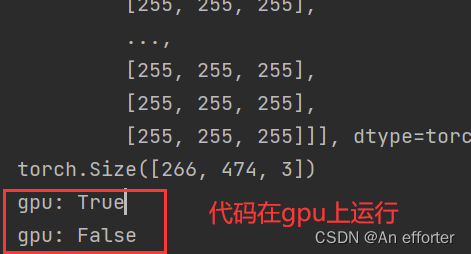
Tensor的相关配置
- torch.is_tensor() #如果是pytorch的tensor类型返回true
- torch.is_storage()# 如果是pytorch的storage类型返回ture
- torch.set_flush_denormal(mode)#防止一些不正常的元素产生
- torch.set_default_dtype(d) #对torch.tensor()设置默认的浮点类型
- torch.set_printoptions(precision=None, threshold=None,edgeitems=None, linewidth=None,profile=None)#设置printing的打印参数
Tensor与numpy的相互转换
- torch.from_numpy(ndarry)
- a.numpy()
import torch
import numpy as np
import cv2
img=cv2.imread("pytorch.jpg")
# a=np.zeros([2,2])
out=torch.from_numpy(img) #numpy转化为torch(不了解的了解一下,跟pytorch差不多)
print(out)
print(out.shape)  #因为这里读出的是图片,应该是H*W*C(通道)
flip=torch.flip(out,dims=[0])  #在0轴上作出反转,所以图片是反的
data=flip.numpy()  #torch进行转化为numpy
cv2.imshow("image",data) #可视化
cv2.waitKey(0)