
本文,我们学习一个叫birdseye的库,看看它是怎么实现Python代码debug可视化的。
先简单看看它的效果。
我用递归,写了一段生成斐波那契数列的函数,然后我用birdseye中的eye对函数进行装饰
from birdseye.server import main
from birdseye import eye

@eye
def fibonacci(n):
    if n <= 0:
        return 0
    elif n == 1:
        return 1
    else:
        return fibonacci(n - 1) + fibonacci(n - 2)

fibonacci(10)

main()
运行后,birdseye会启动一个web服务,通过这个web,我们可以很直观地调试与观察fibonacci函数中的各种数值。
效果如下: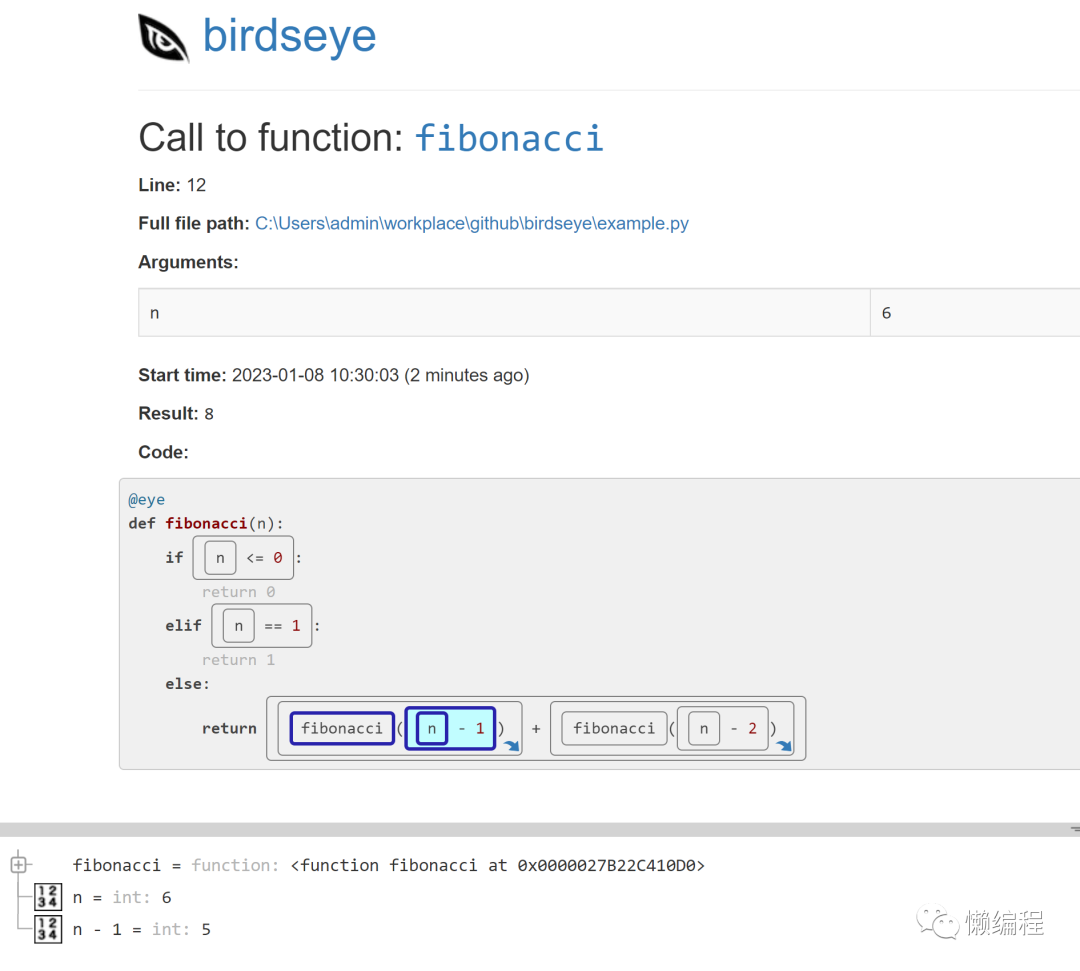
这里,就不多讨论,怎么用它了,你可以直接看项目的github:https://github.com/alexmojaki/birdseye
本文主要要学习一下,人家是怎么做到这种效果的。
birdseye原理
还是老话,阅读任何一个项目的源码,都要有一个目的,因为代码里全是细节,如果没有目的,容易在细节里迷失。
我们阅读birdseye项目源码的目的主要就是:可视化debug是怎么实现的?
基于一开始的例子,我们很自然的,可以从eye装饰器入手,代码如下:
# birdseye/__init__.py

class _SimpleProxy(object):
    def __init__(self, val):
        # 设置了新的属性
        object.__setattr__(self, '_SimpleProxy__val', val)

    def __call__(self, *args, **kwargs):
        return self.__val()(*args, **kwargs)

    def __getattr__(self, item):
        return getattr(self.__val(), item)

    def __setattr__(self, key, value):
        setattr(self.__val(), key, value)

eye = _SimpleProxy(lambda: import_module('birdseye.bird').eye)
eye其实是类装饰器,通过Python的动态import机制(import_module)将birdseye.bird中的eye引入。
在一开始,我不太理解,为啥要特意定义_SimpleProxy类将birdseye.bird.eye包裹多一层,其实就是通过_SimpleProxy类将其变为装饰器,birdseye.bird.eye则是具体的逻辑。
当项目运行时,eye装饰器会让_SimpleProxy类的__call__函数被调用,从而执行birdseye的业务逻辑。
为了避免迷茫,这里先概述一下birdseye的原理,经过学习,birdseye做到可视化debug主要通过下面几步:
1.通过eye装饰器获得被装饰函数的AST(抽象语法树)
2.修改AST,实现对函数中的每个语句(stmt)与表达式(expr)的监控,从而获得运行时的各种信息
3.基于Flask构建了web服务,数据从database来
要比较好地了解birdseye,需要对Python ast库有基本的了解,这里给出一个基本的例子:
import ast

code_str = 'a = 1; b = 2; print(a + b);'
# 解析代码,生成ast
node = ast.parse(code_str)
# 将ast转成string
ast_str = ast.dump(node)
# 打印
print('ast_str: ', ast_str)
print('a object value: ', node.body[0].value.n)

# 编译,获得可直接执行的code
code = compile(node, filename='<string>', mode='exec')
# 执行
exec(code)

# 基于ast修改a变量的值
node.body[0].value.n = 6
# 编译修改后的ast
code = compile(node, filename='<string>', mode='exec')
# 执行
exec(code)

# ast.NodeTransformer用于遍历抽象语法树,并允许修改节点
# MyVisitor继承了st.NodeTransformer
class MyVisitor(ast.NodeTransformer):
    # 修改Num类型节点
    def visit_Num(self, _node):
        # 将ast中Num节点都改成100,即a与b的值都变为的100,那么结果就为200
        return ast.Num(n=100)

# 遍历处理ast
MyVisitor().visit(node)
ast.fix_missing_locations(node)
# 编译
code = compile(node, filename='<string>', mode='exec')
# 执行
exec(code)
从上述代码可知:
ast.parse函数可以将字符串代码转成AST
compile函数可以将AST编译成可执行代码
ast.NodeTransformer类可以遍历AST,重写ast.NodeTransformer类中的函数可以批量修改AST节点
当eye装饰器执行时,其调用链路为:
@eye
-> _SimpleProxy __call__
-> TreeTracerBase __call__
-> TreeTracerBase trace_function
trace_function函数做了所有的主要操作,这里拆分着讨论一下其原理。
首先,trace_function中通过inspect库获得fibonacci函数所在python文件的代码,inspect库是Python的自省库,可以比较方便地获得Python对象的各种信息
这里给个inspect库的例子:
import ast
import inspect


class A:
    def __init__(self):
        super().__init__()
        print('success!')

print('co_name:', A.__init__.__code__.co_name)
print('lineno:', A.__init__.__code__.co_firstlineno)

# 获得所在python路径
filename = inspect.getsourcefile(A.__init__)
# 读取python文件中的python代码
source = open(filename, encoding='utf-8').read()
# 获得ast
node = ast.parse(source)
# 编译文件
code = compile(node, filename=filename, mode='exec')
通过 inspect.getsourcefile 函数,获得A.__init__所在的python文件的路径,然后获得文件中的内容并通过ast.parse函数将其转为AST,最后通过compile函数进行编译,这样就获得了这个文件编译后的对象code。
birdseye也是这样做的。
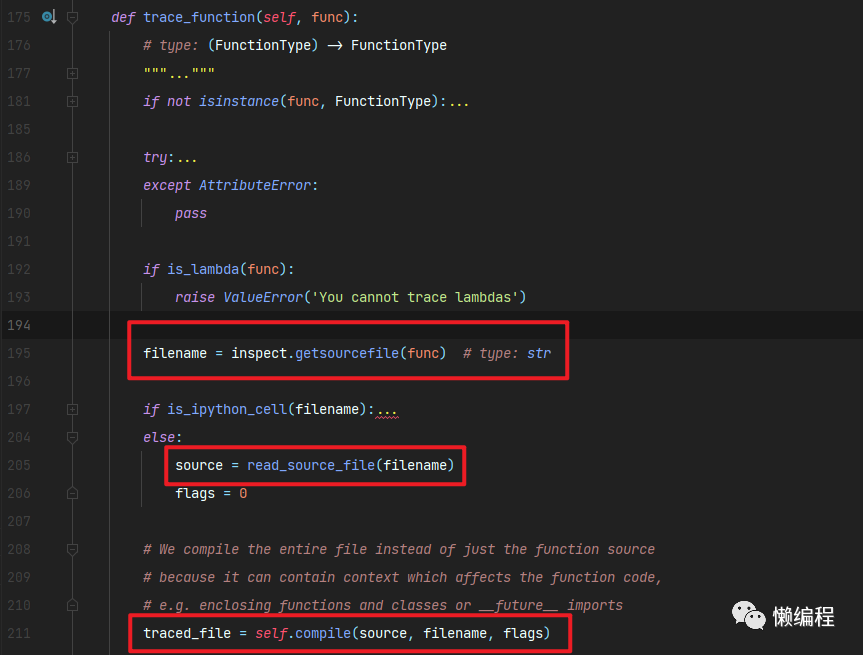
这里有个细节,就是birdseye为啥不直接编译被装饰的函数,而是要编译该函数所在的整个py文件呢?其实inspect库支持只获取部分代码的效果。
还是用我的例子,如果只想获得A.__init__的代码,可以这样写:
import ast
import inspect


class A:
    def __init__(self):
        super().__init__()
        print('success!')

# 获得 A.__init__ 代码
source = inspect.getsource(A.__init__).strip()
# 获得ast
node = ast.parse(source)
# 编译文件
code = compile(node, filename=__file__, mode='exec')

# 执行
exec(code)
print('__init__: ', __init__)
A.__init__ = __init__
A()
这段代码是可以执行,但当我们使用编译后的__init__时会报【RuntimeError: super(): __class__ cell not found】。
为什么会发生这个错误?
这与super函数有关,在Python3中,当编译器发现你使用了super函数,编译器会帮你插入一个对当前类的隐藏引用,这表示报错中提到的__class__。因为我们单独抽离出A.__init__进行编译,就缺失了上下文,从而导致这个RuntimeError。
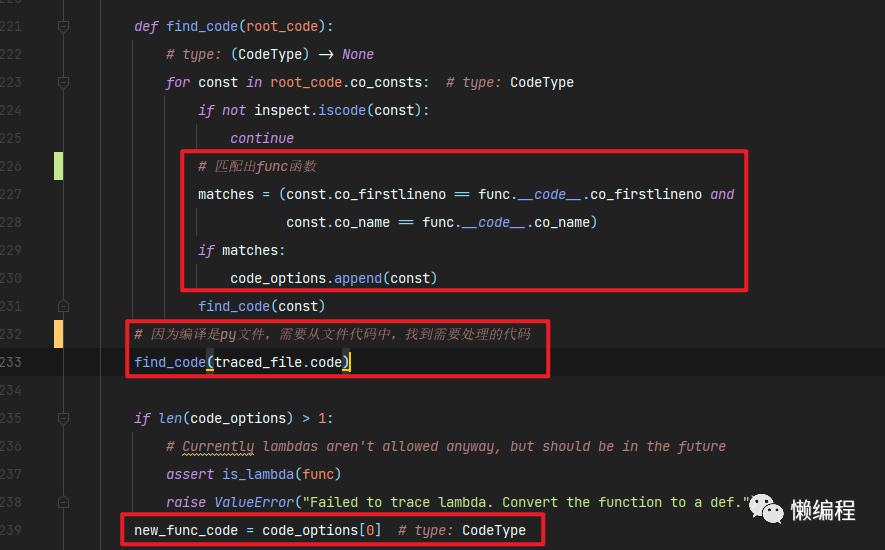
birdseye为了避免这个问题,就直接对整个Python文件进行编译,因为编译的是整个文件,而我们需要的是Python文件中具体的某个函数,所以编译完后,还需要从中找到对应的函数,通过这种形式,绕过了缺失上下文导致的RuntimeError。
这段逻辑依旧在trace_function函数中。
最后,基于new_func_code生成新的函数:
# 生成新函数
new_func = FunctionType(new_func_code, func.__globals__, func.__name__, func.__defaults__, func.__closure__)
# update_wrapper将旧函数(func)中所有属性复制到新函数(new_func)中
update_wrapper(new_func, func)  # type: FunctionType
if PY3:
    new_func.__kwdefaults__ = getattr(func, '__kwdefaults__', None)
new_func.traced_file = traced_file
return new_func你可能会有个疑惑,trace_function函数的逻辑看下来似乎就是编译Python文件,然后通过find_code函数找到相关函数的code,然后基于这个code重新生效一个函数,那修改函数AST的逻辑在哪里?
在trace_function函数中,我们调用了self.compile函数进行编译,这个函数会完成被装饰函数的修改,调用链如下:
TreeTracerBase trace_function
-> TracedFile __init__
-> _NodeVisitor visit
-> _NodeVisitor generic_visit
在TracedFile的__init__函数中,真正调用Python内置的compile函数对Python文件进行编译,然后调用_NodeVisitor的visit函数对AST节点进行遍历。
_NodeVisitor类继承了ast.NodeTransformer类,可以遍历AST节点,birdseye作者重写了generic_visit函数,让遍历的过程走他自己的逻辑,最终实现对expr(expression)与stmt(Statement)的处理,两者差异如下图:
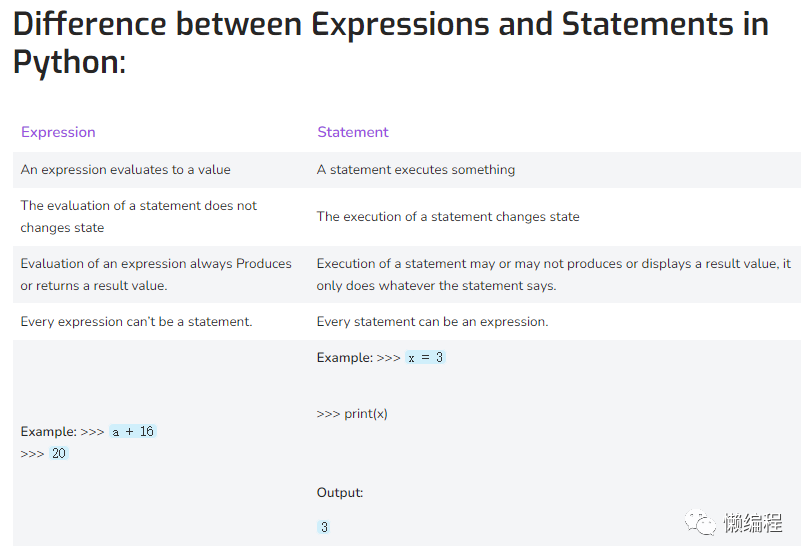 此图来自:https://codepict.com/expressions-and-statements-in-python/
如果节点类型为expr,走visit_expr函数,该函数会为使用before_expr与after_expr将expr包裹。
def visit_expr(self, node):
        # type: (ast.expr) -> ast.Call
        """
        each expression e gets wrapped like this:
            _treetrace_hidden_after_expr(_treetrace_hidden_before_expr(_tree_index), e)

        where the _treetrace_* functions are the corresponding methods with the
        TreeTracerBase and traced_file arguments already filled in (see _trace_methods_dict)
        """

        before_marker = self._create_simple_marker_call(node, TreeTracerBase._treetrace_hidden_before_expr)
        # 将before相关逻辑设置在node前
        ast.copy_location(before_marker, node)

        after_marker = ast.Call(
            func=ast.Name(
                # after相关逻辑设置在node后
                id=self.traced_file.trace_methods[
                    TreeTracerBase._treetrace_hidden_after_expr
                ],
                ctx=ast.Load(),
            ),
            # 参数为 before 和 node
            args=[
                before_marker,
                super(_NodeVisitor, self).generic_visit(node),
            ],
            keywords=[],
        )
        ast.copy_location(after_marker, node)
        ast.fix_missing_locations(after_marker)

        return
上述代码效果如下:
修改前: expr
修改后: after(before(...), expr)
这样,正常逻辑执行前,会先执行before_expr,执行后,会执行after_expr。
如果节点类型为stmt,走visit_stmt函数,该函数会使用上下文管理器(with关键字)将stmt包裹。
def visit_stmt(self, node):
        # type: (ast.stmt) -> ast.With
        """
        Every statement in the original code becomes:

        with _treetrace_hidden_with_stmt(_tree_index):
            <statement>

        where the _treetrace_hidden_with_stmt function is the the corresponding method with the
        TreeTracerBase and traced_file arguments already filled in (see _trace_methods_dict)
        """
        context_expr = self._create_simple_marker_call(
            super(_NodeVisitor, self).generic_visit(node),
            TreeTracerBase._treetrace_hidden_with_stmt)

        if PY3:
            wrapped = ast.With(
                items=[ast.withitem(context_expr=context_expr)],
                body=[node],
            )
        else:
            wrapped = ast.With(
                context_expr=context_expr,
                body=[node],
            )
        ast.copy_location(wrapped, node)
        ast.fix_missing_locations(wrapped)
        return wrapped
上述代码效果如下:
修改前: stmt
修改后: with context(...):
         stmt
当用户执行stmt时,就会经过上下文管理器的__enter__和__exit__函数。
从visit_expr函数与visit_stmt函数的注释也可以其大意(嗯,其实我也是看注释,我对ast库也没那么熟悉)。
至此,被装饰函数的修改就完成了,当这个函数执行时,它的任何信息都会被获取,无论是静态信息还是运行时信息。
当fibonacci函数真正执行时,如果是stmt,就会进入到_StmtContext类(_treetrace_hidden_with_stmt函数设置的)的__enter__函数中,如果是expr,就会进入到_treetrace_hidden_before_expr函数中,从而做到监控fibonacci函数运行时所有信息的效果。
这些信息会被记录起来,用户等待fibonacci函数执行完后,便可以通过web去查看fibonacci函数执行过程中的所有信息,从而做到可视化debug的效果。
结尾
本文只是简要的分析了birdseye的原理,birdseye还有很多细节我们没有深入研究,就本文目前的原理介绍,只能大概知道birdseye这样做了,但如果你想自己开发类似birdseye的库,需要对ast库、inspect库、调用栈等有深入的掌握才行。
扩展讲讲,birdseye的思路可以运用到任意动态类型的语言上,比如JavaScript,我们可以获得JavaScript的AST,并对AST进行修改,从而做到监控任意语句执行的效果,做个JavaScript的birdseye对网站JavaScript的逆向会有降维打击的效果,你再怎么混淆,我可以直接获得执行过程中的任意值,也可以直接可视化调试。
本文就到这里了,我是二两,我们下篇文章见。