1. 在阿里云ECS的Centos7.9和8.2系统中进行Plumed简单安装测试
2. 在腾讯云ECS的Centos7.9系统中进行Plumed简单安装测试
3. 简单的入门案例
4. 集合变量(CV)
5. 命令行工具
1. 在阿里云ECS的Centos7.9和8.2系统中进行Plumed的简单安装测试
Plumed的官方安装教程是以以2.4.1为例进行的,installation教程地址在此:PLUMED: Installation
最新版本2.8.1下载地址再次:Release Release v2.8.1 · plumed/plumed2 · GitHub
在网上看到大家的安装过程都很顺利和简单,然而我在安装过程中却遇到了各种麻烦,在此分享给大家,希望大家能够少走弯路!
首先以阿里云ECS的7.9Centos系统(2核2GB,Open MPI 4.1.1,gcc/g++/gfortran 9.3.1)作为plumed的安装测试环境,root账户下进行。
(1)下载并解压安装包。
以2.8.1的安装为例,首先下载安装包,上传到服务器中,执行以下命令解压缩
tar -xf plumed-2.8.1.tgz(2)进入解压缩的文件夹中,执行以下命令进行简单的编译安装。
cd plumed-2.8.1                  # 进入解压缩文件夹
./configure --prefix=/usr/local  # 编译安装到/usr/local目录下
make -j 2                        # 以2核进行编译安装,-j参数可选
make doc                 # this is optional and requires proper doxygen version installed
make check
make install使用阿里云ECS的centos系统进行configure之后出现了如下很多WARNING,包括提示“Bash completion for plumed will not be installed, please add the following two lines to your bashrc”等等。最重要的是提示:plumed可执行文件将不会在这台机器上执行除非以 plumed --no-mpi 形式的命令行运行,即不能够进行并行计算!
configure: WARNING: **** Bash completion for plumed will not be installed, please add the following two lines to your bashrc
configure: WARNING: **** _plumed() { eval "$(plumed --no-mpi completion 2>/dev/null)";}
configure: WARNING: **** complete -F _plumed -o default plumed
configure: **** PLUMED will be compiled using MPI
configure: WARNING: plumed executable will not run on this machine
configure: WARNING: unless you invoke it as 'plumed --no-mpi'
configure: WARNING: all command line tools are thus available as 'plumed --no-mpi name-of-the-tool'
configure: WARNING: e.g. 'plumed --no-mpi driver'
configure: WARNING: to patch an MD code use 'plumed --no-mpi patch'
configure: WARNING: (notice that MPI will be available anyway in the patched code)
暂时先不管上面的WARNING, 继续进行make安装,之后进行make check(如果make check之后有bug可以make clean,重新清除上次的make命令所产生的object文件(后缀为“.o”的文件)及可执行文件。然后再进行编译),出现以下结果:
+++++++++++++++++++++++++++++++++++++++++++++++++++++
+ Final report:
+ 249 tests performed, 339 tests not applicable
+ 0 errors found
+ Well done!!
+++++++++++++++++++++++++++++++++++++++++++++++++++++
再接着进行make install之后,显示已经安装了,同时提示要配置若干环境变量,还有一些WARNING,提示内容如下。
*** PLUMED has been installed ***

Install prefix : /usr/local
Full name      : plumed

Setup your environment
- Ensure this is in your execution path         : /usr/local/bin
- Ensure this is in your include path           : /usr/local/include
- Ensure this is in your library path           : /usr/local/lib
- Ensure this is in your PKG_CONFIG_PATH path   : /usr/local/lib/pkgconfig
For runtime binding:
- Set this environment variable                 : PLUMED_KERNEL=/usr/local/lib/libplumedKernel.so

To create a tcl module that sets all the variables above, use this one as a starting point:
/usr/local/lib/plumed/modulefile

To uninstall, remove the following files and directories:
/usr/local/lib/plumed
/usr/local/share/doc/plumed
/usr/local/include/plumed
/usr/local/bin/plumed
/usr/local/bin/plumed-patch
/usr/local/bin/plumed-config
/usr/local/lib/pkgconfig/plumed.pc
/usr/local/lib/libplumed.so
/usr/local/lib/libplumedKernel.so
A vim plugin can be found here: /usr/local/lib/plumed/vim/
Copy it to /root/.vim/ directory
Alternatively:
- Set this environment variable         : PLUMED_VIMPATH=/usr/local/lib/plumed/vim
- Add the command 'let &runtimepath.=','.$PLUMED_VIMPATH' to your .vimrc file
From vim, you can use :set syntax=plumed to enable it
WARNING: plumed executable will not run on this machine
WARNING: unless you invoke it as 'plumed --no-mpi'
WARNING: This is normal if this is the login node of a cluster.
WARNING: - to patch an MD code now use 'plumed --no-mpi patch'
WARNING:   (notice that MPI will be available anyway in the patched code)
WARNING: - all command line tools are available as 'plumed --no-mpi name-of-the-tool'
WARNING:   e.g. 'plumed --no-mpi driver'
WARNING:   (MPI will be disabled in this case)
make[2]: Leaving directory '/root/sun789/software/08_plumed/plumed-2.8.1/src/lib'
make[1]: Leaving directory '/root/sun789/software/08_plumed/plumed-2.8.1/src'于是,vi ~/.bashrc文件,添加相关提示的环境变量,如下所示 # this is for plumed 部分,然后source ~/.bashrc。这一部分参考了PLUMED系列-安装教程 的安装教程。/.bashrc中结尾环境变量配置部分对应新添加的plumed部分,两行##之前的对应bashrc中已有的环境变量配置。
# .bashrc

# User specific aliases and functions

alias rm='rm -i'
alias cp='cp -i'
alias mv='mv -i'

# Source global definitions
if [ -f /etc/bashrc ]; then
        . /etc/bashrc
fi


# This is for anaconda
# 在.bashrc文件底部添加
# 为了避免与其他服务器用户产生命令冲突, 使用自己自定义的python8替代python
# alias python8='/root/anaconda3/bin/python'
# 这里写anaconda的安装路径
# export PATH="/root/anaconda3/bin:$PATH"

# This is for vaspkit
# export PATH=/root/sun789/software/vaspkit.1.3.5/bin:${PATH}

# This is for Gaussian09
export g09root=/root/sun789/software/03_gaussian/softwarepackage           # g16所在目录
export GAUSS_SCRDIR=/root/sun789/software/03_gaussian/tmp                      # 临时文件夹tmp所在目录
source /root/sun789/software/03_gaussian/softwarepackage/g09/bsd/g09.profile                                # 解压缩的到的g16.profile所在目录

# this is for openmpi
export PATH=$PATH:/usr/local/lib/openmpi/bin
export LD_LIBRARY_PATH=$LD_LIBRARY_PATH:/usr/local/lib/openmpi/lib

# this is for intel MKL
source /opt/intel/oneapi/setvars.sh > /dev/null

# this is for gcc and gfortran upgrade
source /opt/rh/devtoolset-9/enable

# this is for quantum esrpresso
# 避免root账户下每次调用openmmpi必须执行-allow-run-as-root命令
export OMPI_ALLOW_RUN_AS_ROOT=1
export OMPI_ALLOW_RUN_AS_ROOT_CONFIRM=1
# 写入QE编译后执行文件所在目录,即QE编译后bin文件夹所在目录
export PATH=$PATH:/root/sun789/software/06_quantum_espresso/02_qe_configuration/bin
# 写入intel MKL的intel64_lin文件夹所在目录,在默认安装目录/opt/intel/oneapi/目录下面找
export LD_LIBRARY_PATH=$LD_LIBRARY_PATH:/opt/intel/oneapi/compiler/2022.2.0/linux/compiler/lib/intel64_lin

#########################################################################################
#########################################################################################
# this is for plumed
_plumed() { eval "$(plumed --no-mpi completion 2>/dev/null)";}
complete -F _plumed -o default plumed
# this is for plumed enviroment variable
export PATH=/usr/local/bin:$PATH
export LD_LIBRARY_PATH=/usr/local/lib:$LD_LIBRARY_PATH
export PKG_CONFIG_PATH=/usr/local/lib/pkgconfig:$PKG_CONFIG_PATH
export PLUMED_KERNEL=/usr/local/lib/libplumedKernel.so:$PLUMED_KERNEL
export PLUMED_VIMPATH=/usr/local/lib/plumed/vim:$PLUMED_VIMPATH
export INCLUDE=/usr/local/include:$INCLUDE
# 若开启了时间计算,需要增加
export PLUMED_USE_LEPTON=yes
然后在终端输入 plumed help 之后,再次显示报错,报错内容如下!!!
[root@CentosDesktopSunYW plumed-2.8.1]# plumed help
[CentosDesktopSunYW:02658] [[INVALID],INVALID] ORTE_ERROR_LOG: Unable to start a daemon on the local node in file ess_singleton_module.c at line 716
[CentosDesktopSunYW:02658] [[INVALID],INVALID] ORTE_ERROR_LOG: Unable to start a daemon on the local node in file ess_singleton_module.c at line 172
--------------------------------------------------------------------------
It looks like orte_init failed for some reason; your parallel process is
likely to abort.  There are many reasons that a parallel process can
fail during orte_init; some of which are due to configuration or
environment problems.  This failure appears to be an internal failure;
here's some additional information (which may only be relevant to an
Open MPI developer):

  orte_ess_init failed
  --> Returned value Unable to start a daemon on the local node (-127) instead of ORTE_SUCCESS
--------------------------------------------------------------------------
--------------------------------------------------------------------------
It looks like MPI_INIT failed for some reason; your parallel process is
likely to abort.  There are many reasons that a parallel process can
fail during MPI_INIT; some of which are due to configuration or environment
problems.  This failure appears to be an internal failure; here's some
additional information (which may only be relevant to an Open MPI
developer):

  ompi_mpi_init: ompi_rte_init failed
  --> Returned "Unable to start a daemon on the local node" (-127) instead of "Success" (0)
--------------------------------------------------------------------------
*** An error occurred in MPI_Init
*** on a NULL communicator
*** MPI_ERRORS_ARE_FATAL (processes in this communicator will now abort,
***    and potentially your MPI job)
联想到我之前在阿里ECS的centos7.9系统中编译安装科学计算软件总是出问题,而在腾讯ECS的centos7.9版本中编译安装基本都是一次成功。猜想可能是ECS的centos7.9系统存在问题,或者是当前系统进行了太多软件的编译测试产生了环境冲突。
一番折腾调整还是没能成功运行之后,我果断将阿里云的ECS系统升级至8.2版本的centos系统。然后先配置了gcc, g++, gfortran编译器(8.5版本),接着按照上述步骤重新进行编译。
先进行configure,发现WARNING相比之前由9个减少至4个。由于还没有安装openmpi,所以提示还不能并行编译,但是此处已经没有仅能使用 plumed --no-mpi 命令进行任务运行的warning了。
configure: **** As of PLUMED 2.5, you cannot change paths anymore during "make install"
configure: **** Please configure and make clean to change the prefix
configure: WARNING: **** Bash completion for plumed will not be installed, please add the following two lines to your bashrc
configure: WARNING: **** _plumed() { eval "$(plumed --no-mpi completion 2>/dev/null)";}
configure: WARNING: **** complete -F _plumed -o default plumed
configure: WARNING: **** PLUMED will NOT be compiled using MPI because MPI have not been found!
configure: creating ./config.status
config.status: creating Makefile.conf
config.status: creating sourceme.sh
config.status: creating stamp-h
接着进行make安装,然后make check,结果如下:
+++++++++++++++++++++++++++++++++++++++++++++++++++++
+ Final report:
+ 247 tests performed, 341 tests not applicable
+ 0 errors found
+ Well done!!
+++++++++++++++++++++++++++++++++++++++++++++++++++++
然后继续make install,显示已经安装了,结果如下:
*** PLUMED has been installed ***

Install prefix : /usr/local
Full name      : plumed

Setup your environment
- Ensure this is in your execution path         : /usr/local/bin
- Ensure this is in your include path           : /usr/local/include
- Ensure this is in your library path           : /usr/local/lib
- Ensure this is in your PKG_CONFIG_PATH path   : /usr/local/lib/pkgconfig
For runtime binding:
- Set this environment variable                 : PLUMED_KERNEL=/usr/local/lib/libplumedKernel.so

To create a tcl module that sets all the variables above, use this one as a starting point:
/usr/local/lib/plumed/modulefile

To uninstall, remove the following files and directories:
/usr/local/lib/plumed
/usr/local/share/doc/plumed
/usr/local/include/plumed
/usr/local/bin/plumed
/usr/local/bin/plumed-patch
/usr/local/bin/plumed-config
/usr/local/lib/pkgconfig/plumed.pc
/usr/local/lib/libplumed.so
/usr/local/lib/libplumedKernel.so
A vim plugin can be found here: /usr/local/lib/plumed/vim/
Copy it to /root/.vim/ directory
Alternatively:
- Set this environment variable         : PLUMED_VIMPATH=/usr/local/lib/plumed/vim
- Add the command 'let &runtimepath.=','.$PLUMED_VIMPATH' to your .vimrc file
From vim, you can use :set syntax=plumed to enable it
make[2]: Leaving directory '/root/sun789/01_software/01_plumed/plumed-2.8.1/src/lib'
make[1]: Leaving directory '/root/sun789/01_software/01_plumed/plumed-2.8.1/src'
注意:相比之前,已经没有WARNING提示了。我输入plumed help之后,然而还是报错,结果如下:
[root@CentosDesktopSunYW plumed-2.8.1]# plumed help
plumed: error while loading shared libraries: libplumedKernel.so: cannot open shared object file: No such file or directory提示不能够加载libplumedKernel.so共享库,其实上述make install中已经提到配置的这个库环境变量的问题了。将相应环境变量进行配置,即加入上述环境变量配置的内容,再次运行plumed help,结果如下,终于成功了!
[root@CentosDesktopSunYW plumed-2.8.1]# plumed help
Usage: plumed [options] [command] [command options]
  plumed [command] -h|--help: to print help for a specific command
Options:
  [help|-h|--help]          : to print this help
  [--is-installed]          : fails if plumed is not installed
  [--has-mpi]               : fails if plumed is running without MPI
  [--has-dlopen]            : fails if plumed is compiled without dlopen
  [--load LIB]              : loads a shared object (typically a plugin library)
  [--standalone-executable] : tells plumed not to look for commands implemented as scripts
Commands:
  plumed completion : dump a function usable for programmable completion
  plumed driver : analyze trajectories with plumed
  plumed driver-float : analyze trajectories with plumed (single precision version)
  plumed gen_example : construct an example for the manual that users can interact with
  plumed gentemplate : print out a template input for a particular action
  plumed info : provide informations about plumed
  plumed kt : print out the value of kT at a particular temperature
  plumed manual : print out a description of the keywords for an action in html
  plumed pathtools : print out a description of the keywords for an action in html
  plumed pdbrenumber : Modify atom numbers in a PDB, possibly using hybrid-36 coding
  plumed pesmd : Langevin dynamics on PLUMED energy landscape
  plumed simplemd : run lj code
  plumed sum_hills : sum the hills with  plumed
  plumed config : inquire plumed about how it was configure
  plumed mklib : compile a .cpp file into a shared library
  plumed newcv : create a new collective variable from a template
  plumed partial_tempering : scale parameters in a gromacs topology to implement solute or partial tempering
  plumed patch : patch an MD engine
/usr/local/lib/plumed/scripts/selector.sh: line 219: python: command not found
  plumed selector :
plumed vim2html : convert plumed input file to colored html using vim syntax除此之外,后续还在阿里云centos8.5系统上进行了测试。发现与8.2版本centos系统测试还是有差异的,但是不用设置环境变量就可以成功运行plumed help命令。
make check之后
+++++++++++++++++++++++++++++++++++++++++++++++++++++
+ Final report:
+ 312 tests performed, 276 tests not applicable
+ 65 errors found
+ Find the bug!
+ To replace references, go to the test directory and
+ type 'make reset'
make[1]: *** [Makefile:14: checkfail] Error 1
make[1]: Leaving directory '/root/01_sun789/02_plumed/plumed-2.8.1/regtest'
make: *** [Makefile:66: check] Error 2
make install之后
*** PLUMED has been installed ***

Install prefix : /usr/local
Full name      : plumed

Setup your environment
- Ensure this is in your execution path         : /usr/local/bin
- Ensure this is in your include path           : /usr/local/include
- Ensure this is in your library path           : /usr/local/lib
- Ensure this is in your PKG_CONFIG_PATH path   : /usr/local/lib/pkgconfig
For runtime binding:
- Set this environment variable                 : PLUMED_KERNEL=/usr/local/lib/libplumedKernel.so

To create a tcl module that sets all the variables above, use this one as a starting point:
/usr/local/lib/plumed/modulefile

To uninstall, remove the following files and directories:
/usr/local/lib/plumed
/usr/local/share/doc/plumed
/usr/local/include/plumed
/usr/local/bin/plumed
/usr/local/bin/plumed-patch
/usr/local/bin/plumed-config
/usr/local/lib/pkgconfig/plumed.pc
/usr/local/lib/libplumed.so
/usr/local/lib/libplumedKernel.so
A vim plugin can be found here: /usr/local/lib/plumed/vim/
Copy it to /root/.vim/ directory
Alternatively:
- Set this environment variable         : PLUMED_VIMPATH=/usr/local/lib/plumed/vim
- Add the command 'let &runtimepath.=','.$PLUMED_VIMPATH' to your .vimrc file
From vim, you can use :set syntax=plumed to enable it
make[2]: Leaving directory '/root/01_sun789/02_plumed/plumed-2.8.1/src/lib'
make[1]: Leaving directory '/root/01_sun789/02_plumed/plumed-2.8.1/src'
为了测试腾讯云ECS上是否存在上述类似问题,进行了接下来的测试。
2. 在腾讯云ECS的Centos7.9系统中进行Plumed的简单安装测试
在腾讯云ECS的centos7.9系统(4核8GB,Open MPI 4.1.1,gcc/g++/gfortran 9.3.1)进行测试,
在configure之后,warning明显减少,没有只能够进行非并行计算的WARNING:
configure: **** Please configure and make clean to change the prefix
configure: WARNING: **** Bash completion for plumed will not be installed, please add the following two lines to your bashrc
configure: WARNING: **** _plumed() { eval "$(plumed --no-mpi completion 2>/dev/null)";}
configure: WARNING: **** complete -F _plumed -o default plumed
configure: **** PLUMED will be compiled using MPI
configure: creating ./config.status
config.status: creating Makefile.conf
config.status: creating sourceme.sh
config.status: creating stamp-h在腾讯云ECS的centos系统进行了make check之后,虽然出现了errors,但暂时可以忽略,因为可能涉及到一些库没有安装。
+++++++++++++++++++++++++++++++++++++++++++++++++++++
+ Final report:
+ 316 tests performed, 272 tests not applicable
+ 13 errors found
+ Find the bug!
+ To replace references, go to the test directory and
+ type 'make reset'
make[1]: *** [Makefile:14: checkfail] Error 1
make[1]: Leaving directory '/home/lighthouse/06_plumed/plumed-2.8.1/regtest'
make: *** [Makefile:66: check] Error 2
接着进行 make install,显示已经安装,并且也没有WARNING。
*** PLUMED has been installed ***

Install prefix : /usr/local
Full name      : plumed

Setup your environment
- Ensure this is in your execution path         : /usr/local/bin
- Ensure this is in your include path           : /usr/local/include
- Ensure this is in your library path           : /usr/local/lib
- Ensure this is in your PKG_CONFIG_PATH path   : /usr/local/lib/pkgconfig
For runtime binding:
- Set this environment variable                 : PLUMED_KERNEL=/usr/local/lib/libplumedKernel.so

To create a tcl module that sets all the variables above, use this one as a starting point:
/usr/local/lib/plumed/modulefile

To uninstall, remove the following files and directories:
/usr/local/lib/plumed
/usr/local/share/doc/plumed
/usr/local/include/plumed
/usr/local/bin/plumed
/usr/local/bin/plumed-patch
/usr/local/bin/plumed-config
/usr/local/lib/pkgconfig/plumed.pc
/usr/local/lib/libplumed.so
/usr/local/lib/libplumedKernel.so
A vim plugin can be found here: /usr/local/lib/plumed/vim/
Copy it to /root/.vim/ directory
Alternatively:
- Set this environment variable         : PLUMED_VIMPATH=/usr/local/lib/plumed/vim
- Add the command 'let &runtimepath.=','.$PLUMED_VIMPATH' to your .vimrc file
From vim, you can use :set syntax=plumed to enable it
make[2]: Leaving directory '/home/lighthouse/06_plumed/plumed-2.8.1/src/lib'
make[1]: Leaving directory '/home/lighthouse/06_plumed/plumed-2.8.1/src'输入plumed help命令,结果表明成功运行,注意此处是在没有配置一些环境变量的情况下成功运行的!
[root@VM-4-6-centos plumed-2.8.1]# plumed help
Usage: plumed [options] [command] [command options]
  plumed [command] -h|--help: to print help for a specific command
Options:
  [help|-h|--help]          : to print this help
  [--is-installed]          : fails if plumed is not installed
  [--has-mpi]               : fails if plumed is running without MPI
  [--has-dlopen]            : fails if plumed is compiled without dlopen
  [--load LIB]              : loads a shared object (typically a plugin library)
  [--standalone-executable] : tells plumed not to look for commands implemented as scripts
Commands:
  plumed completion : dump a function usable for programmable completion
  plumed driver : analyze trajectories with plumed
  plumed driver-float : analyze trajectories with plumed (single precision version)
  plumed gen_example : construct an example for the manual that users can interact with
  plumed gentemplate : print out a template input for a particular action
  plumed info : provide informations about plumed
  plumed kt : print out the value of kT at a particular temperature
  plumed manual : print out a description of the keywords for an action in html
  plumed pathtools : print out a description of the keywords for an action in html
  plumed pdbrenumber : Modify atom numbers in a PDB, possibly using hybrid-36 coding
  plumed pesmd : Langevin dynamics on PLUMED energy landscape
  plumed simplemd : run lj code
  plumed sum_hills : sum the hills with  plumed
  plumed selector : create lists of serial atom numbers
  plumed patch : patch an MD engine
  plumed partial_tempering : scale parameters in a gromacs topology to implement solute or partial tempering
  plumed vim2html : convert plumed input file to colored html using vim syntax
  plumed config : inquire plumed about how it was configure
  plumed newcv : create a new collective variable from a template
  plumed mklib : compile a .cpp file into a shared library
腾讯云ECS的Centos系统再一次不负众望。之前在ORCA、Gaussian16的安装上就已经出现过阿里云ECS无法成功安装或运行而腾讯ECS成功编译的经历。这也告诉大家,有时候软件编译或安装不成功,在排除掉自己的问题之后,可能就是系统兼容性问题或者软件环境变量冲突了。
本小节参考资料:增强采样软件PLUMED的安装与使用 - 腾讯云开发者社区-腾讯云
PLUMED系列-安装教程 | 小康学习 | 计算化学与分子模拟爱好者
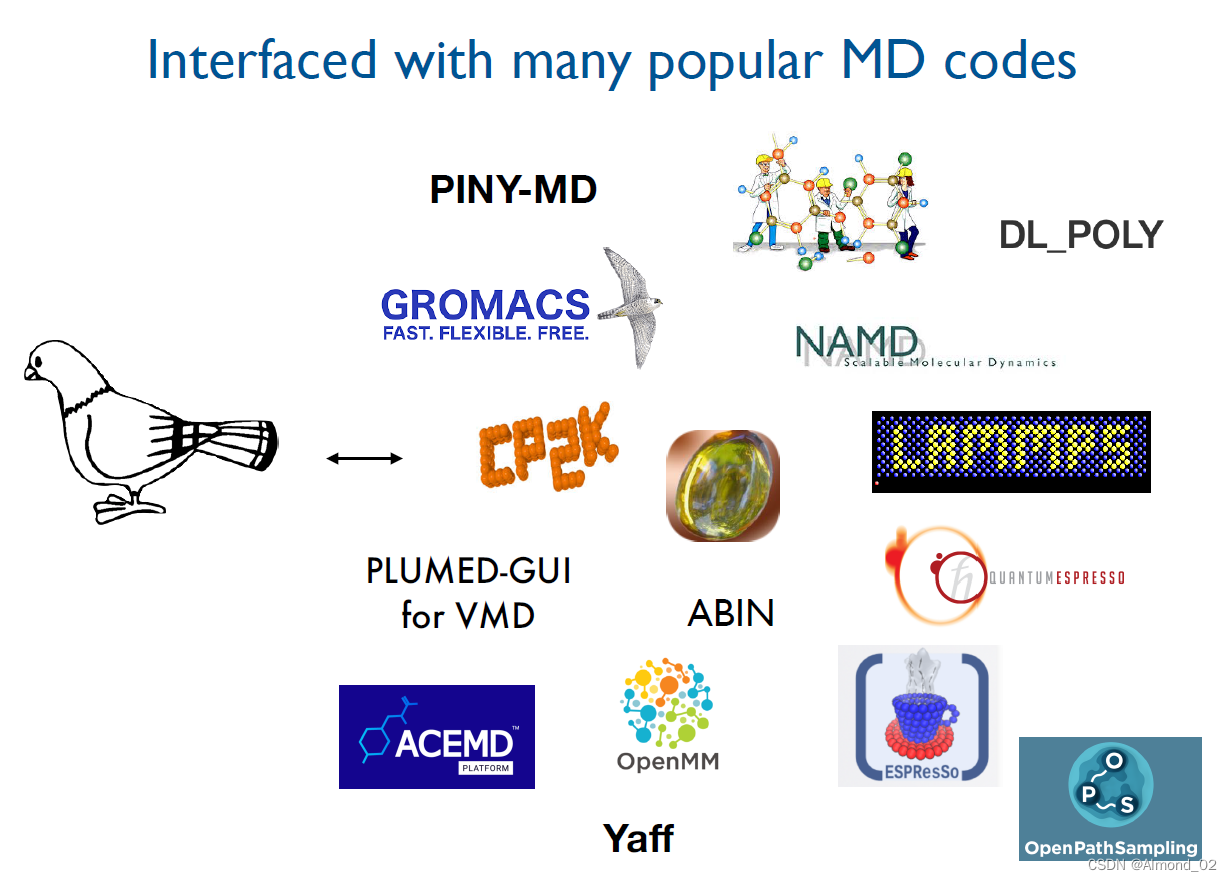
完成上述操作后,plumed可执行文件应该在执行路径中,您将能够使用 PLUMED 分析现有轨迹或使用包含的 Lennard-Jones 代码。但是,由于 PLUMED 主要用于偏向使用分子动力学软件包执行的动态模拟,您可以在下面找到有关如何修补您喜欢的 MD 代码以便它可以与 PLUMED 结合。
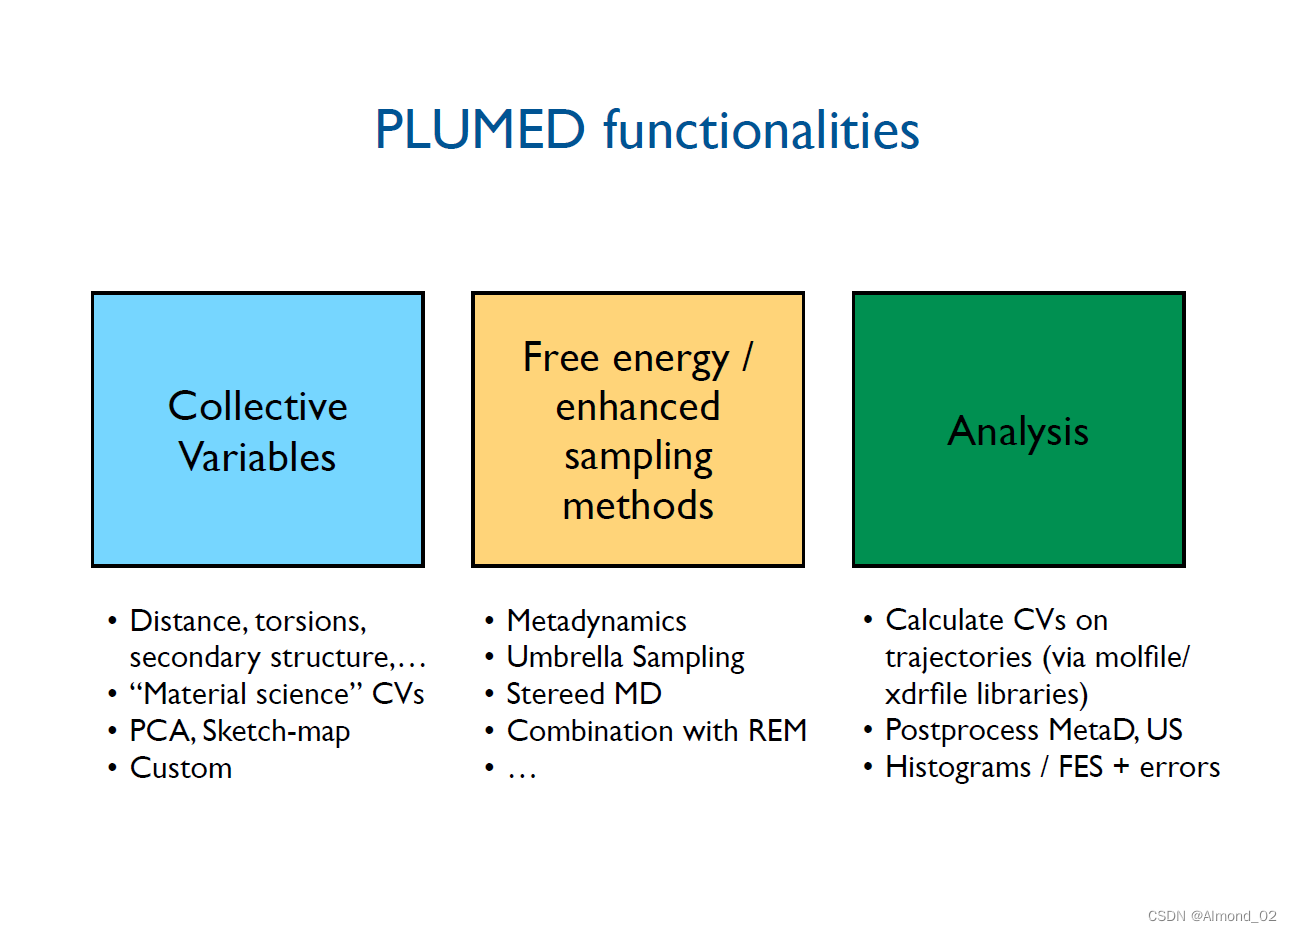
3. 简单的入门案例(Collective Variables)
安装成功之后,建议从官网的Getting Started开始学习(对应手册93页)。
要运行 PLUMED,您需要提供一个输入文件。在此文件中,您可以指定 PLUMED 在运行过程中应该做什么。通常这将涉及计算一个或多个集体变量,也许是计算这些 集合变量 的函数,然后对集体变量/函数的值进行一些分析或运行一些自由能计算的方法。如下所示:
DISTANCE  ATOMS=1,2  LABEL=d1
PRINT ARG=d1 FILE=colvar STRIDE=10在这个输入文件中,每一行都是 PLUMED 执行某些特定操作的指令(每隔10步将轨迹文件中原子1和原子2之间的距离打印到colvar文件中)。可能是计算一个colvar,分析一个轨迹(trajectory)或者偏置(bias)系统的动力学。
这些行中的第一个词指定要执行的特定操作。然后是一些关键字,这些关键字为 PLUMED 提供了有关如何执行操作的更多详细信息。下面是对关键词及集合变量的一些理解:
(1)集合变量通常分为两类:一类是定义(原子)组和虚拟原子的变量,一般为虚拟原子坐标或一组原子序号,用于后续的第二类集合变量的计算使用,如center,com,ghost等,这一类的集合变量一共有11个,见手册5.1小节;
(2)另外一类是键角、原子间距等集合变(CV)如DISTANCE, COORDINATION, 等等,可以将第二类集合变量理解为一种用于描述体系性质的函数变量 。这类变量大概有34个。
(3)可以将每一个集合变量和Analysis关键词理解为一个多变量的函数,类似于python中定义的函数,有若干限定输入参数关键字,如上所说,这些关键字为 PLUMED 提供了有关如何执行操作的更多详细信息。比如GROUP集合变量关键词后面可以跟的参数关键词(包括ATOMS, REMOVE, SORT, UNIQUE, NDX_FILE, NDX_GROUP等)及默认值如下:

(4)每一行的开始要么是用于表示集合变量的小写字母(或与数字组合)加上冒号,要么就是Analysis Keyword,如PRINT,等。后面跟的就是该函数可以调用的一些关键词,手册中在每个关键词的说明中都明确指出了。
(5)每一行格式: FirstWord KeyWords LabelKeyword 。注:Firstword一般来源于CV, Analysis, Bias中的关键词,LabelKeyword一般是要传递的变量值(如计算得到的距离、键角),通常与Firstword含义相同,比如键角,距离,原子序号(原子坐标)等,常放在一行的开头,用小写字母数字组合自定义组合进行标记,后接冒号“:”。

CV(1):GROUP, COM, CENTER, FIXEDATOM, ...
CV(2): DISTANCE, COORDINATION, ANGLE, ...
Analysis: PRINT, DUMPATOMS, ...
这些关键字要么是单个词(它们告诉 PLUMED 以特定方式进行计算 - 例如 NOPBC 告诉 PLUMED 在计算特定 colvar 时不要使用周期性边界条件),或者它们可以是后跟等号的词和没有空格的逗号分隔列表数字或字符(例如 ATOMS=1,2,3,4 告诉 PLUMED 在计算特定 colvar 时使用原子编号 1,2,3 和 4)。不允许空格的原因是 PLUMED 应该能够理解原子列表何时结束,并且应该期望一个新的关键字。如果整个列表包含在花括号中(例如 ATOMS={1 2 3 4}),则可以使用空格分隔列表而不是逗号分隔列表。请注意,您可以使用Continuation lines将命令拆分为多行。
这些关键字中最重要的是标签关键字(label keyword),因为只有使用这些标签,我们才能将数据从一个动作传递到另一个动作。如
d1: DISTANCE ATOMS=1,2
PRINT ARG=d1 FILE=colvar STRIDE=10
然后 PLUMED 将每 10 步将原子 1 和 2 之间的距离值打印到文件 colvar 中,正如您告诉 PLUMED 采用由操作 d1 计算的值并打印它一样。您可以使用任何字符串来标记您的操作,只要它不以符号 @ 开头。在 PLUMED 中,以 @ 开头的字符串用于引用特殊的、代码生成的原子组,并为用户在输入中未提供标签的任何操作提供标签。
请注意,如果在行首添加了一个单词后跟一列(例如 pippo:),PLUMED 会自动删除它并添加一个等效标签(LABEL=pippo)。因此,可以使用以下快捷方式获得完全等效的结果。
DISTANCE ATOMS=1,2 LABEL=d1
PRINT ARG=d1 FILE=colvar STRIDE=10

# 下面和上面是等效的
# d1: DISTANCE ATOMS=1,2
# PRINT ARG=d1 FILE=colvar STRIDE=10
还要注意,所有动作都可以被标记,除了普通的集体变量之外,许多动作可以定义一个或多个值,然后可以使用相应的标签来引用。
如果您的系统上有正则表达式库并在配置时检测到,则也可以使用 POSIX 正则表达式(请参阅正则表达式)引用操作。您还可以在输入中添加注释或在多个文件中设置输入,然后通过包含其他文件创建复合输入。
可以通过指定plumed默认单位的转换因子或使用与下面给出的定义单位之一相对应的字符串来设置新单位。该指令必须出现在 plumed.dat 文件的开头。必须在整个 plumed.dat 文件中使用相同的单位。
# this is using Angstrom - kj/mol - fs
UNITS LENGTH=A TIME=fs
# compute distance between atoms 1 and 4
d: DISTANCE ATOMS=1,4
# print time and distance on a COLVAR file
PRINT ARG=d FILE=COLVAR
# dump atoms 1 to 100 on a 'out.gro' file
DUMPATOMS FILE=out.gro STRIDE=10 ATOMS=1-100
# dump atoms 1 to 100 on a 'out.xyz' file
DUMPATOMS FILE=out.xyz STRIDE=10 ATOMS=1-100
在COLVAR文件中,时间和距离将分别出现在 fs 和 A 中,无论您在主机 MD 代码中使用的单位是什么。文件中的坐标out.gro将以 nm 表示,因为gro按照惯例,文件是用 nm 编写的。由于我们使用 UNITS 命令设置 Angstrom 单位,因此文件中的坐标out.xyz将以 Angstrom 写入。事实上,在 PLUMED xyz 文件中使用的是内部 PLUMED 单位,不一定是埃!
LENGTH: nm (default), A (for Angstrom), um (for micrometer), Bohr (0.052917721067 nm)

ENERGY: kj/mol (default), j/mol, kcal/mol (4.184 kj/mol), eV (96.48530749925792 kj/mol), Ha (for Hartree,2625.499638 kj/mol)

TIME: ps (default), fs, ns, atomic (2.418884326509e-5 ps)

MASS: amu (default)

CHARGE: e (default)
4. 集合变量
化学系统包含大量原子,在大多数情况下,这使我们无法通过直接监测原子位置来理解任何事情。因此,我们引入了描述我们感兴趣的化学过程的集体变量 (CV),并改为监控这些更简单的数量。这些 CV 用于 PLUMED 中实现的许多方法中 - 可以使用PRINT监控值,可以计算它们的函数,或者可以使用PLUMED 中实现的分析和偏置方法对它们进行分析或偏置。然而,在做任何这些事情之前,我们首先必须告诉 PLUMED 如何计算它们。
在 PLUMED 中实现的最简单的集合变量采用一组原子位置并输出一个或多个标量 CV 值。有关这些变量的信息在标题为CV 文档的页面上提供,而有关如何选择原子集的信息可以在Groups 和 Virtual Atoms页面中找到。请注意,PLUMED 包含许多其他集体变量的实现,但这些变量的输入在第一次遇到时可能不太透明。特别是关于与参考配置的距离的页面描述了计算与特定参考配置的距离的各种方法。因此,您将在此处找到有关如何计算蛋白质折叠状态的 RMSD 距离的说明。同时,Functions页面描述了可以在代码中使用的集合变量的各种功能。这是 PLUMED 的一个非常强大的功能,因为您可以使用函数命令来计算任何函数或CV 文档页面上列出的简单集合变量的组合。最后,MultiColvar 上的页面描述了 MultiColvars。
MultiColvars 允许您使用许多不同的 colvars,并允许我们在没有大量代码的情况下实现所有这些集体变量。对于某些事情(例如DISTANCES GROUPA=1 GROUPB=2-100 LESS_THAN={RATIONAL R_0=3}),plumed 中有更多计算效率更高的选项(例如COORDINATION)。然而,MultiColvars 值得研究,因为它们为许多相当复杂的 CV 提供了灵活的语法。
(1)指定原子
在 PLUMED 中实现的绝大多数 CV 都是从原子位置列表中计算出来的。在 PLUMED 中,原子使用分子动力学输入文件中的数字索引指定。
在 PLUMED 中,原子列表可以直接在每个集合变量的定义中提供,也可以预定义为可以多次重用的GROUP 。原子列表可以写成:
- 逗号分隔的数字列表 (
GROUP ATOMS=10,11,15,20 LABEL=g1) - 数值范围。所以
GROUP ATOMS=10-20 LABEL=g2相当于GROUP ATOMS=10,11,12,13,14,15,16,17,18,19,20 LABEL=g2 - 具有步幅的数值范围。所以
GROUP ATOMS=10-100:10 LABEL=g3 is equivalent toGROUP ATOMS=10,20,30,40,50,60,70,80,90,100 LABEL=g3 atoms ranges with a negative stride. SoGROUP ATOMS=100-10:-10 LABEL=g4 相当于GROUP ATOMS=100,90,80,70,60,50,40,30,20,10 LABEL=g4
此外,还有一些快捷方式可以使用:
@mdatoms表示 MD 引擎中存在的所有物理原子(例如DUMPATOMS ATOMS=@mdatoms)。@allatoms表示所有原子,包括那些仅在 PLUMED 中定义的原子(例如DUMPATOMS ATOMS=@allatoms)。
PLUMED 中定义的虚拟原子列表可以通过命令获取GROUP ATOMS=@allatoms REMOVE=@mdatoms。
如果您使用MOLINFO命令加载分子的结构,则可以使用其他快捷方式。
以上所有方法都可以组合在一起,只需将一个名称放在另一个名称之后,用逗号分隔:
g5: DUMPATOMS ATOMS=1,2,10-20,40-60:5,100-70:-2 FILE=test.xyz 一些集体变量必须接受固定数量的原子,例如,DISTANCE仅使用两个原子计算,ANGLE使用 3 或 4 个原子计算,TORSION使用 4 个原子计算。
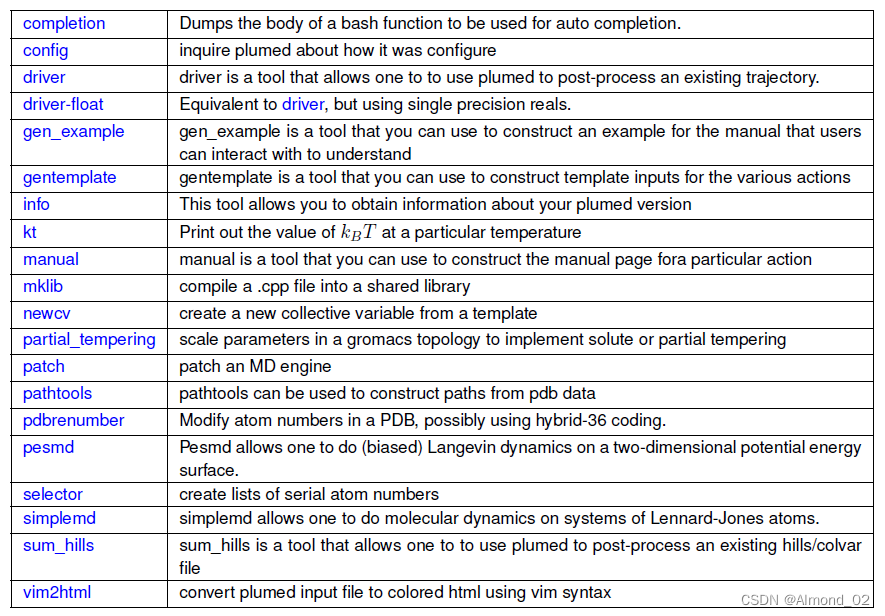
plumed的独立运行通常包含3类文件:轨迹文件、运行控制文件input file、运行得到的输出文件。需要重点学习plumed的关键词语法。同时plumed也包含了若干命令行工具,如下所示(对应手册717页),接下来的测试中会用到其中的一部分。
5. 命令行工具
plumed的命令行工具主要包含以下这些,调用格式如下
plumed <toolname> <list of input flags for that tool>
以config的使用为例,config用于判断编译plumed时是否安装了某些包。
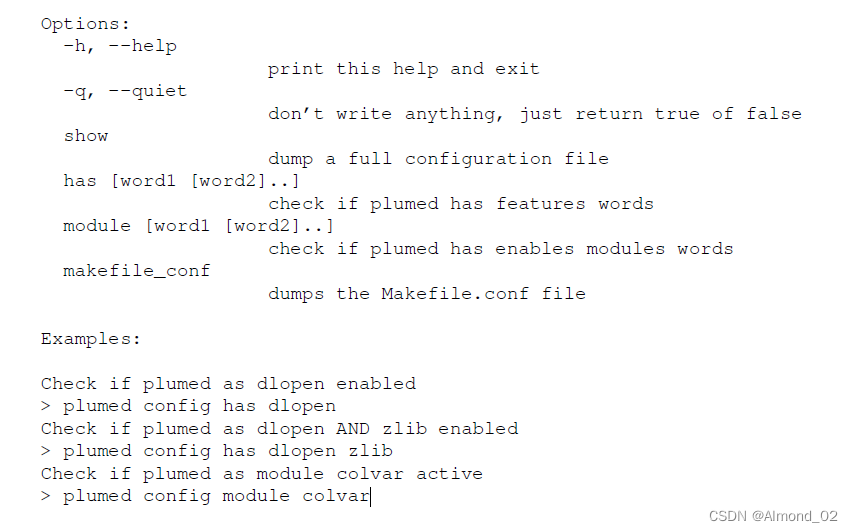
plumed config makefile_conf #
plumed config show # 展示plumed所有的configuration
info 命令行工具 ,查询plumed的版本,调用格式如下

driver 命令行工具
driver 是一种工具,它允许人们使用 plumed 对现有轨迹进行后处理。 使用下面描述的命令行参数指定驱动程序的输入。 此外,您可以在plumed输入中使用特殊的 READ 命令来读取在 MD 模拟期间生成的 colvar 文件。 然后可以将读入的值视为计算的 colvars。
下面是一些典型的driver调用命令
# 后处理trajectory.xyz轨迹文件
plumed driver --plumed plumed.dat --ixyz trajectory.xyz

# 后处理trajectory.xyz轨迹文件
# 请注意 xyz文件应采用内部 PLUMED 单位,默认情况下为 nm。 您可以使用 --length-units选项
# 在这种情况下,驱动程序读取 xyz文件假设它包含以埃为单位的坐标。 然而,由此产生的 colvar文件包含以 nm 表示的距离。
plumed driver --plumed plumed.dat --ixyz trajectory.xyz --length-units A
# plumed.dat输入文件内容如下
BEGIN_PLUMED_FILE working DATADIR=example-check/driver.tmp
# no explicit UNITS action here
d: DISTANCE ATOMS=1,2
PRINT ARG=d FILE=colvar

plumed driver --plumed plumed.dat --ixyz trajectory.xyz --trajectory-stride 100 --timestep 0.001

plumed driver --plumed plumed.dat --pdb diala.pdb --mf_xtc traj.xtc --trajectory-stride 100 --timestep 0.001

plumed driver --plumed plumed.dat --imf_crd trajectory.crd --natoms 128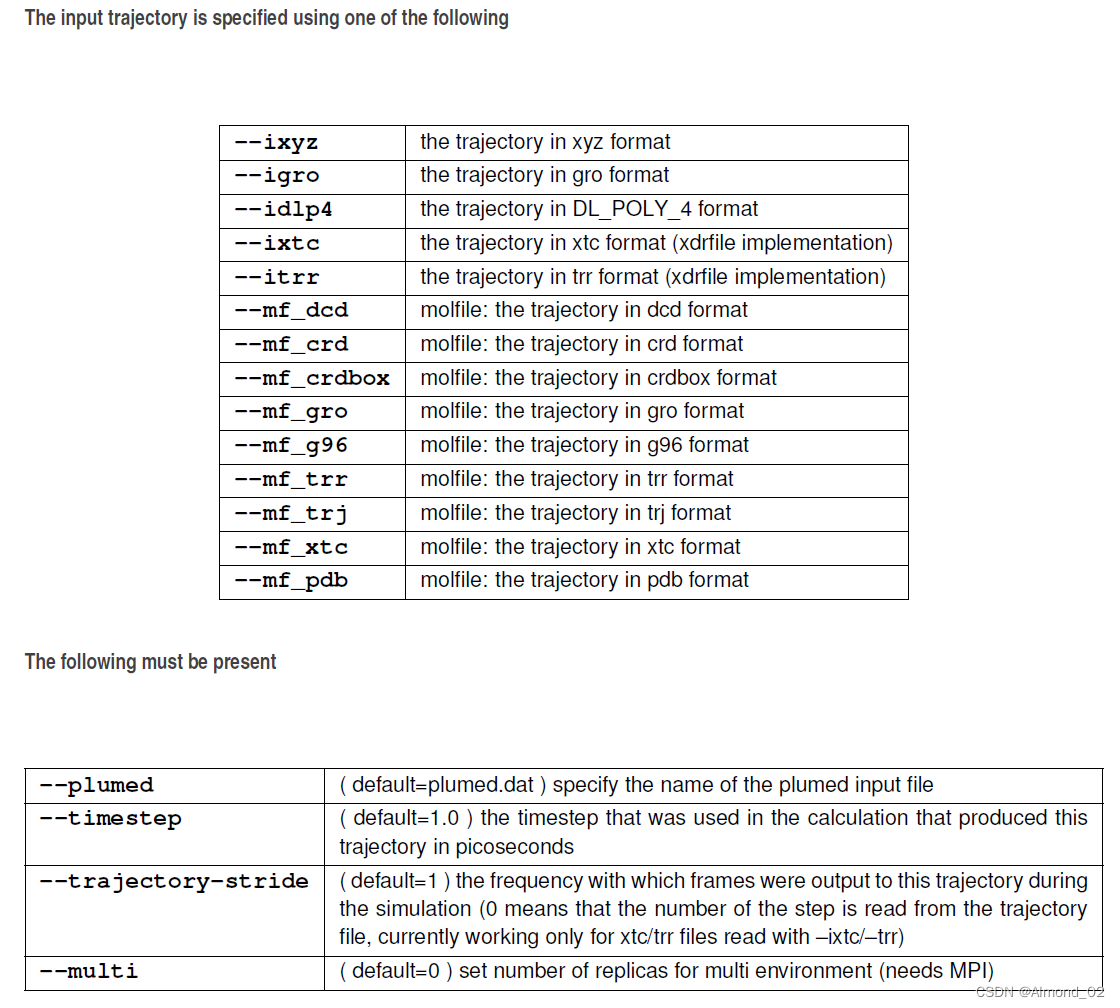

参考资料:
增强采样软件PLUMED的安装与使用 - DECHIN - 博客园
增强采样软件PLUMED的安装与使用 - 腾讯云开发者社区-腾讯云
浅谈PCA与g_covar+g_anaeig+ddtdp+sigmaplot做自由能面图的方法 - 思想家公社的门口:量子化学·分子模拟·二次元
高斯核函数_摆烂办不到的博客-CSDN博客_gaussian kernel