关于目标检测的模型有很多,nanodet模型小且轻量化,适合移植部署到硬件设备上,非常推荐学习这个模型。经过我自己踩了无数坑后总结了此教程,助学刚接触nanodet,想要快速上手的学者,教程很详细,学者耐心看。
目录
一、准备nanodet框架
我提供了一个已经调试好的源码包,后面的教程也都是基于我自己提供的源码包讲解的,学习者自行下载,下载源码包的链接为:添加链接描述,提取码为:4g6w,学者下载解压后的文件如下所示:
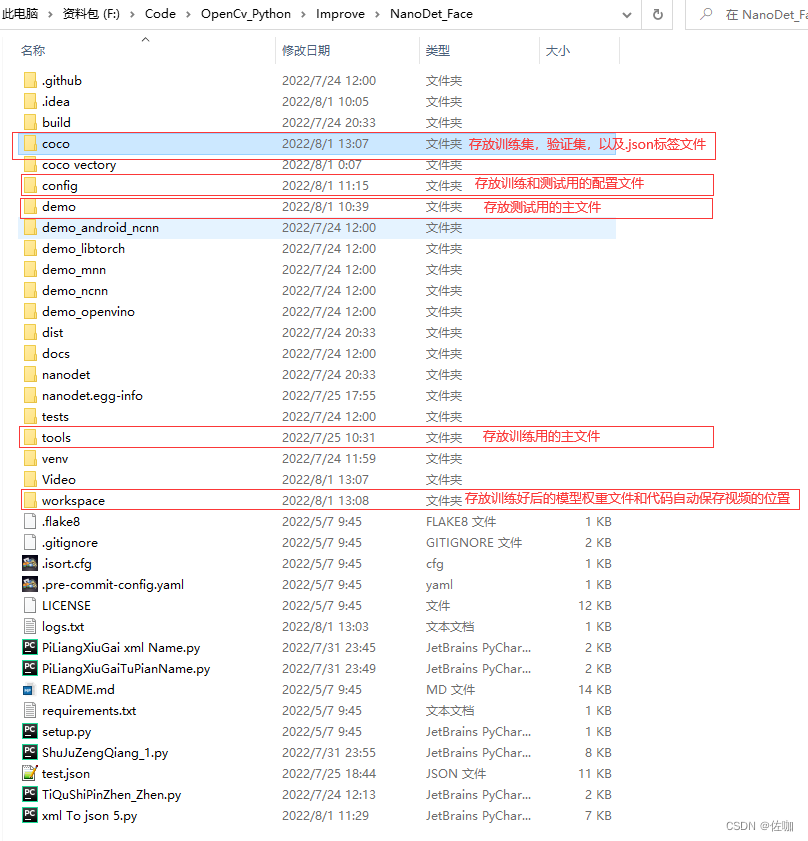
当然官方也给了nanodet源码的下载地址,下载链接为:添加链接描述,如下
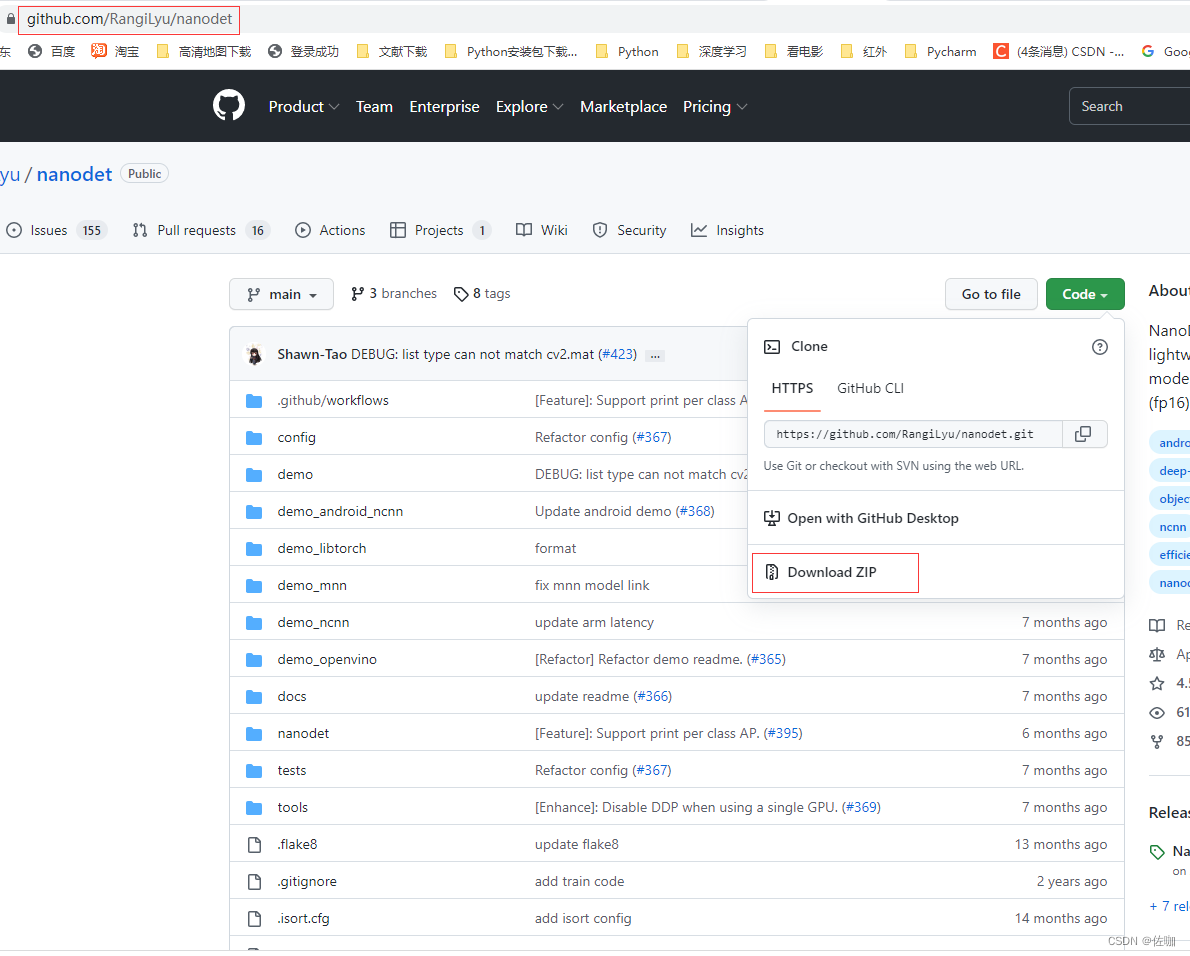
补:关于源码包的选择,推荐学者直接下载我提供的使用,我给的源码包中已经填了很多坑,使用官网给的,中间还有很多坑需要自己补。
二、安装训练必要的库文件
1、必要库文件
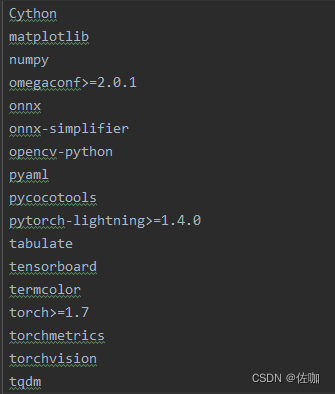
python的版本选择3.7或者3.8及其它高版本的都可以,其它必要包见下:
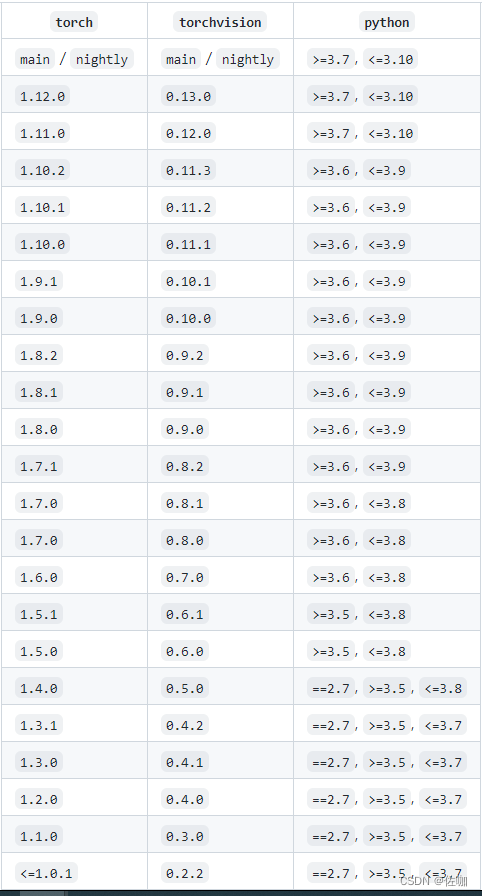
2、torch和torchvison的版本对应问题
torch和torchvision版本的选择一定要对应,不然后期正式训练会遇到各种问题,很糟心。关于版本的对应,学者自己查看网址:添加链接描述,如下:
3、坑
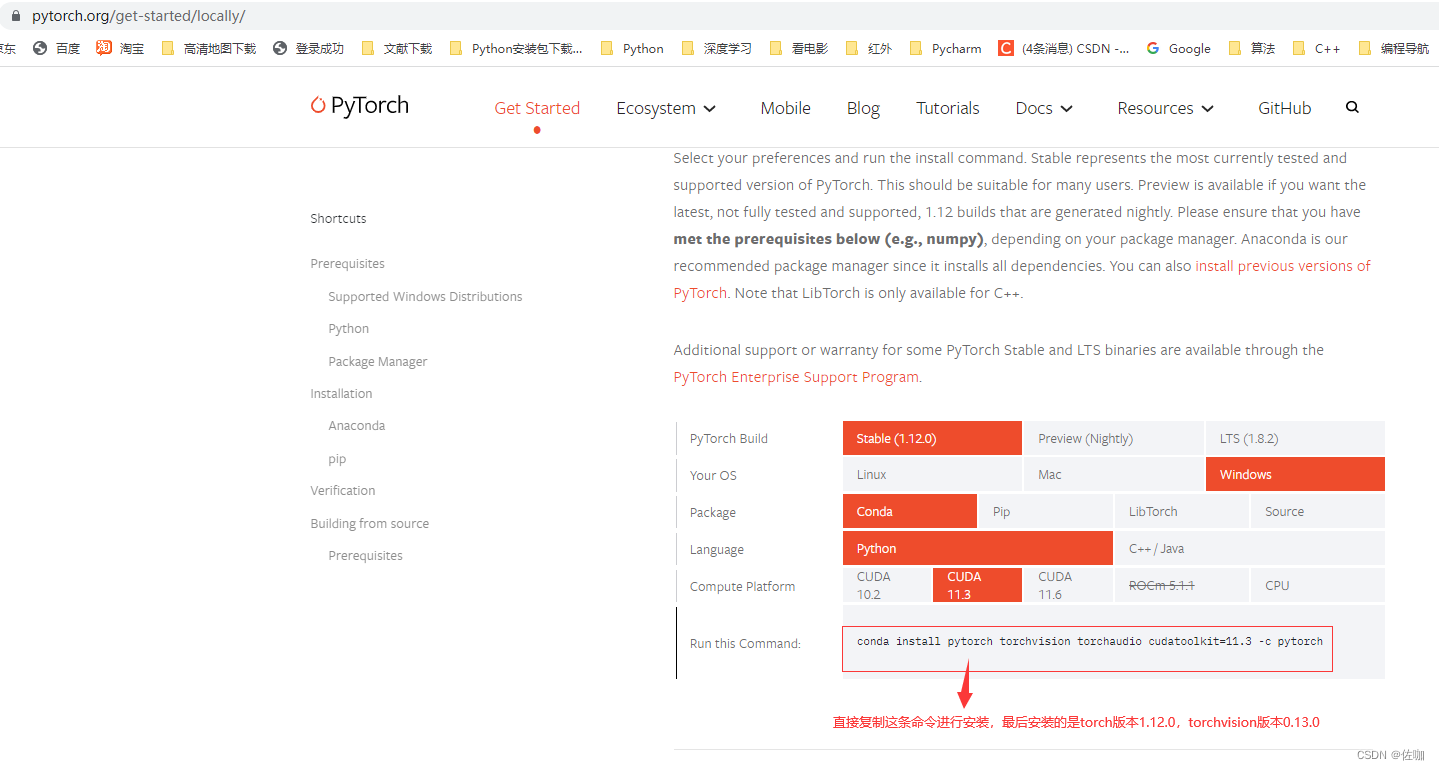
一开始我自己电脑安装的是torch版本1.12.0,torchvision版本0.13.0,python版本3.7,按照官网给的版本是对应的,但是正式训练时就报错提示torch和torchvison版本不对应。我最开始安装torch和torchvision的时候是通过官网页面给的命令安装的,最后发现训练有问题,官网链接:添加链接描述,官网给的如下:
通过上面官网页面直接给的安装链接有问题,卸载原始的torch和torchvision。后我又换了官网给的其它安装链接,可以对应安装成功,链接为:添加链接描述,如下:
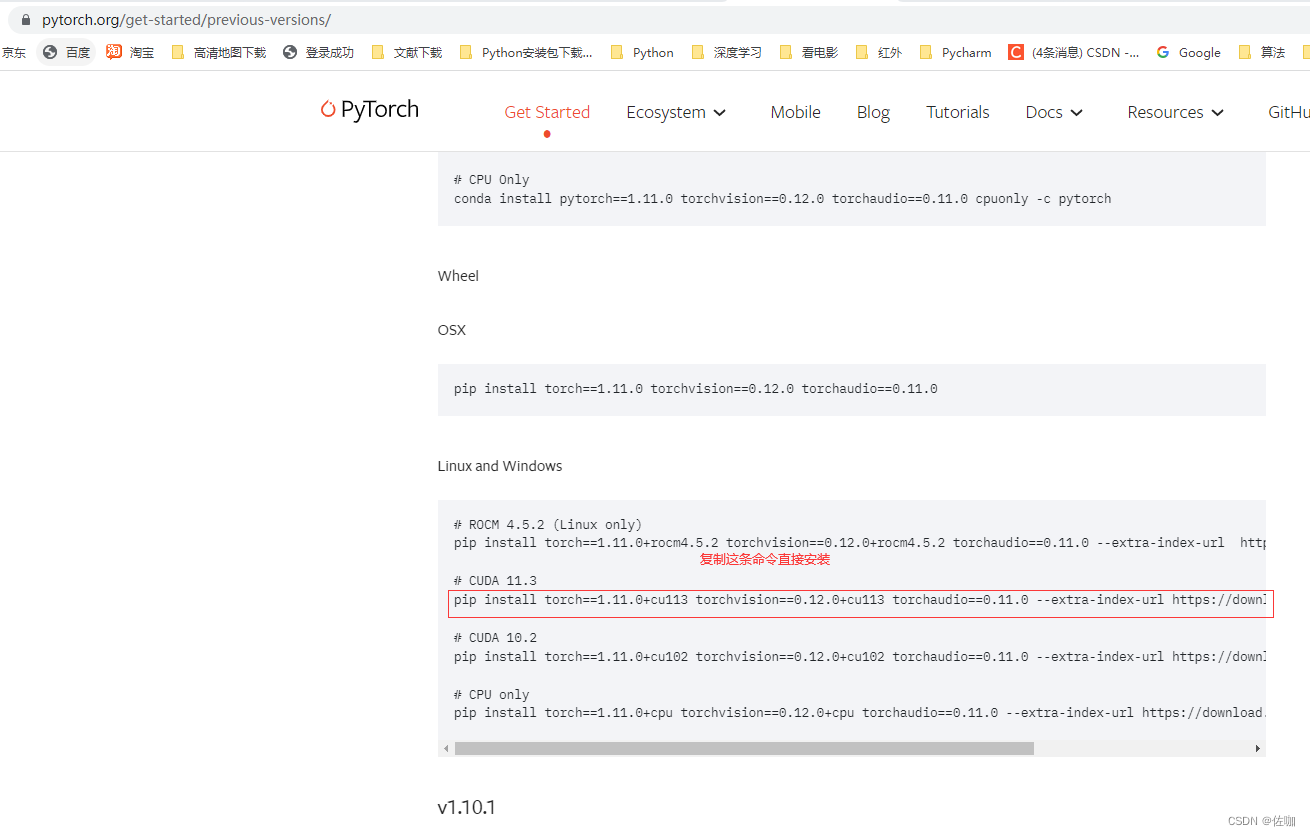
在这个链接里面给了很多安装命令,学者在安装时注意查看自己的电脑显卡型号,以及cuda版本,不知道怎么查看自己电脑显卡型号的学者看我的另外一篇博文:添加链接描述
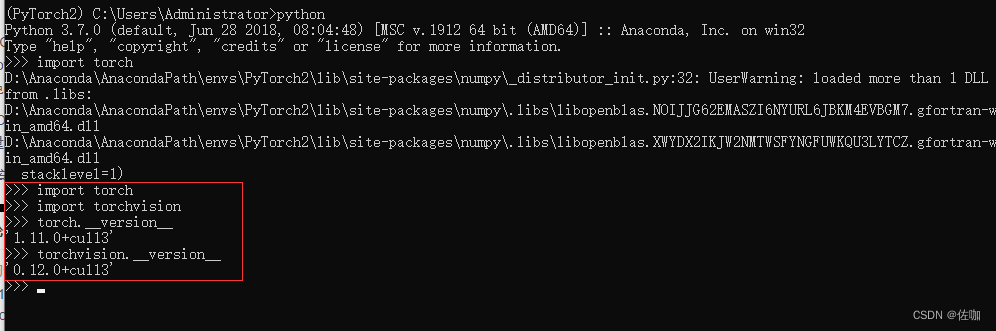
安装好torch和torchvision后,在dos命令窗口中进入对应虚拟环境中输入import torch 和import torchvision,如果都不报错,说明安装成功了,且torch和torchvision的版本也已经是对应的,如下:
三、安装nanodet包
在根目录下找到setup.py文件,并安装这个包,具体安装方法见下:
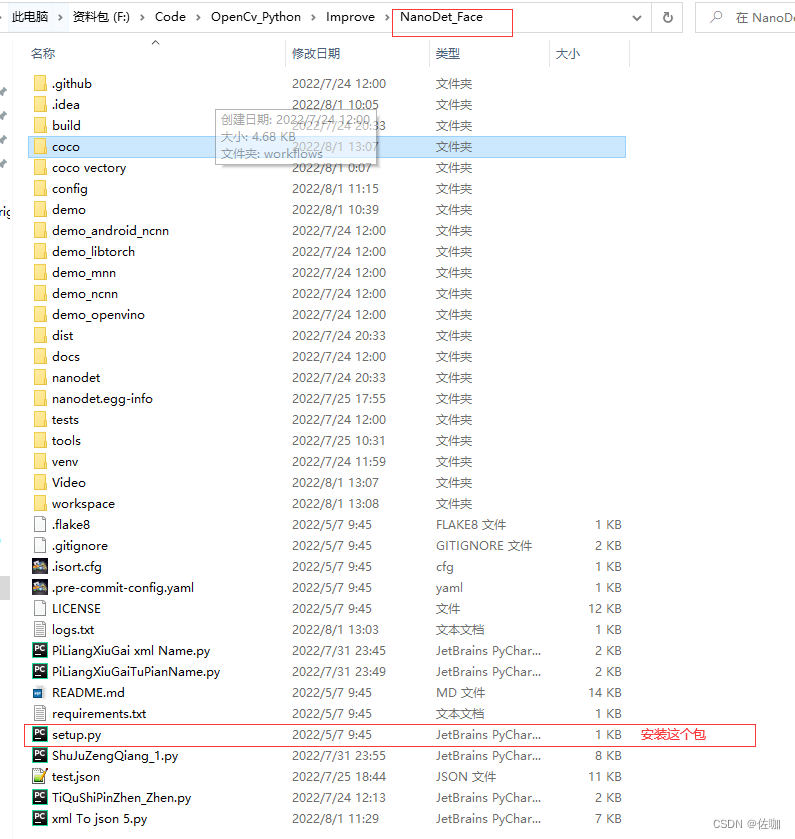
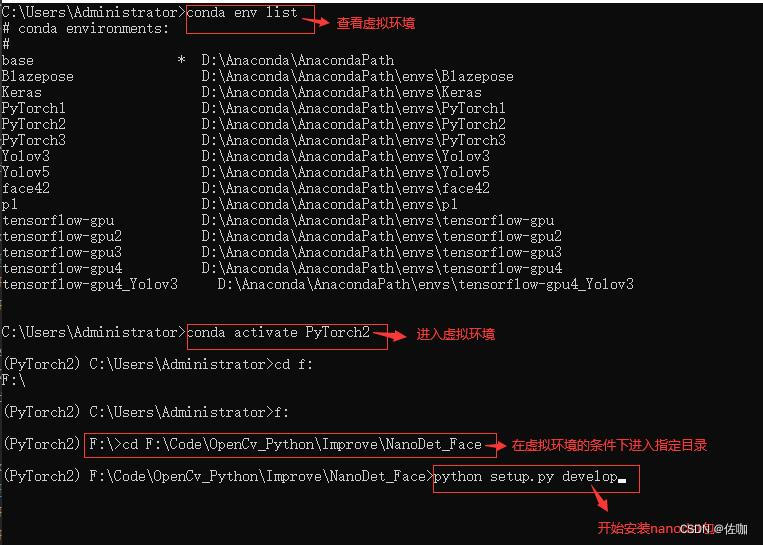
具体安装先进入到虚拟环境中,再去到根目录文件中,输入下面的安装命令回车即可安装nanodet包:
python setup.py develop
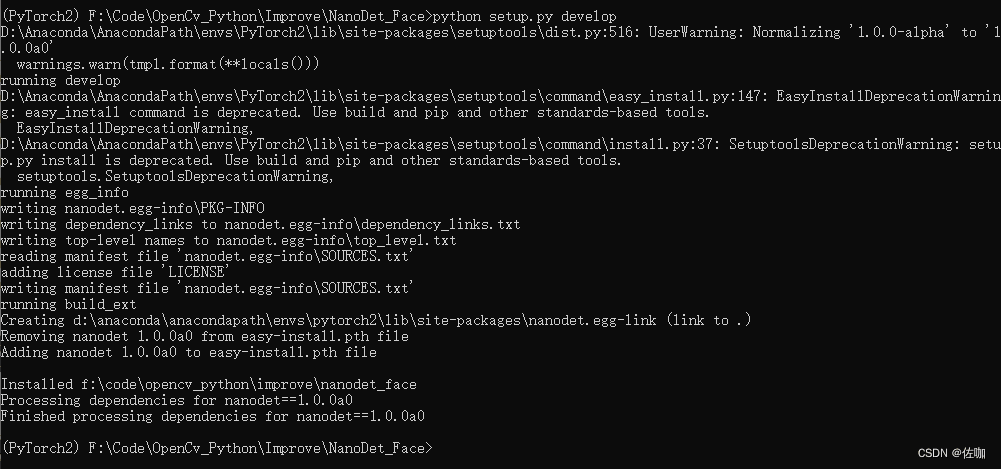
运行后如下图所示就说明nanodet包安装成功了:
四、数据集制作
1、VOC格式数据集
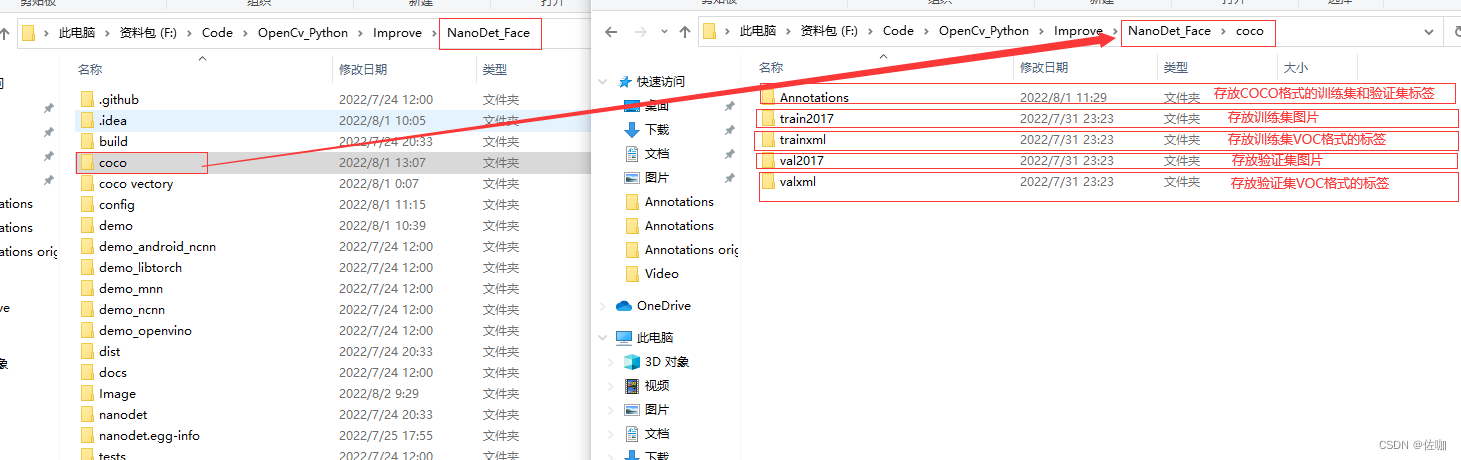
nanodet支持VOC数据集和COCO数据集,我提供的源码包中,主要是针对COCO 数据集,我先制作了VOC数据集,后又通过一段代码将VOC数据集直接转换为COCO数据集。VOC数据集的制作我使用的软件是labelimg,关于labelimg制作VOC数据集的方法,学者见我的另外一篇博客,整理的很详细,链接:添加链接描述

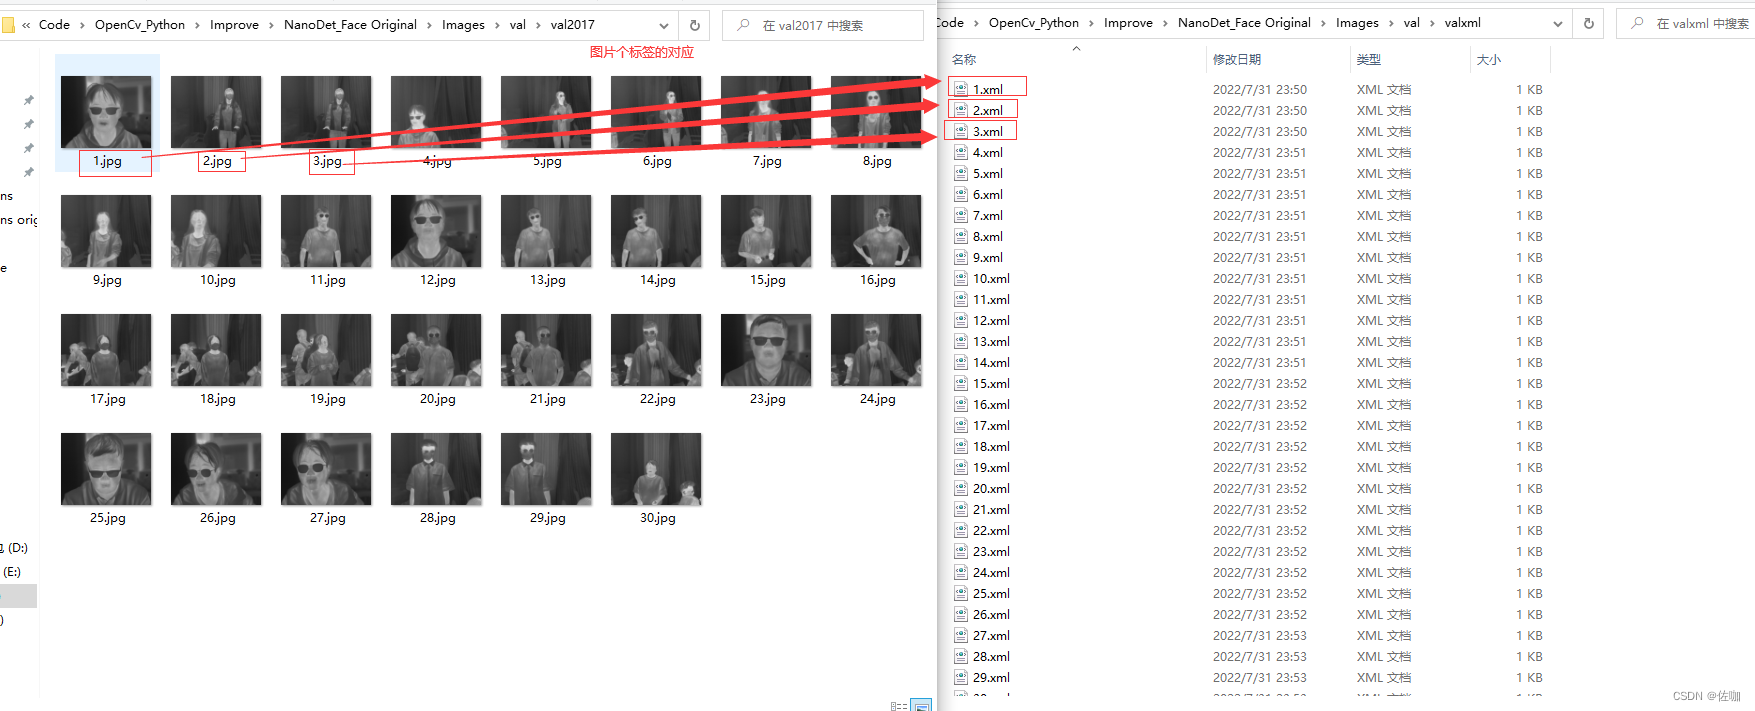
VOC数据集图片与标签文件对应的样纸见下:
2、数据增强
上面打标签制作好一部分数据集后,我们可以对数据集进行增强,即增强数据集的复杂性,增强训练模型的适应性。具体的数据增强方法见我的另外一篇博客,有详细的介绍,链接为:添加链接描述
在数据增强的代码中要修改的地方见下:
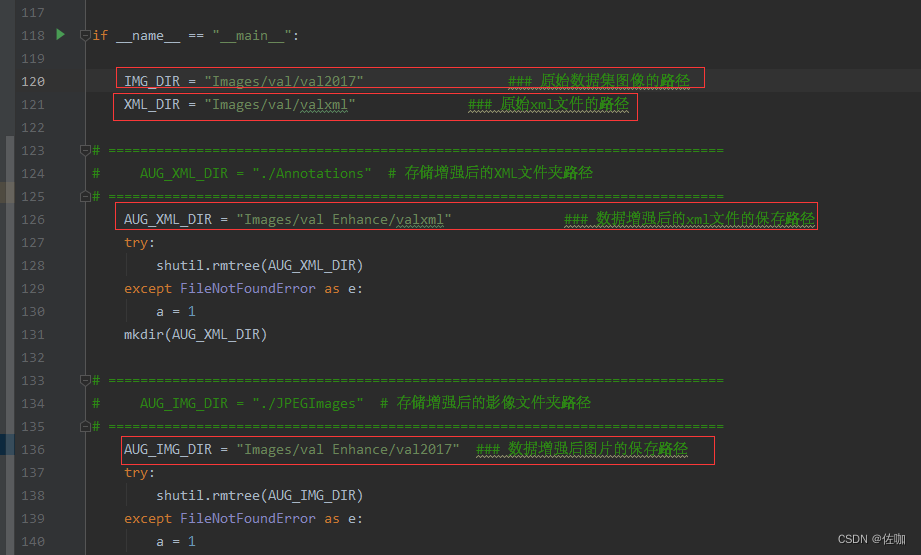

具体代码见下:
import xml.etree.ElementTree as ET
import pickle
import os
from os import getcwd
import numpy as np
from PIL import Image
import shutil
import matplotlib.pyplot as plt

import imgaug as ia
from imgaug import augmenters as iaa


ia.seed(1)


def read_xml_annotation(root, image_id):
    in_file = open(os.path.join(root, image_id))
    tree = ET.parse(in_file)
    root = tree.getroot()
    bndboxlist = []

    for object in root.findall('object'):  # 找到root节点下的所有country节点
        bndbox = object.find('bndbox')  # 子节点下节点rank的值

        xmin = int(bndbox.find('xmin').text)
        xmax = int(bndbox.find('xmax').text)
        ymin = int(bndbox.find('ymin').text)
        ymax = int(bndbox.find('ymax').text)
        # print(xmin,ymin,xmax,ymax)
        bndboxlist.append([xmin, ymin, xmax, ymax])
        # print(bndboxlist)

    bndbox = root.find('object').find('bndbox')
    return bndboxlist


# (506.0000, 330.0000, 528.0000, 348.0000) -> (520.4747, 381.5080, 540.5596, 398.6603)
def change_xml_annotation(root, image_id, new_target):
    new_xmin = new_target[0]
    new_ymin = new_target[1]
    new_xmax = new_target[2]
    new_ymax = new_target[3]

    in_file = open(os.path.join(root, str(image_id) + '.xml'))  # 这里root分别由两个意思
    tree = ET.parse(in_file)
    xmlroot = tree.getroot()
    object = xmlroot.find('object')
    bndbox = object.find('bndbox')
    xmin = bndbox.find('xmin')
    xmin.text = str(new_xmin)
    ymin = bndbox.find('ymin')
    ymin.text = str(new_ymin)
    xmax = bndbox.find('xmax')
    xmax.text = str(new_xmax)
    ymax = bndbox.find('ymax')
    ymax.text = str(new_ymax)
    tree.write(os.path.join(root, str("%06d" % (str(id) + '.xml'))))


def change_xml_list_annotation(root, image_id, new_target, saveroot, id,img_name):
    in_file = open(os.path.join(root, str(image_id) + '.xml'))  # 这里root分别由两个意思
    tree = ET.parse(in_file)
    elem = tree.find('filename')
    elem.text = (img_name + str("_%06d" % int(id)) + '.jpg')
    xmlroot = tree.getroot()
    index = 0

    for object in xmlroot.findall('object'):  # 找到root节点下的所有country节点
        bndbox = object.find('bndbox')  # 子节点下节点rank的值

        # xmin = int(bndbox.find('xmin').text)
        # xmax = int(bndbox.find('xmax').text)
        # ymin = int(bndbox.find('ymin').text)
        # ymax = int(bndbox.find('ymax').text)

        new_xmin = new_target[index][0]
        new_ymin = new_target[index][1]
        new_xmax = new_target[index][2]
        new_ymax = new_target[index][3]

        xmin = bndbox.find('xmin')
        xmin.text = str(new_xmin)
        ymin = bndbox.find('ymin')
        ymin.text = str(new_ymin)
        xmax = bndbox.find('xmax')
        xmax.text = str(new_xmax)
        ymax = bndbox.find('ymax')
        ymax.text = str(new_ymax)

        index = index + 1

    tree.write(os.path.join(saveroot, img_name + str("_%06d" % int(id)) + '.xml'))


def mkdir(path):
    # 去除首位空格
    path = path.strip()
    # 去除尾部 \ 符号
    path = path.rstrip("\\")
    # 判断路径是否存在
    # 存在     True
    # 不存在   False
    isExists = os.path.exists(path)
    # 判断结果
    if not isExists:
        # 如果不存在则创建目录
        # 创建目录操作函数
        os.makedirs(path)
        print(path + ' 创建成功')
        return True
    else:
        # 如果目录存在则不创建,并提示目录已存在
        print(path + ' 目录已存在')
        return False


if __name__ == "__main__":

    IMG_DIR = "Images/val/val2017"                  ### 原始数据集图像的路径
    XML_DIR = "Images/val/valxml"              ### 原始xml文件的路径

# =============================================================================
#     AUG_XML_DIR = "./Annotations"  # 存储增强后的XML文件夹路径
# =============================================================================
    AUG_XML_DIR = "Images/val Enhance/valxml"              ### 数据增强后的xml文件的保存路径
    try:
        shutil.rmtree(AUG_XML_DIR)
    except FileNotFoundError as e:
        a = 1
    mkdir(AUG_XML_DIR)

# =============================================================================
#     AUG_IMG_DIR = "./JPEGImages"  # 存储增强后的影像文件夹路径
# =============================================================================
    AUG_IMG_DIR = "Images/val Enhance/val2017"  ### 数据增强后图片的保存路径
    try:
        shutil.rmtree(AUG_IMG_DIR)
    except FileNotFoundError as e:
        a = 1
    mkdir(AUG_IMG_DIR)

    AUGLOOP = 10  # 每张影像增强的数量

    boxes_img_aug_list = []
    new_bndbox = []
    new_bndbox_list = []

    # 影像增强
    seq = iaa.Sequential([
        iaa.Flipud(0.5),  # vertically flip 20% of all images
        iaa.Fliplr(0.5),  # 镜像
        iaa.Multiply((1.2, 1.5)),  # change brightness, doesn't affect BBs
        iaa.GaussianBlur(sigma=(0, 3.0)),  # iaa.GaussianBlur(0.5),
        iaa.Affine(
            translate_px={

    "x": 15, "y": 15},
            scale=(0.8, 0.95),
            rotate=(-30, 30)
        )  # translate by 40/60px on x/y axis, and scale to 50-70%, affects BBs
    ])

    for root, sub_folders, files in os.walk(XML_DIR):

        for name in files:
            print(name)
            bndbox = read_xml_annotation(XML_DIR, name)
            shutil.copy(os.path.join(XML_DIR, name), AUG_XML_DIR)
            shutil.copy(os.path.join(IMG_DIR, name[:-4] + '.jpg'), AUG_IMG_DIR)

            for epoch in range(AUGLOOP):
                seq_det = seq.to_deterministic()  # 保持坐标和图像同步改变,而不是随机
                # 读取图片
                img = Image.open(os.path.join(IMG_DIR, name[:-4] + '.jpg'))
                # sp = img.size
                img = np.asarray(img)
                # bndbox 坐标增强
                for i in range(len(bndbox)):
                    bbs = ia.BoundingBoxesOnImage([
                        ia.BoundingBox(x1=bndbox[i][0], y1=bndbox[i][1], x2=bndbox[i][2], y2=bndbox[i][3]),
                    ], shape=img.shape)

                    bbs_aug = seq_det.augment_bounding_boxes([bbs])[0]
                    boxes_img_aug_list.append(bbs_aug)

                    # new_bndbox_list:[[x1,y1,x2,y2],...[],[]]
                    n_x1 = int(max(1, min(img.shape[1], bbs_aug.bounding_boxes[0].x1)))
                    n_y1 = int(max(1, min(img.shape[0], bbs_aug.bounding_boxes[0].y1)))
                    n_x2 = int(max(1, min(img.shape[1], bbs_aug.bounding_boxes[0].x2)))
                    n_y2 = int(max(1, min(img.shape[0], bbs_aug.bounding_boxes[0].y2)))
                    if n_x1 == 1 and n_x1 == n_x2:
                        n_x2 += 1
                    if n_y1 == 1 and n_y2 == n_y1:
                        n_y2 += 1
                    if n_x1 >= n_x2 or n_y1 >= n_y2:
                        print('error', name)
                    new_bndbox_list.append([n_x1, n_y1, n_x2, n_y2])
                # 存储变化后的图片
                image_aug = seq_det.augment_images([img])[0]
                path = os.path.join(AUG_IMG_DIR,
                                    name[:-4] + str( "_%06d" % (epoch + 1)) + '.jpg')
                image_auged = bbs.draw_on_image(image_aug, thickness=0)
                Image.fromarray(image_auged).save(path)

                # 存储变化后的XML
                change_xml_list_annotation(XML_DIR, name[:-4], new_bndbox_list, AUG_XML_DIR,
                                           epoch + 1,name[:-4])
                print( name[:-4] + str( "_%06d" % (epoch + 1)) + '.jpg')
                new_bndbox_list = []
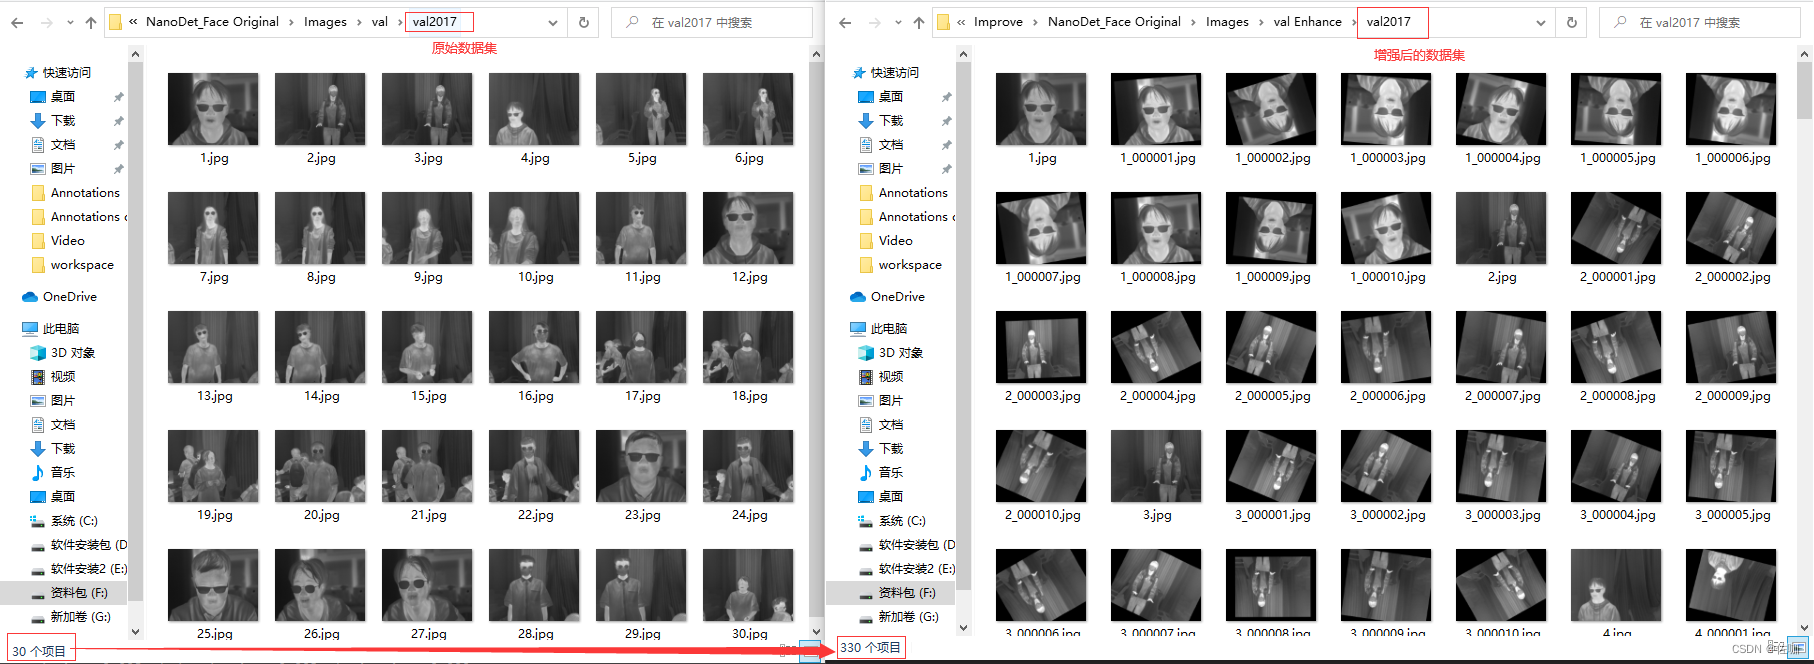
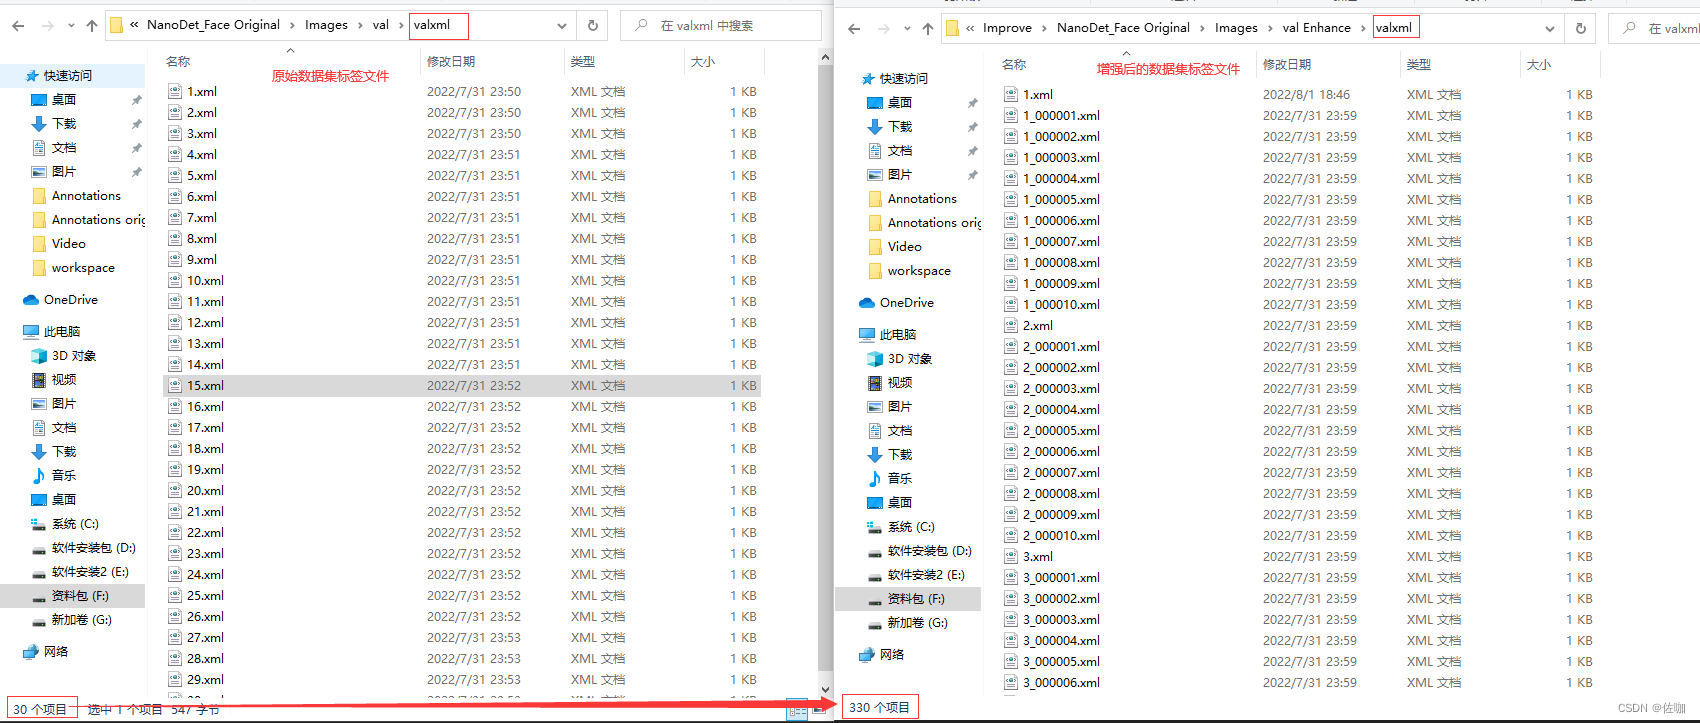
增强后的数据集图片和对应标签文件都增多了,具体见下:
3、VOC格式数据集转COCO格式数据集
上面的VOC格式数据集制作好后,只需要通过下面的一段代码,即可将VOC格式数据集转换为COCO数据集,代码中需要的地方见下:

具体代码见下:
### 用这个将xml转化为json格式可以正常的训练

import xml.etree.ElementTree as ET
import os
import json

coco = dict()
coco['images'] = []
coco['type'] = 'instances'
coco['annotations'] = []
coco['categories'] = []

category_set = dict()
image_set = set()

category_item_id = 0
# image_id = 'ball-'
image_id = 0
id_num = 0
annotation_id = 0


def addCatItem(name):
    global category_item_id
    category_item = dict()
    category_item['supercategory'] = 'none'
    category_item_id += 1
    category_item['id'] = category_item_id
    category_item['name'] = name
    coco['categories'].append(category_item)
    category_set[name] = category_item_id
    return category_item_id


def addImgItem(file_name, size):
    global image_id, id_num
    if file_name is None:
        raise Exception('Could not find filename tag in xml file.')
    if size['width'] is None:
        raise Exception('Could not find width tag in xml file.')
    if size['height'] is None:
        raise Exception('Could not find height tag in xml file.')

    image_item = dict()
    # temp = str(id_num)
    temp = int(id_num)
    # image_item['id'] = image_id + temp
    image_item['id'] = temp
    id_num += 1
    image_item['file_name'] = file_name
    image_item['width'] = size['width']
    image_item['height'] = size['height']
    coco['images'].append(image_item)
    image_set.add(file_name)
    return image_item['id']


def addAnnoItem(object_name, image_id, category_id, bbox):
    global annotation_id
    annotation_item = dict()
    annotation_item['segmentation'] = []
    seg = []
    # bbox[] is x,y,w,h
    # left_top
    seg.append(bbox[0])
    seg.append(bbox[1])
    # left_bottom
    seg.append(bbox[0])
    seg.append(bbox[1] + bbox[3])
    # right_bottom
    seg.append(bbox[0] + bbox[2])
    seg.append(bbox[1] + bbox[3])
    # right_top
    seg.append(bbox[0] + bbox[2])
    seg.append(bbox[1])

    annotation_item['segmentation'].append(seg)

    annotation_item['area'] = bbox[2] * bbox[3]
    annotation_item['iscrowd'] = 0
    annotation_item['ignore'] = 0
    annotation_item['image_id'] = image_id
    annotation_item['bbox'] = bbox
    annotation_item['category_id'] = category_id
    annotation_id += 1
    annotation_item['id'] = annotation_id
    coco['annotations'].append(annotation_item)


def parseXmlFiles(xml_path):
    for f in os.listdir(xml_path):
        if not f.endswith('.xml'):
            continue

        bndbox = dict()
        size = dict()
        current_image_id = None
        current_category_id = None
        file_name = None
        size['width'] = None
        size['height'] = None
        size['depth'] = None

        xml_file = os.path.join(xml_path, f)
        print(xml_file)

        tree = ET.parse(xml_file)
        root = tree.getroot()
        if root.tag != 'annotation':
            raise Exception('pascal voc xml root element should be annotation, rather than {}'.format(root.tag))

        # elem is <folder>, <filename>, <size>, <object>
        for elem in root:
            current_parent = elem.tag
            current_sub = None
            object_name = None

            if elem.tag == 'folder':
                continue

            if elem.tag == 'filename':
                file_name = elem.text
                if file_name in category_set:
                    raise Exception('file_name duplicated')

            # add img item only after parse <size> tag
            elif current_image_id is None and file_name is not None and size['width'] is not None:
                if file_name not in image_set:
                    current_image_id = addImgItem(file_name, size)
                    print('add image with {} and {}'.format(file_name, size))
                else:
                    raise Exception('duplicated image: {}'.format(file_name))
                    # subelem is <width>, <height>, <depth>, <name>, <bndbox>
            for subelem in elem:
                bndbox['xmin'] = None
                bndbox['xmax'] = None
                bndbox['ymin'] = None
                bndbox['ymax'] = None

                current_sub = subelem.tag
                if current_parent == 'object' and subelem.tag == 'name':
                    object_name = subelem.text
                    if object_name not in category_set:
                        current_category_id = addCatItem(object_name)
                    else:
                        current_category_id = category_set[object_name]

                elif current_parent == 'size':
                    if size[subelem.tag] is not None:
                        raise Exception('xml structure broken at size tag.')
                    size[subelem.tag] = int(subelem.text)

                # option is <xmin>, <ymin>, <xmax>, <ymax>, when subelem is <bndbox>
                for option in subelem:
                    if current_sub == 'bndbox':
                        if bndbox[option.tag] is not None:
                            raise Exception('xml structure corrupted at bndbox tag.')
                        bndbox[option.tag] = int(option.text)

                # only after parse the <object> tag
                if bndbox['xmin'] is not None:
                    if object_name is None:
                        raise Exception('xml structure broken at bndbox tag')
                    if current_image_id is None:
                        raise Exception('xml structure broken at bndbox tag')
                    if current_category_id is None:
                        raise Exception('xml structure broken at bndbox tag')
                    bbox = []
                    # x
                    bbox.append(bndbox['xmin'])
                    # y
                    bbox.append(bndbox['ymin'])
                    # w
                    bbox.append(bndbox['xmax'] - bndbox['xmin'])
                    # h
                    bbox.append(bndbox['ymax'] - bndbox['ymin'])
                    print('add annotation with {},{},{},{}'.format(object_name, current_image_id, current_category_id,
                                                                   bbox))
                    addAnnoItem(object_name, current_image_id, current_category_id, bbox)


if __name__ == '__main__':

    xml_path = "coco/trainxml"  ## 原始的xml文件路径
    json_file = 'coco/annotations/instances_train2017.json'  ## 转后保存.json文件的路径
    #
    # xml_path = "coco/valxml"  ## 原始的xml文件路径
    # json_file = 'coco/annotations/instances_val2017.json'  ## 转后保存.json文件的路径

    parseXmlFiles(xml_path)
    json.dump(coco, open(json_file, 'w'))
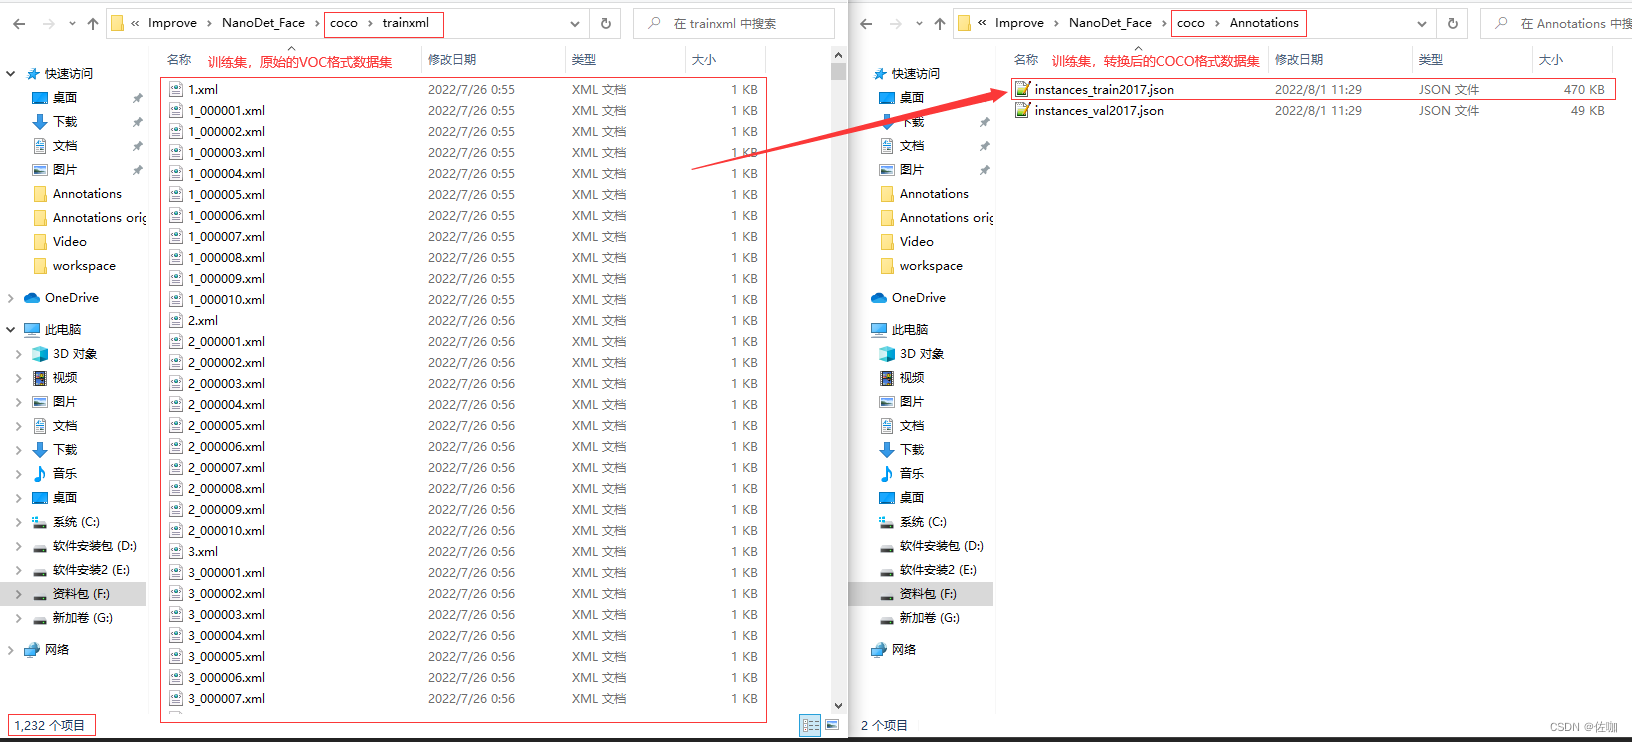
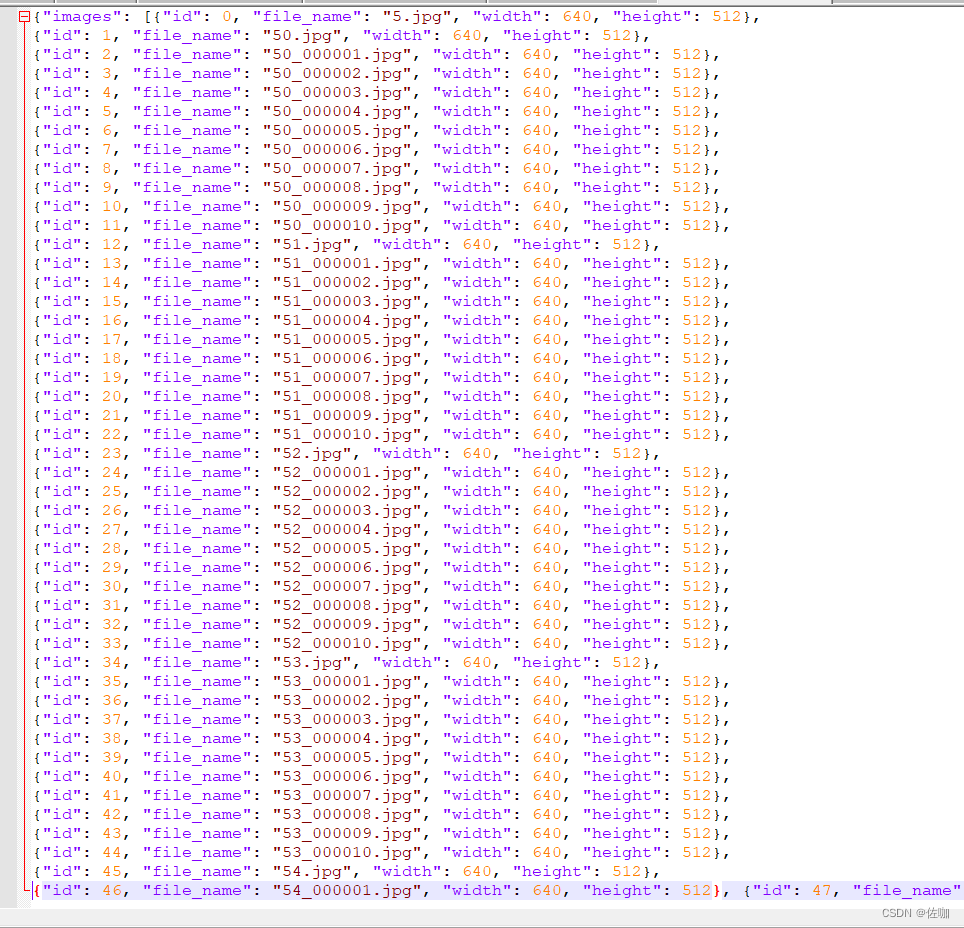
上面代码是将训练集或验证集里面的所有.xml标签文件转化为一个.json文件,具体转换后的效果见下:

转换后的.json文件中标签的样纸见下:
4、坑
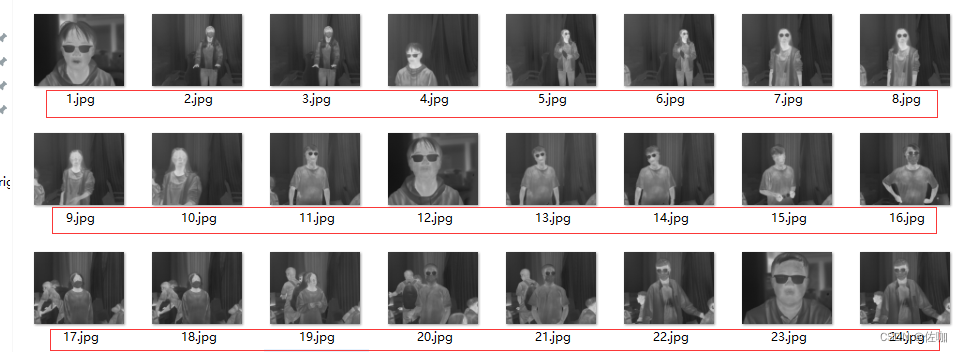
学者自己制作数据集的时候,图片名字最好命名为1.jpg,2.jpg这种格式(如下图),不要命名为(1).jpg,(2).jpg这种格式,如果命名为后面这种格式,后期训练会遇到各种麻烦问题,报错等。
注:图片格式其它的也行,不是非得.jpg格式,主要是图片名要注意。
如果学者想快速批量修改数据集中图片名,具体方法见我的另外一篇博客,链接为:添加链接描述。想要快速批量修改VOC格式数据集中标签名,即快速批量修改.xml文件名,见我另外一篇博客,链接为:添加链接描述
五、训练数据集
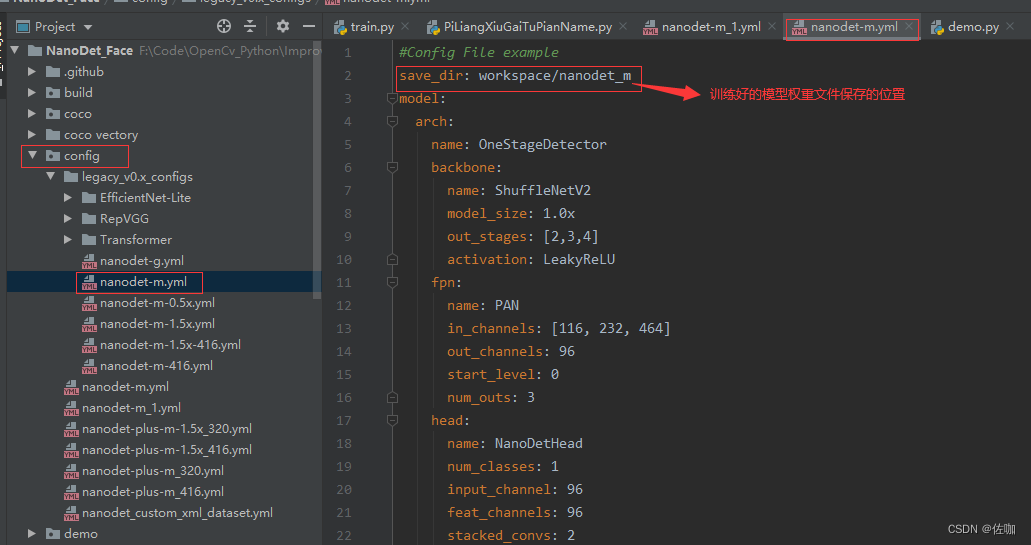
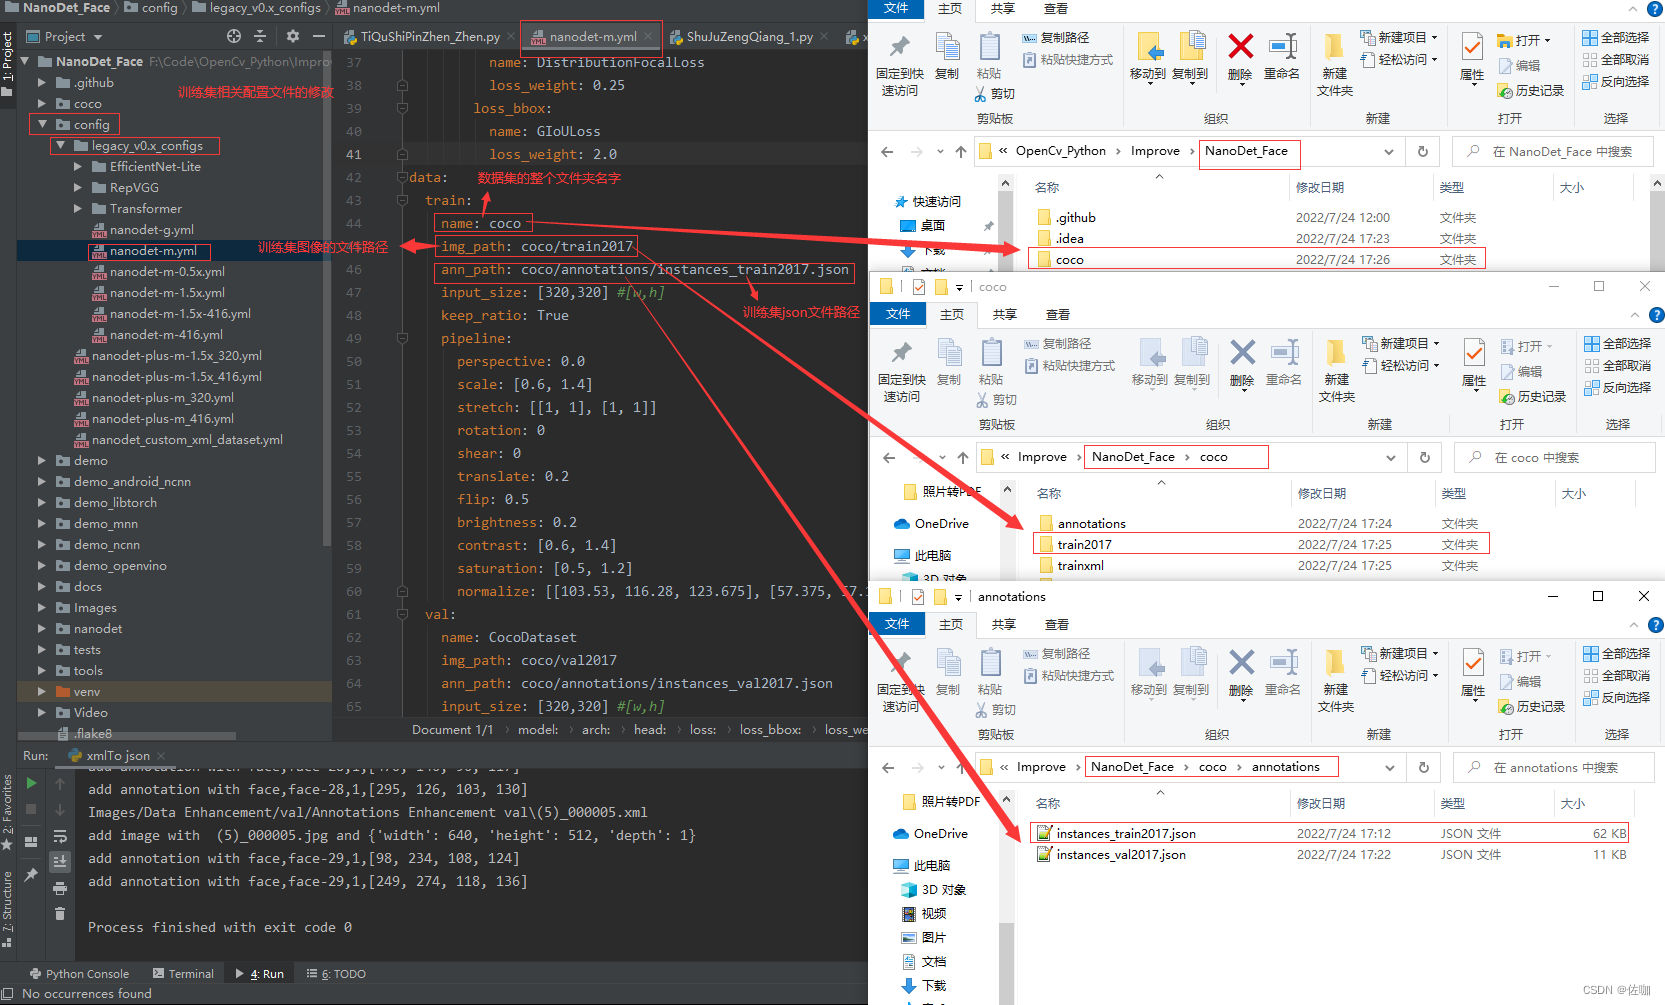
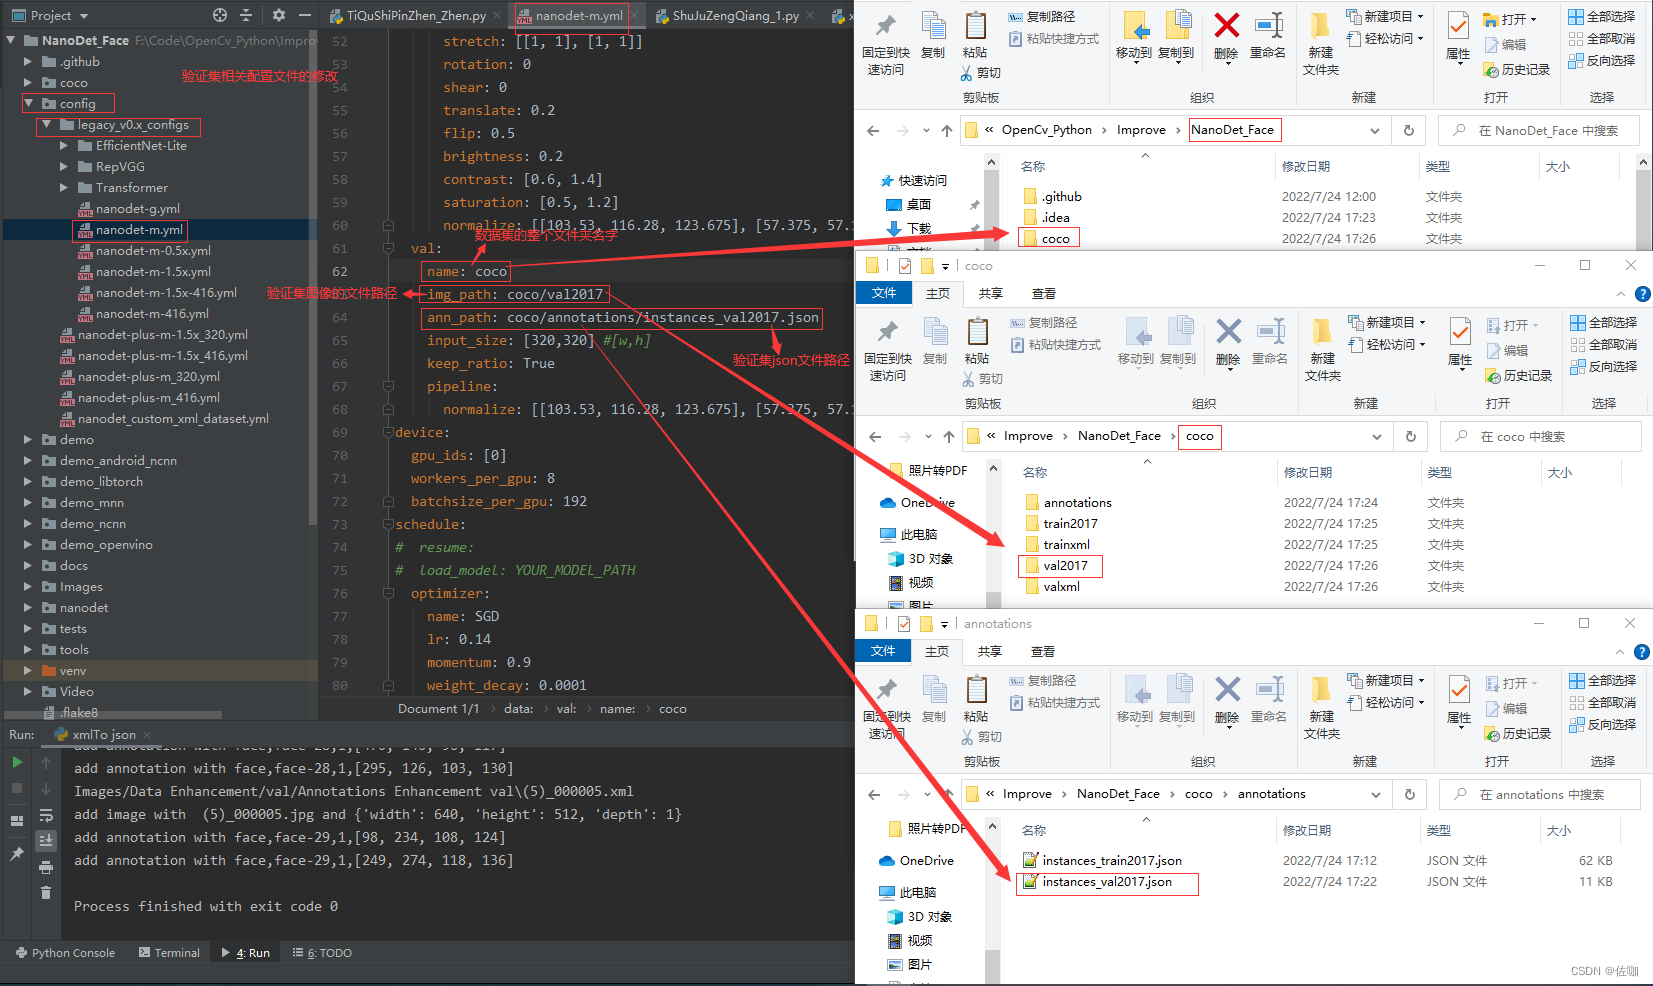
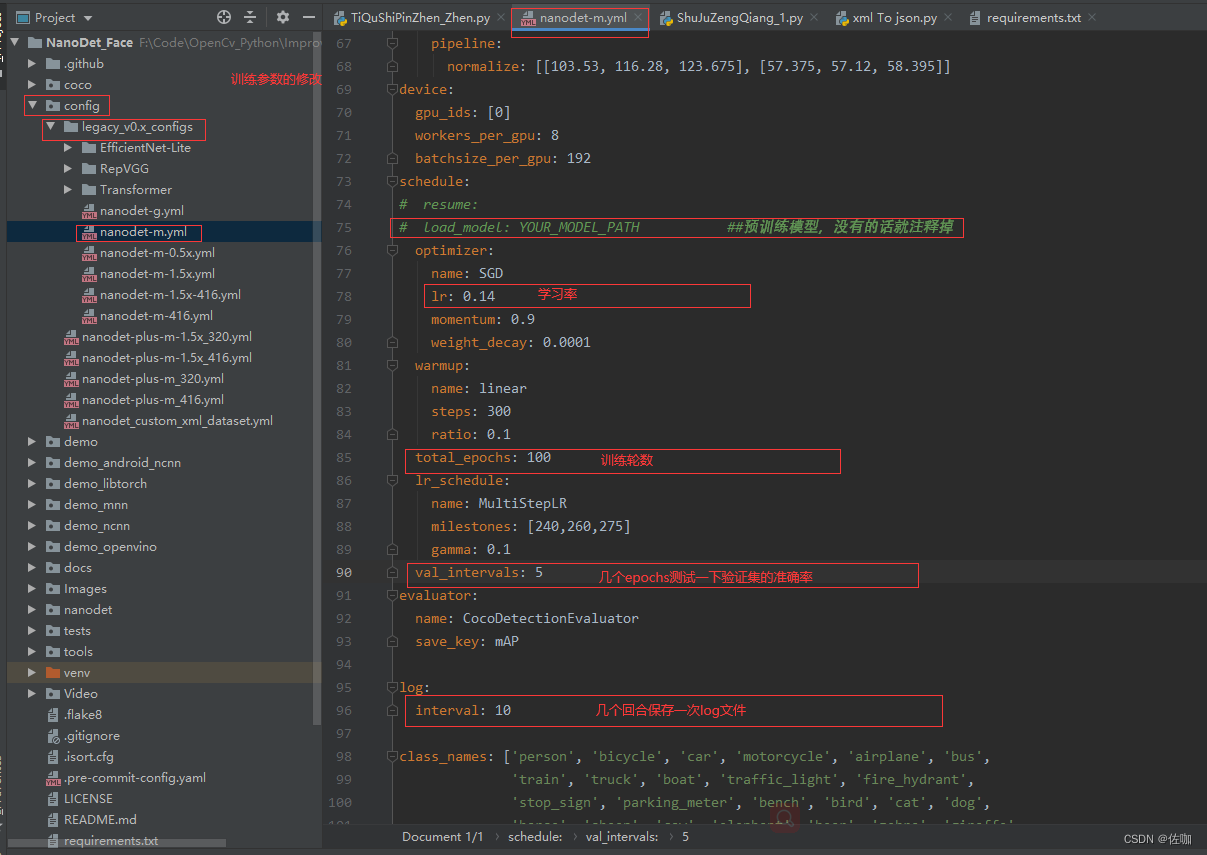
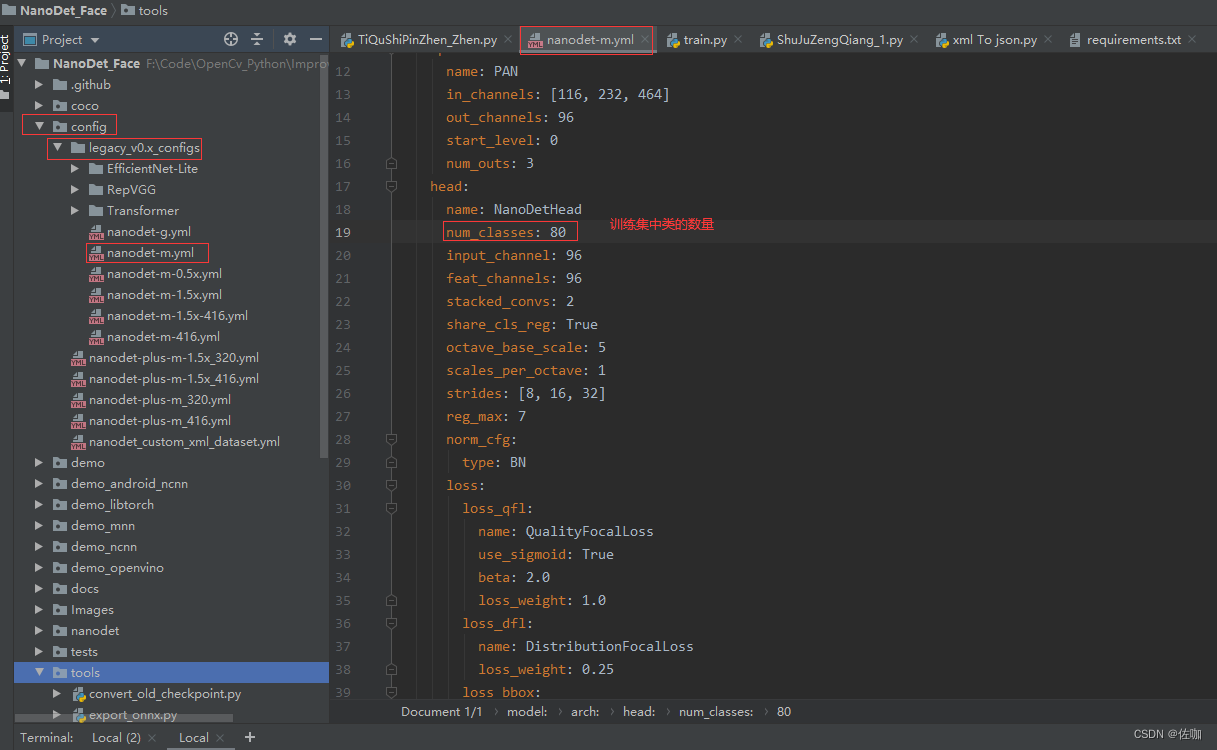
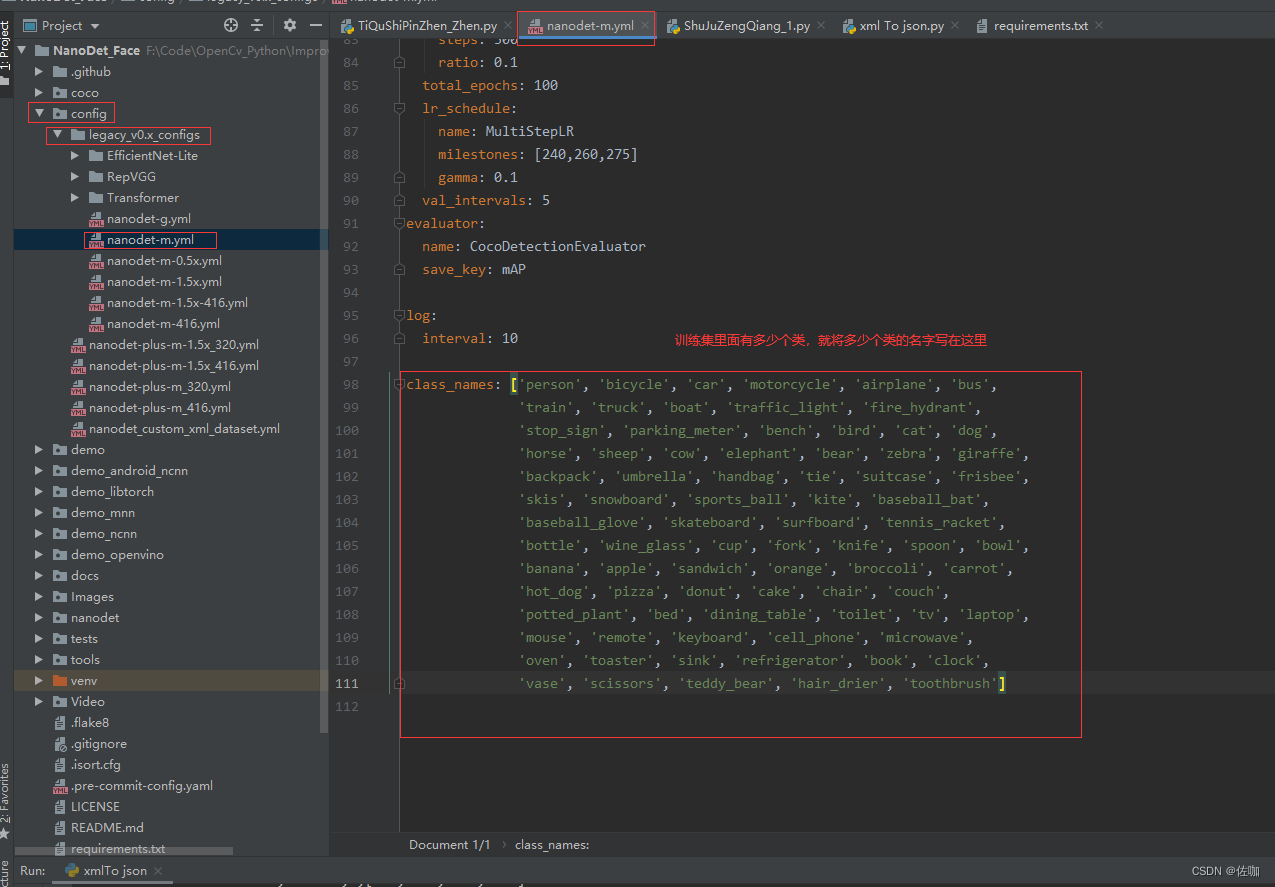
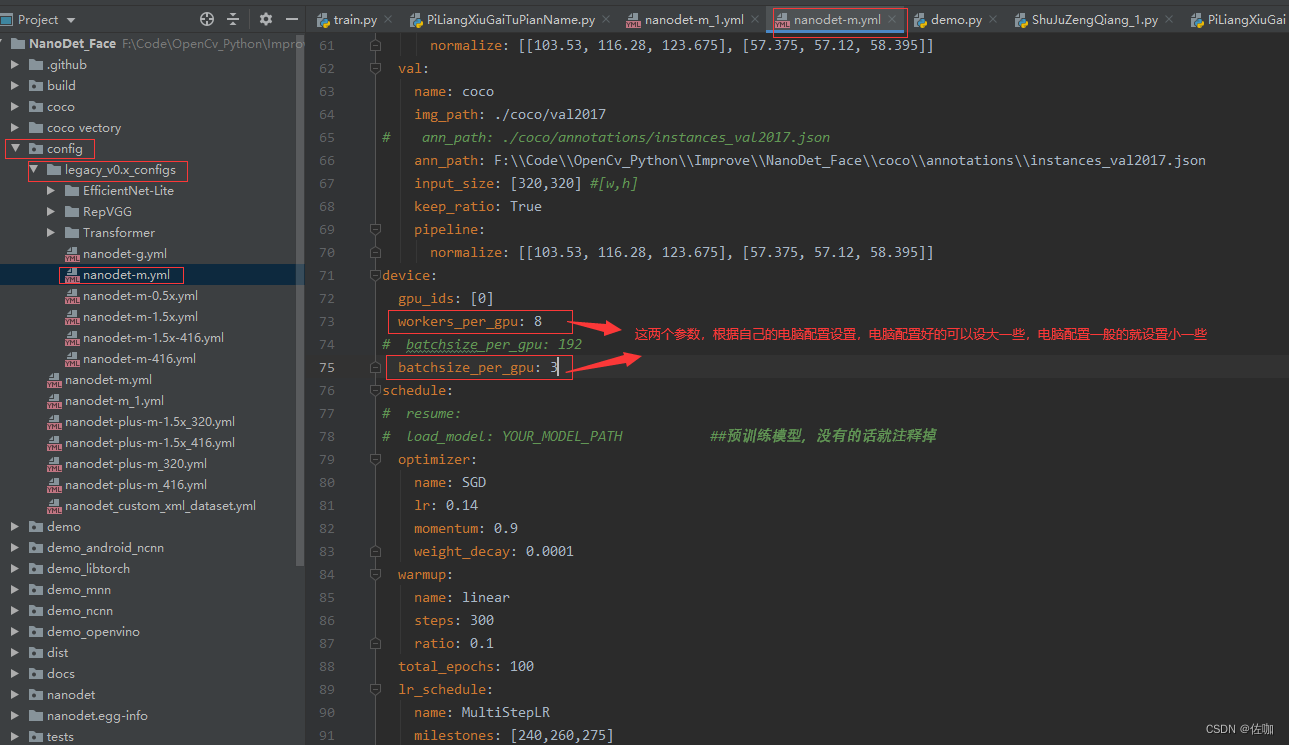
1、配置文件的修改
在正式训练前需要在配置文件中修改几处地方,具体的修改位置见下:
2、开始训练
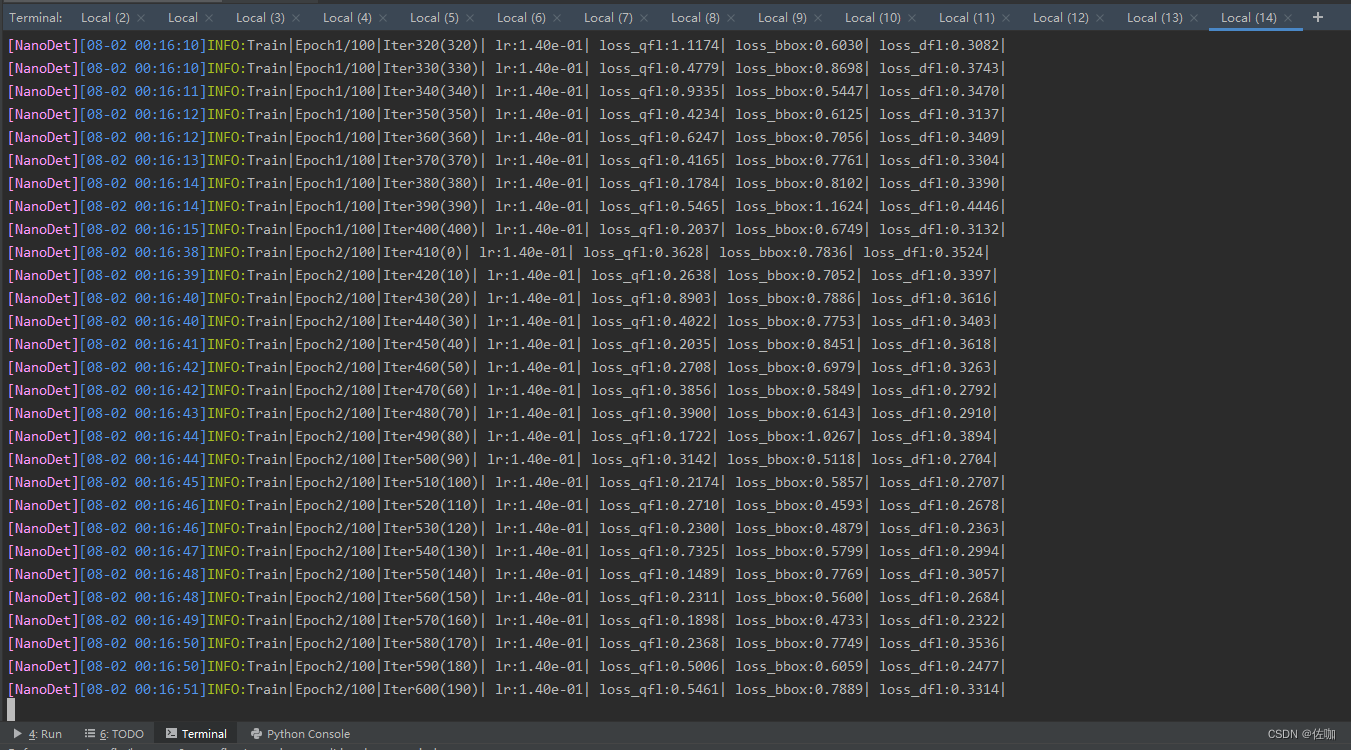
在控制台中输入下面命令回车等待就开始训练了,见下:
python tools/train.py ./config/legacy_v0.x_configs/nanodet-m.yml

回车后如下面这个样纸就说明在正常训练了,等待训练完即可:
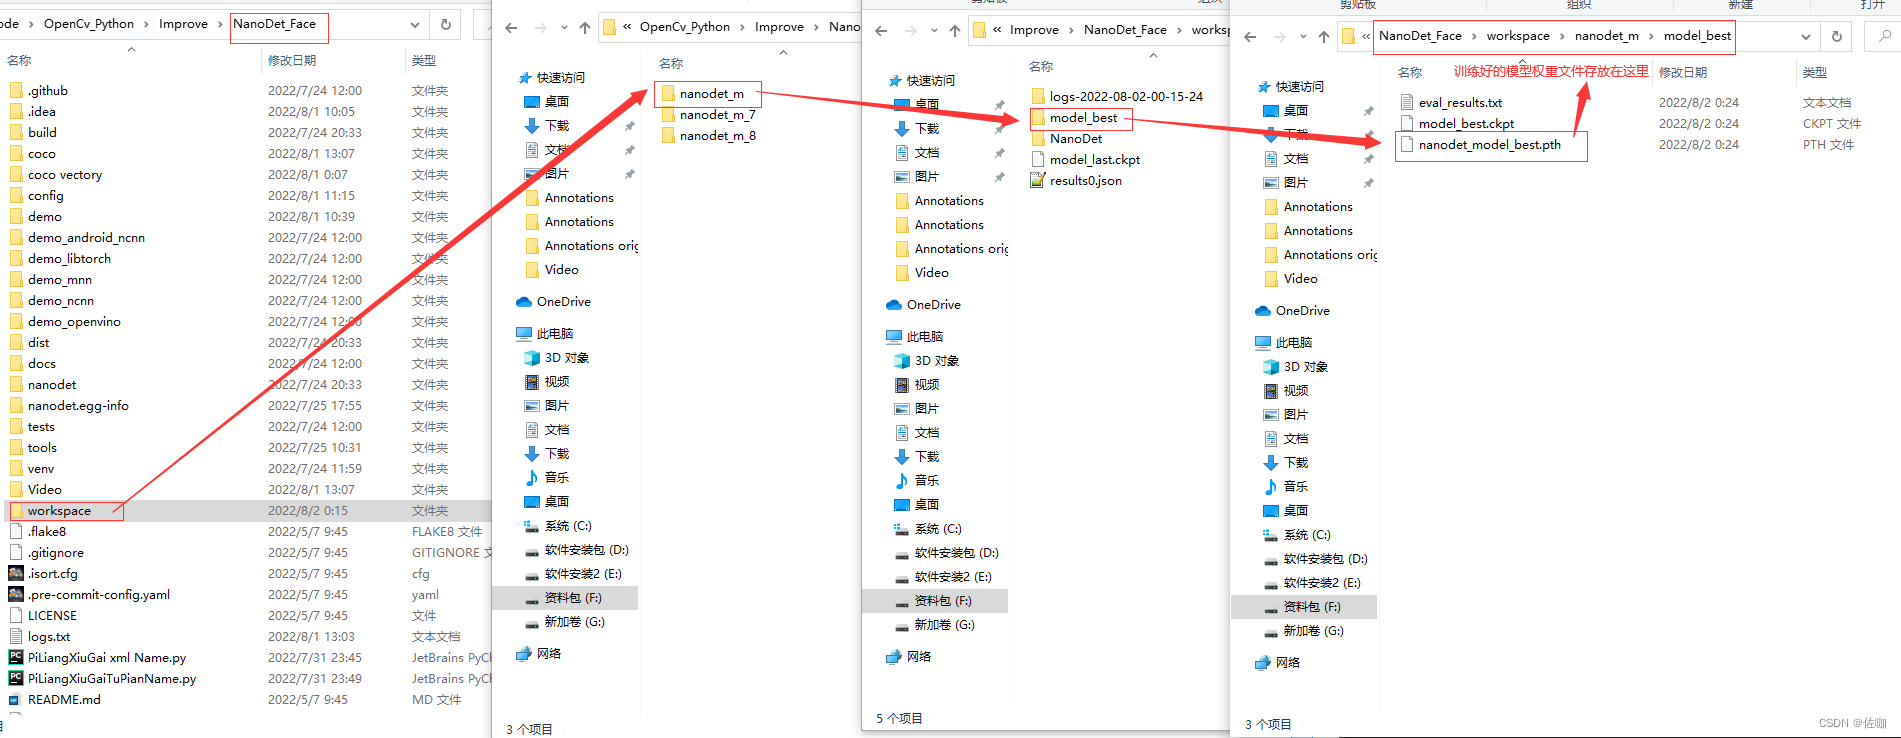
在这个训练过程中,训练好的模型权重文件会被存放到根目录下的workspace文件夹中,具体位置见下:
六、测试训练好的模型
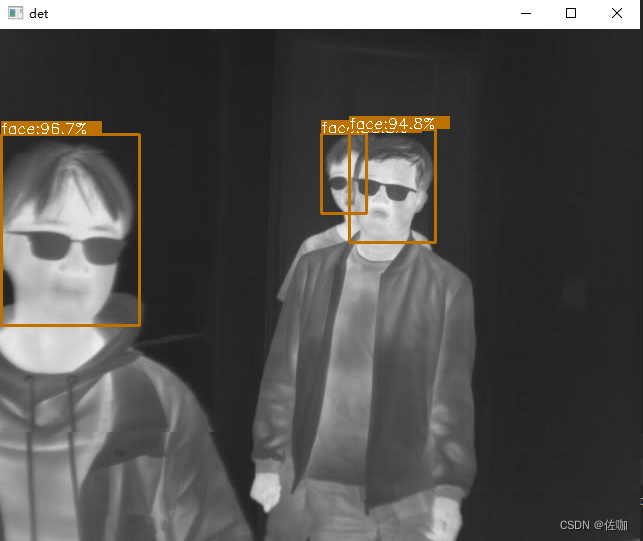
漫长的等待训练好后,我们测试一下模型的实际检测效果。
1、检测图片
如果想要测试某张图片,则使用下面的命令:
其中,CONFIG_PATH 为开始的config文件,MODEL_PATH 为刚刚生成的pth文件,IMAGE_PATH为图片的路径。
python demo/demo.py image --config CONFIG_PATH --model MODEL_PATH --path IMAGE_PATH
比如我自己训练好后调用我自己的模型则输入:
python demo/demo.py image --config ./config/legacy_v0.x_configs/nanodet-m.yml --model ./workspace/nanodet_m/model_best/nanodet_model_best.pth --path ./coco/val2017/53.jpg
2、检测视频
其中,CONFIG_PATH 为开始的config文件,MODEL_PATH 为刚刚生成的pth文件,VIDEO_PATH为视频的路径。
python demo/demo.py video --config CONFIG_PATH --model MODEL_PATH --path VIDEO_PATH
比如我自己训练好后调用我自己的模型则输入:
python demo/demo.py video --config ./config/legacy_v0.x_configs/nanodet-m.yml --model ./workspace/nanodet_m/model_best/nanodet_model_best.pth --path ./Video/dai.avi
3、调用电脑摄像头
其中,CONFIG_PATH 为开始的config文件,MODEL_PATH 为刚刚生成的pth文件,0为调用电脑自带的摄像头。
输入下面命令即可调用电脑摄像头检测:
python demo/demo.py webcam --config CONFIG_PATH --model MODEL_PATH --path 0
比如我自己训练好后调用我自己的模型则输入:
python demo/demo.py webcam --config ./config/legacy_v0.x_configs/nanodet-m.yml --model ./workspace/nanodet_m/model_best/nanodet_model_best.pth --path 0
七、总结
上面的教程中我提供了少量的数据集,以及训练好的模型,学者按照我上面的步骤,先准备好数据集,后再训练,最后测试,在这个过程中每个人都会遇到不同的问题,实在解决不了的问题可以在下面评论,我看到会及时回复。
希望此教程能帮助到你快速上手使用nanodet,总结教程不易,多多支持,谢谢!