前言
目前,springboot已然成为了最热的java开发整合框架,主要是因其简单的配置,并且本身提供了很多与第三方框架的整合,甚至可以让我们在短短的几分钟里就可以搭建一个完整的项目架构。所以,博主打算近期写一些springboot整合案例,也不知道先写哪个,那就从最近的写起吧, 言归正传。。。
今天博主要说的是Springboot整合RabbitMQ,那么,Let's start...
1、新建一个springboot工程(博主这里使用的是IDEA)
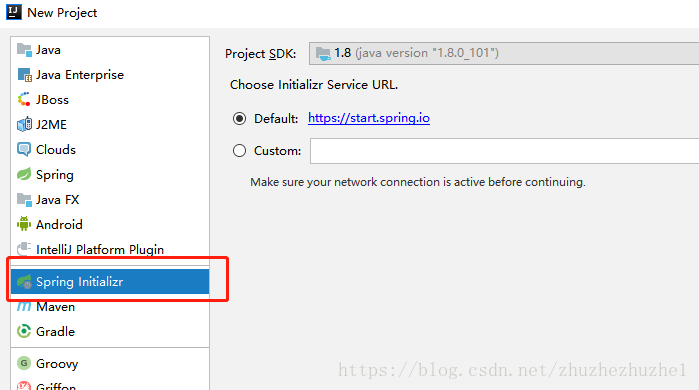
关于具体怎么创建一个springboot工程,博主这里就不多做说明了(很easy的事情)。
2、添加依赖
这个大家再熟悉不过了,也很简单。
                <!-- rabbitmq依赖 -->
		<dependency>
			<groupId>org.springframework.boot</groupId>
			<artifactId>spring-boot-starter-amqp</artifactId>
		</dependency>
3、在application.yml文件中进行RabbitMQ的相关配置
先上代码
spring:
  rabbitmq:
    host: 116.85.33.91
    port: 5672
    username: guest
    password: password
    publisher-confirms: true    #  消息发送到交换机确认机制,是否确认回调
server:
  port: 8080
关于上面的几行配置相信用过springboot的同学都明白,这里主要做以下说明:
首先,确保你的RabbitMQ已经安装好,并且已经启动,在你的本地确实可以连接的上(关于RabbitMQ的安装和相关配置博主在这里不做多说,要不未免有些偏题,后续博主会专门出一篇文章详解的 )。
)。
RabbitMQ的安装和相关配置 https://blog.csdn.net/zhuzhezhuzhe1/article/details/80464291
接下来,就可以开始撸代码了。。。先上一张图
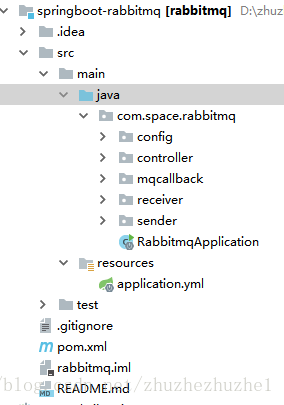
4、进行相关配置
大家可以看到上图中的config包,这里就是相关配置类
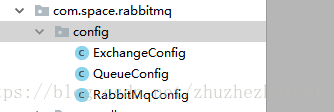
这里博主一共写了三个配置类,其实我们完全可以把这三个写在一个配置类中,不过在这里博主为了便于大家理解,特地写了三个,在实际开发中,如果允许的话,博主也是建议写成三个(个人建议)。
下面,就这三个配置类,做下说明:(这里需要大家对RabbitMQ有一定的了解,知道生产者、消费者、消息交换机、队列等)
ExchangeConfig 消息交换机配置
package com.space.rabbitmq.config;

import org.springframework.amqp.core.DirectExchange;
import org.springframework.context.annotation.Bean;
import org.springframework.context.annotation.Configuration;

/**
 * 消息交换机配置  可以配置多个
 * @author zhuzhe
 * @date 2018/5/25 15:40
 * @email [email protected]
 */
@Configuration
public class ExchangeConfig {

    /**
     *   1.定义direct exchange,绑定queueTest
     *   2.durable="true" rabbitmq重启的时候不需要创建新的交换机
     *   3.direct交换器相对来说比较简单,匹配规则为:如果路由键匹配,消息就被投送到相关的队列
     *     fanout交换器中没有路由键的概念,他会把消息发送到所有绑定在此交换器上面的队列中。
     *     topic交换器你采用模糊匹配路由键的原则进行转发消息到队列中
     *   key: queue在该direct-exchange中的key值,当消息发送给direct-exchange中指定key为设置值时,
     *   消息将会转发给queue参数指定的消息队列
     */
    @Bean
    public DirectExchange directExchange(){
        DirectExchange directExchange = new DirectExchange(RabbitMqConfig.EXCHANGE,true,false);
        return directExchange;
    }
}
QueueConfig 队列配置
package com.space.rabbitmq.config;

import org.springframework.amqp.core.Queue;
import org.springframework.context.annotation.Bean;
import org.springframework.context.annotation.Configuration;

/**
 * 队列配置  可以配置多个队列
 * @author zhuzhe
 * @date 2018/5/25 13:25
 * @email [email protected]
 */
@Configuration
public class QueueConfig {

    @Bean
    public Queue firstQueue() {
        /**
         durable="true" 持久化 rabbitmq重启的时候不需要创建新的队列
         auto-delete 表示消息队列没有在使用时将被自动删除 默认是false
         exclusive  表示该消息队列是否只在当前connection生效,默认是false
         */
        return new Queue("first-queue",true,false,false);
    }

    @Bean
    public Queue secondQueue() {
        return new Queue("second-queue",true,false,false);
    }
}
RabbitMqConfig RabbitMq配置
package com.space.rabbitmq.config;

import com.space.rabbitmq.mqcallback.MsgSendConfirmCallBack;
import org.springframework.amqp.core.AcknowledgeMode;
import org.springframework.amqp.core.Binding;
import org.springframework.amqp.core.BindingBuilder;
import org.springframework.amqp.rabbit.connection.ConnectionFactory;
import org.springframework.amqp.rabbit.core.RabbitTemplate;
import org.springframework.amqp.rabbit.listener.SimpleMessageListenerContainer;
import org.springframework.beans.factory.annotation.Autowired;
import org.springframework.context.annotation.Bean;
import org.springframework.context.annotation.Configuration;

/**
 * RabbitMq配置
 * @author zhuzhe
 * @date 2018/5/25 13:37
 * @email [email protected]
 */
@Configuration
public class RabbitMqConfig {

    /** 消息交换机的名字*/
    public static final String EXCHANGE = "exchangeTest";
    /** 队列key1*/
    public static final String ROUTINGKEY1 = "queue_one_key1";
    /** 队列key2*/
    public static final String ROUTINGKEY2 = "queue_one_key2";

    @Autowired
    private QueueConfig queueConfig;
    @Autowired
    private ExchangeConfig exchangeConfig;

    /**
     * 连接工厂
     */
    @Autowired
    private ConnectionFactory connectionFactory;

    /**
     将消息队列1和交换机进行绑定
     */
    @Bean
    public Binding binding_one() {
        return BindingBuilder.bind(queueConfig.firstQueue()).to(exchangeConfig.directExchange()).with(RabbitMqConfig.ROUTINGKEY1);
    }

    /**
     * 将消息队列2和交换机进行绑定
     */
    @Bean
    public Binding binding_two() {
        return BindingBuilder.bind(queueConfig.secondQueue()).to(exchangeConfig.directExchange()).with(RabbitMqConfig.ROUTINGKEY2);
    }

    /**
     * queue listener  观察 监听模式
     * 当有消息到达时会通知监听在对应的队列上的监听对象
     * @return
     */
    @Bean
    public SimpleMessageListenerContainer simpleMessageListenerContainer_one(){
        SimpleMessageListenerContainer simpleMessageListenerContainer = new SimpleMessageListenerContainer(connectionFactory);
        simpleMessageListenerContainer.addQueues(queueConfig.firstQueue());
        simpleMessageListenerContainer.setExposeListenerChannel(true);
        simpleMessageListenerContainer.setMaxConcurrentConsumers(5);
        simpleMessageListenerContainer.setConcurrentConsumers(1);
        simpleMessageListenerContainer.setAcknowledgeMode(AcknowledgeMode.MANUAL); //设置确认模式手工确认
        return simpleMessageListenerContainer;
    }

    /**
     * 定义rabbit template用于数据的接收和发送
     * @return
     */
    @Bean
    public RabbitTemplate rabbitTemplate() {
        RabbitTemplate template = new RabbitTemplate(connectionFactory);
        /**若使用confirm-callback或return-callback,
         * 必须要配置publisherConfirms或publisherReturns为true
         * 每个rabbitTemplate只能有一个confirm-callback和return-callback
         */
        template.setConfirmCallback(msgSendConfirmCallBack());
        //template.setReturnCallback(msgSendReturnCallback());
        /**
         * 使用return-callback时必须设置mandatory为true,或者在配置中设置mandatory-expression的值为true,
         * 可针对每次请求的消息去确定’mandatory’的boolean值,
         * 只能在提供’return -callback’时使用,与mandatory互斥
         */
        //  template.setMandatory(true);
        return template;
    }

    /**
     * 消息确认机制
     * Confirms给客户端一种轻量级的方式,能够跟踪哪些消息被broker处理,
     * 哪些可能因为broker宕掉或者网络失败的情况而重新发布。
     * 确认并且保证消息被送达,提供了两种方式:发布确认和事务。(两者不可同时使用)
     * 在channel为事务时,不可引入确认模式;同样channel为确认模式下,不可使用事务。
     * @return
     */
    @Bean
    public MsgSendConfirmCallBack msgSendConfirmCallBack(){
        return new MsgSendConfirmCallBack();
    }

}
消息回调

package com.space.rabbitmq.mqcallback;

import org.springframework.amqp.rabbit.core.RabbitTemplate;
import org.springframework.amqp.rabbit.support.CorrelationData;

/**
 * 消息发送到交换机确认机制
 * @author zhuzhe
 * @date 2018/5/25 15:53
 * @email [email protected]
 */
public class MsgSendConfirmCallBack implements RabbitTemplate.ConfirmCallback {

    @Override
    public void confirm(CorrelationData correlationData, boolean ack, String cause) {
        System.out.println("MsgSendConfirmCallBack  , 回调id:" + correlationData);
        if (ack) {
            System.out.println("消息消费成功");
        } else {
            System.out.println("消息消费失败:" + cause+"\n重新发送");
        }
    }
}
5、生产者/消息发送者

package com.space.rabbitmq.sender;

import com.space.rabbitmq.config.RabbitMqConfig;
import lombok.extern.slf4j.Slf4j;
import org.springframework.amqp.rabbit.core.RabbitTemplate;
import org.springframework.amqp.rabbit.support.CorrelationData;
import org.springframework.beans.factory.annotation.Autowired;
import org.springframework.stereotype.Component;

import java.util.UUID;

/**
 * 消息发送  生产者1
 * @author zhuzhe
 * @date 2018/5/25 14:28
 * @email [email protected]
 */
@Slf4j
@Component
public class FirstSender {

    @Autowired
    private RabbitTemplate rabbitTemplate;

    /**
     * 发送消息
     * @param uuid
     * @param message  消息
     */
    public void send(String uuid,Object message) {
        CorrelationData correlationId = new CorrelationData(uuid);
        rabbitTemplate.convertAndSend(RabbitMqConfig.EXCHANGE, RabbitMqConfig.ROUTINGKEY2,
                message, correlationId);
    }
}
6、消费者

package com.space.rabbitmq.receiver;

import org.springframework.amqp.rabbit.annotation.RabbitListener;
import org.springframework.stereotype.Component;

/**
 * 消息消费者1
 * @author zhuzhe
 * @date 2018/5/25 17:32
 * @email [email protected]
 */
@Component
public class FirstConsumer {

    @RabbitListener(queues = {"first-queue","second-queue"}, containerFactory = "rabbitListenerContainerFactory")
    public void handleMessage(String message) throws Exception {
        // 处理消息
        System.out.println("FirstConsumer {} handleMessage :"+message);
    }
}
7、测试

package com.space.rabbitmq.controller;

import com.space.rabbitmq.sender.FirstSender;
import org.springframework.beans.factory.annotation.Autowired;
import org.springframework.web.bind.annotation.GetMapping;
import org.springframework.web.bind.annotation.RestController;

import java.util.UUID;

/**
 * @author zhuzhe
 * @date 2018/5/25 16:00
 * @email [email protected]
 */
@RestController
public class SendController {

    @Autowired
    private FirstSender firstSender;

    @GetMapping("/send")
    public String send(String message){
        String uuid = UUID.randomUUID().toString();
        firstSender.send(uuid,message);
        return uuid;
    }
}
此时,我们就可以启动项目,进行测试了
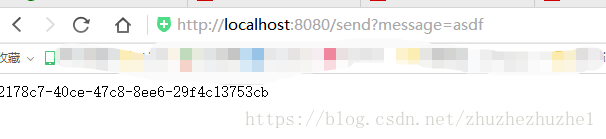

当我们访问send接口时,看到控制台打印如下信息,证明我们的消息已经发送,并且消费者也已经成功接收!
源码地址:https://github.com/zhuzhegithub/springboot-rabbitmq
转载请务必保留此出处(原作者):https://blog.csdn.net/zhuzhezhuzhe1
版权声明:本文为原创文章,允许转载,转载时请务必以超链接形式标明文章 原始出处 、作者信息和本声明。
https://blog.csdn.net/zhuzhezhuzhe1