系列文章目录
Vue基础篇一:编写第一个Vue程序
Vue基础篇二:Vue组件的核心概念
Vue基础篇三:Vue的计算属性与侦听器
Vue基础篇四:Vue的生命周期(秒杀案例实战)
Vue基础篇五:Vue的指令
Vue基础篇六:Vue使用JSX进行动态渲染
Vue提高篇一:使用Vuex进行状态管理
Vue提高篇二:使用vue-router实现静态路由
Vue提高篇三:使用vue-router实现动态路由
Vue提高篇四:使用Element UI组件库
Vue提高篇五:使用Jest进行单元测试
Vue提高篇六: 使用Vetur+ESLint+Prettier插件提升开发效率
Vue实战篇一: 使用Vue搭建注册登录界面
Vue实战篇二: 实现邮件验证码发送
Vue实战篇三:实现用户注册
Vue实战篇四:创建多步骤表单
Vue实战篇五:实现文件上传
Vue实战篇六:表格渲染动态数据
Vue实战篇七:表单校验
Vue实战篇八:实现弹出对话框进行交互
Vue实战篇九:使用省市区级联选择插件
Vue实战篇十:响应式布局
Vue实战篇十一:父组件获取子组件数据的常规方法
Vue实战篇十二:多项选择器的实际运用
Vue实战篇十三:实战分页组件
Vue实战篇十四:前端excel组件实现数据导入
Vue实战篇十五:表格数据多选在实际项目中的技巧
Vue实战篇十六:导航菜单
Vue实战篇十七:用树型组件实现一个知识目录
Vue实战篇十八:搭建一个知识库框架
Vue实战篇十九:使用printjs打印表单
Vue实战篇二十:自定义表格合计
Vue实战篇二十一:实战Prop的双向绑定
Vue实战篇二十二:生成二维码
Vue实战篇二十三:卡片风格与列表风格的切换
Vue实战篇二十四:分页显示
Vue实战篇二十五:使用ECharts绘制疫情折线图
Vue实战篇二十六:创建动态仪表盘
Vue实战篇二十七:实现走马灯效果的商品轮播图
Vue实战篇二十八:实现一个手机版的购物车
Vue实战篇二十九:模拟一个简易留言板
文章目录
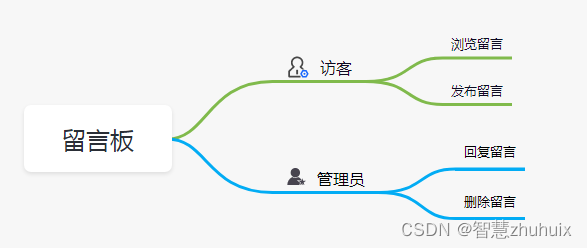
一、背景
- 这次我们将以项目实战的方式实现一个完整的留言板,以下是该项目需要实现的功能:
– 访客允许浏览留言、发布留言
– 后台管理员可以进行回复留言、删除留言
- 该项目使用前后端分离的技术,主要步骤如下:
1、创建后端SpringBoot工程
2、通过Spring MVC建立留言的WebApi接口
3、搭建访客的前端页面
4、搭建管理员的前端页面
5、前后端联调,效果演示
-
后端工程中会涉及JWT认证的技术,可以参考文章:
SpringBoot整合SpringSecurity实现JWT认证 -
前端工程中会涉及注册登录的技术,可以参考文章:
手把手教你使用Vue搭建注册登录界面 -
前端技术栈
vue 2.x
vue-cli脚手架
vue-router路由
vuex状态管理
element-ui组件库
vscode编辑器
vetur+eSLint+prettier插件
- 后端技术栈
Spring Boot
Spring MVC
Mybatis-Plus
Spring Security
Mysql
Redis
Swagger2
二、后端实现
2.1 创建SpringBoot工程
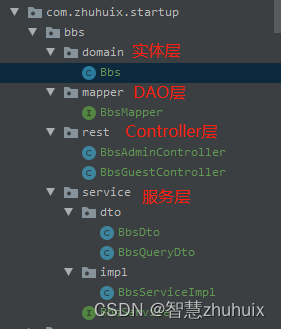

2.2 创建留言实体类
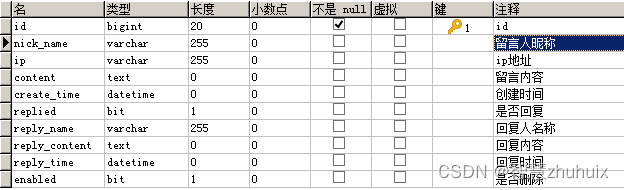
- 根据留言的基本信息,创建留言实体类。
/**
 * 留言表
 *
 * @author zhuhuix
 * @date 2022-06-09
 */
@ApiModel(value = "留言表")
@Data
@SuperBuilder
@NoArgsConstructor
@AllArgsConstructor
@TableName("bbs")
public class Bbs {


    @TableId(value = "id", type = IdType.AUTO)
    private Long id;

    private String nickName;

    private String ip;

    private String content;

    private Timestamp createTime ;

    @Builder.Default
    private Boolean replied = false;

    private String replyName;

    private String replyContent;

    private Timestamp replyTime ;

    @JsonIgnore
    @Builder.Default
    @TableLogic
    private Boolean enabled = true;
}
2.3 添加操作留言表的Mapper接口
- 通过继承mybatis-plus的BaseMapper接口创建操作留言表的DAO接口,该BaseMapper接口已经包含了基本的增删改查操作。
/**
 * 留言DAO接口
 *
 * @author zhuhuix
 * @date 2022-10-09
 */

@Mapper
public interface BbsMapper extends BaseMapper<Bbs> {


}
2.4 实现留言的增删改查
- 服务接口定义:
/**
 * 留言服务接口
 *
 * @author zhuhuix
 * @date 2022-06-09
 */
public interface BbsService {


    /**
     * 创建留言
     * @param bbs 待新增的留言信息
     * @return 新增成功的留言信息
     */
    Bbs create(Bbs bbs);

    /**
     * 删除留言
     * @param ids 留言id集合
     * @return 是否成功
     */
    Boolean delete(Set<Long> ids);

    /**
     * 更新留言
     * @param bbs 待更新的留言信息
     * @return 更新成功的留言信息
     */
    Bbs update(Bbs bbs);

    /**
     * 根据id查找留言
     * @param id 留言id
     * @return 留言信息
     */
    Bbs findById(Long id);


    /**
     * 根据查询条件分页查找留言信息
     * @param bbsQueryDto 查询条件
     * @return 分页留言信息
     */
    BbsDto page(BbsQueryDto bbsQueryDto);
}

/**
 * 留言查询条件
 *
 * @author zhuhuix
 * @date 2022-06-09
 */
@ApiModel(value = "留言查询条件")
@Data
@AllArgsConstructor
@NoArgsConstructor
public class BbsQueryDto {


    @ApiModelProperty(value = "用户昵称")
    private String nickName;

    @ApiModelProperty(value = "留言内容")
    private String content;

    @ApiModelProperty(value = "是否回复")
    private Boolean replied;

    @ApiModelProperty(value = "留言起始时间")
    private Long createTimeStart;

    @ApiModelProperty(value = "留言结束时间")
    private Long createTimeEnd;

    @ApiModelProperty(value = "当前页数")
    private Integer currentPage;

    @ApiModelProperty(value = "每页条数")
    private Integer pageSize;
}

/**
 * 留言分页返回数据
 *
 * @author zhuhuix
 * @date 2022-06-09
 */

@ApiModel(value = "留言分页数据")
@Data
@AllArgsConstructor
@NoArgsConstructor
public class BbsDto {


    private Integer currentPage;

    private Integer pageSize;

    private Long total;

    private List<Bbs> bbsList;
}
- 服务实现类:
/**
 * 留言接口实现类
 *
 * @author zhuhuix
 * @date 2022-06-09
 */
@Slf4j
@Service
@RequiredArgsConstructor
@Transactional(propagation = Propagation.SUPPORTS, readOnly = true, rollbackFor = Exception.class)
public class BbsServiceImpl implements BbsService {


    private final BbsMapper bbsMapper;

    @Override
    @Transactional(rollbackFor = Exception.class)
    public Bbs create(Bbs bbs) {


        bbs.setCreateTime(Timestamp.valueOf(LocalDateTime.now()));
        if (bbsMapper.insert(bbs) > 0) {


            return bbs;
        }

        throw new RuntimeException("新增留言失败");
    }

    @Override
    @Transactional(rollbackFor = Exception.class)
    public Boolean delete(Set<Long> ids) {


        if (bbsMapper.deleteBatchIds(ids) > 0) {


            return true;
        }

        throw new RuntimeException("删除留言失败");
    }

    @Override
    @Transactional(rollbackFor = Exception.class)
    public Bbs update(Bbs bbs) {


        bbs.setReplyTime(Timestamp.valueOf(LocalDateTime.now()));
        if (bbsMapper.updateById(bbs) > 0) {


            return bbs;
        }

        throw new RuntimeException("更新留言失败");
    }

    @Override
    public Bbs findById(Long id) {


        return bbsMapper.selectById(id);
    }

    @Override
    public BbsDto page(BbsQueryDto bbsQueryDto) {


        QueryWrapper<Bbs> queryWrapper = new QueryWrapper<>();
        if (!StringUtils.isEmpty(bbsQueryDto.getNickName())) {


            queryWrapper.lambda().like(Bbs::getNickName, bbsQueryDto.getNickName());
        }

        if (bbsQueryDto.getReplied() != null){


            queryWrapper.lambda().eq(Bbs::getReplied,bbsQueryDto.getReplied() );
        }

        if (!StringUtils.isEmpty(bbsQueryDto.getCreateTimeStart())
                && !StringUtils.isEmpty(bbsQueryDto.getCreateTimeEnd())) {


            queryWrapper.and(wrapper -> wrapper.lambda().between(Bbs::getCreateTime,
                    new Timestamp(bbsQueryDto.getCreateTimeStart()),
                    new Timestamp(bbsQueryDto.getCreateTimeEnd())));
        }

        queryWrapper.orderByDesc("create_time");

        Page<Bbs> page = new Page<>(bbsQueryDto.getCurrentPage(), bbsQueryDto.getPageSize());
        bbsMapper.selectPage(page, queryWrapper);

        BbsDto bbsDto = new BbsDto();
        bbsDto.setCurrentPage(bbsQueryDto.getCurrentPage());
        bbsDto.setPageSize(bbsQueryDto.getPageSize());
        bbsDto.setTotal(page.getTotal());
        bbsDto.setBbsList(page.getRecords());

        return bbsDto;
    }
}
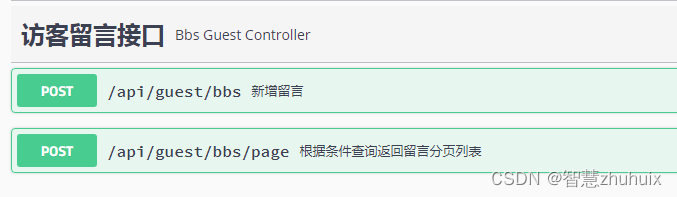
2.5 编写Controller层
- 形成以下访客WebApi访问接口(允许匿名访问)
/**
 * 访客留言Api
 *
 * @author zhuhuix
 * @date 2022-06-09
 */

@Slf4j
@RestController
@AllArgsConstructor
@RequestMapping("/api/guest/bbs")
@Api(tags = "访客留言接口")
public class BbsGuestController {


    private final BbsService bbsService;

    @ApiOperation("新增留言")
    @PostMapping
    public ResponseEntity<Object> create(@RequestBody Bbs bbs) {


        return ResponseEntity.ok(bbsService.create(bbs));

    }

    @ApiOperation("根据条件查询返回留言分页列表")
    @PostMapping("/page")
    public ResponseEntity<Object> getBbsPage(@RequestBody BbsQueryDto bbsQueryDto) {


        return ResponseEntity.ok(bbsService.page(bbsQueryDto));
    }
}
- 形成以下管理员WebApi访问接口(需token验证访问)
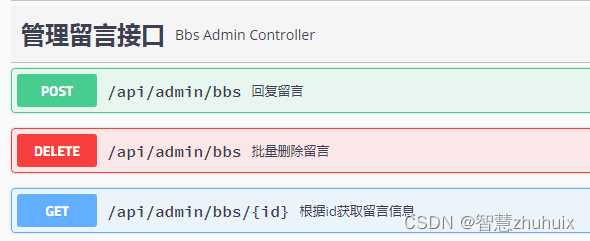
/**
 * 管理留言Api
 *
 * @author zhuhuix
 * @date 2022-06-09
 */

@Slf4j
@RestController
@AllArgsConstructor
@RequestMapping("/api/admin/bbs")
@Api(tags = "管理留言接口")
public class BbsAdminController {


    private final BbsService bbsService;

    @ApiOperation("回复留言")
    @PostMapping
    public ResponseEntity<Object> update(@RequestBody Bbs bbs) {


        return ResponseEntity.ok(bbsService.update(bbs));

    }

    @ApiOperation("批量删除留言")
    @DeleteMapping
    public ResponseEntity<Object> deleteBbsInfo(@RequestBody Set<Long> ids) {


        return ResponseEntity.ok(bbsService.delete(ids));
    }

    @ApiOperation("根据id获取留言信息")
    @GetMapping("/{id}")
    public ResponseEntity<Object> getBbsInfo(@PathVariable Long id) {


        return ResponseEntity.ok(bbsService.findById(id));
    }

}
三、搭建访客前端
3.1 添加访客api访问接口
-根据后端的访客WebApi在前端添加相应的访问接口
import request from '@/utils/request'

export function createBbs(data) {


  return request({


    url: '/api/guest/bbs',
    method: 'post',
    data
  })
}

export function getBbsPageList(params) {


  return request({


    url: '/api/guest/bbs/page',
    method: 'post',
    data: JSON.stringify(params)
  })
}
3.2 访客的前端页面实现
- 主要分为两大部分:
– 留言区
– 发布区
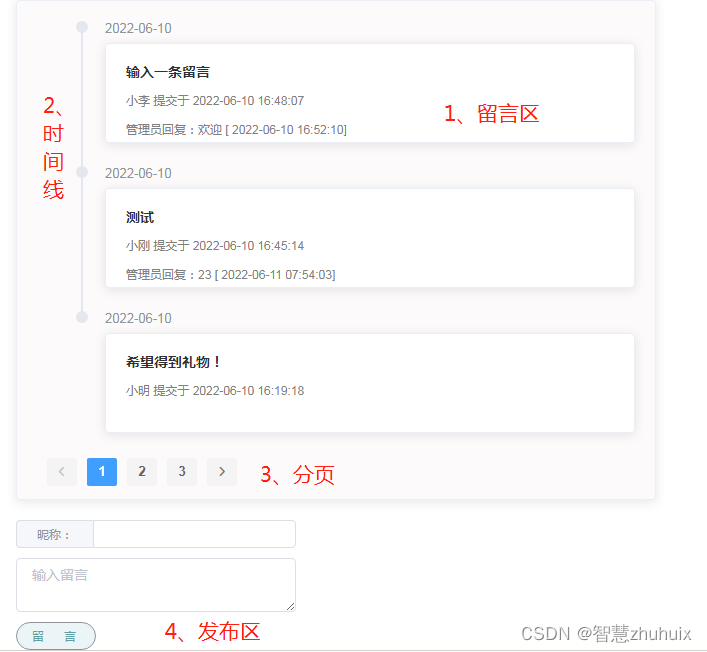
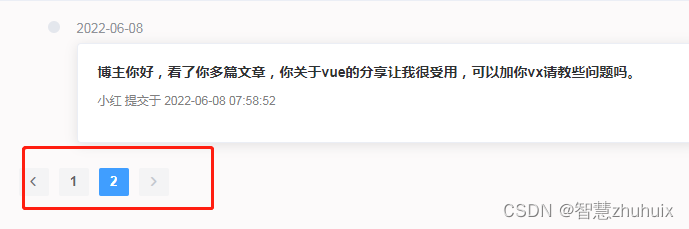
3.2.1 留言区
- 我们用el-card组件来搭建留言展示块
<el-card class="el-card-m">
<span class="el-card-m-content">{
{ item.content }}</span>
<div />
<span class="el-card-m-nick-name">{
{ item.nickName }} 提交于 {
{ parseTime(item.createTime) }} </span>
<div />
<span v-if="item.replyContent" class="el-card-m-reply">{
{ item.replyName }}回复:{
{ item.replyContent }} [ {
{ parseTime(item.replyTime) }}] </span>
</el-card>

– 用el-timeline时间线组件呈现留言区的时间信息
<el-timeline infinite-scroll-disabled="disabled">
<div v-if="pagemessages.length > 0">
<el-timeline-item
v-for="(item, index) in pagemessages"
:key="index"
:timestamp="parseTime(item.createTime, '{y}-{m}-{d}')"
placement="top"
>
<el-card class="el-card-m">
<span class="el-card-m-content">{
{ item.content }}</span>
<div />
<span class="el-card-m-nick-name">{
{ item.nickName }} 提交于 {
{ parseTime(item.createTime) }} </span>
<div />
<span v-if="item.replyContent" class="el-card-m-reply">{
{ item.replyName }}回复:{
{ item.replyContent }} [ {
{ parseTime(item.replyTime) }}] </span>
</el-card>
</el-timeline-item>
</div>
<div v-else>
<el-timeline-item placement="top">
<el-card class="el-card-m">
<p class="el-card-m-nick-name"> 没有任何留言</p>
</el-card>
</el-timeline-item>
</div>
</el-timeline>

– 用分页组件分解数据,翻页浏览
    <el-pagination
        background
        :current-page="currentPage"
        :page-size="pagesize"
        layout="prev, pager, next"
        :total="total"
        :hide-on-single-page="true"
        @current-change="handleCurrentChange"
      />
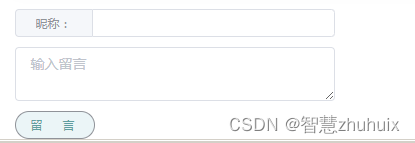
3.2.2 发布区
– 输入昵称
– 输入留言内容
– 点击留言按钮进行发布
    <div class="el-card-messages">
      <el-input v-model="nickName" size="mini" class="message-nick-name">
        <template slot="prepend">昵称:</template>
      </el-input>
      <el-input
        slot="prepend"
        v-model="message"
        type="textarea"
        :rows="2"
        class="message-text"
        placeholder="输入留言"
        maxlength="200"
      />

      <el-button
        type="info"
        round
        class="submit-message"
        size="mini"
        @click="submitMessage"
      >留言</el-button>
    </div>
四、搭建管理前端
4.1 添加管理api访问接口
-根据后端的管理员WebApi在前端添加相应的访问接口
import request from '@/utils/request'

export function updateBbs(data) {


  return request({


    url: '/api/admin/bbs',
    method: 'post',
    data
  })
}

export function deleteBbs(ids) {


  return request({


    url: '/api/admin/bbs',
    method: 'delete',
    data: ids
  })
}

export function getBbsById(id) {


  return request({


    url: '/api/admin/bbs/' + id,
    method: 'get'
  })
}
4.2 管理的前端页面实现
- 主要分为两大部分:
– 留言列表
– 回复留言表单
4.2.1 留言列表
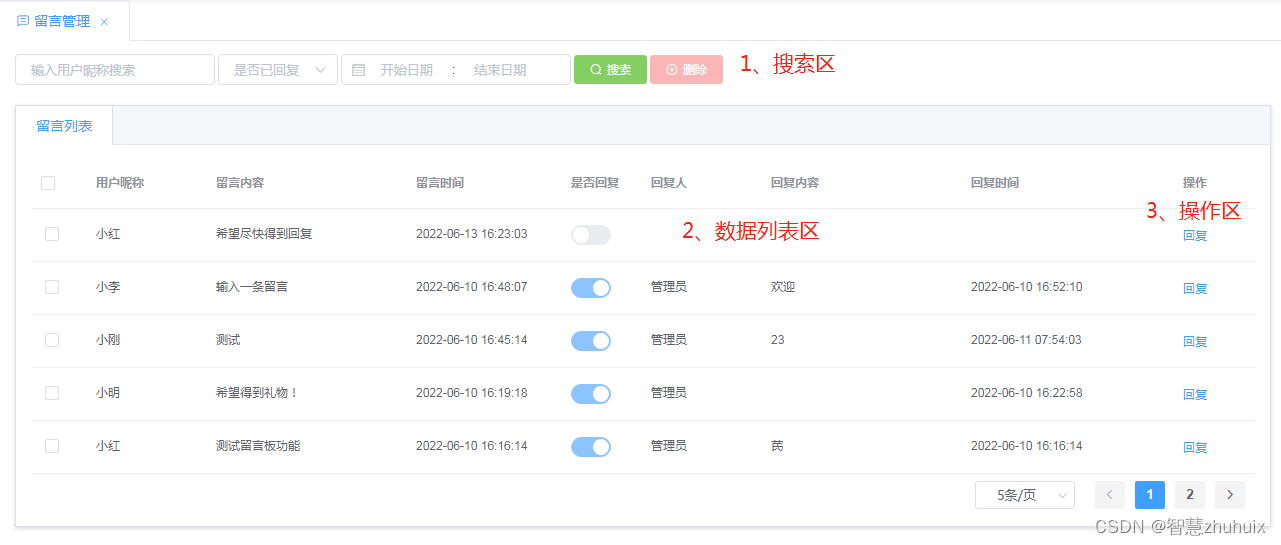
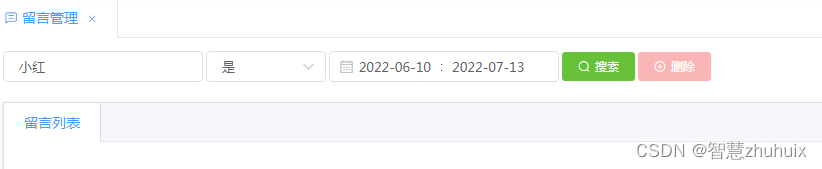
- 搜索区可以通过昵称,是否回复及留言时间进行搜索,管理员也可以选中列表区的留言,进行删除。
  <!--工具栏-->
    <div class="head-container">
      <!-- 搜索 -->
      <el-input
        v-model="nickName"
        size="small"
        clearable
        placeholder="输入用户昵称搜索"
        style="width: 200px"
        class="filter-item"
        @keyup.enter.native="search"
      />
      <el-select
        v-model="replied"
        placeholder="是否已回复"
        clearable
        size="small"
        style="width: 120px"
        class="filter-item"
      >
        <el-option
          v-for="item in options"
          :key="item.value"
          :label="item.label"
          :value="item.value"
        />
      </el-select>
      <el-date-picker
        v-model="createTime"
        :default-time="['00:00:00', '23:59:59']"
        type="daterange"
        range-separator=":"
        size="small"
        class="date-item"
        value-format="yyyy-MM-dd HH:mm:ss"
        start-placeholder="开始日期"
        end-placeholder="结束日期"
      />
      <el-button
        class="filter-item"
        size="mini"
        type="success"
        icon="el-icon-search"
        @click="search"
      >搜索</el-button>
      <el-button
        class="filter-item"
        size="mini"
        type="danger"
        icon="el-icon-circle-plus-outline"
        :disabled="selections.length === 0"
        @click="doDelete"
      >删除</el-button>
    </div>
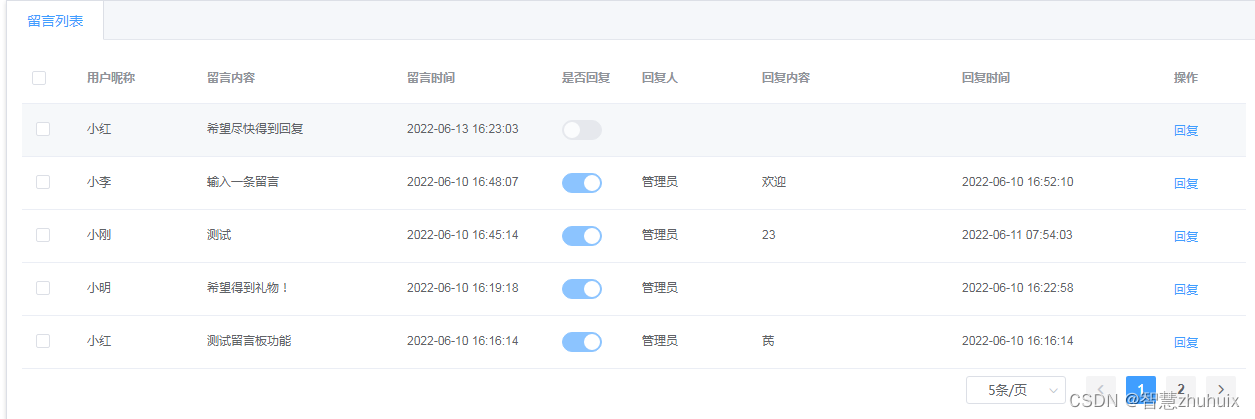
- 通过el-table组件展示留言数据
  <el-tabs v-model="activeName" type="border-card">
        <el-tab-pane label="留言列表" name="bbsList">
          <el-table
            ref="table"
            v-loading="loading"
            :data="bbsList"
            style="width: 100%; font-size: 12px"
            @selection-change="selectionChangeHandler"
          >
            <el-table-column type="selection" width="55" />
            <el-table-column
              :show-overflow-tooltip="true"
              width="120"
              prop="nickName"
              label="用户昵称"
            />

            <el-table-column
              :show-overflow-tooltip="true"
              prop="content"
              width="200"
              label="留言内容"
            />

            <el-table-column
              :show-overflow-tooltip="true"
              prop="createTime"
              width="155"
              label="留言时间"
            >
              <template slot-scope="scope">
                <span>{

    {

     parseTime(scope.row.createTime) }}</span>
              </template>
            </el-table-column>

            <el-table-column prop="replied" width="80" label="是否回复">
              <template slot-scope="scope">
                <el-switch
                  v-model="scope.row.replied"
                  :disabled="true"
                />
              </template>
            </el-table-column>

            <el-table-column
              :show-overflow-tooltip="true"
              width="120"
              prop="replyName"
              label="回复人"
            />
            <el-table-column
              :show-overflow-tooltip="true"
              prop="replyContent"
              width="200"
              label="回复内容"
            />
            <el-table-column
              :show-overflow-tooltip="true"
              prop="replyTime"
              width="155"
              label="回复时间"
            >
              <template slot-scope="scope">
                <span>{

    {

     parseTime(scope.row.replyTime) }}</span>
              </template>
            </el-table-column>
            <el-table-column
              label="操作"
              width="120"
              align="center"
              fixed="right"
            >
              <template slot-scope="scope">
                <el-button
                  size="mini"
                  type="text"
                  round
                  @click="doReply(scope.row.id)"
                >回复</el-button>
              </template>
            </el-table-column>
          </el-table>
          <el-pagination
            class="page"
            background
            :current-page="currentPage"
            :page-sizes="[5, 10, 15, 20]"
            :page-size="pageSize"
            layout="sizes,prev, pager, next"
            :total="total"
            @size-change="handleSizeChange"
            @current-change="handleCurrentChange"
          />
        </el-tab-pane>
      </el-tabs>
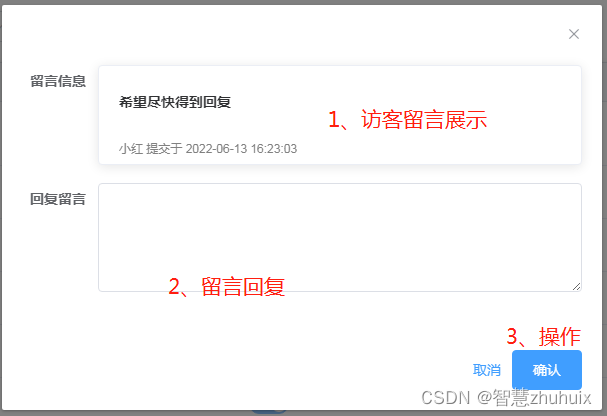
4.2.2 回复留言表单
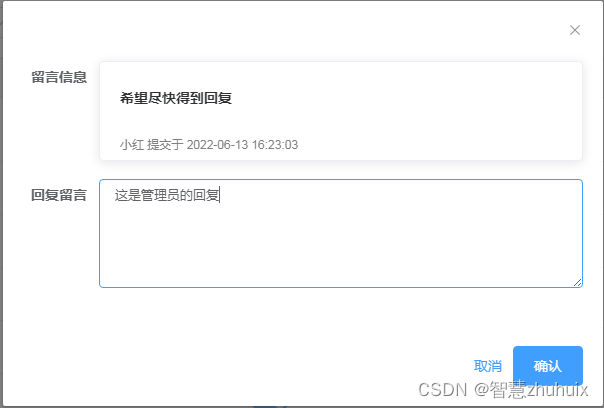
- 回复留言时,需要跳出一个表单,让管理员看到访客留言信息,填写回复信息进行提交。
   <!--回复留言表单-->
      <el-dialog
        append-to-body
        :close-on-click-modal="false"
        :visible.sync="showDialog"
        width="600px"
      >
        <el-form
          ref="form"
          :model="form"
          size="small"
          label-width="76px"
        >
          <el-form-item label="留言信息" prop="">
            <el-card class="el-card-m">
              <span class="el-card-m-content">{

    {

     form.content }}</span>
              <div />
              <span class="el-card-m-nick-name">{

    {

     form.nickName }} 提交于 {

    {

     parseTime(form.createTime) }}  </span>
            </el-card>
          </el-form-item>
          <el-form-item label="回复留言" prop="replyContent">
            <el-input
              v-model="form.replyContent"
              rows="5"
              type="textarea"
            />
          </el-form-item>

        </el-form>
        <div slot="footer" class="dialog-footer">
          <el-button type="text" @click="doCancel">取消</el-button>
          <el-button
            :loading="formLoading"
            type="primary"
            @click="doSubmit"
          >确认</el-button>
        </div>
      </el-dialog>
五、联调及效果演示
5.1 设置前端路由
- 我们在前端中加入留言板的访客访问路由与管理员管理路由
– 添加访客访问路由
import Vue from 'vue'
import Router from 'vue-router'

Vue.use(Router)

/* Layout */
import Layout from '@/layout'

/**
 * constantRoutes
 * a base page that does not have permission requirements
 * all roles can be accessed
 */
export const constantRoutes = [
  ...
  // 访客访问路由
  {


    path: '/bbs',
    component: () => import('@/views/bbs/index'),
    hidden: true
  },

  {


    path: '/401',
    component: () => import('@/views/401'),
    hidden: true
  },

  {


    path: '/404',
    component: () => import('@/views/404'),
    hidden: true
  },

  {


    path: '/',
    component: Layout,
    redirect: '/dashboard',
    children: [{


      path: 'dashboard',
      name: 'Dashboard',
      component: () => import('@/views/dashboard/index'),
      meta: {

     title: 'Dashboard', icon: 'dashboard' }
    }]
  },
  {


    path: '/user',
    component: Layout,
    hidden: true,
    redirect: 'noredirect',
    children: [
      {


        path: 'center',
        component: (resolve) => require(['@/views/user/center'], resolve),
        name: '个人中心',
        meta: {

     title: '个人中心' }
      }
    ]
  }

]


const createRouter = () => new Router({


  mode: 'history', // require service support
  scrollBehavior: () => ({

     y: 0 }),
  routes: constantRoutes
})

export const router = createRouter()

export function resetRouter() {


  const newRouter = createRouter()
  router.matcher = newRouter.matcher // reset router
}

export default router
– 添加管理留言路由
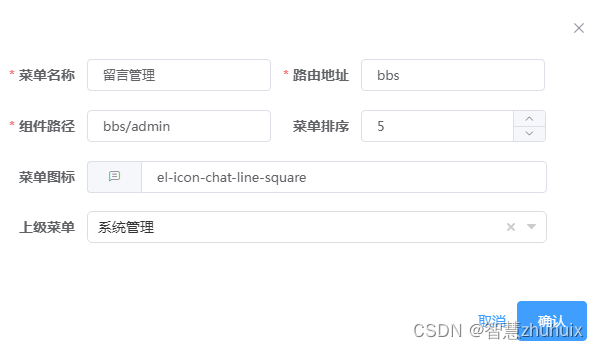
我们直接通过后台管理界面,添加留言管理菜单即可.
具体文章可参考SpringBoot整合SpringSecurity实现权限控制(六):菜单管理
5.2 访客留言演示

5.3 管理留言演示
