这是我的课题内容,用作记录也用做分享!
本页面的搭建采用的是组件化开发,开发出的最终的页面成品如图3.1所示
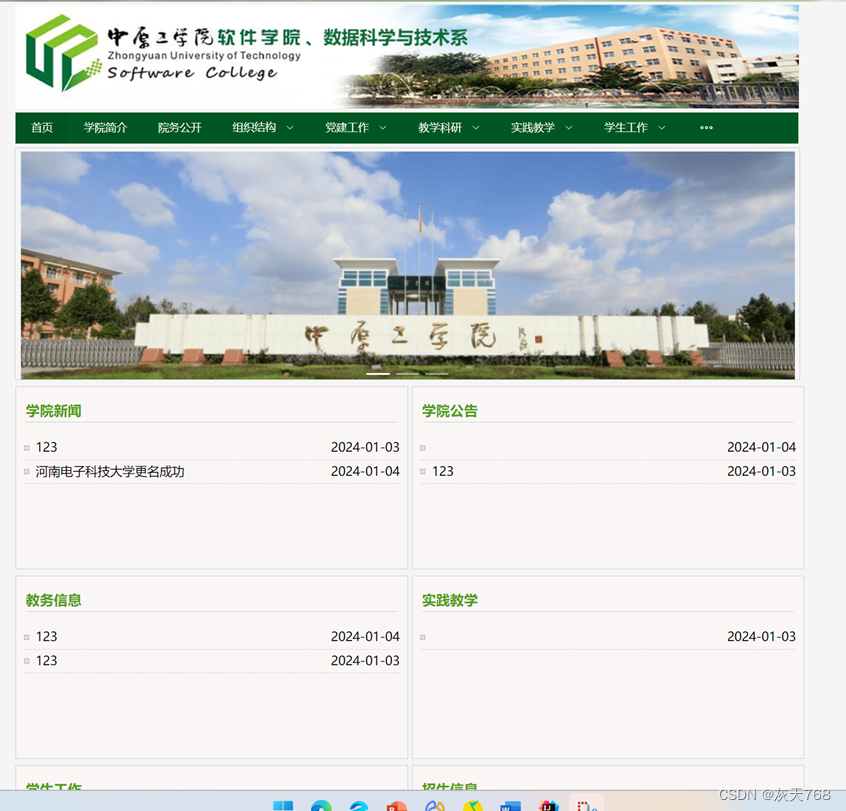
图3.1
全部的页面共由三部分组成HeaderItem即头部组件,FooterItem底部组件,和中间部分的内容,其中头部组件的代码主要包括最顶部的图片,导航栏。HeaderItem中的主要代码为
<template>

  <div>

    <div class="header">

      <img src="@/assets/header.jpg" alt="" style="margin-top: 4px">

    </div>


    <div id="nav">

      <div class="line"></div>

      <el-menu

          :default-active="activeIndex2"

          class="el-menu-demo"

          mode="horizontal"

          @select="handleSelect"

          background-color="#015723"

          text-color="#fff"

          active-text-color="#ffd04b"

          style="height: 41px ;width: 1010px;"

          align-content: center>

        <el-menu-item index="1" @click="goTOPage(1)">首页</el-menu-item>


        <el-menu-item index="2" @click="goTOPage(2)">学院简介</el-menu-item>

        <el-menu-item index="3">院务公开</el-menu-item>

        <el-sub-menu index="4">

          <template #title>组织结构</template>

          <el-menu-item index="4-1">组织结构</el-menu-item>

          <el-menu-item index="4-2">学院领导</el-menu-item>

          <el-menu-item index="4-3">学院办公室</el-menu-item>

          <el-menu-item index="4-4">教学部</el-menu-item>

          <el-menu-item index="4-5">学工办</el-menu-item>

          <el-menu-item index="4-6">软件工程与技术</el-menu-item>

          <el-menu-item index="4-7">互联网工程与技术</el-menu-item>

          <el-menu-item index="4-8">数据科学与大技术</el-menu-item>

          <el-menu-item index="4-9">实验实训中心</el-menu-item>

        </el-sub-menu>

        <el-sub-menu index="5">

          <template #title>党建工作</template>

          <el-menu-item index="5-1">理论学习</el-menu-item>

          <el-menu-item index="5-2">师生党建</el-menu-item>

          <el-menu-item index="5-3">组织结构</el-menu-item>

          <el-menu-item index="5-4">教工之家</el-menu-item>

        </el-sub-menu>

        <el-sub-menu index="6">

          <template #title>教学科研</template>

          <el-menu-item index="6-1">课程建设</el-menu-item>

          <el-menu-item index="6-2">专业建设</el-menu-item>

          <el-menu-item index="6-3">教研改革</el-menu-item>

          <el-menu-item index="6-4">教务信息</el-menu-item>

        </el-sub-menu>

        <el-sub-menu index="7">

          <template #title>实践教学</template>

          <el-menu-item index="7-1">学科竞赛</el-menu-item>

          <el-menu-item index="7-2">集中实践</el-menu-item>

        </el-sub-menu>

        <el-sub-menu index="8">

          <template #title>学生工作</template>

          <el-menu-item index="8-1">公告通知</el-menu-item>

          <el-menu-item index="8-2">学生组织</el-menu-item>

          <el-menu-item index="8-3">社团风采</el-menu-item>

          <el-menu-item index="8-4">学生活动</el-menu-item>

          <el-menu-item index="8-5">资助工作</el-menu-item>

          <el-menu-item index="8-6">宿舍文化</el-menu-item>

        </el-sub-menu>

        <el-menu-item>招生信息</el-menu-item>

        <el-menu-item>管理员登录</el-menu-item>

      </el-menu>

    </div>

  </div>

</template>
其中,在点击顶部导航栏时,会进行页面的跳转,vue中的语法进行页面跳转时,是通过内部的路由直接进行页面的跳转。具体的语法格式为。
<script lang="js">

import router from "@/router/index.js";


export default {

  name: "HeaderItem",

  methods:{

    goTOPage(index){

      if(index===1){

        router.push("/index")

        console.log("index")

      }else if(index===2){

        router.push("/xy")

      }

    }

  }

}


import { ref } from 'vue'


</script>
在设置好路由后,直接进行router.push()直接就能够进行页面的跳转!
页面的底部主要是FooterItem,FooterItem实现效果如图3.2所示

图3.2
其中的照片能够实现走马灯的效果。在页面的最下部藏着一个登录字体,点击后能够跳转到登录的页面。实现照片的跑马灯的效果代码为
<script>

import {ref, onMounted, nextTick, onUnmounted} from "vue";

import shufa from "@/assets/轮播/书法协会.jpg"

import tiyu from "@/assets/轮播/体育文化广场节.jpg"

import jianmeicao from "@/assets/轮播/健美操.png"

import zhengxian from "@/assets/轮播/创先争优.jpg"

import hongyang from "@/assets/轮播/弘扬劳动教育.jpg"

import xinli from "@/assets/轮播/心里拓展运动会.png"

import shetuan from "@/assets/轮播/社团联合.jpg"

import zhumeng from "@/assets/轮播/筑梦青春自信飞扬.jpg"

import ruanjian from "@/assets/轮播/软件设计大赛.jpg"

import router from "@/router/index.js";


export default {

  name: "FooterItem",

  setup(){

    const items=[

      {id:1,image:shufa},

      {id:2,image:tiyu},

      {id:3,image:jianmeicao},

      {id:4,image:zhengxian},

      {id:5,image:hongyang},

      {id:6,image:xinli},

      {id:7,image:shetuan},

      {id:8,image:zhumeng},

      {id:9,image:ruanjian},

    ];

    const sliderRef = ref(null);

    const movement = ref(-2);

    let intervalId = null;


    const move = () => {

      const ul = sliderRef.value;

      if (!ul) return;


      const movementValue = movement.value;


      const left = ul.offsetLeft + movementValue;

      if (Math.abs(left) >= ul.offsetWidth) {

        ul.style.left = '0';

      } else {

        ul.style.left = left + 'px';

      }

    };

    const stopSlider = () => {

      clearInterval(intervalId);

    };


    const startSlider = () => {

      intervalId = setInterval(move, 20);

    };


    const login=()=>{

      router.push("/login")

    }


    onMounted(() => {

      nextTick(() => {

        const ul = sliderRef.value;

        const sliderItems = ul.innerHTML;

        const itemWidth = ul.firstElementChild.offsetWidth;


        ul.innerHTML += sliderItems;

        ul.style.width = (ul.childElementCount * itemWidth) + 'px';


        startSlider();

      });

    });


    onUnmounted(() => {

      clearInterval(intervalId);

    });


    return {

      items,

      sliderRef,

      stopSlider,

      startSlider,

      login,

    };

  },

};

</script>
其中通过startSlider来开始照片的移动,在鼠标指针移动到照片上时,通过@click点击事件来触发stopSlider进行是图片的暂停。
中间主页面的部分是通过后端拿到数据来放到前端进行显示,具体的多少内容通过vue3语句的<v-for>标签来控制,具体为for-each语句。
  <div class="flashboxu_u">

          <div class="block text-center">

            <el-carousel height="300px">

              <el-carousel-item v-for="item in images" :key="item">

                <router-link :to="`/${item.id}`">

                  <img :src="item.url" class="gundongimage" alt="">

                </router-link>

              </el-carousel-item>

            </el-carousel>

          </div>

        </div>

      </td>

    </tr>

  </table>

</div>

<div class="clear"></div>

<div class="container">

  <div class="row">

    <div class="col">

      <div class="news-container">

        <div class="news">

          <div class="news-tit" style="width: 480px">

            <h2>学院新闻</h2>

          </div>

          <!--                与后端连接-->

          <ul>


            <li v-for="article in articleList.area1" :key="article.id" style="text-align: left;display: flex;justify-content: space-between;" @click="toView(article.id)">

              <span class="title">{

    { article.title }}</span>

              <span class="time">{

    { article.time }}</span>

            </li>

          </ul>

        </div>

      </div>

      <div class="news-container">

        <div class="news">

          <div class="news-tit" style="width: 480px">

            <h2>学院公告</h2>

          </div>

          <!--                与后端连接-->

          <ul>

            <li v-for="article in articleList.area2" :key="article.id" style="text-align: left;display: flex;justify-content: space-between;">

              <span class="title">{

    { article.title }}</span>

              <span class="time">{

    { article.time }}</span>

            </li>

          </ul>


        </div>

      </div>

    </div>

  </div>
分区的script语句
const getArticleList = async () => {

  try {

    const response = await listservice();

    const data = response.data;


    // 根据不同的area进行数据分区

    data.forEach((article) => {

      if (article.area === 1 && articleList.area1.length < 5) {

        articleList.area1.push({

          ...article,   // 复制原始文章对象的所有属性

          time: article.updateTime  // 添加时间字段

        });

      } else if (article.area === 2 && articleList.area2.length < 5) {

        articleList.area2.push({

          ...article,   // 复制原始文章对象的所有属性

          time: article.updateTime   // 添加时间字段

        });

      } else if (article.area === 3 && articleList.area3.length < 5) {

        articleList.area3.push({

          ...article,   // 复制原始文章对象的所有属性

          time: article.updateTime   // 添加时间字段

        });

      } else if (article.area === 4 && articleList.area4.length < 5) {

        articleList.area4.push({

          ...article,   // 复制原始文章对象的所有属性

          time: article.updateTime   // 添加时间字段

        });

      } else if (article.area === 5 && articleList.area5.length < 5) {

        articleList.area5.push({

          ...article,   // 复制原始文章对象的所有属性

          time: article.updateTime   // 添加时间字段

        });

      } else if (article.area === 6 && articleList.area6.length < 5) {

        articleList.area6.push({

          ...article,   // 复制原始文章对象的所有属性

          time: article.updateTime   // 添加时间字段

        });

      }

    });

  } catch (error) {

    console.error(error);

  }

};

onMounted(getArticleList)
3.2 后端文章管理页面的实现
具体的vue实现的页面如图3.3所示
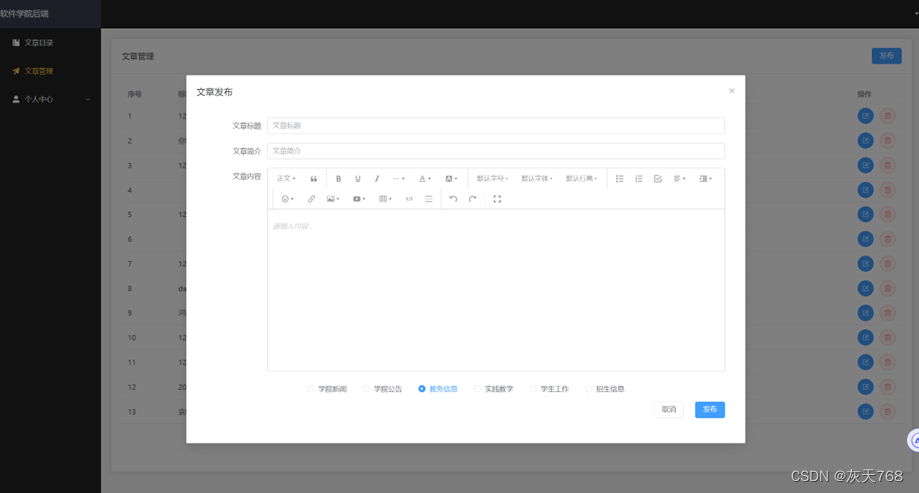
图3.3
其中的富文本框使用的是咱们国家的一位前端开发工作者开发的一个富文本组件,Wangeditor,这是一个异步的组件,使用起来也比较简单,而我是把它封装到了wangeditor的一个组件中,作为ArticalManager的子组件。具体的内容可以进行内容的传递。
<template>

  <div style="border: 1px solid #ccc">

    <Toolbar

        style="border-bottom: 1px solid #ccc"

        :editor="editorRef"

        :defaultConfig="toolbarConfig"

        :mode="mode" />

    <Editor

        :style="{ height: height + 'px', 'overflow-y': 'hidden' }"

        v-model="valueHtml"

        :defaultConfig="editorConfig"

        :mode="mode"

        @onCreated="handleCreated" />

  </div>

</template>

<script lang="ts" setup>

import '@wangeditor/editor/dist/css/style.css' // 引入 css

import { Editor, Toolbar } from '@wangeditor/editor-for-vue'

import { onBeforeUnmount, computed, shallowRef, ref } from 'vue'


// interface EmitEvent {

//   (e: 'update:modelValue', params: string): void

// }

const props = defineProps({

  height:{

    type:Number,

    default:320

  },

  modelValue:{

    type:String,

    default:''

  },

})

const emit = defineEmits()

const valueHtml = computed({

  get() {

    return props.modelValue

  },

  set(value: string) {

    console.log("value",value)

//子组件传值给父组件

    emit('update:modelValue', value)

  }

})


// 编辑器实例,必须用 shallowRef

const editorRef = shallowRef()

const toolbarConfig = {}

const editorConfig = {

  placeholder: '请输入内容...',

  MENU_CONF: {},

}

// 组件销毁时,也及时销毁编辑器

onBeforeUnmount(() => {

  const { value } = editorRef

  if (value === null) return

  value.destroy()

})

const handleCreated = (editor: any) => {

  editorRef.value = editor // 记录 editor 实例,重要!

}

</script>

<style lang="scss" scoped></style>


    封装完之后就能在后端进行内容的传递,而具体的发布文章和编辑文章到后端,由专门的api接口

const save = async () => {

  dialogFormVisible = false;

  let result = await addservice(articleInfo.value);

  await nextTick(); // 等待DOM更新

  ElMessage.success(result.msg ? result.msg : "添加成功");

  this.$refs.weditor.destroy()

}


//修改操作

const update = async () => {

  // 根据 editId 进行编辑操作

  dialogFormVisible = false;

  let result = await updateservice(articleInfo.value);

  ElMessage.success(result.msg ? result.msg : "编辑成功");

  // ...

}


let isFirstOpen = ref(true)

const putArticle = () => {


  if (editId.value) { // 编辑操作

    dialogFormVisible.value = true;

    const tempContent = articleInfo.value.content; // 临时保存富文本框的内容

    articleInfo.value = {

      ...articleInfo.value, // 保留articleInfo的其他属性值

    };

    nextTick(() => {

      if (shouldResetContent.value) {

        resetEditor(); // 重置富文本编辑器的内容

        shouldResetContent.value = false; // 重置标志位

      } else {

        articleInfo.value.content = tempContent; // 重新赋值富文本框的内容

      }

    });

  }

  if (!editId.value) { // 新增操作

    dialogFormVisible.value = true;

    console.log("新增");


    if (isFirstOpen.value) {

      resetEditor(); // 清除富文本编辑器的内容

      articleInfo.value = {

        id: "",

        title: "",

        description: "",

        content: "",

        area: radio.value,

      };

      isFirstOpen.value = false;

    }

  }

};


let shouldResetContent = ref(false)

const handleRichTextBoxClick = () => {

  shouldResetContent.value = true;

};

const kan=()=>{

  console.log(radio.value)

}
这样就能在前端传递参数后在后端接收了。
这个是有源码的,是我的课题设计。可以问我要哦!大家共同进步!