系列文章目录
Vue基础篇一:编写第一个Vue程序
Vue基础篇二:Vue组件的核心概念
Vue基础篇三:Vue的计算属性与侦听器
Vue基础篇四:Vue的生命周期(秒杀案例实战)
Vue基础篇五:Vue的指令
Vue基础篇六:Vue使用JSX进行动态渲染
Vue提高篇一:使用Vuex进行状态管理
Vue提高篇二:使用vue-router实现静态路由
Vue提高篇三:使用vue-router实现动态路由
Vue提高篇四:使用Element UI组件库
Vue提高篇五:使用Jest进行单元测试
Vue提高篇六: 使用Vetur+ESLint+Prettier插件提升开发效率
Vue实战篇一: 使用Vue搭建注册登录界面
Vue实战篇二: 实现邮件验证码发送
Vue实战篇三:实现用户注册
Vue实战篇四:创建多步骤表单
Vue实战篇五:实现文件上传
Vue实战篇六:表格渲染动态数据
Vue实战篇七:表单校验
Vue实战篇八:实现弹出对话框进行交互
Vue实战篇九:使用省市区级联选择插件
Vue实战篇十:响应式布局
Vue实战篇十一:父组件获取子组件数据的常规方法
Vue实战篇十二:多项选择器的实际运用
Vue实战篇十三:实战分页组件
Vue实战篇十四:前端excel组件实现数据导入
Vue实战篇十五:表格数据多选在实际项目中的技巧
Vue实战篇十六:导航菜单
Vue实战篇十七:用树型组件实现一个知识目录
Vue实战篇十八:搭建一个知识库框架
Vue实战篇十九:使用printjs打印表单
Vue实战篇二十:自定义表格合计
Vue实战篇二十一:实战Prop的双向绑定
Vue实战篇二十二:生成二维码
Vue实战篇二十三:卡片风格与列表风格的切换
Vue实战篇二十四:分页显示
Vue实战篇二十五:使用ECharts绘制疫情折线图
Vue实战篇二十六:创建动态仪表盘
Vue实战篇二十七:实现走马灯效果的商品轮播图
文章目录
一、背景
- 上周我们实现了走马灯效果的商品轮播图,这周我们在此基础上,来做一个手机版的购物车。
二、底部导航条
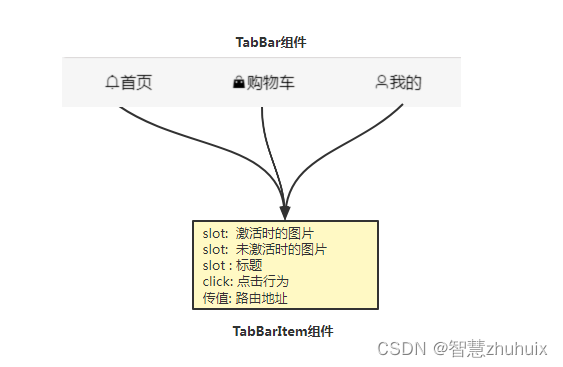
- 在实现购物车之前,我们补充说明一下底部导航条的实现,在这个底部导航条中会包含首页,购物车,我的三个菜单。
2.1 封装底层的TabBarItem组件
– 设置标题、激活/未激活的图片插槽;设置路由地址传值参数;设置click点击行为,根据路由地址跳转。
– TabBarItem组件实现代码
<template>
  <div class="tab-bar-item" @click="itemClick">
    <div v-if="!isActive">
     <!-- 未激活时的图片插槽 -->
      <slot name="item-icon" />
    </div>
    <div v-else>
    <!-- 激活时的图片插槽 -->
      <slot name="item-icon-active" />
    </div>
    <!-- 标题插槽 -->
    <div><slot name="item-text" /></div>
  </div>
</template>

<script>
export default {


  name: 'TabBarItem',
  props: {


     // 路由地址传值
    path: {


      type: String,
      default: ''
    }
  },
  data() {


    return {


    }
  },
  computed: {


    // 判断当前条目是否被选中
    isActive() {


      return !this.$route.path.indexOf(this.path)
    }
  },
  methods: {


    // 跳转路由
    itemClick() {


      this.$router.replace(this.path)
    }
  }

}
</script>

<style>
.tab-bar-item {


  display: flex;
  flex: 1;
  justify-content: center;
  text-align: center;
  height: 49px;
  line-height: 49px;
  cursor: pointer;
}
</style>
2.2 实现底部导航条TabBar
– 通过css设置将导航条固定在底部
– 调用TabBarItem进行组合
<template>
  <div id="tab-bar">
    <tab-bar-item path="/home">
      <i slot="item-icon-active" class="el-icon-message-solid" />
      <i slot="item-icon" class="el-icon-bell" />
      <div slot="item-text">首页</div>
    </tab-bar-item>

    <tab-bar-item path="/cart">
      <i slot="item-icon-active" class="el-icon-s-goods" />
      <i slot="item-icon" class="el-icon-goods" />
      <div slot="item-text">购物车</div>
    </tab-bar-item>

    <tab-bar-item path="/my">
      <i slot="item-icon-active" class="el-icon-user-solid" />
      <i slot="item-icon" class="el-icon-user" />
      <div slot="item-text">我的</div>
    </tab-bar-item>

  </div>

</template>

<script>
import TabBarItem from '@/components/TabBar/tabBarItem'
export default {


  name: 'TabBar',
  components: {

      TabBarItem },
  data() {


    return {


    }
  },
  methods: {


  }
}

</script>

<style>
#tab-bar {


  display: flex;
  background-color: #f6f6f6;
  position: fixed;
  left: 0;
  right: 0;
  bottom: 0;
  box-shadow: 0 -1px 1px rgba(100, 100, 100, 0.08);
}
</style>
三、实现购物车信息的状态管理
- 在创建购物车页面前,我们需要创建一个共享的购物车信息,让各个页面可以增删改查这些数据,该功能用Vuex来实现
const cart = {


  state: {


    productList: []
  },

  mutations: {


    // 增加商品
    ADD_PRODUCT: (state, product) => {


      const index = state.productList.findIndex(item => item.id === product.id)
      if (index >= 0) {


        state.productList[index].num += 1
      } else {


        state.productList.push(product)
      }
    },
    // 删除商品
    DEL_PRODUCT: (state, id) => {


      state.productList.splice(state.productList.findIndex(item => item.id === id), 1)
    },
    // 设置数量
    SET_PRODUCT: (state, product) => {


      const index = state.productList.findIndex(item => item.id === product.id)
      if (index >= 0) {


        state.productList[index].num = product.num
      }
    }

  },

  actions: {


    addProduct({

     commit }, product) {


      return new Promise(resolve => {


        commit('ADD_PRODUCT', product)
      })
    },
    delProduct({

     commit }, id) {


      return new Promise(resolve => {


        commit('DEL_PRODUCT', id)
      })
    },
    setProduct({

     commit }, product) {


      return new Promise(resolve => {


        commit('SET_PRODUCT', product)
      })
    }
  }
}

export default cart
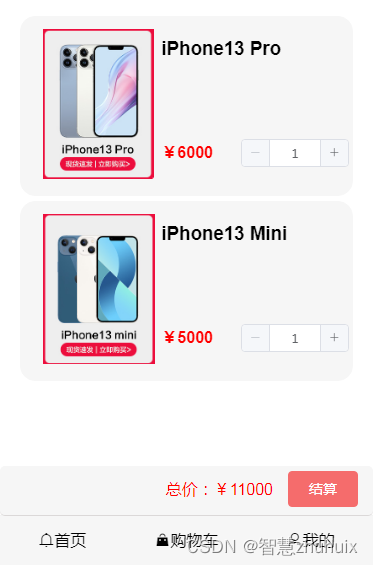
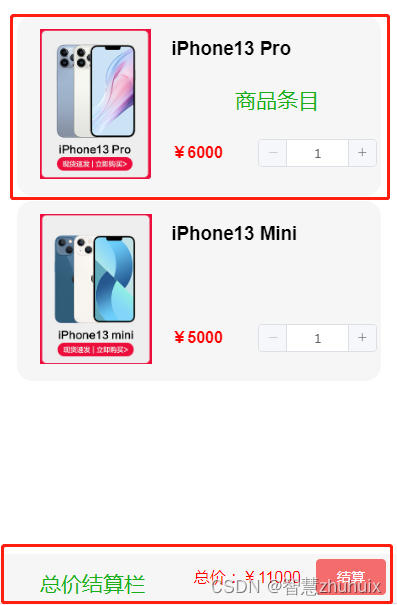
四、创建购物车页面
- 购物车主要实现商品条目与总价结算栏
- 商品条目中包含商品图片、商品名称、单价与购买数量
- 商品数量增减时需要设置购物车状态信息,并重新计算总价
- 购物车页面源码
<template>
  <div>
    <div class="cart">
      <!-- 商品列表 -->
      <ul>
        <li v-for="item in productList" :key="item.id">
          <el-row :gutter="5">
              <!-- 商品图片 -->
            <el-col :span="10">
              <img
                class="img"
                :src="require('@/assets/images/' + item.image)"
                height="150px"
              >
            </el-col>
            <el-col :span="14">
             <!-- 商品名称 -->
              <el-row>
                <h3>{

   { item.name }}</h3>
              </el-row>
               <!-- 商品单价 -->
              <el-row class="numRow">
                <el-col :span="10" class="price">
                  <h4>¥{

   { item.price }}</h4>
                </el-col>
                 <!-- 商品数量加减,重新设置状态信息及总价 -->
                <el-col :span="14" class="num">
                  <el-input-number
                    v-model="item.num"
                    size="mini"
                    :min="1"
                    :max="10"
                     @change="handleChange(item)"
                  />
                </el-col>
              </el-row>
            </el-col>
          </el-row>
        </li>
      </ul>
    </div>
     <!-- 结算栏 -->
    <div class="bottom">
      <div class="button">
        <span class="total"> 总价:¥{

   { total }} </span>
        <el-button type="danger" size="medium">结算</el-button>
      </div>
    </div>
  </div>
</template>

<script>
export default {


  name: 'Cart',
  data() {


    return {


      total: 0,
      // 从状态管理中获取购物车信息
      productList: this.$store.state.cart.productList,
    }
  },
  created() {


    this.totalPrice()
  },
  methods: {


    handleChange(item) {


      // 重新设置购物状态信息
     this.$store.dispatch('setProduct', item)
     // 重新计算总价
      this.totalPrice()
    },
    // 加减数量时,计算总价
    totalPrice() {


      let total = 0
      this.productList.forEach(p => {


        total += p.price * p.num
      })
      this.total = total
    }
  }
}
</script>

<style scoped>
.cart {


  position: fixed;
  top:0;
  left: 0;
  right :0;
  bottom: 99px;
  overflow-y:auto;
}

ul {


  list-style-type: none;
}

li {


  padding: 2px;
  background: #f6f6f6;
  border-radius: 15px;
  border: 1px solid #f6f6f6;
  width: 100%;
  height: 180px;
  margin-left: -20px;
  margin-top: 5px;
}

.img {


  margin-top: 10px;
  margin-left: 20px;
}

.numRow {


  margin-top: 45px;
}

.price {


  color: red;
}

.num {


  display: flex;
  float: right;
  margin-top: 15px;
  padding: 1px;
}

.bottom {


  width: 100%;
  height: 50px;
  background-color: #f6f6f6;
  position: fixed;
  left: 0;
  bottom: 49px;
  border-width: 0 0 1px 0;
  border-style: solid;
  border-color: rgb(219, 216, 216);
  border-radius: 5px;
  z-index: 99;
}

.total {


  margin-top: 10px;
  margin-right: 15px;
  color: red;
}

.button {


  display: flex;
  float: right;
  margin-right: 15px;
  margin-top: 5px;
}
</style>
五、设置路由
- 在路由表中增加购物车的路由
import Vue from 'vue'
import Router from 'vue-router'

Vue.use(Router)

export const constantRoutes = [

  {


    path: '',
    redirect: '/home'
  },
  // 省页
  {


    path: '/home',
    component: () => import('@/views/h5/home')
  },
  // 购物车
  {


    path: '/cart',
    component: () => import('@/views/h5/cart')
  },
  // 我的
  {


    path: '/my',
    component: () => import('@/views/h5/my')
  },

  {


    path: '/401',
    component: () => import('@/views/401'),
    hidden: true
  },

  {


    path: '/404',
    component: () => import('@/views/404'),
    hidden: true
  }
]

const createRouter = () => new Router({


  mode: 'history', // require service support
  scrollBehavior: () => ({

     y: 0 }),
  routes: constantRoutes
})

export const router = createRouter()

// Detail see: https://github.com/vuejs/vue-router/issues/1234#issuecomment-357941465
export function resetRouter() {


  const newRouter = createRouter()
  router.matcher = newRouter.matcher // reset router
}

export default router
六、改写主页面
- 在主页面中加入底部导航条;
<template>
  <div id="app">
    <!--路由切换 -->
    <router-view />
    <!-- 底部导航条 -->
    <tab-bar />
  </div>
</template>

<script>
import TabBar from '@/components/TabBar/tabBar'
export default {


  name: 'App',
  components: {

      TabBar }
}
</script>
七、效果演示
– 动图演示