SpringCloud Alibab-Seata 简介:
Seata 是一款开源的分布式事务解决方案,致力于在微服务架构下提供高性能和简单易用的分布式事务服务。
Seata 将为用户提供了 AT、TCC、SAGA 和 XA 事务模式,为用户打造一站式的分布式解决方案。
原Fescar,即分布式事务解决方案。
详细介绍,可以阅读 SpringCloud Alibab-Seata 官网
一、SpringBoot 整合 Seata
1、前置要求
整合Seata之前,必须已经做了如下的前置要求:
1、创建表 undo_log
-
SEATA AT 模式需要 每一个微服务对应的数据库表必须先创建表 undo_log(回滚记录表)
– 注意此处0.3.0+ 增加唯一索引 ux_undo_log
CREATE TABLEundo_log(
idbigint(20) NOT NULL AUTO_INCREMENT,
branch_idbigint(20) NOT NULL,
xidvarchar(100) NOT NULL,
contextvarchar(128) NOT NULL,
rollback_infolongblob NOT NULL,
log_statusint(11) NOT NULL,
log_createddatetime NOT NULL,
log_modifieddatetime NOT NULL,
extvarchar(100) DEFAULT NULL,
PRIMARY KEY (id),
UNIQUE KEYux_undo_log(xid,branch_id)
) ENGINE=InnoDB AUTO_INCREMENT=1 DEFAULT CHARSET=utf8;
2、安装事务协调器(seata-server)
下载并安装最新版的事务协调器(seata-server)。
- 下载 seata-server V1.5.1 ,GitHub下载地址
- 执行/conf 目录下的启动文件,正常启动。
2、导入依赖
 <!--Seata (分布式事务解决方案)-->
<dependency>
    <groupId>com.alibaba.cloud</groupId>
    <artifactId>spring-cloud-starter-alibaba-seata</artifactId>
     <!-- 根据spring-cloud-alibaba版本自定导入对应版本的seata依赖 -->
    <version>${spring-cloud-alibaba.version}</version>
</dependency>
 <!--如果想单独升级 seata版本使用最新版,可以自己导入 seata 核心包-->
<dependency>
    <groupId>io.seata</groupId>
    <artifactId>seata-spring-boot-starter</artifactId>
    <version>1.5.1</version>
</dependency>
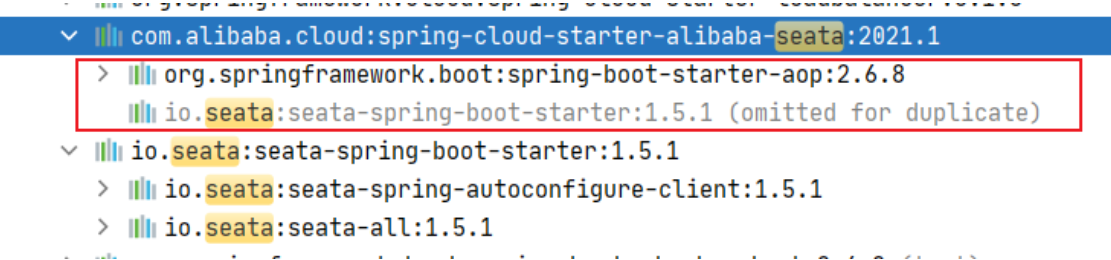
maven 依赖关系图如下:
3、添加Seata配置
方案一:file.conf + registry.conf (原始配置)
seata 配置方式默认是
file,从文件读取,seata也提供了其他的配置方式,比如放到:Nacos、Apollo等配置中心。
以下讲解默认的
file配置方式,如需要使用配置中心的方式,请自行抽取到配置中心:
将
file.conf文件添加到/resources配置路径下,跟application.yml同级。将
registry.conf文件添加到/resources配置路径下,跟application.yml同级。
file.conf 示例
最新的示例配置,请参考官方文档。此示例是拷贝自 v1.5.0 - v1.5.1 seata conf配置文件地址 。
- 这里重点关注
service.vgroupMapping.default_tx_group = "default"配置,default_tx_group这个是v1.5.1版本默认事务组名字,如果想自定义这个事务组名字,可以配置seata.tx-service-group=default_tx_group自定义。- 如果对不上,当客户端启动时会注册不到
seata-server,控制台会报错can not get cluster name in registry config 'service.vgroupMapping.default_tx_group', please make sure registry config correct。
transport {
  # tcp udt unix-domain-socket
  type = "TCP"
  #NIO NATIVE
  server = "NIO"
  #enable heartbeat
  heartbeat = true
  # the client batch send request enable
  enableClientBatchSendRequest = true
  #thread factory for netty
  threadFactory {
    bossThreadPrefix = "NettyBoss"
    workerThreadPrefix = "NettyServerNIOWorker"
    serverExecutorThread-prefix = "NettyServerBizHandler"
    shareBossWorker = false
    clientSelectorThreadPrefix = "NettyClientSelector"
    clientSelectorThreadSize = 1
    clientWorkerThreadPrefix = "NettyClientWorkerThread"
    # netty boss thread size,will not be used for UDT
    bossThreadSize = 1
    #auto default pin or 8
    workerThreadSize = "default"
  }
  shutdown {
    # when destroy server, wait seconds
    wait = 3
  }
  serialization = "seata"
  compressor = "none"
}
service {
  #transaction service group mapping
  vgroupMapping.default_tx_group = "default"
  #only support when registry.type=file, please don't set multiple addresses
  default.grouplist = "127.0.0.1:8091"
  #degrade, current not support
  enableDegrade = false
  #disable seata
  disableGlobalTransaction = false
}

client {
  rm {
    asyncCommitBufferLimit = 10000
    lock {
      retryInterval = 10
      retryTimes = 30
      retryPolicyBranchRollbackOnConflict = true
    }
    reportRetryCount = 5
    tableMetaCheckEnable = false
    reportSuccessEnable = false
  }
  tm {
    commitRetryCount = 5
    rollbackRetryCount = 5
  }
  undo {
    dataValidation = true
    logSerialization = "jackson"
    logTable = "undo_log"
  }
  log {
    exceptionRate = 100
  }
}
registry.conf 示例
最新的示例配置,请参考官方文档。此示例是拷贝自 v1.5.0 - v1.5.1 seata conf配置文件地址 。
registry {
  # file 、nacos 、eureka、redis、zk、consul、etcd3、sofa
  # 指定注册类型,这里使用 file 文件读取配置模式,如果使用`nacos`配置中心,则修改对应`naocs`的配置即可(不要忘记将当前配置文件迁移到配置中心喔)
  type = "file"

  nacos {
	application = "seata-server"
    serverAddr = "127.0.0.1:8848"
    group = "SEATA_GROUP"
    namespace = ""
    cluster = "default"
    username = "nacos"
    password = "nacos"
  }
  eureka {
    serviceUrl = "http://localhost:8761/eureka"
    application = "default"
    weight = "1"
  }
  redis {
    serverAddr = "localhost:6379"
    db = 0
    password = ""
    cluster = "default"
    timeout = 0
  }
  zk {
    cluster = "default"
    serverAddr = "127.0.0.1:2181"
    sessionTimeout = 6000
    connectTimeout = 2000
    username = ""
    password = ""
  }
  consul {
    cluster = "default"
    serverAddr = "127.0.0.1:8500"
  }
  etcd3 {
    cluster = "default"
    serverAddr = "http://localhost:2379"
  }
  sofa {
    serverAddr = "127.0.0.1:9603"
    application = "default"
    region = "DEFAULT_ZONE"
    datacenter = "DefaultDataCenter"
    cluster = "default"
    group = "SEATA_GROUP"
    addressWaitTime = "3000"
  }
  file {
    name = "file.conf"
  }
}

config {
  # file、nacos 、apollo、zk、consul、etcd3
  type = "nacos"

  nacos {
    serverAddr = "127.0.0.1:8848"
    namespace = ""
    group = "SEATA_GROUP"
    username = "nacos"
    password = "nacos"
    dataId = "seataServer.properties"
  }
  consul {
    serverAddr = "127.0.0.1:8500"
  }
  apollo {
    appId = "seata-server"
    apolloMeta = "http://192.168.1.204:8801"
    namespace = "application"
  }
  zk {
    serverAddr = "127.0.0.1:2181"
    sessionTimeout = 6000
    connectTimeout = 2000
    username = ""
    password = ""
  }
  etcd3 {
    serverAddr = "http://localhost:2379"
  }
  file {
    name = "file.conf"
  }
}
application.yml
高版本的 Springboot 启动时,控制台可能会报
com.alibaba.cloud.seata.rest.SeataRestTemplateAutoConfiguration循环依赖的错。需要配置一下spring.main.allow-circular-references=true,允许循环依赖即可。
spring:
  application:
    name: seata-test
  main:
    # 允许循环依赖,避免启动时"com.alibaba.cloud.seata.rest.SeataRestTemplateAutoConfiguration"循环依赖报错
    allow-circular-references: true
server:
  port: 9000

# seata 事务组默认配置(解决v1.5.1版本配置失效问题)
seata:
  tx-service-group: default_tx_group # 可以自定义事务组名字,"default_tx_group"是默认值,如果改了这里,file.conf配置下的 `server.vgroupMapping.xxxx`也要跟着一起改,否则会注册不到 “seata-server”导致报错。
logging:
  level:
    io.seata: debug
方案二:seata 配置整合到 application.yml 文件中
相当于
file.conf+registry.conf,整合到application.yml中。
####################################################################################################
# Seata 配置
seata:
  enabled: true # 默认开启
  application-id: ${spring.application.name}
  tx-service-group: default_tx_group # 事务群组(可以每个应用独立取名,也可以使用相同的名字)
  client:
    rm-report-success-enable: true
    rm-table-meta-check-enable: false # 自动刷新缓存中的表结构(默认false)
    rm-report-retry-count: 5 # 一阶段结果上报TC重试次数(默认5)
    rm-async-commit-buffer-limit: 10000 # 异步提交缓存队列长度(默认10000)
    rm:
      lock:
        lock-retry-internal: 10 # 校验或占用全局锁重试间隔(默认10ms)
        lock-retry-times: 30 # 校验或占用全局锁重试次数(默认30)
        lock-retry-policy-branch-rollback-on-conflict: true # 分支事务与其它全局回滚事务冲突时锁策略(优先释放本地锁让回滚成功)
    tm-commit-retry-count: 3 # 一阶段全局提交结果上报TC重试次数(默认1次,建议大于1)
    tm-rollback-retry-count: 3 # 一阶段全局回滚结果上报TC重试次数(默认1次,建议大于1)
    undo:
      undo-data-validation: true # 二阶段回滚镜像校验(默认true开启)
      undo-log-serialization: jackson # undo序列化方式(默认jackson)
      undo-log-table: undo_log  # 自定义undo表名(默认undo_log)
    log:
      exception-rate: 100 # 日志异常输出概率(默认100)
    support:
      spring:
        datasource-autoproxy: true
  service:
    vgroup-mapping:
      default_tx_group: default # TC 集群(必须与seata-server保持一致)
    grouplist:
      default: 127.0.0.1:8091
    enable-degrade: false # 降级开关
    disable-global-transaction: false # 禁用全局事务(默认false)

  transport:
    type: TCP
    server: NIO
    heartbeat: true
    serialization: seata
    compressor: none
    enable-client-batch-send-request: true # 客户端事务消息请求是否批量合并发送(默认true)
    shutdown:
      wait: 3
    thread-factory:
      boss-thread-prefix: NettyBoss
      worker-thread-prefix: NettyServerNIOWorker
      server-executor-thread-prefix: NettyServerBizHandler
      share-boss-worker: false
      client-selector-thread-prefix: NettyClientSelector
      client-selector-thread-size: 1
      client-worker-thread-prefix: NettyClientWorkerThread

  registry:
    type: file  # file 、nacos 、eureka、redis、zk、consul、etcd3、sofa
  config:
    #    file:
    #      name: file.conf
    type: file  # file、nacos 、apollo、zk、consul、etcd3
####################################################################################################
方案三:seata客户端配置整合到配置中心:
- 略,以Nacos为例,详情见下方 “FAQ-问题1-方案2”。
读取配置源码分析:
ConfigurationFactory
public final class ConfigurationFactory {

    private static Configuration buildConfiguration() {
        //1、获取 `config.type`配置类型
        String configTypeName = CURRENT_FILE_INSTANCE.getConfig(
                ConfigurationKeys.FILE_ROOT_CONFIG + ConfigurationKeys.FILE_CONFIG_SPLIT_CHAR
                        + ConfigurationKeys.FILE_ROOT_TYPE);
        //略。。。。

        //2、 file 类型(本地file文件方式读取配置)
        if (ConfigType.File == configType) {
            String pathDataId = String.join(ConfigurationKeys.FILE_CONFIG_SPLIT_CHAR,
                    ConfigurationKeys.FILE_ROOT_CONFIG, FILE_TYPE, NAME_KEY);
            String name = CURRENT_FILE_INSTANCE.getConfig(pathDataId);
            configuration = new FileConfiguration(name);
            try {
                //2.1  `ExtConfigurationProvider` 接口,唯一实现类 `SpringBootConfigurationProvider`
                extConfiguration = EnhancedServiceLoader.load(ExtConfigurationProvider.class).provide(configuration);
               //略...
            }
            //略...
        } else {

            //3、其他类型读取配置走到这里
            //3.1 `ConfigurationProvider`接口有很多实现类,比如:Nacos、apollo等配置中心读取
            configuration = EnhancedServiceLoader
                    .load(ConfigurationProvider.class, Objects.requireNonNull(configType).name()).provide();
        }
        //略。。。不是重点
        return null == extConfiguration ? configuration : extConfiguration;
    }
}
ExtConfigurationProvider接口的实现类:

ConfigurationProvider 接口的实现类:
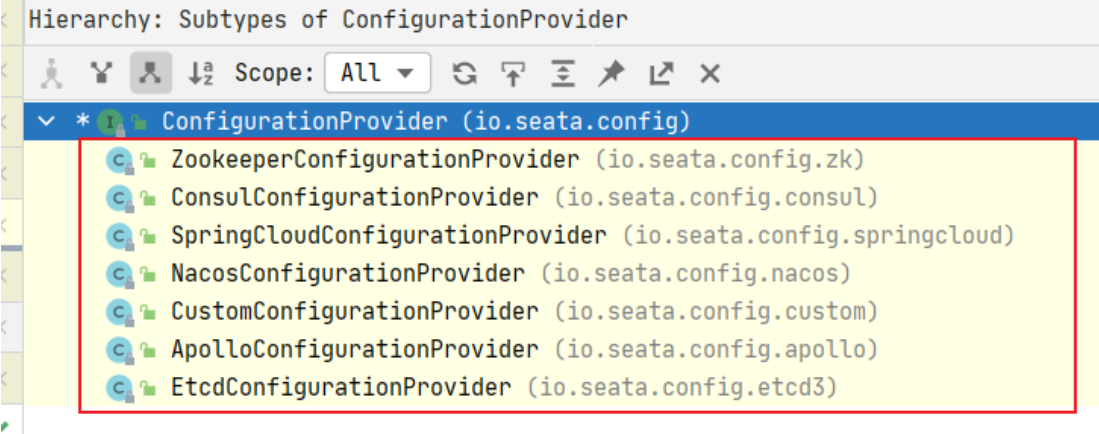
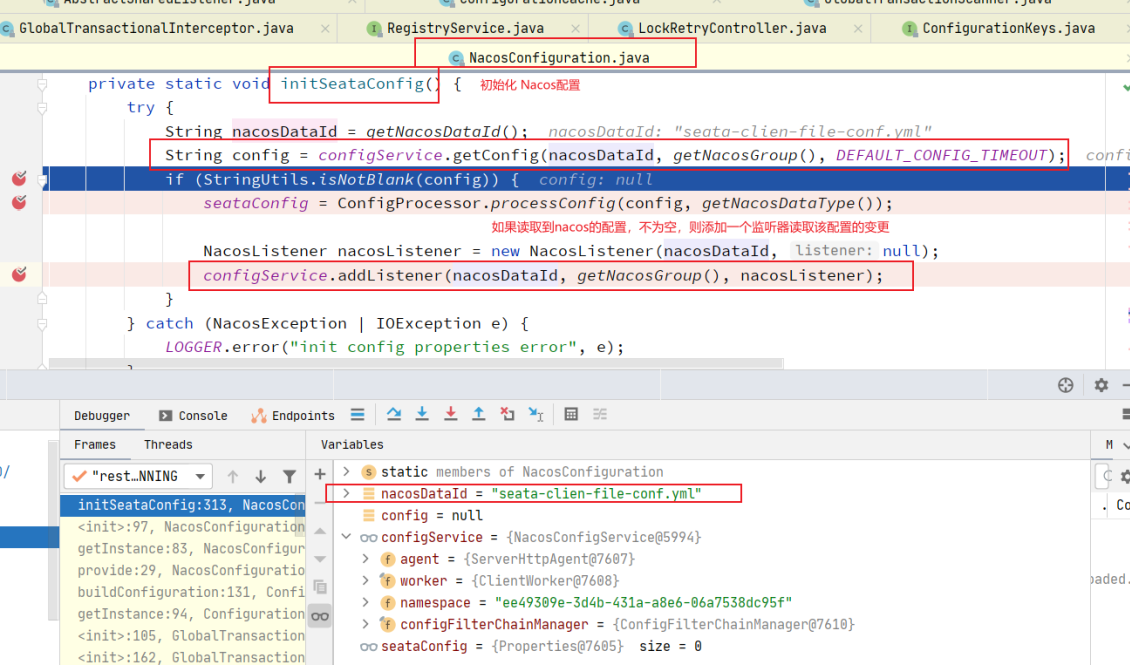
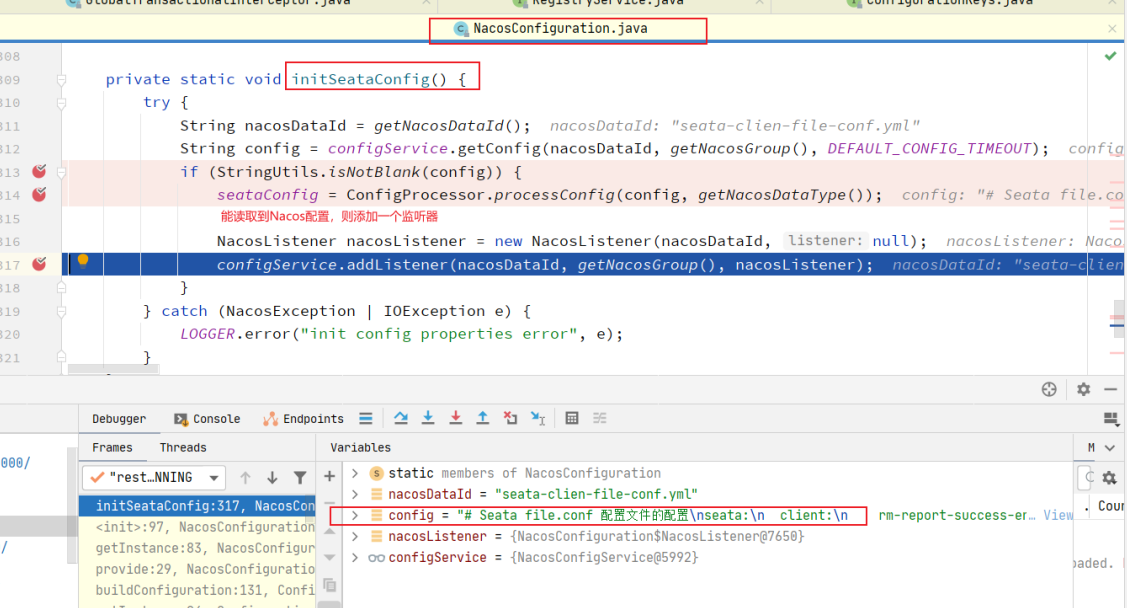
以 Nacos 为例,seata.config.nacos.data-id读取的配置不为空,则添加一个监听器,专门监听该配置的变更。
4、将 seata 的 DataSourceProxy 设置为主数据源,包住原来的 DataSource 数据源,否则事务无法回滚
- 引入
spring-cloud-starter-alibaba-seata依赖后,io.seata.spring.boot.autoconfigure.SeataDataSourceAutoConfiguration已帮我们自动注入处理了。
源码分析:
SeataDataSourceAutoConfiguration
@ConditionalOnBean({DataSource.class})
@ConditionalOnExpression("${seata.enabled:true} && ${seata.enableAutoDataSourceProxy:true} && ${seata.enable-auto-data-source-proxy:true}")
@AutoConfigureAfter({SeataCoreAutoConfiguration.class})
public class SeataDataSourceAutoConfiguration {
    public SeataDataSourceAutoConfiguration() {
    }

    @Bean({"seataAutoDataSourceProxyCreator"})
    @ConditionalOnMissingBean({SeataAutoDataSourceProxyCreator.class})//如果缺少这个类`SeataAutoDataSourceProxyCreator`,则自动注入。
    public SeataAutoDataSourceProxyCreator seataAutoDataSourceProxyCreator(SeataProperties seataProperties) {
        //【重点】这个类`SeataAutoDataSourceProxyCreator`帮我封装了DataSource处理了。
        //seataProperties.getDataSourceProxyMode():默认使用"AT"模式
        return new SeataAutoDataSourceProxyCreator(seataProperties.isUseJdkProxy(), seataProperties.getExcludesForAutoProxying(), seataProperties.getDataSourceProxyMode());
    }
}
SeataAutoDataSourceProxyCreator
import javax.sql.DataSource;
import java.util.Arrays;
import java.util.HashSet;
import java.util.Set;

import io.seata.core.model.BranchType;
import io.seata.rm.datasource.DataSourceProxy;
import io.seata.rm.datasource.SeataDataSourceProxy;
import io.seata.rm.datasource.xa.DataSourceProxyXA;
import org.aopalliance.aop.Advice;
import org.slf4j.Logger;
import org.slf4j.LoggerFactory;
import org.springframework.aop.TargetSource;
import org.springframework.aop.framework.autoproxy.AbstractAutoProxyCreator;
import org.springframework.aop.support.DefaultIntroductionAdvisor;
public class SeataAutoDataSourceProxyCreator extends AbstractAutoProxyCreator {
	//其他代码略。

    SeataDataSourceProxy buildProxy(DataSource origin, String proxyMode) {

        if (BranchType.AT.name().equalsIgnoreCase(proxyMode)) {
            //将 DataSource 给seata的 DataSourceProxy 代理
            return new DataSourceProxy(origin);
        }
        if (BranchType.XA.name().equalsIgnoreCase(proxyMode)) {
             //将 DataSource 给seata的 DataSourceProxy 代理
            return new DataSourceProxyXA(origin);
        }
        throw new IllegalArgumentException("Unknown dataSourceProxyMode: " + proxyMode);
    }
}
5、可以启动微服务,并测试分布式事务
1、给分布式大事务的入口标注
@GlobalTransactional,效果可以简单的理解成跟Spring提供的@Transactional作用雷同。不同的是,seata的@GlobalTransactional注解,默认利用AT模式,通过2PC模型,控制分布式事务。(当然,前提是其他微服务也有引入seata,并重复上面1-2步骤。)2、被远程调用的其他微服务方法的方法正常使用
@Transactional注解,代表控制住自己的事务。跟@GlobalTransactional注解不冲突,应该同时使用。
测试项目,以官方的子项目 springcloud-nacos-seata 为例:
- 当有需要记录的事务时,会在对应数据库的
undo_log表,新增一条记录。

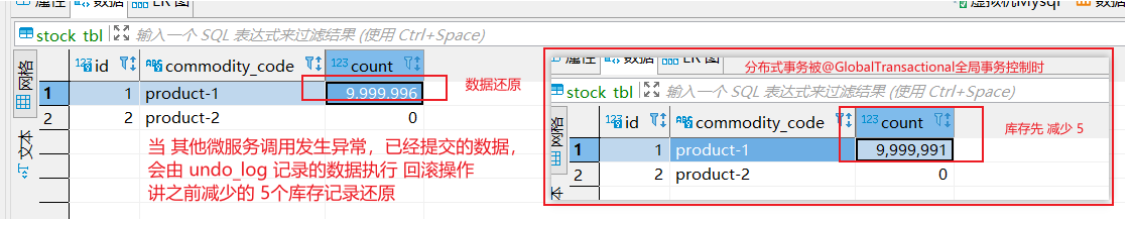
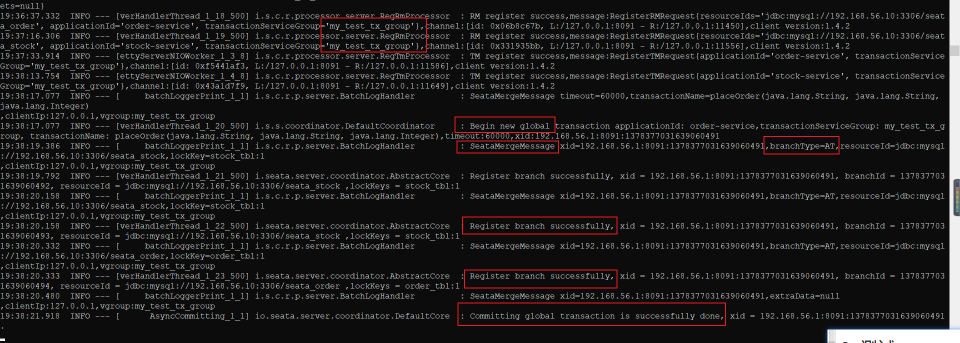
- Seata-Server 控制台 全局事务日志打印。可以从图中看到 “AT模式”,自动控制全局事务的提交和回滚。
二、FAQ
问题1、Seata 启动报错 can not get cluster name in registry config 'service.vgroupMapping.default_tx_group', please make sure registry config correct
今天学习使用的时候发现客户端启动成功后控制台一直报错can not get cluster name in registry config 'service.vgroupMapping.default_tx_group', please make sure registry config correct,问题解决过程记录如下:
服务端 seata-server 版本 : 1.5.1
客户端 seata-spring-boot-starter 版本: 1.5.1
复现:
-
下载完最新的
seata-server 1.5.1,解压后,修改application.yml配置文件为nacos方式,然后执行启动文件(在安装目录inseata-server.bat), 双击直接启动服务端。 -
客户端导入
seata-spring-boot-starter依赖后启动,控制台疯狂报错。can not get cluster name in registry config 'service.vgroupMapping.default_tx_group', please make sure registry config correct
(如果是部署到Linux系统报的这个问题,也是一样的原因)
解决:
后来debug查看了源码,才发现我在
application.yml配置文件中设置了registry.type=nacos和config.type=nacos,意思是:读取 Nacos配置中心的seata配置。但是Nacos配置中心又没有加file.conf和registry.conf的配置导致的….我以为
V1.5.1版本的seata-server目录D:seata-server-1.5.1seataconfapplication.yml配置文件配置了,就不用再在Nacos配置了,毕竟他们这么像…然而并不是,一个是服务端(seata-server)的配置,一个是客户端(微服务)的配置。特此记录一下,避免忘记。
方案1:改为从文件配置的方式获取配置
- 修改配置:
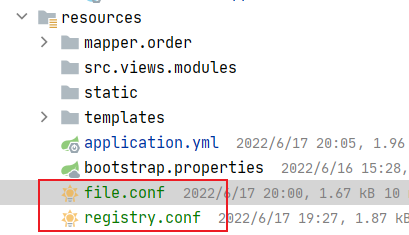
registry.type=file和config.type=file,意思是从文件配置的方式获取配置。 - 然后,客户端添加
file.conf和registry.conf配置,如下图:
1.5.0 ~ 1.5.1 版本关于(seata/script/client/conf/)配置的地址
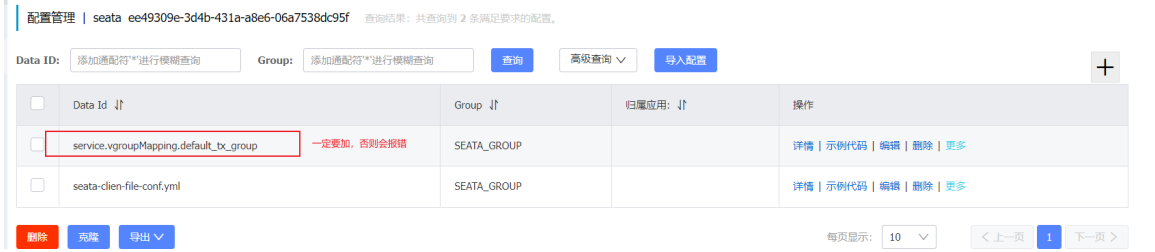
方案2:“配置中心读取的方式”有个坑:除了添加自定义的seata.properties配置文件外, 还需要额外添加 DataId 为service.vgroupMapping.default_tx_group,值为default。
比如:Nacos配置中心,Nacos 关于Seata客户端的配置,如下图:
service.vgroupMapping.default_tx_group。 这个配置是因为RegistryService类默认创建了 key 为service.vgroupMapping.default_tx_group的监听器,专门监听这个属性,如果没添加,控制台会报错can not get cluster name in registry config 'service.vgroupMapping.default_tx_group', please make sure registry config correctseata-clien-file-conf.yml(相当于将file.conf文件迁移到配置中心。)
application.yml (相当于将registry.conf配置文件的配置整合到这里 )
# Seata registry.conf 配置文件的配置
seata:
  enabled: true # 默认开启 (这个值配到配置中心也没用,所以放这里)
  application-id: ${spring.application.name}  #  (这个值配到配置中心也没用,所以放这里)
  tx-service-group: default_tx_group # 事务群组(可以每个应用独立取名,也可以使用相同的名字)
  registry:
    type: nacos  # file 、nacos 、eureka、redis、zk、consul、etcd3、sofa
    nacos:
      server-addr: localhost:8848
      namespace: ee49309e-3d4b-431a-a8e6-06a7538dc95f
      cluster: default
      group: SEATA_GROUP
      username: nacos
      password: nacos

  config:
    type: nacos  # file、nacos 、apollo、zk、consul、etcd3
    nacos:
      namespace: ee49309e-3d4b-431a-a8e6-06a7538dc95f   # 配置中心名称空间唯一id
      server-addr: localhost:8848
      group: SEATA_GROUP   # nacos分组,默认是 SEATA_GROUP ,注意:Nacos默认组是 DEFAULT_GROP
      username: nacos
      password: nacos
      data-id:  seata-clien-file-conf.yml   # 自定义读取配置名,默认seata.properties
seata-clien-file-conf.yml(相当于file.conf配置文件)
# Seata file.conf 配置文件的配置
seata:
  client:
    rm-report-success-enable: true
    rm-table-meta-check-enable: false # 自动刷新缓存中的表结构(默认false)
    rm-report-retry-count: 5 # 一阶段结果上报TC重试次数(默认5)
    rm-async-commit-buffer-limit: 10000 # 异步提交缓存队列长度(默认10000)
    rm:
      lock:
        lock-retry-internal: 10 # 校验或占用全局锁重试间隔(默认10ms)
        lock-retry-times: 30 # 校验或占用全局锁重试次数(默认30)
        lock-retry-policy-branch-rollback-on-conflict: true # 分支事务与其它全局回滚事务冲突时锁策略(优先释放本地锁让回滚成功)
    tm-commit-retry-count: 3 # 一阶段全局提交结果上报TC重试次数(默认1次,建议大于1)
    tm-rollback-retry-count: 3 # 一阶段全局回滚结果上报TC重试次数(默认1次,建议大于1)
    undo:
      undo-data-validation: true # 二阶段回滚镜像校验(默认true开启)
      undo-log-serialization: jackson # undo序列化方式(默认jackson)
      undo-log-table: undo_log  # 自定义undo表名(默认undo_log)
    log:
      exception-rate: 100 # 日志异常输出概率(默认100)
    support:
      spring:
        datasource-autoproxy: true
  service:
    vgroup-mapping:
      default_tx_group: default # TC 集群(必须与seata-server保持一致)
    grouplist:
      default: 127.0.0.1:8091
    enable-degrade: false # 降级开关
    disable-global-transaction: false # 禁用全局事务(默认false)

  transport:
    type: TCP
    server: NIO
    heartbeat: true
    serialization: seata
    compressor: none
    enable-client-batch-send-request: true # 客户端事务消息请求是否批量合并发送(默认true)
    shutdown:
      wait: 3
    thread-factory:
      boss-thread-prefix: NettyBoss
      worker-thread-prefix: NettyServerNIOWorker
      server-executor-thread-prefix: NettyServerBizHandler
      share-boss-worker: false
      client-selector-thread-prefix: NettyClientSelector
      client-selector-thread-size: 1
      client-worker-thread-prefix: NettyClientWorkerThread
成功解决
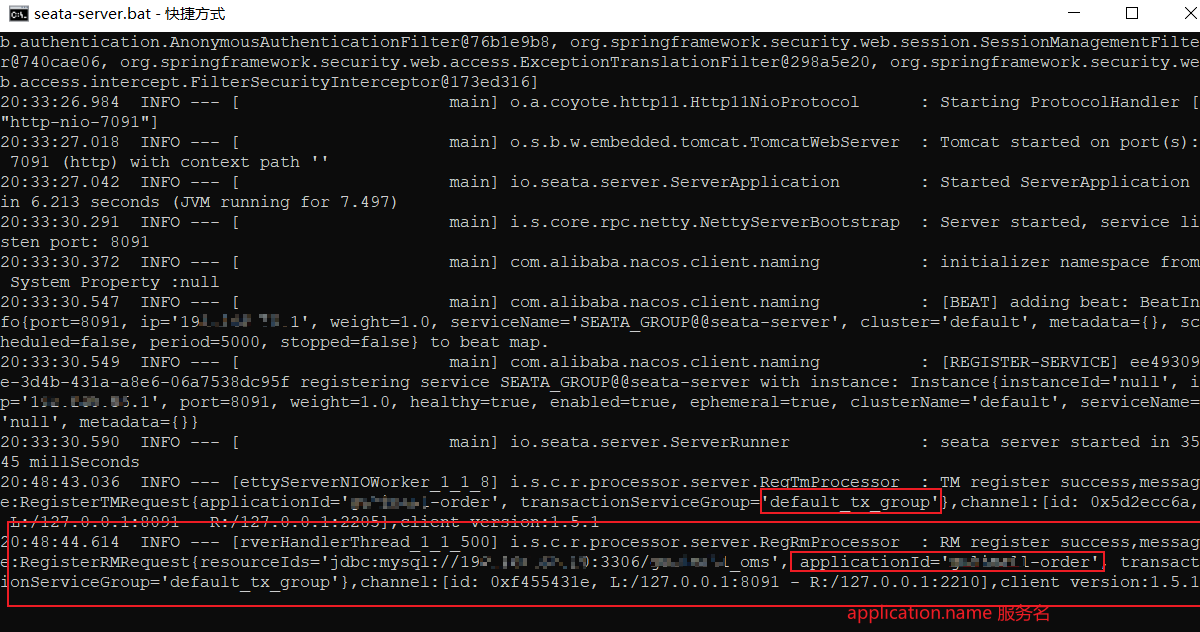
seata-server 1.5.1服务端控制台打印 内容如下,表示 该“xxx-order”服务已经成功注册到 seata。运行稳定后,客户端控制也没有再报错了,成功。
解决过程中的坑:
- 官方文档只有使用效果的大概说明,具体还得看“子项目”的代码。
- 期间,我查还看了官网的 版本升级指南 ,从 v1.4.x 升级到 v1.5.x 版本没有涉及到该问题的改动,没有找到该问题的答案。
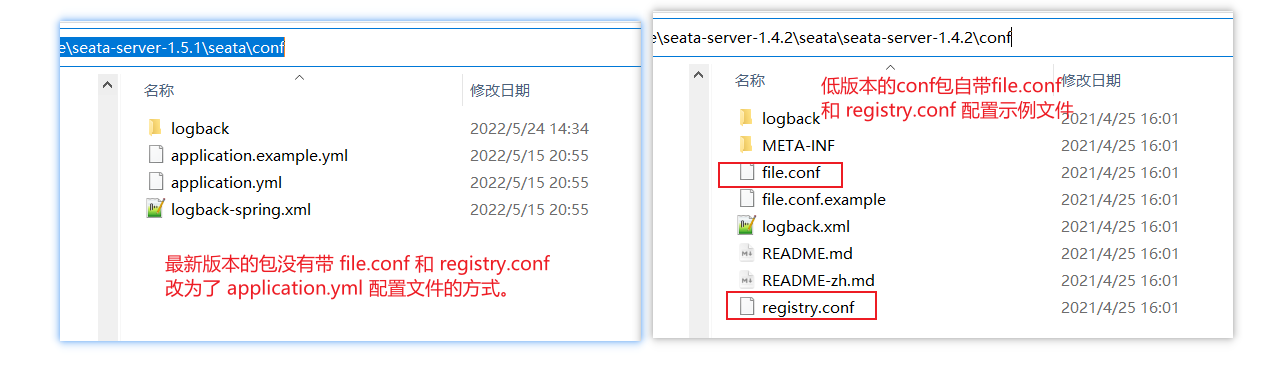
- 一开始我下载的是最新版的
v1.5.1,seata-server。然后被安装目录忽悠了。下面是v1.5.1与v1.4.2的conf目录对比图。
- 无奈之下,去 github找到官方提供的 示例代码子项目(seata-samples) ,仔细阅读说明,并跑了一下项目。
- 每一个子项目的配置文件都会有 “
file.conf” 和“registry.conf”配置文件。后来才得知这些项目均是使用了registry.type=file和config.type=file从本地文件读取配置的方式获取配置 (即上面的方案1)。
总结:
-
很显然,v1.4.2 使用的是从“本地文件读取(
file.conf和registry.conf)”的方式获取的配置,实际上这种方式里面配置的很多参数我们很多都不需要改动,或者说一般人也不会轻易修改; -
而 v1.5.1 版本其中一项优化应该是优化掉
file.conf和registry.conf,然后整合到 了application.yml中,将大部分不会被改动的参数(使用默认配置的方式)隐藏起来。 -
由于这种将配置放在
application.yml的方式里面放的配置跟file.conf和registry.conf配置很像,导致我有种错觉:服务端配置了,客户端就不用配置了file.conf和registry.conf,然后实际上并不是。seata-server 是服务端,服务端是服务端,客户端是客户端,两边的配置是分开的,都需要加。 -
解决该问题的办法就是“添加seata配置(
file.conf和registry.conf)”。
问题2、SpringBoot 整合完 Seata 后,发现分布式事务并没有起作用?
请按照顺序排查是否有如下情况。
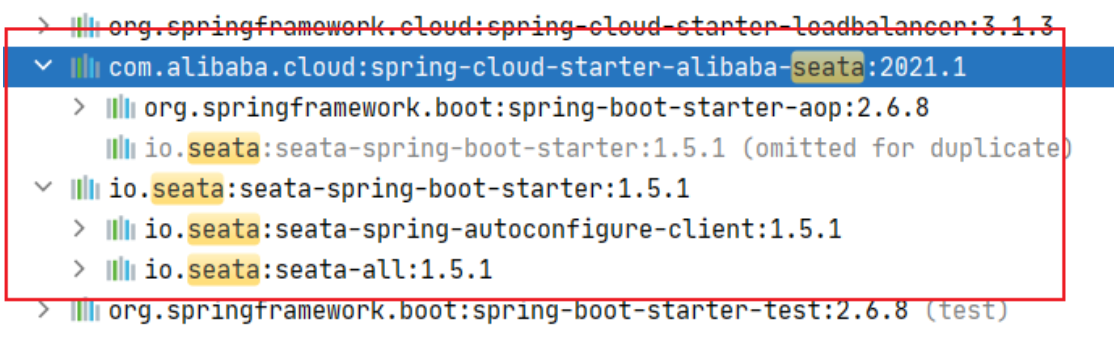
1、检查 依赖是否引入正确.只导入 seata-spring-boot-starter依赖是不够的。
-
只导入
seata-spring-boot-starter依赖是不够的 -
还需要导入
spring-boot-starter-aop依赖,内部有引入org.aspectj:aspectjweaver建议这样引入依赖:
com.alibaba.cloud spring-cloud-starter-alibaba-seata ${spring-cloud-alibaba.version} io.seata seata-spring-boot-starter 1.5.1
依赖图:
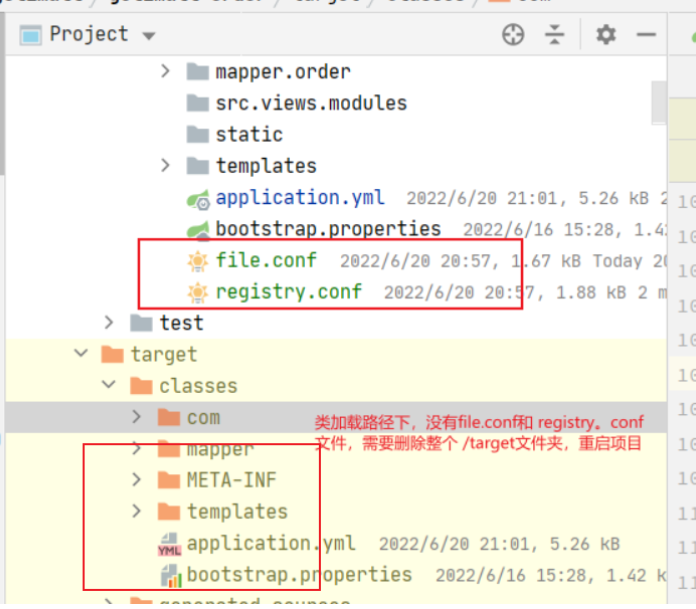
2、如果是“从文件读取配置的方式(registry.type=file 和config.type=file )”,检查 classes 目录下是否加载了配置文件。
如下图所示:
3、@GlobalTransactional 注解是否起效果?
检查
seata.enabled属性,设置为true才是打开seata分布式事务。
@GlobalTransactional是加在 大事务的入口方法上。比如 :A 服务的方法调用了 :B 、C、D服务的方法。则@GlobalTransactional注解应该加在 A服务的xxxxServiceImpl方法上,而不是加在 被远程调用的 B、C、D服务。
@GlobalTransactional标注没问题,但是涉及到的远程调用微服务是否有引入seata依赖 涉及到的 各个微服务(B、C、D) 是否正常注册到seata-server事务协调器 ?
- 如果正常注册上,
seata-server控制台会打印:TM register success,message:RegisterTMRequest{applicationId='你的服务名'...略};- 还会打印
RM register success,message:RegisterRMRequest{resourceIds='jdbc:mysql://ip:3306/数据库名',applicationId='你的服务名'...略}各个服务需要使用seata的重复排查 1-3 问题,一般就能解决。
三、Seata AT 模式解决分布式事务的弊端
Seata 默认是使用“AT模式”解决分布式事务,其实就是“2PC模式” ,由于AT模式是基于全局事务实现的,基于一把全局锁,因此不适用高并发场景。
Seata 还提供支持了“TCC模式”和“saga模式”,虽然并发数相较于AT模式有改善,但遇到高并发场景,一样不太适用。
高并发的场景,最终还得利用“柔性事务-最大努力通知方案” 或者 “柔性事务-可靠消息+最终一致性方案(异步取保型)”解决。