1.setContentView源码
每天都在用的setContentView,你真的了解它吗?一起看看它的源码实现吧!
public void setContentView(View view) {
getWindow().setContentView(view);
initActionBar();
}
它里面调用了getWindow.setContentView。点击getWindow看看里面是什么!
public Window getWindow() {
return mWindow;
}
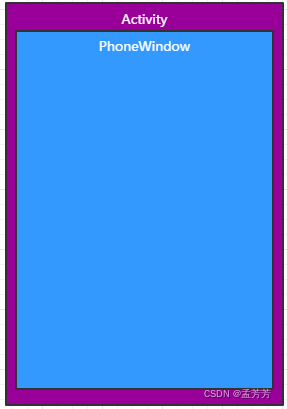
返回了一个Window对象,这个mWindow就是Window的子类PhoneWindow,每一个Activity都有一个PhoneWindow对象。
PhoneWindow就是布局的第一层了!
于是到PhoneWindow类去看看setContentView的实现吧。
Phone window.class:
public class PhoneWindow extends Window implements MenuBuilder.Callback {
//第一个setContentView
@Override
public void setContentView(int layoutResID) {
if (mContentParent == null) {
installDecor();
} else {
mContentParent.removeAllViews();
}
mLayoutInflater.inflate(layoutResID, mContentParent);
final Callback cb = getCallback();
if (cb != null && !isDestroyed()) {
cb.onContentChanged();
}
}
//第二个setContentView
@Override
public void setContentView(View view) {
setContentView(view, new ViewGroup.LayoutParams(MATCH_PARENT, MATCH_PARENT));
}
//第三个setContentView
@Override
public void setContentView(View view, ViewGroup.LayoutParams params) {
if (mContentParent == null) {
installDecor();
} else {
mContentParent.removeAllViews();
}
mContentParent.addView(view, params);
final Callback cb = getCallback();
if (cb != null && !isDestroyed()) {
cb.onContentChanged();
}
}
}
一共三个setContentView方法,平时用的最多的就是第一个了。具体看看:首先判断了mContentParent,当mContentParent为空的时候,就会执行installDecor()方法,那么我们肯定要到installDecor中去找找这个mContentParent是什么了。
Phone window.class:
private void installDecor() {
if (mDecor == null) {
mDecor = generateDecor(-1);
//...
} else {
mDecor.setWindow(this)
}
if (mContentParent == null) {
mContentParent = generateLayout(mDecor);
//...
}
}
我们发现,当mContentParent为空的时候,会执行generateLayout()方法,同时需要传入一个mDecor,所以要想弄清楚mContentParent,我们首先要知道mDecor是什么。往上面看,mDecor是通过generateDecor()方法创建出来的,于是到generateDecor()中一探究竟。
protected DecorView generateDecor(int featureId) {
return new DecorView(context,featureId, this,getAttributes());
}
new了一个DecorView对象,DecorView就是我们界面中最顶层的View了,这个View的结构是这样的:
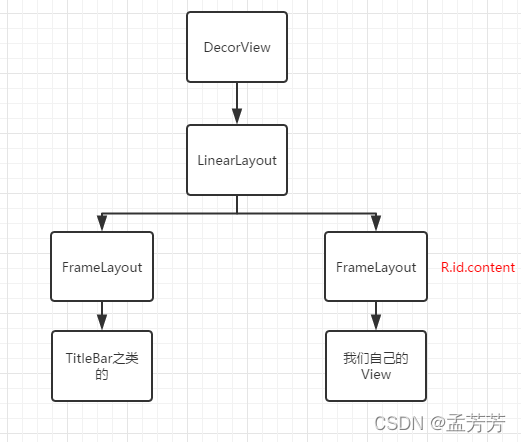
DecorView继承于FrameLayout,它有一个子view即LinearLayout,方向为竖直方向,里面有两个FrameLayout,上面的FrameLayout是TitleBar之类的,下面的FrameLayout就是我们的ContentView,所谓的setContentView就是往这个FrameLayout里面添加我们的布局View。
现在可以画出第二层了!
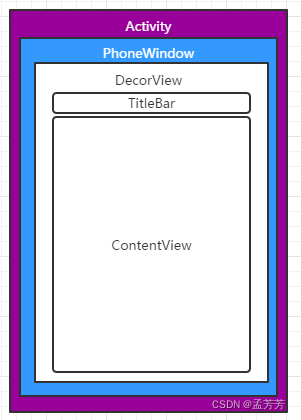
现在mDecor有了,终于可以进入到generateLayout(mDecor);里面去看看了!
protected ViewGroup generateLayout(DecorView decor) {
//省略一大段设置Window样式的代码
int layoutResource;
int features = getLocalFeatures();
...
mDecor.onResourcesLoaded(mLayoutInflater, layoutResource);
ViewGroup contentParent =(ViewGroup)findViewById(ID_ANDROID_CONTENT);
//...
return contentParent;
}
generateLayout 方法主要有 3 点:
①加载系统的布局
②将布局加载到创建的 DecorView 中
③通过DecorView找到 id 为 com.android.internal.R.id.content 的 ViewGroup 返回,也就是 mContentParent。
ID_ANDROID_CONTENT就是R.id.content,就是上图中这个FrameLayout:
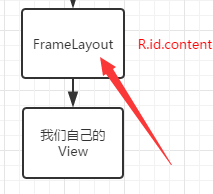
我们看到contentParent就是这个FrameLayout!所以,setContentView方法中的mContentParent就是这个FrameLayout,也就是我们自己布局文件的父控件!
现在回到PhoneWindow中的setContentView方法中,继续追踪。
在setContentView方法中,首先会先判断mContentParent是否为空,如果为空说明我们还没有DecorView,于是会调用installDecor。之后DecorView准备好了,mContentParent就会指向我们的ContentView,由于是新建的,mContentParent中肯定没有子View,如果不是新建的,我们要先把mContentParent中的子View全部清干净。接下来通过反射加载我们传入的布局,也就是这句代码:
mLayoutInflater.inflate(layoutResID, mContentParent);
所以来看看Layoutinflate.inflate()方法的源码吧。
2.LayoutInflater
①LayoutInflater基本用法
LayoutInflater对象可以通过LayoutInflater的from方法获取:
public static LayoutInflater from(Context context) {
LayoutInflater LayoutInflater =(LayoutInflater) context.getSystemService(Context.LAYOUT_INFLATER_SERVICE);
if (LayoutInflater == null) {
throw new AssertionError("LayoutInflater not found.");
}
return LayoutInflater;
}
②LayoutInflater类共有4个inflate方法。
LayoutInflater.class:
public View inflate(int resource, ViewGroup root){
return inflate(resource, root, root!=null);
}
public View inflate(XmlPullParser parsee, ViewGroup root) {
return inflate(parser, root, root!=null);
}
public View inflate(int resource, ViewGroup root, boolean attachToRoot) {
……
}
public View inflate(XmlPullParser parser, ViewGroup root, boolean attachToRoot) {
……
}
其中resource是布局文件的id,root表示父View,attachToRoot表示是否将布局表示的View作为子View添加到root中。
前三个inflate方法最终都会调用最后一个。在最后一个inflate方法中通过createViewFromTag方法获得temp,也就是在xml布局文件中找到的根视图(布局文件里根视图只能有一个)。
③Layoutinflater的inflate(int,ViewGroup,boolean)方法分析
public View inflate( int resource, ViewGroup root, boolean attachToRoot) {
final Resources res = getContext().getResources();
View view = tryInflatePrecompiled(resource, res, root, attachToRoot);
if (view != null) {
return view;
}
XmlResourceParser parser = res.getLayout(resource);
try {
return inflate(parser, root, attachToRoot);
} finally {
parser.close();
}
}
首先获取Context相关联的Resources,然后根据布局文件的id将布局文件加载成XmlResourceParser对象,用于解析布局文件,再调用inflate(XmlPullParser, ViewGroup, boolean)方法:
public View inflate(XmlPullParser parser, ViewGroup root, boolean attachToRoot) {
synchronized (mConstructorArgs) {
final Context inflaterContext = mContext;
final AttributeSet attrs = Xml.asAttributeSet( parser);
View result = root;
try{
if(TAG_MERGE.equals(name)){
if (root == null || !attachToRoot) {
throw new InflateException("<merge /> can be used only with a valid " + "ViewGroup root and attachToRoot=true");
}
rInflateChildren( parser, root, inflaterContext, attrs, false);
} else {
//temp is the root view that was found in the xml temp是布局文件里的根view
final View temp = createViewFromTag( root, name, inflaterContext, attrs);
ViewGroup.LayoutParams params = null;
if(root != null) {
params = root.generateLayoutParams( attrs);
if(!attachToRoot) {
temp.setLayoutParams(params);
}
}
rInflateChildren(parse,temp,attrs,true);
if(root != null && attachToRoot) {
root.addView(temp,params);
}
if(root == null || !attachToRoot) {
result = temp;
}
}
} catch{
}
return result;
}
}
该方法最后返回值为result, result首先赋值为root,当root为null或者attachToRoot为false时,result赋值为temp,也就是布局文件对应的View,意思是root不为null且attachToRoot为true时该方法将返回root,其他情况返回布局文件解析得到的View。
这里总结一下:
1)如果root为null,那么构建的view将是一个独立的个体,其顶层布局设置的属性无效。
2)如果root不为null,又分两种情况:①attachToRoot为false,此时顶层布局的属性值会依托于root构建,所以此时的xml根布局的属性有效,且根布局产生的view不是root的子布局。②attachedToRoot为true,此时顶层布局的属性值会依托于root构建,所以此时的xml根布局的属性有效,且根布局产生的view是root的子布局,是通过addView实现的。
try代码块中节点name为最外层的节点名称,根据name不同共有两个分支:①根节点name是merge;②根节点name不是merge。
分别从这两种情况分析。
(1)根节点是merge时分支代码如下:
if (root == null || !attachToRoot) {
throw new InflateException("<merge /> can be used only with a valid " + "ViewGroup root and attachToRoot=true");
}
rInflate(parser, root, inflaterContext, attrs, false);
当root为null或者attachToRoot为false时,将抛出异常。
rInflate(XmlPullParser, View, Context, AttributeSet, boolean)继续解析xml中布局,以root作为根节点,于是merge标签中的布局被合并到root中去(merge标签中高度、宽度、线性布局的方向等参数被舍弃),所以要求root不为null, attachToRoot为true。
(2)根节点不是merge时分支主要代码如下:
final View temp = createViewFromTag(root, name, inflaterContext, attrs);
ViewGroup.LayoutParams params = null;
if (root != null) {
params = root.generateLayoutParams(attrs);
if (!attachToRoot) {
temp.setLayoutParams(params);
}
}
rInflate(parser, temp, attrs, true);
if (root != null && attachToRoot) {
root.addView(temp, params);
}
if (root == null || !attachToRoot) {
result = temp;
}
主要步骤如下:
1)调用createViewFromTag方法,根据布局文件中最外层标签name创建对应的View,即temp;
2)如果root不为null,调用root的generateLayoutParams生成LayoutParams, 获取temp的layout_width、layout_height、layout_weight等参数(generateLayoutParams方法在LinearLayout、RelativeLayout等ViewGroup中都有具体实现,生成对应的LayoutParams),如果attachToRoot为false,则设置temp的LayoutParams参数;
3)调用rInflateChildren方法,继续解析子节点,该方法调用rInflate方法;
4)如果root不为null,并且attachToRoot为true,则把布局文件解析成的View,添加到root中。
5)如果root为null或者attachToRoot为false,整个方法返回值置为temp, 不然就是root。
这段源码可以解释一个常见的问题:使用ListView的时候,比如item布局如下所示:
<?xml version="1.0" encoding="utf-8">
<LinearLayout xmls:android="https…"
android:layout_width="match_parent"
android:layout_height="100dp">
<TextView
android:layout_width="wrap_content"
android:layout_height="50dp"
android:text="hello">
</LinearLayout>
然后在Adapter的getView方法里通过以下代码获取item布局:
LayoutInflater.from(mContext).inflate(R.layout.listitem, null);
这时候发现,获得的item的顶层布局高度实际为50dp,设置的固定高度100dp不起作用。网上大部分的解决方法要么是在listeitem的根布局外面再套一层layout,要么是在根布局上设置minHeight,其实正确的方式应该是这样解决:
LayoutInflater.from(mContext).inflate(R.layout.listitem, parent, false);
这两种写法最终都会调用同一个inflate方法,他们的区别在这里:
if (root != null) {
if (DEBUG) {
System.out.println("Creating params from root: " + root);
}
// Create layout params that match root, if supplied
params =root.generateLayoutParams(attrs);
if (!attachToRoot) {
// Set the layout params for temp if we are not attaching. (If we are, we use addView, below)
temp.setLayoutParams(params);
}
}
rInflate(parser, temp, attrs, true);
if (root != null && attachToRoot) {
root.addView(temp, params);
}
if (root == null || !attachToRoot) {
result = temp;
}
只有在传入的父view(root)不为空的时候,才会去解析item顶层布局的LayoutParams参数;否则,root为空的时候,不去解析LayoutParams,直接把temp返回(LayoutParams参数不参与计算),所以在inflate方法第二个参数传入null的时候,item顶层布局设置成多高都不会生效。
那如果此时第二个参数不传null,但是第三个参数改为true呢?如下所示:
LayoutInflater.from(mContext).inflate(R.layout.listitem, parent, false);
这时候程序会崩溃。
UnsupportedOprationException: addView(View, LayoutParams) is not supported in AdapterView。
因为此时会调用root.addView(temp, params);这在Adapter里是不支持的。
④rInflate(XmlPullParser, View, Context, AttributeSet, boolean)方法分析
void rInflate(XmlPullParser parser, View parent, Context context, AttributeSet attrs, boolean finishInflate) throws XmlPullParserException, IOException {
final int depth = parser.getDepth();
int type;
boolean pendingRequestFocus = false;
while (((type = parser.next()) != XmlPullParser.END_TAG || parser.getDepth() > depth) && type != XmlPullParser.END_DOCUMENT) {
if (type != XmlPullParser.START_TAG) {
continue;
}
final String name = parser.getName();
if (TAG_REQUEST_FOCUS.equals(name)) {
pendingRequestFocus = true;
consumeChildElements(parser);
} else if (TAG_TAG.equals(name)) {
parseViewTag(parser, parent, attrs);
} else if (TAG_INCLUDE.equals(name)) {
if (parser.getDepth() == 0) {
throw new InflateException("<include /> cannot be the root element");
}
parseInclude(parser, context, parent, attrs);
} else if (TAG_MERGE.equals(name)) {
throw new InflateException("<merge /> must be the root element");
} else {
final View view = createViewFromTag( parent, name, context, attrs);
final ViewGroup viewGroup = (ViewGroup) parent;
final ViewGroup.LayoutParams params = viewGroup.generateLayoutParams(attrs);
rInflateChildren(parser, view, attrs, true);
viewGroup.addView(view, params);
}
}
......
}
主要看节点为include、merge以及正常节点,主要逻辑如下:
1)节点为include,不能为布局根节点;
2)节点为merge,则抛出异常,提示merge必须为布局根节点;
3)节点为正常节点,则调用createViewFromTag创建对应的View,然后rInflateChildrend方法迭代继续解析节点内的节点,最后将节点对应的View添加到parent中去。
⑤createViewFromTag(View, String, Context, AttributeSet)方法分析
private View createViewFromTag(View parent,String name,Context context,AttributeSet attrs) {
return createViewFromTag( parent, name, context, attrs, false);
}
View createViewFromTag(View parent, String name, Context context, AttributeSet attrs,boolean ignoreThemeAttr) {
try {
View view = tryCreateView(parent, name, context, attrs);
if (view == null) {
final Object lastContext = mConstructorArgs[0];
mConstructorArgs[0] = context;
try {
if (-1 == name.indexOf('.')) {
view = onCreateView(context, parent, name, attrs);
} else {
view = createView(context, name, null, attrs);
}
} finally {
mConstructorArgs[0] = lastContext;
}
}
return view;
} catch () {}
}
首先调用tryCreateView创建view,如果创建的view为空,则根据name是否是类名(是否有 . 分隔)来判断调用onCreateView还是createView,而onCreateView实质上也是调用了createView, 中间加了类名前缀 ”android.view.“,这也是xml布局中部分View类不需要加全路径的原因,如View、ViewStub、SurfaceView类等(这些类实际上被Factory2拦截生成了)。
tryCreateView方法源码如下:
public final View tryCreateView(View parent, String name, Context context, AttributeSet attrs) {
View view;
if (mFactory2 != null) {
view = mFactory2.onCreateView(parent, name, context, attrs);
} else if (mFactory != null) {
view = mFactory.onCreateView(name, context, attrs);
} else {
view = null;
}
if (view == null && mPrivateFactory != null) {
view = mPrivateFactory.onCreateView( parent, name, context, attrs);
}
return view;
}
该方法根据mFactory、mFactory2、mPrivateFactory三个Factory类来创建View。
⑥LayoutInflater实例的mFactory属性(Factory实例)、mFactory2属性(Factory2实例)的作用:拦截与处理View类的创建
查找LayoutInflater的setFactory2方法使用, LayoutInflater.setFactory2 -> LayoutInflaterCompat.setFactory2 -> AppCompatDelegateImpl.installViewFactory()
于是找到LayoutInflater.Factory2的接口具体实现为AppCompatDelegateImpl类,AppCompatActivity的setContentView也是由该类负责具体实现的。
AppCompatDelegateImpl类中Factory类的onCreateView是调用Factory2类的onCreateView实现的,Factory2.onCreateView最后调用createView方法,最终由AppCompatViewInflater类的createView创建View,部分代码如下:
final View createView(View parent, final String name, Context context,AttributeSet attrs, boolean inheritContext, boolean readAndroidTheme, boolean readAppTheme, boolean wrapContext) {
final Context originalContext = context;
if (inheritContext && parent != null) {
context = parent.getContext();
}
if (readAndroidTheme || readAppTheme) {
context = themifyContext(context, attrs, readAndroidTheme, readAppTheme);
}
if (wrapContext) {
context= TintContextWrapper.wrap(context);
}
View view = null;
switch (name) {
case "TextView":
view = createTextView(context, attrs);
verifyNotNull(view, name);
break;
...
default:
view = createView(context,name,attrs);
}
if (view == null && originalContext != context) {
view = createViewFromTag(context, name, attrs);
} ...
return view;
}
于是TextView标签解析成AppCompatTextView,ImageView标签解析成AppCompatImageView等等, 其他View由createViewFromTag创建:
private View createViewFromTag(Context context, String name, AttributeSet attrs) {
if (name.equals("view")) {
name = attrs.getAttributeValue(null, "class");
}
try {
mConstructorArgs[0] = context;
mConstructorArgs[1] = attrs;
if (-1 == name.indexOf('.')) {
for (int i = 0; i < sClassPrefixList.length; i++) {
final View view = createViewByPrefix( context, name, sClassPrefixList[i]);
if (view != null) {
return view;
}
}
return null;
} else {
return createViewByPrefix(context, name, null);
}
} catch (Exception e) {
return null;
} finally {
mConstructorArgs[0] = null;
mConstructorArgs[1] = null;
}
}
createViewFromTag根据View的名称name以及"android.widget."、"android.view."、"android.webkit."这三个前缀尝试生成View,生成View则返回, 如android.widget包名下LinearLayout、RelativeLayout、ListView等,android.view下的View、ViewStub、SurfaceView等(拦截了LayoutInflater中部分View的创建),android.webkit包名下的WebView。
⑥LayoutInflater类的mPrivateFactory属性
断点调试, 查看LayoutInflater的实例属性,如下:
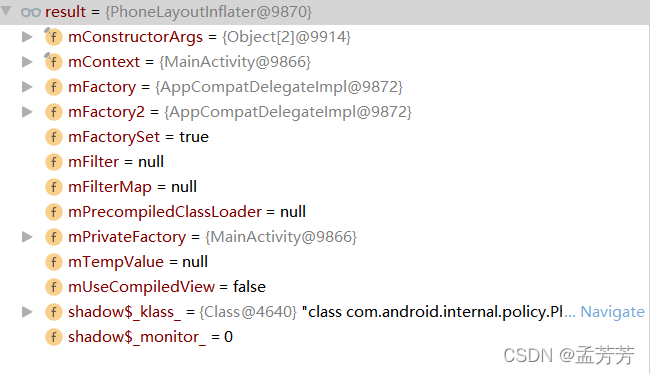
可以看到mPrivateFactory属性为MainActivity的实例(该属性在Activity的attach方法中设置), 一步步查找MainActivity的父类,最终在Activity类中看到了LayoutInflater.Factory2的实现,在FragmentActivity中进行了重写。
1)Activity中逻辑
Activity中Factory2接口实现如下:
public View onCreateView(View parent, String name,Context context, AttributeSet attrs) {
if (!"fragment".equals(name)) {
return onCreateView(name, context, attrs);
}
return mFragments.onCreateView(parent, name, context, attrs);
}
于是,当标签是fragment时交给mFragments进行处理, 最终由FragmentManagerImpl实现fragment标签的创建。主要逻辑是: 依次根据fragment的id、tag、containerId来获取已经存在的fragment,没有就创建,然后设置xml中配置的id、tag、containerId,调用addFragment将fragment添加到Activity中,最后返回fragment的View。
2)FragmentActivity中LayoutInflater.Factory2的两个方法均由FragmentLayoutInflaterFactory来负责具体View的创建。
来看看AppCompatActivity类:
public class AppCompatActivity {
public AppCompatActivity(int contentLayoutId){
super(contentLayoutId);
initDelegate();
}
private void initDelegate() {
final AppCompatDelegate delegate = getDelegate();
delegate.installViewFactory();
delegate.onCreate(getSavedStateRegistry( ).consumeRestoredStateForkey(DELEGATE_TAG));
}
}
public void installViewFactory() {
LayoutInflater layoutInflater = LayoutInflater.from(mContext);
if (layoutInflater.getFactory() == null) {
LayoutInflaterCompat.setFactory2( layoutInflater, this);
} else {
if (!(layoutInflater.getFactory2() instanceof AppCompatDelegateImpl)) {
Log.i(TAG, "The Activity's LayoutInflater already has a Factory installed, so we can not install AppCompat's");
}
}
}
可见,AppCompatActivity 在initDelegate中设置了Factory,所以会执行 mFactory2.onCreateView 的方法。
class AppCompatDelegateImpl {
public View createView(View parent, final String name, @NonNull Context context, @NonNull AttributeSet attrs) {
...
return mAppCompatViewInflater. createView(parent, name, context, attrs, inheritContext, IS_PRE_LOLLIPOP, true, VectorEnabledTintResources.shouldBeUsed()
);
}
...
}
public class AppCompatViewInflater {
final View createView(View parent, final String name, @NonNull Context context, @NonNull AttributeSet attrs, boolean inheritContext, boolean readAndroidTheme, boolean readAppTheme, boolean wrapContext) {
...
switch (name) {
case "TextView":
view = createTextView(context, attrs);
verifyNotNull(view, name);
…
default:
view = createView(context, name, attrs);
}
...
if (view == null && originalContext != context){
view = createViewFromTag(context, name, attrs);
}
}
...
}
可以看到当 API < 21时 View 被转换成为其他的 View,所以我们可以理解为 AppCompatActivity 会兼容低版本。
有兴趣的可以去做个小实验,分别继承 Activity 和 AppCompatActivity,将 TextView 打印出来。继承 Activity TextView 还是 TextView,而继承 AppCompatActivity 时 TextView 打印为 AppCompatTextView。
public abstract class LayoutInflater {
...
View createViewFromTag(View parent, String name, Context context, AttributeSet attrs,boolean ignoreThemeAttr) {
View view = tryCreateView(parent, name, context, attrs);
if (view == null) {
final Object lastContext = mConstructorArgs[0];
mConstructorArgs[0] = context;
try {
if (-1 == name.indexOf('.')) {
view = onCreateView(context, parent, name, attrs);
} else {
view = createView(context, name, null, attrs);
}
} finally {
mConstructorArgs[0] = lastContext;
}
}
return view;
}
经过刚才的分析,继承 AppCompatActivity View 会被创建成对应的 View,而Activity 是没有设置 Factory 的,所以 View 为空,将执行下面的判断。
if (-1 == name.indexOf('.')) {
view = onCreateView(context, parent, name, attrs);
} else {
view = createView(context, name, null, attrs);
}
如果没有'.',也就是说如果是系统控件会执行 onCreateView 方法;如果有'.',就是我们的自定义控件,如'com.xxx',将会执行 createView 方法。
当为系统控件时,调用的方法:
protected View onCreateView(String name, AttributeSet attrs) throws ClassNotFoundException {
return createView(name, "android.view.", attrs);
}
就是将系统的控件拼接上 android.view ,然后创建出来。
通过这一系列的过程,我们自己布局文件里的View就被加载到那个FrameLayout中了,至此我们的布局就显示到屏幕上了!
总结一下:
①Activity 和 AppCompatActivity 加载布局前都会创建一个 DecorView,并将系统布局加载到 DecorView 中,通过 DecorView 找到 id 为 android.id.content 的FrameLayout,最后通过 LayoutInflater 加载我们的 xml 布局。
②Activity 没有设置Factory ,AppCompatActivity 设置了 Factory。
③Activity 不会拦截 View,而 AppCompatActivity 会拦截 View,并将部分 View 转换成对应的 AppCompatView。
拦截小例子:
public class V8BaseActivity extends Activity {
@Override
protected void onCreate(@Nullable Bundle savedInstanceState) {
inflateTest();
super.onCreate(savedInstanceState);
}
private void inflateTest() {
LayoutInflater layoutInflater = LayoutInflater.from(this);
LayoutInflaterCompat.setFactory2( layoutInflater, new LayoutInflater.Factory2() {
@Nullable
@Override
public View onCreateView(@Nullable View parent, @NonNull String name, @NonNull Context context, @NonNull AttributeSet attrs) {
Log.d("View:", name);
if (name.equals("Button")) {
TextView textView = new TextView(context);
textView.setText("test");
textView.setTextColor(Color.BLACK);
return textView;
}
return null;
}
@Nullable
@Override
public View onCreateView(@NonNull String name, @NonNull Context context, @NonNull AttributeSet attrs) {
return onCreateView(null, name, context, attrs);
}
});
}
}
通过拦截方法将 Button 换成了 TextView。
3.
接着下面会通过调用getCallBack得到一个CallBack对象cb,其实这个cb就是我们的Activity,接着会调用Activity的onContentChanged方法,这个方法是一个空实现。