在看setContentView源码之前,就知道,PhoneWindow, DecorView这些东西,不知道之间的联系,上周末加班看了下源码,慷慨颇多,“源码面前,无所遁形。”
Hierarchy View 的使用
在看是之前我们先看下Android studio的Hierarchy View, 这是AS自带的View调试工具,怎样使用呢?
打开步骤:Tools —— Android ——Android Device Monitor —— window —— open persepctive :
此时我们的MainActivity的XML文件是这样的:
<?xml version="1.0" encoding="utf-8"?>
<LinearLayout xmlns:android="http://schemas.android.com/apk/res/android"
    xmlns:app="http://schemas.android.com/apk/res-auto"
    xmlns:tools="http://schemas.android.com/tools"
    android:layout_width="match_parent"
    android:layout_height="match_parent"
    tools:context="com.example.liumengqiang.viewproject.MainActivity">

    <RelativeLayout
        android:layout_width="wrap_content"
        android:layout_height="wrap_content">
        <TextView
            android:id="@+id/aaaaaaaaaaaa"
            android:layout_width="wrap_content"
            android:layout_height="wrap_content"
            android:layout_gravity="center"
            android:background="@drawable/drawable_select"
            android:padding="10dp"
            android:text="Hello World!"
            app:layout_constraintBottom_toBottomOf="parent"
            app:layout_constraintLeft_toLeftOf="parent"
            app:layout_constraintRight_toRightOf="parent"
            app:layout_constraintTop_toTopOf="parent" />
    </RelativeLayout>

</LinearLayout>
那么此时我们的View树是这样的:
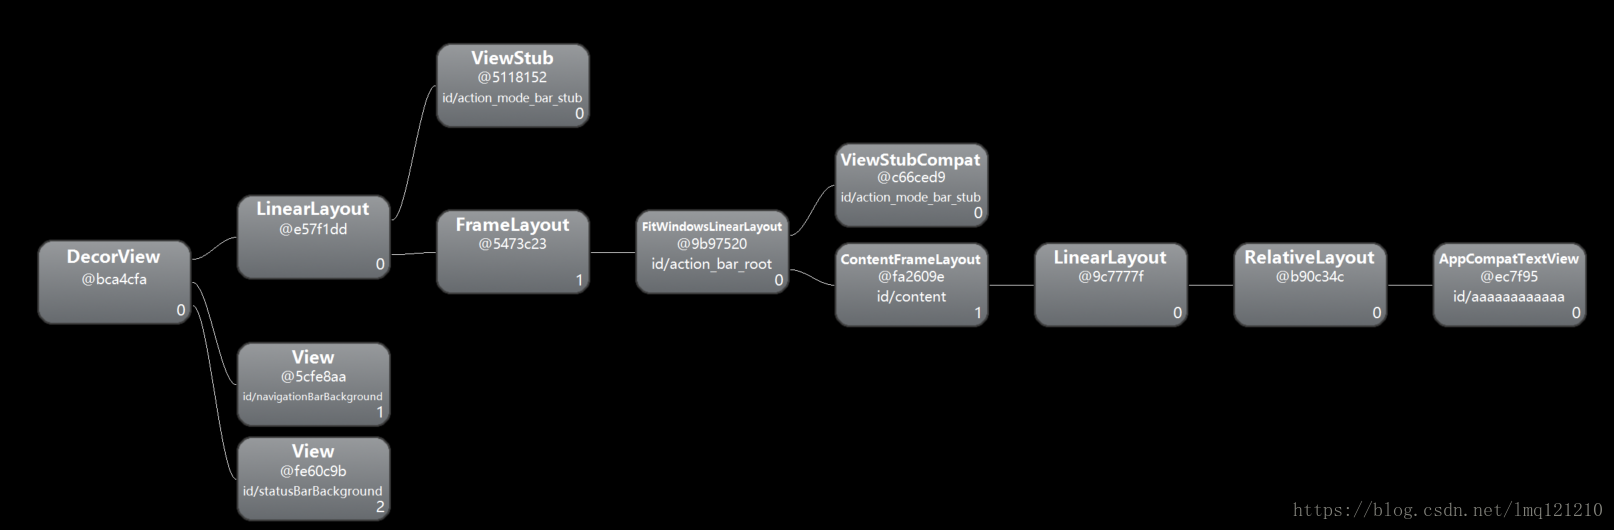
此时看这图可能是一脸懵逼,分析完源码,我详细应该能看懂的。
源码开始:
setContentView(R.layout.activity_main);
我们的Activity继承自AppCompatActivity,:
   @Override
    public void setContentView(int layoutResID) {
        getDelegate().setContentView(layoutResID);
    }
getDelegate()是什么呢?
    @NonNull
    public AppCompatDelegate getDelegate() {
        if (mDelegate == null) {
            mDelegate = AppCompatDelegate.create(this, this);
        }
        return mDelegate;
    }
进入create方法:
    public static AppCompatDelegate create(Activity activity, AppCompatCallback callback) {
        return create(activity, activity.getWindow(), callback);
    }

    private static AppCompatDelegate create(Context context, Window window,
            AppCompatCallback callback) {
        if (BuildCompat.isAtLeastO()) {
            return new AppCompatDelegateImplO(context, window, callback);
        } else if (Build.VERSION.SDK_INT >= 24) {
            return new AppCompatDelegateImplN(context, window, callback);
        } else if (Build.VERSION.SDK_INT >= 23) {
            return new AppCompatDelegateImplV23(context, window, callback);
        } else if (Build.VERSION.SDK_INT >= 14) {
            return new AppCompatDelegateImplV14(context, window, callback);
        } else if (Build.VERSION.SDK_INT >= 11) {
            return new AppCompatDelegateImplV11(context, window, callback);
        } else {
            return new AppCompatDelegateImplV9(context, window, callback);
        }
    }
可以看到,根据SDK版本的不同,返回不同的AppCompatDelegateImplO继承自AppCompatDelegateImplN,AppCompatDelegateImplN继承自AppCompatDelegateImplV23,以此类推,最后都继承自AppCompatDelegateImplV9。那么getDelegate().setContentView调用的肯定是父类的方法,最后在AppCompatDelegateImplV9类中找到了setContentView重载方法,可自行查找。源码如下:
    @Override
    public void setContentView(int resId) {
        ensureSubDecor();
        ViewGroup contentParent = (ViewGroup) mSubDecor.findViewById(android.R.id.content);
        contentParent.removeAllViews();
        LayoutInflater.from(mContext).inflate(resId, contentParent);
        mOriginalWindowCallback.onContentChanged();
    }
从代码可以暂时看出,经过ensureSubDecor()方法之后,mSubDecor.findViewById,返回一个ViewGroup, 然后contentParent作为跟布局,将我们的自己定义的布局添加到此contentParent中,至于contentParent和mSubDecor是什么,下文讲到。接下来进入ensureSubDecor方法:
    private void ensureSubDecor() {
    //初始化进入,mSubDecorInstalled为false, 所以执行createSubDecor方法
        if (!mSubDecorInstalled) {
            mSubDecor = createSubDecor();

            .....
			mSubDecorInstalled = true;
			....
    }
初始化进入该方法时,mSubDecorInstalled是false,所以进入该方法,在if判断内,将该标记置为了true,重点记一下这个,下文用到。进入:createSubDecor()
   private ViewGroup createSubDecor() {
        .......

		//设置Window窗口
        if (a.getBoolean(R.styleable.AppCompatTheme_windowNoTitle, false)) {
	        //注意点1:
            requestWindowFeature(Window.FEATURE_NO_TITLE);
        } else if (a.getBoolean(R.styleable.AppCompatTheme_windowActionBar, false)) {
            // Don't allow an action bar if there is no title.
            requestWindowFeature(FEATURE_SUPPORT_ACTION_BAR);
        }
        if (a.getBoolean(R.styleable.AppCompatTheme_windowActionBarOverlay, false)) {
            requestWindowFeature(FEATURE_SUPPORT_ACTION_BAR_OVERLAY);
        }
        if (a.getBoolean(R.styleable.AppCompatTheme_windowActionModeOverlay, false)) {
            requestWindowFeature(FEATURE_ACTION_MODE_OVERLAY);
        }

        ......
        //注意点2:
		// Now let's make sure that the Window has installed its decor by retrieving it
		mWindow.getDecorView();

        final LayoutInflater inflater = LayoutInflater.from(mContext);
        ViewGroup subDecor = null;


        .......

        } else {
            if (mOverlayActionMode) {
                subDecor = (ViewGroup) inflater.inflate(
                        R.layout.abc_screen_simple_overlay_action_mode, null);
            } else {
	            //注意点3:初始化subDecor 布局
                subDecor = (ViewGroup) inflater.inflate(R.layout.abc_screen_simple, null);
            }

            ......
        }

        if (subDecor == null) {
            throw new IllegalArgumentException(
                    "AppCompat does not support the current theme features: { "
                            + "windowActionBar: " + mHasActionBar
                            + ", windowActionBarOverlay: "+ mOverlayActionBar
                            + ", android:windowIsFloating: " + mIsFloating
                            + ", windowActionModeOverlay: " + mOverlayActionMode
                            + ", windowNoTitle: " + mWindowNoTitle
                            + " }");
        }

	    //注意点4:contentView 和 windowContentView
        final ContentFrameLayout contentView = (ContentFrameLayout) subDecor.findViewById(
                R.id.action_bar_activity_content);

        final ViewGroup windowContentView = (ViewGroup) mWindow.findViewById(android.R.id.content);
        if (windowContentView != null) {
            // There might be Views already added to the Window's content view so we need to
            // migrate them to our content view
            while (windowContentView.getChildCount() > 0) {
                final View child = windowContentView.getChildAt(0);
                windowContentView.removeViewAt(0);
                contentView.addView(child);
            }

            // Change our content FrameLayout to use the android.R.id.content id.
            // Useful for fragments.
            windowContentView.setId(View.NO_ID);
            contentView.setId(android.R.id.content);

            // The decorContent may have a foreground drawable set (windowContentOverlay).
            // Remove this as we handle it ourselves
            if (windowContentView instanceof FrameLayout) {
                ((FrameLayout) windowContentView).setForeground(null);
            }
        }

		//注意点5:
        // Now set the Window's content view with the decor
        mWindow.setContentView(subDecor);

        contentView.setAttachListener(new ContentFrameLayout.OnAttachListener() {
            @Override
            public void onAttachedFromWindow() {}

            @Override
            public void onDetachedFromWindow() {
                dismissPopups();
            }
        });

        return subDecor;
    }
上述有5个注意点,我们一个一个看。
注意点1:
进入requestWindowFeature方法:
   @Override
    public boolean requestWindowFeature(int featureId) {
        featureId = sanitizeWindowFeatureId(featureId);

        if (mWindowNoTitle && featureId == FEATURE_SUPPORT_ACTION_BAR) {
            return false; // Ignore. No title dominates.
        }
        if (mHasActionBar && featureId == Window.FEATURE_NO_TITLE) {
            // Remove the action bar feature if we have no title. No title dominates.
            mHasActionBar = false;
        }

        switch (featureId) {
            case FEATURE_SUPPORT_ACTION_BAR:
                throwFeatureRequestIfSubDecorInstalled();
                mHasActionBar = true;
                return true;
            case FEATURE_SUPPORT_ACTION_BAR_OVERLAY:
                throwFeatureRequestIfSubDecorInstalled();
                mOverlayActionBar = true;
                return true;
            case FEATURE_ACTION_MODE_OVERLAY:
                throwFeatureRequestIfSubDecorInstalled();
                mOverlayActionMode = true;
                return true;
            case Window.FEATURE_PROGRESS:
                throwFeatureRequestIfSubDecorInstalled();
                mFeatureProgress = true;
                return true;
            case Window.FEATURE_INDETERMINATE_PROGRESS:
                throwFeatureRequestIfSubDecorInstalled();
                mFeatureIndeterminateProgress = true;
                return true;
            case Window.FEATURE_NO_TITLE:
                throwFeatureRequestIfSubDecorInstalled();
                mWindowNoTitle = true;
                return true;
        }

        return mWindow.requestFeature(featureId);
    }
记得在Activity中设置Window窗口属性的时候必须在setContentView之前么?为什么呢? 看下上述代码,做了switch判断,每个case内都有一个throwFeatureRequestIfSubDecorInstalled()方法,进入该方法:
    private void throwFeatureRequestIfSubDecorInstalled() {
        if (mSubDecorInstalled) {
            throw new AndroidRuntimeException(
                    "Window feature must be requested before adding content");
        }
    }
判断mSubDecorInstalled是true,就抛出异常,这个异常是不是很熟悉呢?没错,如果我们如果在Activity的onCreate方法中这样写,肯定报这个错:
setContentView(R.layout.activity_main);
requestWindowFeature(Window.FEATURE_NO_TITLE);
因为经过setContentView之后,mSubDecorInstalled已经置为了true,刚开始代码有重点强调的。所以必须在setContentView之前更改window属性。
注意点2:
mWindow.getDecorView();
这个mWindow是个Window对象,首先mWindow对象什么时候被创建赋值了呢? 在AppCompatDelegateImplV9的创建的时候传入了window对象,那么就得在AppCompatDelegate.java中查找了,可以看到:
    public static AppCompatDelegate create(Activity activity, AppCompatCallback callback) {
        return create(activity, activity.getWindow(), callback);
    }
可以看到activity.getWindow(),又回到了Activity.java中,经过查找,在Activity中的attach看到了mWindow的赋值和创建的,attach方法是通过反射创建Activity成功之后调用的第一个方法。前两篇文章有讲到。
   final void attach(Context context, ActivityThread aThread,
            Instrumentation instr, IBinder token, int ident,
            Application application, Intent intent, ActivityInfo info,
            CharSequence title, Activity parent, String id,
            NonConfigurationInstances lastNonConfigurationInstances,
            Configuration config, String referrer, IVoiceInteractor voiceInteractor,
            Window window, ActivityConfigCallback activityConfigCallback) {
        attachBaseContext(context);

        mFragments.attachHost(null /*parent*/);

        //创建PhoneWindow
        mWindow = new PhoneWindow(this, window, activityConfigCallback);
        mWindow.setWindowControllerCallback(this);
        mWindow.setCallback(this);
        mWindow.setOnWindowDismissedCallback(this);
        mWindow.getLayoutInflater().setPrivateFactory(this);
        .....
    }
创建了PhoneWindow,但是类型是Window,可以肯定PhoneWindow肯定集成自Window,查看一下PhoneWindow也确实如此,看下Window的源码:
/ * <p>The only existing implementation of this abstract class is
 * android.view.PhoneWindow, which you should instantiate when needing a
 * Window.
 * /
 //翻译:此抽象类的唯一实现类:PhoneWindow,当需要时,你应该实现它。
public abstract class Window {
}
从翻译我们能够看出,PhoneWindow是Window的实现类,并且是唯一的。好了,扯得有点远了,回到mWindow.getDecorView(); 。
此时调用getDecorView方法应该调用的是PhoneWindow类内的实现方法,通过方法名,我们看到了DecorView, 那么PhoneWindow肯定和DecorView有关联啊。进入该方法:
    @Override
    public final View getDecorView() {
        if (mDecor == null || mForceDecorInstall) {
            installDecor();
        }
        return mDecor;
    }
进入installDecor方法:
    private void installDecor() {
        mForceDecorInstall = false;
        if (mDecor == null) {
            //创建DecorView
            mDecor = generateDecor(-1);
            mDecor.setDescendantFocusability(ViewGroup.FOCUS_AFTER_DESCENDANTS);
            mDecor.setIsRootNamespace(true);
            if (!mInvalidatePanelMenuPosted && mInvalidatePanelMenuFeatures != 0) {
                mDecor.postOnAnimation(mInvalidatePanelMenuRunnable);
            }
        } else {
            mDecor.setWindow(this);
        }
        //初始化mContentParent为null
        if (mContentParent == null) {
            mContentParent = generateLayout(mDecor);

            ......
    }
由于mDecor为null,所以执行generateDecor方法,可以看出generateDecor()方法返回的是个DecorView对象。进入该方法:
    protected DecorView generateDecor(int featureId) {
        // System process doesn't have application context and in that case we need to directly use
        // the context we have. Otherwise we want the application context, so we don't cling to the
        // activity.
        Context context;
        if (mUseDecorContext) {
            Context applicationContext = getContext().getApplicationContext();
            if (applicationContext == null) {
                context = getContext();
            } else {
                context = new DecorContext(applicationContext, getContext().getResources());
                if (mTheme != -1) {
                    context.setTheme(mTheme);
                }
            }
        } else {
            context = getContext();
        }
        return new DecorView(context, featureId, this, getAttributes());
    }
再次创建了DecorView对象,赋值给mDecor对象。
再回到installDecor()方法,看下generateLayout方法,参数为DecorView。
   protected ViewGroup generateLayout(DecorView decor) {
        // Apply data from current theme.
        //翻译:应用当前主题的数据。
        //给window设置theme的标记

        TypedArray a = getWindowStyle();

        .......

        // Inflate the window decor.

        int layoutResource;
        int features = getLocalFeatures();
        // System.out.println("Features: 0x" + Integer.toHexString(features));

        ......

        } else {

            //默认是这种布局
            layoutResource = R.layout.screen_simple;
            // System.out.println("Simple!");
        }

		//DecorView开始改变
        mDecor.startChanging();
        //
        mDecor.onResourcesLoaded(mLayoutInflater, layoutResource);
        ViewGroup contentParent = (ViewGroup)findViewById(ID_ANDROID_CONTENT);
        if (contentParent == null) {
            throw new RuntimeException("Window couldn't find content container view");
        }

        ......
		//改变结束
        mDecor.finishChanging();
		//返回contentParent
        return contentParent;
    }
首先看下layoutResource的默认布局screen_simple.xml:
<LinearLayout xmlns:android="http://schemas.android.com/apk/res/android"
    android:layout_width="match_parent"
    android:layout_height="match_parent"
    android:fitsSystemWindows="true"
    android:orientation="vertical">
    <ViewStub android:id="@+id/action_mode_bar_stub"
              android:inflatedId="@+id/action_mode_bar"
              android:layout="@layout/action_mode_bar"
              android:layout_width="match_parent"
              android:layout_height="wrap_content"
              android:theme="?attr/actionBarTheme" />
    <FrameLayout
         android:id="@android:id/content"
         android:layout_width="match_parent"
         android:layout_height="match_parent"
         android:foregroundInsidePadding="false"
         android:foregroundGravity="fill_horizontal|top"
         android:foreground="?android:attr/windowContentOverlay" />
</LinearLayout>
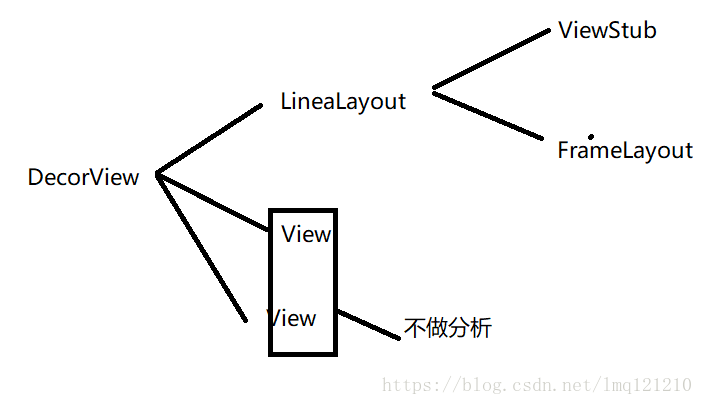
看到,这是个LinearLayout,包含两个子View:ViewStub 和FrameLayout。ViewStub的布局是给ActivityBar的,FrameLayout的id为content。
再次回到generateLayout()方法,调用了DecorView的onResourcesLoaded方法,进入该方法:
  void onResourcesLoaded(LayoutInflater inflater, int layoutResource) {
        mStackId = getStackId();
		//此处省略了添加的两个View.
        .....
        // Put it below the color views.
            addView(root, 0, new ViewGroup.LayoutParams(MATCH_PARENT, MATCH_PARENT));
		.....
    }
调用了addView方法,what? 难道DecorView是一个ViewGroup? 实时确实如此,DecorView继承自FrameLayout, 那么addView方法实际上是将R.layout.screen_simple布局添加到了DecorView中!
再返回generateLayout()方法,ViewGroup contentParent = (ViewGroup)findViewById(ID_ANDROID_CONTENT);获得content的ViewGroup, 实际上在此场景下,我们获得的也就是FrameLayout。 并且返回此ViewGroup。
等等再次我们捋一下View的结构:
再回到的installDecor()方法,可以知道mContentParent实际上就是我们的id为CONTENT的ViewGroup对象。
再回到最初的createSubDecor方法,看下注意点3:
注意点3:
看下默认的XML布局:abc_screen_simple.xml
<?xml version="1.0" encoding="utf-8"?>
<!-- Copyright (C) 2013 The Android Open Source Project

     Licensed under the Apache License, Version 2.0 (the "License");
     you may not use this file except in compliance with the License.
     You may obtain a copy of the License at

          http://www.apache.org/licenses/LICENSE-2.0

     Unless required by applicable law or agreed to in writing, software
     distributed under the License is distributed on an "AS IS" BASIS,
     WITHOUT WARRANTIES OR CONDITIONS OF ANY KIND, either express or implied.
     See the License for the specific language governing permissions and
     limitations under the License.
-->

<android.support.v7.widget.FitWindowsLinearLayout
    xmlns:android="http://schemas.android.com/apk/res/android"
    android:id="@+id/action_bar_root"
    android:layout_width="match_parent"
    android:layout_height="match_parent"
    android:orientation="vertical"
    android:fitsSystemWindows="true">

    <android.support.v7.widget.ViewStubCompat
        android:id="@+id/action_mode_bar_stub"
        android:inflatedId="@+id/action_mode_bar"
        android:layout="@layout/abc_action_mode_bar"
        android:layout_width="match_parent"
        android:layout_height="wrap_content" />

    <include layout="@layout/abc_screen_content_include" />

</android.support.v7.widget.FitWindowsLinearLayout>
abc_screen_content_include
<?xml version="1.0" encoding="utf-8"?>
<merge xmlns:android="http://schemas.android.com/apk/res/android">

    <android.support.v7.widget.ContentFrameLayout
            android:id="@id/action_bar_activity_content"
            android:layout_width="match_parent"
            android:layout_height="match_parent"
            android:foregroundGravity="fill_horizontal|top"
            android:foreground="?android:attr/windowContentOverlay" />

</merge>
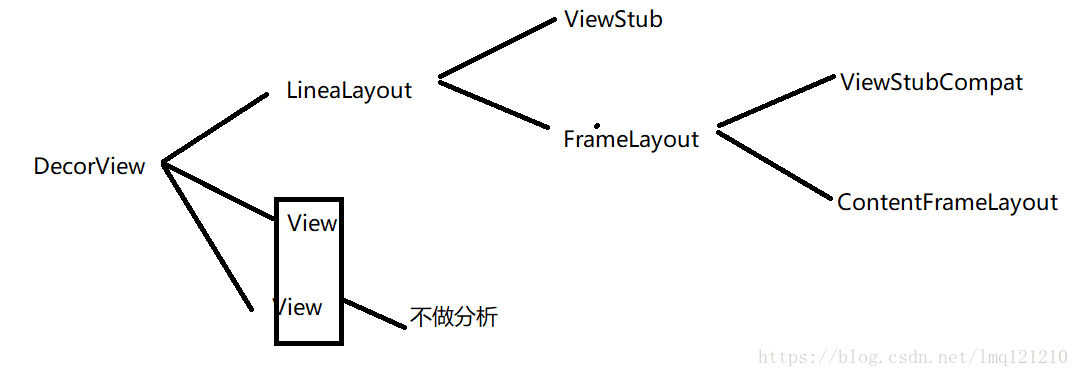
看上述代码,subDecorde的跟布局是FitWindowsLinearLayout,有两个字View, 分别是:ViewStubCompat 和 ContentFrameLayout,其中ContentFrameLayout的id是:action_bar_activity_content, 这里注意一下,下文用到。
再看注意点4:
注意点4:
获取id为action_bar_activity_content的子View,命名为:contentView;
mWindow.findViewById其实调用的是getDecorView.findViewById:
    public <T extends View> T findViewById(@IdRes int id) {
        return getDecorView().findViewById(id);
    }
android.R.id.content获取的实际上就是:FrameLayout, 赋值给windowContentView,然后将windowContentView中的子View添加到contentView中, 然后将contentView的id 置为 R.id.content, 这里需要注意下。
注意点4:
mWindow.setContentView(subDecor)看下PhoneWindow的setContentView方法:
    @Override
    public void setContentView(View view) {
        setContentView(view, new ViewGroup.LayoutParams(MATCH_PARENT, MATCH_PARENT));
    }

    @Override
    public void setContentView(View view, ViewGroup.LayoutParams params) {
        // 由于执行了PhoneWindow的getDecorView方法,所以mContentParent不为null。
        if (mContentParent == null) {
            installDecor();
        } else if (!hasFeature(FEATURE_CONTENT_TRANSITIONS)) {
            mContentParent.removeAllViews();
        }

        if (hasFeature(FEATURE_CONTENT_TRANSITIONS)) {
            view.setLayoutParams(params);
            final Scene newScene = new Scene(mContentParent, view);
            transitionTo(newScene);
        } else {
	        //
            mContentParent.addView(view, params);
        }
        mContentParent.requestApplyInsets();
        final Callback cb = getCallback();
        if (cb != null && !isDestroyed()) {
            cb.onContentChanged();
        }
        mContentParentExplicitlySet = true;
    }
由于之前运行了mWindow.getDecorView(),所以mContentParent 不等于null。接下来,将view添加到了mContentParent中,我们知道mContentParent实际上就是generateLayout方法的返回值,这个返回值是:screen_simple.xml中的id是content的FrameLayout。
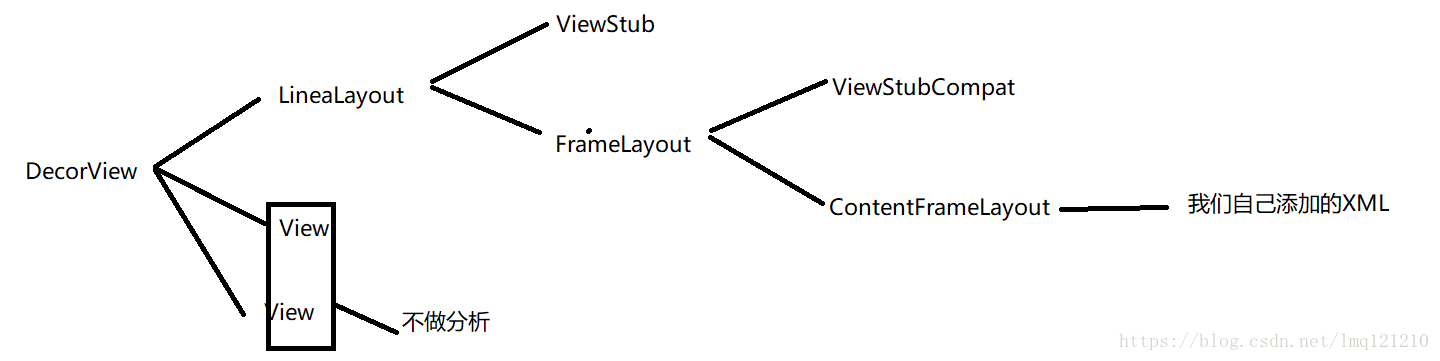
注意点4总结起来就是:将abc_screen_simple.xml添加到screen_simple.xml的id为content的FrameLayout中,在添加之前,先将screen_simple.xml中的id为content的子View添加到abc_screen_simple.xml中的id为action_bar_activity_content的contentView中,然后将contentView的id置为content——action_bar_activity_content变为content。
现在我们捋一下View树:
最后返回了subDecor。
至此四个注意点解释完了,然后重回setContentView方法,ViewGroup contentParent = (ViewGroup) mSubDecor.findViewById(android.R.id.content);这里获得的对象实际上就是原ID为action_bar_activity_content的ContentFrameLayout对象,LayoutInflater.from(mContext).inflate(resId, contentParent);也就是将我们自己的xml添加到ContentFrameLayout中。至此再看下view树:
经过上述分析,再回过头看下开头的图是不是清晰多了呢?!
纯手打,如果知识点有错误,欢迎指正!
Android技术交流QQ群: