学习资料参考:
张平.《OpenCV算法精解:基于Python与C++》.[Z].北京.电子工业出版社.2017.
原理
优点
- 基于边缘梯度方向的非极大值抑制。
- 双阈值的滞后阈值处理
检测步骤
- 首先将图像矩阵与水平方向的卷积核和垂直方向上的卷积核卷积得到 d x dx dx和 d y dy dy,然后利用平方和的开方 d x + d y 2 \sqrt[2]{dx + dy} 2dx+dy得到边缘强度。
- 利用第一步计算出的 d x 和 d y dx和dy dx和dy,计算出梯度方向 a n g l e = a r c t a n 2 ( d y , d x ) angle=arctan2(dy,dx) angle=arctan2(dy,dx),即对每一个位置 ( r , c ) , a n g l e ( r , c ) = a r c t a n 2 ( d y ( ) r , c ) , d x ( r , c ) (r,c),angle(r,c)=arctan2(dy()r,c),dx(r,c) (r,c),angle(r,c)=arctan2(dy()r,c),dx(r,c)代表该位置的梯度方向,一般用角度表示,即 a n g l e ( r , c ) 在 − 180 度 到 180 度 之 间 angle(r,c)在-180度到180度之间 angle(r,c)在−180度到180度之间
- 对每一个位置进行非极大值抑制的处理,非极大值抑制操作返回的仍然是一个矩阵,假设为noMaxSup.
简单操作示例:
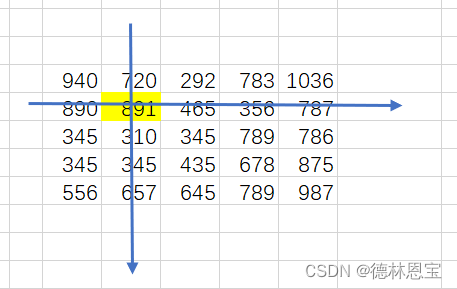
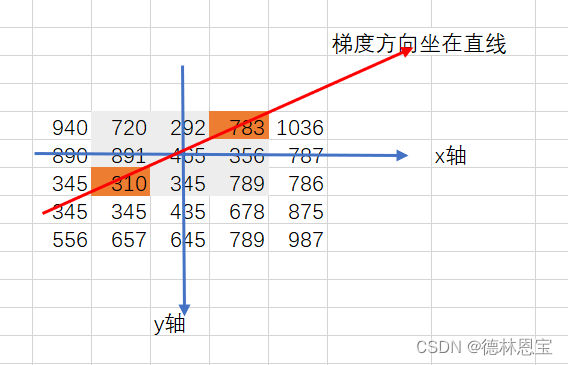
边缘强度矩阵如下所示(考虑(1,1)点的边缘强度取值):
根据第一步的dx和dy找出边缘强度的梯度方向,如下所示:
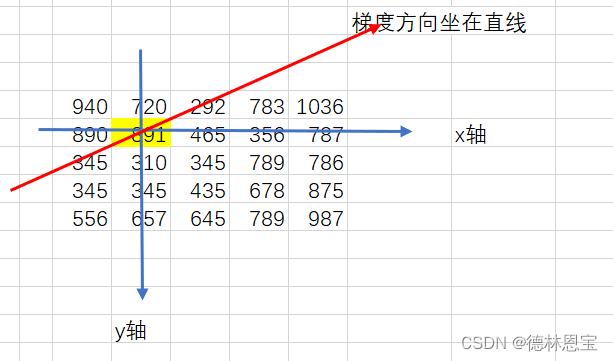
然后将891与梯度方向上的数值进行比较(注意选取3x3大小的邻域),由于 891 > 291 891>291 891>291 and 891 > 345 891>345 891>345,则在noMaxSup中的(1,1)处填上891,即noMaxSup(1,1)=891;同理,考虑465(即坐标(2,1)处),得到梯度方向如下所示:
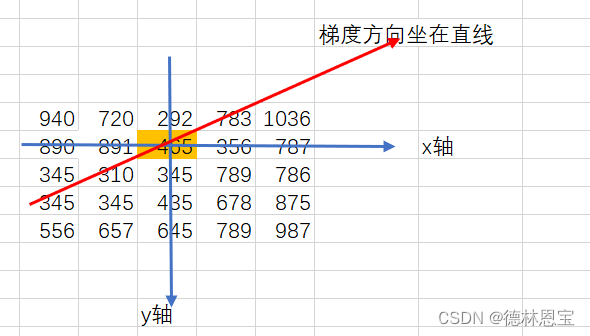
找到梯度方向上的值,如下所示
发现465>310 but 465 < 783,那么在noMaxSup(2,1)=0
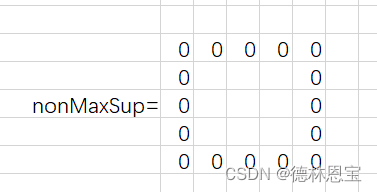
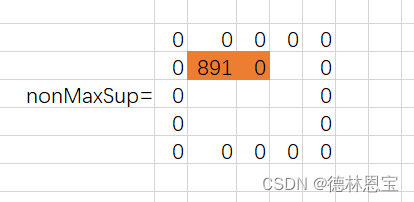
最后得到的noMaxSup矩阵为:
后面进行类似操作即可完成矩阵的所有取值。
当然,有时候梯度方向并不是完全只通过右上方和左下方,其实还可能通过下方或者上方。如图:
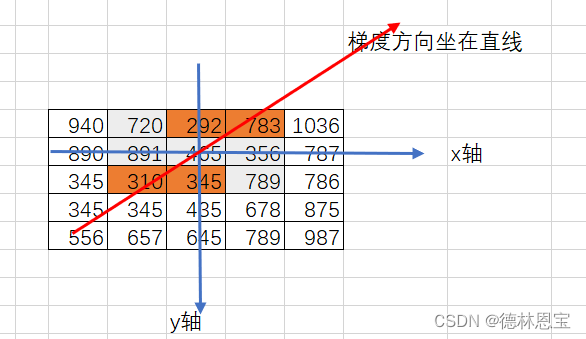
那么此时我们如何取值呢?
两种方法
- 查看梯度方向上,哪两个数值与所要求解的位置最近,就取哪两个数值,作为参考值。如上图中,345和292更加接近465,那么就考虑345和292即可。
- 使用差值法拟合梯度方向上的边缘强度即可,该方法更加精准。此处不予介绍。
- 最后一步,双阈值的之后阈值处理。经过第二部非极大值抑制处理后的边缘强度图,一般需要阈值化处理,常用的方法是全局阈值分割和局部自适应阈值分割。此处使用滞后阈值处理,它使用两个阈值----高阈值和低阈值,按照以下三个规则进行边缘的阈值化处理。
(1) 边缘强度大于高于之的那些点作为确定的边缘点。
(2)边缘强度比低阈值小的那些点立即被剔除。
(3)边缘强度在低阈值和高阈值之间的那些点,按照以下原则进行处理----只有这些点能按某一路径与确定边缘点相连时,才可作为边缘点被接受。组成这一路径的所有点的边缘强度都比低阈值要大。
python实现
import math
import cv2
import numpy as np


def non_maximum_suppression_default(dx, dy):
    edgeMag = np.sqrt(np.power(dx, 2.0) + np.power(dy, 2.0))
    rows, cols = dx.shape
    # 梯度方向
    gradientDirection = np.zeros(dx.shape)
    # 边缘强度非极大值抑制
    edgeMag_nonMaxSup = np.zeros(dx.shape)
    for r in range(1, rows - 1):
        for c in range(1, cols - 1):
            angle = math.atan2(dy[r][c], dx[r][c]) / math.pi * 180
            gradientDirection[r][c] = angle
            # 左/右方向
            if abs(angle) < 22.5 or abs(angle) > 157.5:
                if edgeMag[r][c] > edgeMag[r][c - 1] and edgeMag[r][c] > edgeMag[r][c + 1]:
                    edgeMag_nonMaxSup[r][c] = edgeMag[r][c]
            # 左上/右下方向
            if 22.5 <= angle < 67.5 or 112.5 < -angle <= 157.5:
                if edgeMag[r][c] > edgeMag[r - 1][c - 1] and edgeMag[r][c] > edgeMag[r + 1][c + 1]:
                    edgeMag_nonMaxSup[r][c] = edgeMag[r][c]
            # 上下方向
            if 67.5 <= abs(angle) <= 112.5:
                if edgeMag[r][c] > edgeMag[r - 1][c] and edgeMag[r][c] > edgeMag[r + 1][c]:
                    edgeMag_nonMaxSup[r][c] = edgeMag[r][c]
            # 右上/左下方向
            if 112.5 < angle <= 157.5 or 22.5 < -angle < 67.5:
                if edgeMag[r][c] > edgeMag[r - 1][c + 1] and edgeMag[r][c] > edgeMag[r + 1][c - 1]:
                    edgeMag_nonMaxSup[r][c] = edgeMag[r][c]
    return edgeMag_nonMaxSup


# 判断一个点是否在图像内
def checkInRange(r, c, rows, cols):
    if 0 <= r < rows and 0 <= c < cols:
        return True
    else:
        return False


# 阈值处理之寻找连接点
def trace(edgeMag_nonMaxSup, edge, lowerTresh, r, c, rows, cols):
    if edge[r][c] == 0:
        edge[r][c] = 255
        for i in range(-1, 2):
            for j in range(-1, 2):
                if checkInRange(r + i, c + j, rows, cols) and edgeMag_nonMaxSup[r + i][c + j] >= lowerTresh:
                    trace(edgeMag_nonMaxSup, edge, lowerTresh, r + i, c + j, rows, cols)


# 滞后阈值处理
def hysteresusThreshold(edgeMag_nonMaxSup, lowerTresh, upperThresh):
    rows, cols = edgeMag_nonMaxSup.shape
    edge = np.zeros(edgeMag_nonMaxSup.shape, np.uint8)
    for r in range(1, rows - 1):
        for c in range(1, cols - 1):
            if edgeMag_nonMaxSup[r][c] >= upperThresh:
                trace(edgeMag_nonMaxSup, edge, lowerTresh, r, c, rows, cols)
            if edgeMag_nonMaxSup[r][c] < lowerTresh:
                edge[r][c] = 0
    return edge


if __name__ == "__main__":
    image = cv2.imread(r"C:\Users\1\Pictures\test1.jpg", 0)
    # 生成dx和dy
    image_soble_x = cv2.Sobel(image, cv2.CV_64F, 1, 0)
    image_soble_x = cv2.convertScaleAbs(image_soble_x)
    image_soble_y = cv2.Sobel(image, cv2.CV_64F, 0, 1)
    image_soble_y = cv2.convertScaleAbs(image_soble_y)
    # 生成边缘强度
    edge = np.sqrt(np.power(image_soble_x, 2.0) + np.power(image_soble_y, 2.0))
    # 边缘强度的灰度级显示
    edge[edge > 255] = 255
    # 非极大值抑制
    edgeMag_nonMaxSup = non_maximum_suppression_default(image_soble_x, image_soble_y)
    edgeMag_nonMaxSup[edgeMag_nonMaxSup > 255] = 255
    edgeMag_nonMaxSup = edgeMag_nonMaxSup.astype(np.uint8)
    cv2.imshow('edgeMag_nonMaxSup', edgeMag_nonMaxSup)
    # 双阈值判断
    edge = hysteresusThreshold(edgeMag_nonMaxSup, 60, 180)
    cv2.imshow("edge", edge)
    cv2.waitKey(0)
    cv2.destroyAllWindows()
运行结果
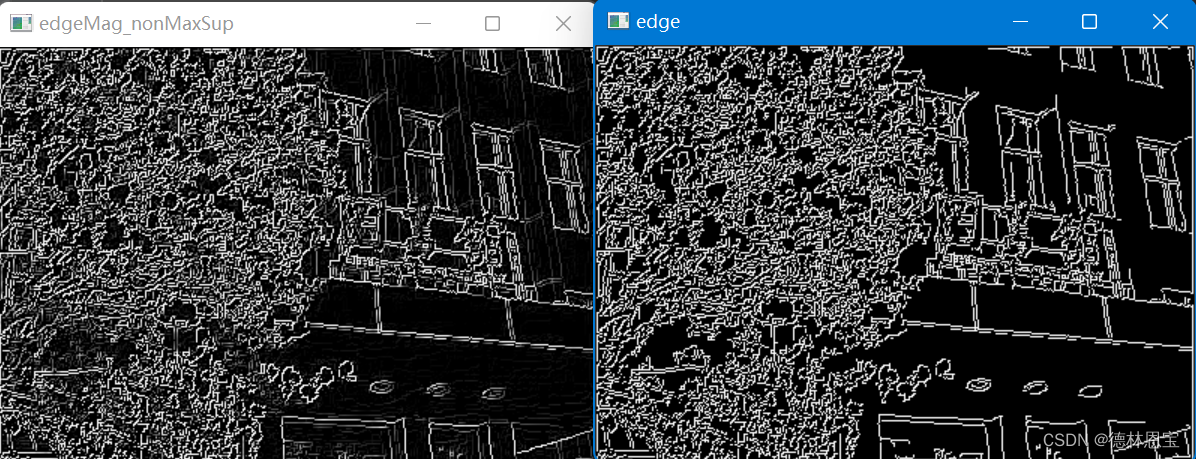
从上图中可以看出,使用双阈值处理后的图片中轮廓更加清晰。