开头资源地址:B站搬运:【Unity教程】如何在Unity当中实现像《Celeste(蔚蓝)》中完美的跳跃手感【转载搬运】【自翻】_哔哩哔哩_bilibilihttps://youtu.be/STyY26a_dPY建议配合卡姐翻译的这个视频食用更佳https://www.bilibili.com/video/BV1M441197sr?share_source=copy_web在Patreon上支持作者的链接https://www.patreon.com/mixandjam项目工程Github链接----------------------------- https://www.bilibili.com/video/BV1xr4y1s71V?spm_id_from=333.851.header_right.history_list.click
Github:完整项目:
学习目标:
作为IGN上少数满分10分的游戏,蔚蓝的操作手感始终是被无数游戏制造者所称赞的,偶然间看到了有个很优秀的Untiy项目制作者介绍了如何还原蔚蓝的手感今天就来学习下怎么制作如蔚蓝般极佳的操作手感,虽然做不到百分百还原,但如果有半成以上的实现也算颇有收获。
学习内容:
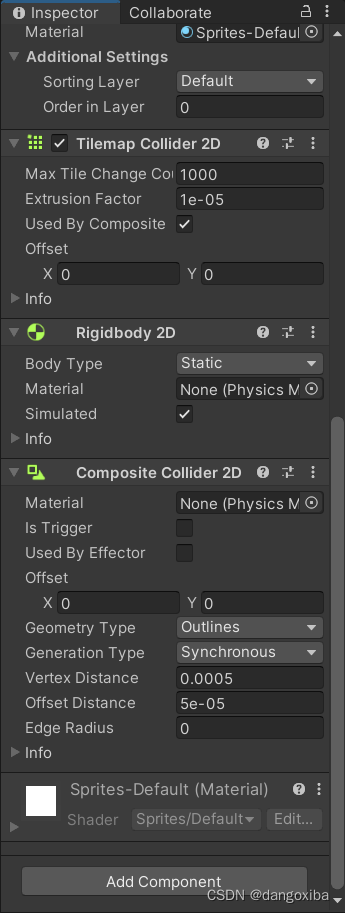
首先我们要先搭建好游戏的场景,利用TileMap将作者已经切割好的Sprite放到我们的Tile Pattle面板中,这里我创建了三个Grid,并把绘制地板的那个Grid添加好Tilemap Collider 2D以及Composite和Rigibody2D,需要提醒的一点是,别忘了设置一下这三个Grid的Sorting Layer,无论如何人物的层肯定要显示在最上面。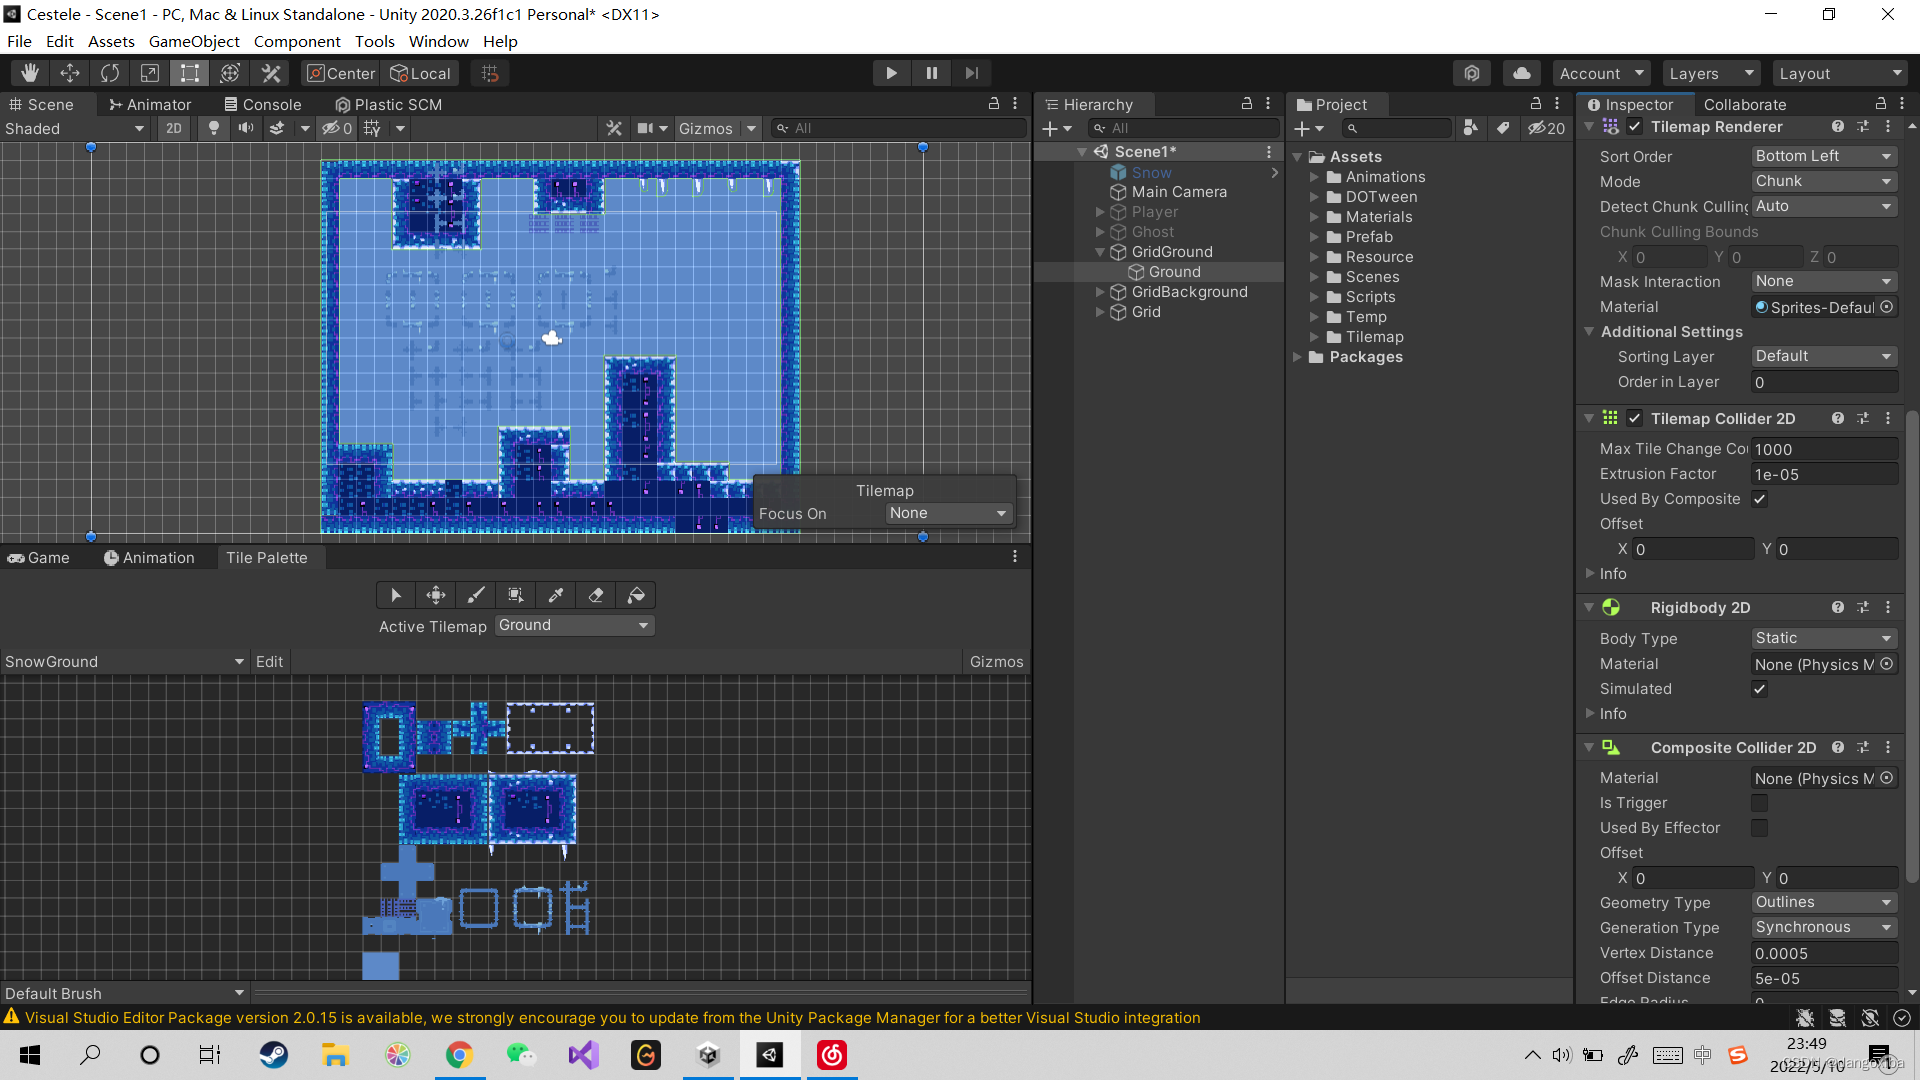
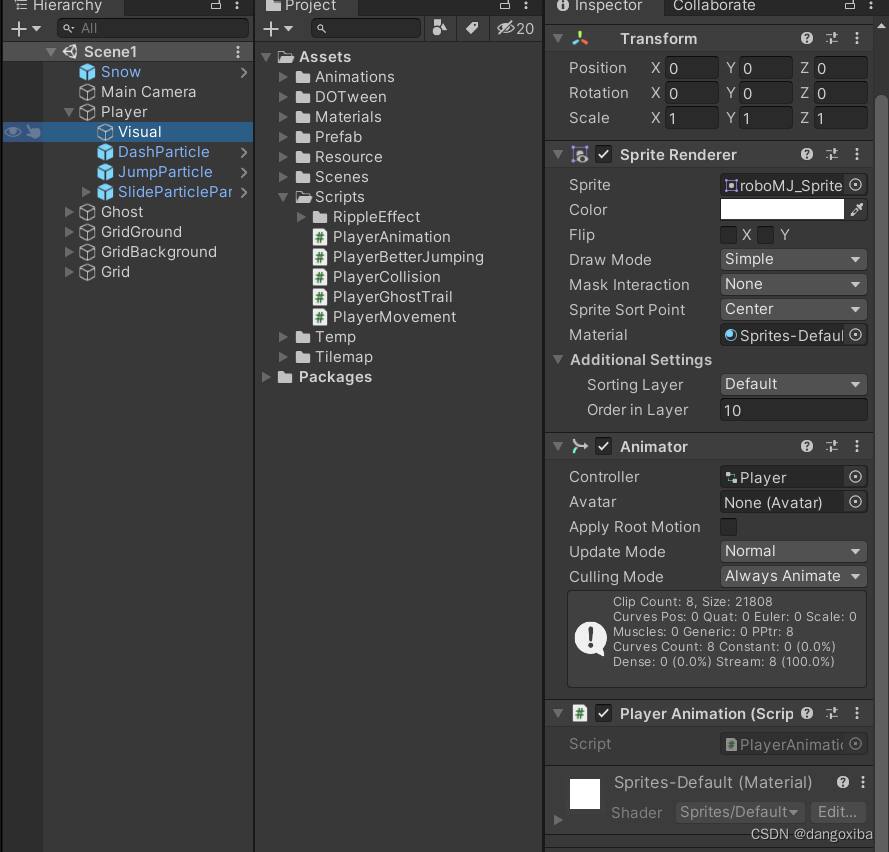
然后就是设置人物。先创建一个空对象。并给它相应的组件,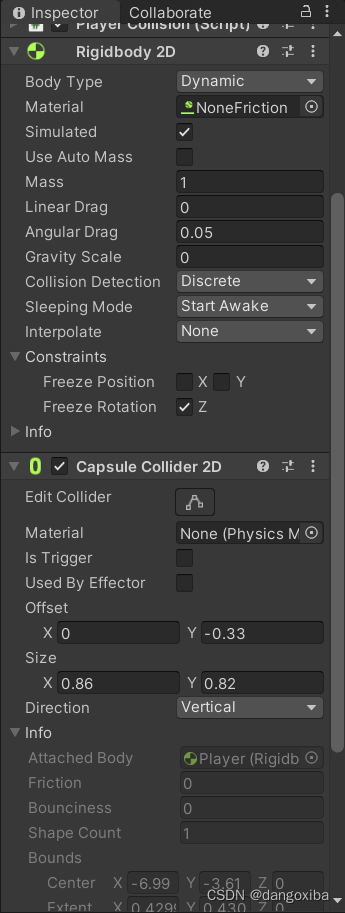
正如我前面讲的,将人物的显示部分作为子对象然后再给它Sprite Render,并把我们人物精灵图给它
接下来调整它的Sorting Layer以及创建好动画给它
动画的有限状态机我们先放一边,先来制作人物的碰撞检测的脚本
using System.Collections;
using System.Collections.Generic;
using UnityEngine;

public class PlayerCollision : MonoBehaviour
{

    [Header("地面层级")]
    public LayerMask groundLayer;

    [Space]
    public bool onGround;
    public bool onWall;
    public bool onLeftWall;
    public bool onRightWall;
    public int wallSide;

    [Header("检测参数")]
    public float collisionRadius = 0.25f;
    public Vector2 bottomPos, leftPos, rightPos;
    private Color collisionColor = Color.red;

    void Update()
    {
        // Physics2D.OverlapCircle形成圆形检测通过我们设置的对应检测参数来设置
        onGround = Physics2D.OverlapCircle((Vector2)transform.position + bottomPos, collisionRadius, groundLayer);
        onWall = Physics2D.OverlapCircle((Vector2)transform.position + leftPos, collisionRadius, groundLayer) ||
            Physics2D.OverlapCircle((Vector2)transform.position + rightPos, collisionRadius, groundLayer);
        onLeftWall = Physics2D.OverlapCircle((Vector2)transform.position + leftPos, collisionRadius, groundLayer);
        onRightWall = Physics2D.OverlapCircle((Vector2)transform.position + rightPos, collisionRadius, groundLayer);

        wallSide = onRightWall ? -1 : 1;
    }

    private void OnDrawGizmos()
    {
        //将检测圆形直接在Scene界面上更直观的显示
        Gizmos.color = Color.red;

        var checkositions = new Vector2[] { bottomPos, leftPos, rightPos };
        Gizmos.DrawWireSphere((Vector2)transform.position + bottomPos, collisionRadius);
        Gizmos.DrawWireSphere((Vector2)transform.position + leftPos, collisionRadius);
        Gizmos.DrawWireSphere((Vector2)transform.position + rightPos, collisionRadius);
    }
}
然后再创建一个PlayerMovement,把对应的检测补上,一会动画的时候还要用
public class PlayerMovement : MonoBehaviour
{
    [Space]
    [Header("运动参数")]
    [SerializeField] float moveSpeed;
    [SerializeField] float jumpForece;
    [SerializeField] float dashSpeed;
    [SerializeField] float slideSpeed;
    [SerializeField] float wallJumpLefp;

    private PlayerAnimation anim;
    private PlayerCollision coll;
    [HideInInspector]
    public Rigidbody2D rigi2D;

    [Header("判断")]
    public bool canMove;
    public bool hasDashed;
    public bool isDashing;
    public bool wallGrab;
    public bool wallSlide;
    public bool wallJumped;
    private bool groundTouch;

    public int side = 1;

    [Space]
    [Header("粒子系统")]
    public ParticleSystem slidePartical;
    public ParticleSystem dashPartical;
    public ParticleSystem jumpPartical;
    public ParticleSystem wallJumpPartical;

    void Start()
    {
        rigi2D = GetComponent<Rigidbody2D>();
        anim = GetComponentInChildren<PlayerAnimation>();
        coll = GetComponent<PlayerCollision>();
    }
}
我们通过代码控制动画条件,有了我们前面的检测和PlayerMovement我们能更轻易的控制动画。
using System.Collections;
using System.Collections.Generic;
using UnityEngine;

public class PlayerAnimation : MonoBehaviour
{
    private Animator anim;
    private PlayerMovement movement;
    private PlayerCollision coll;
    [HideInInspector]
    public SpriteRenderer sr;
    void Start()
    {
        anim = GetComponent<Animator>();
        coll = GetComponentInParent<PlayerCollision>();
        movement = GetComponentInParent<PlayerMovement>();
        sr = GetComponent<SpriteRenderer>();
    }

    void Update()
    {
        anim.SetBool("onWall", coll.onWall);
        anim.SetBool("onGround", coll.onGround);
        anim.SetBool("onRightWall", coll.onRightWall);
        anim.SetBool("wallGrab", movement.wallGrab);
        anim.SetBool("wallSlide", movement.wallSlide);
        anim.SetBool("canMove", movement.canMove);
        anim.SetBool("isDashing", movement.isDashing); ;
    }

    public void SetHorizontalMovement(float x,float y,float yVel)
    {
        anim.SetFloat("HorizontalAxis", x);
        anim.SetFloat("VerticalAxis", y);
        anim.SetFloat("VerticalVelocity", yVel);
    }

    public void SetATrigger(string trigger)
    {
        anim.SetTrigger(trigger);
    }

    public void Flip(int side)
    {
        if(movement.wallGrab || movement.wallSlide)
        {
            if (side == -1 && sr.flipX)
                return;

            if (side == 1 && !sr.flipX)
                return;
        }


        bool state = (side == 1) ? false : true;
        sr.flipX = state;
    }
}
然后在动画状态机上设置对应的参数以及连线设置条件
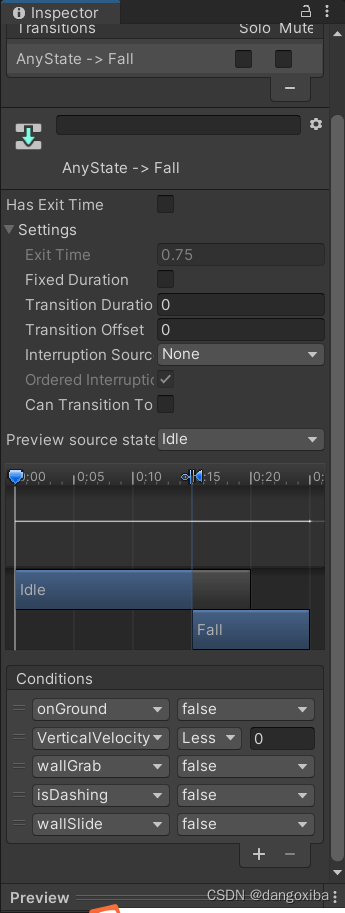
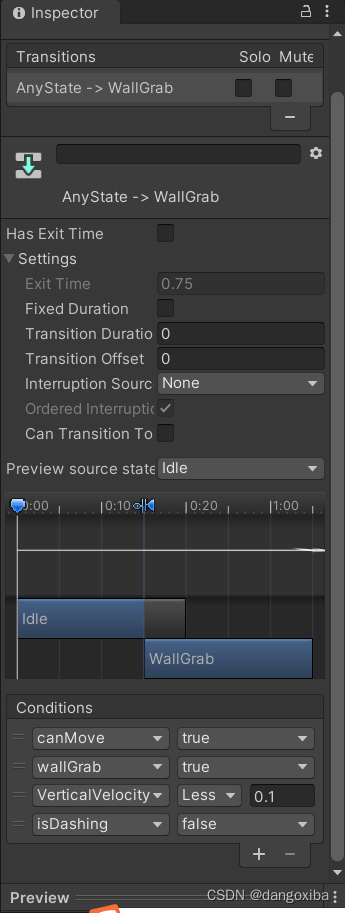
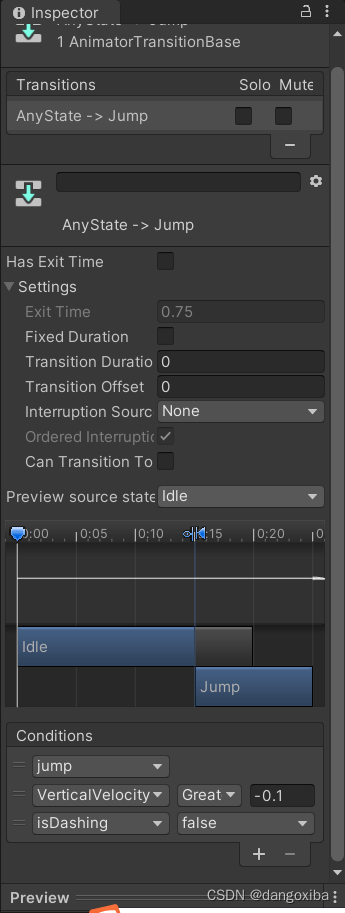
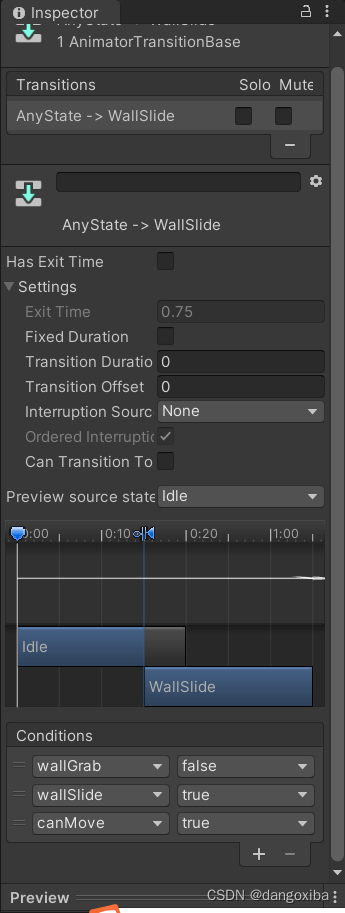
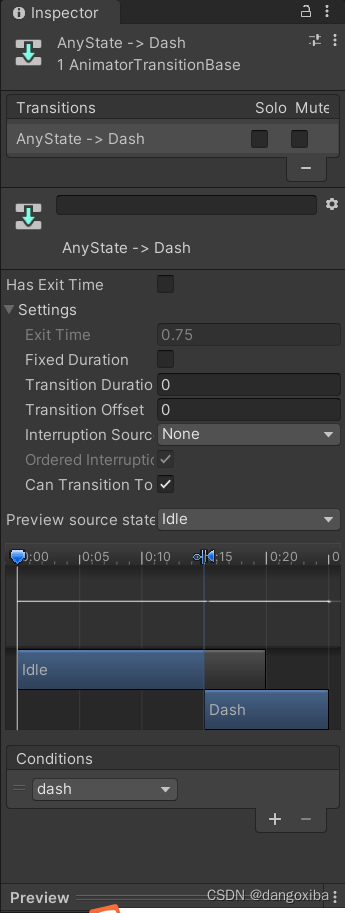
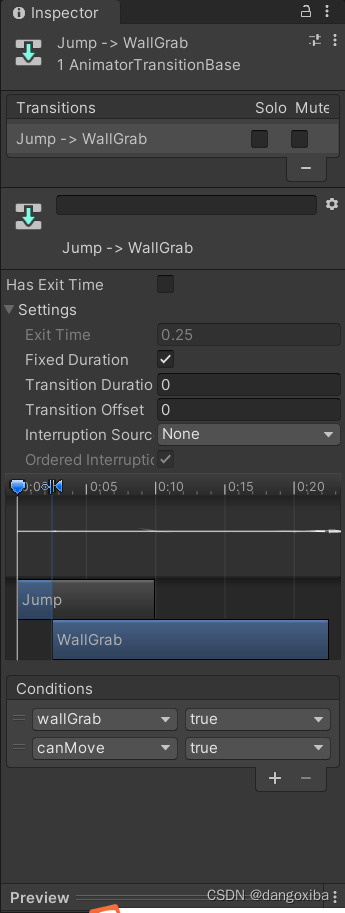
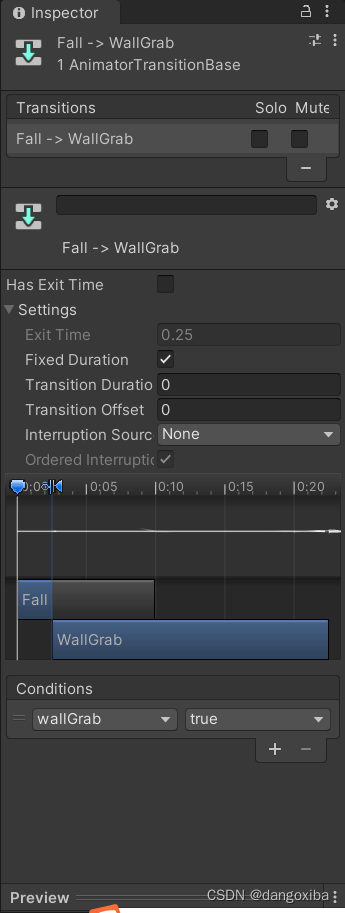


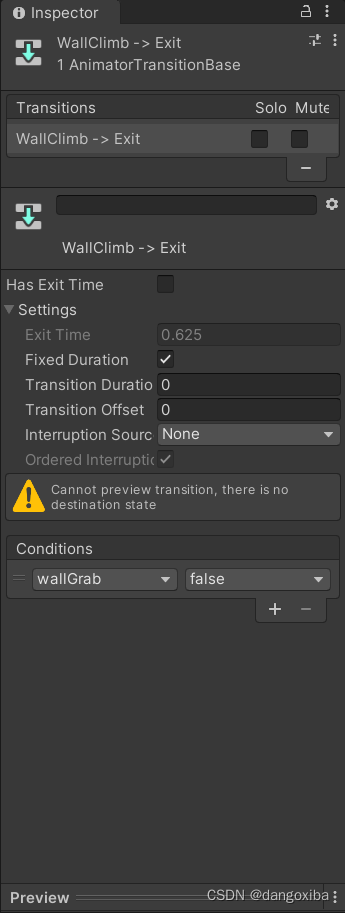


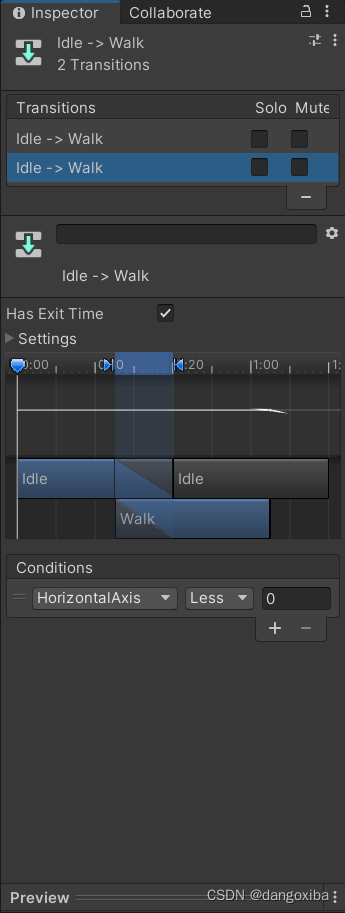
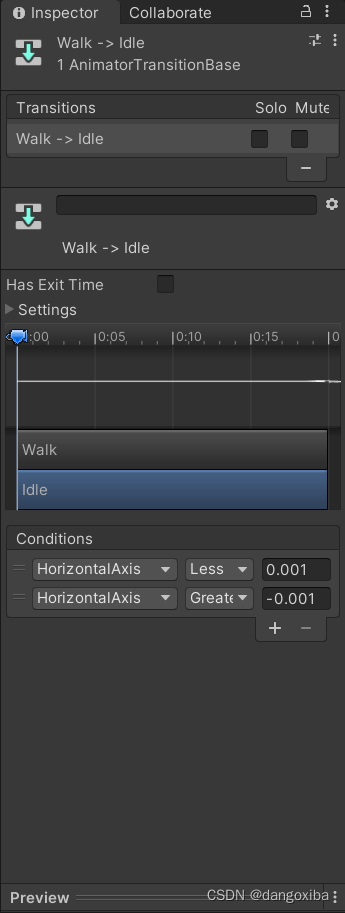
截屏截的有点多了,需要注意的是代码设置的动画名字和我们Animator的参数要对应起来
别忘了在我们的子对象上挂载脚本
接下来我们继续萹蓄PlayerMovement的脚本
首先是要在Update中持续读入的Input,并且要把参数传入到PlayerAnimation中让条件读入
void Update()
    {
        float x = Input.GetAxis("Horizontal");
        float y = Input.GetAxis("Vertical");
        float xRaw = Input.GetAxisRaw("Horizontal");
        float yRaw = Input.GetAxisRaw("Vertical");
        Vector2 dir = new Vector2(x, y);
        Walk(dir);
        anim.SetHorizontalMovement(x, y, rigi2D.velocity.y);
}
我们接着创建一个Walk(Vector2)函数,需要注意的是,为了让玩家在墙上跳跃的时候更加平滑即更好的操作空间,在玩家墙上跳跃的时候仍然能够往回走,就用了插值函数Lerp
 private void Walk(Vector2 dir)
    {
        if (!canMove)
            return;

        if (wallGrab)
            return;

        if (!wallJumped)
        {
            rigi2D.velocity = new Vector2(dir.x * moveSpeed, rigi2D.velocity.y);
        }
        else
        {
            rigi2D.velocity = Vector2.Lerp(rigi2D.velocity, new Vector2(dir.x * moveSpeed, rigi2D.velocity.y), wallJumpLefp * Time.deltaTime);
        }
    }
接下来编写跳跃相关的,跳跃分为在地面上跳跃以及再墙上跳跃,所以我们用我们的碰撞检测脚本的属性onWall和onGround来判断。
首先是在Update函数中
void Update
{
//跳跃
        if (Input.GetButtonDown("Jump"))
        {
            anim.SetATrigger("jump");

            if (coll.onGround)
            {
                Jump( Vector2.up,false);
            }else if (coll.onWall && !coll.onGround)
            {
                WallJump();
            }
        }
}
private void Jump(Vector2 dir,bool wall)
{
slidePartical.transform.parent.localScale = new Vector3(ParticalSide(), 1, 1);
ParticleSystem particle = wall ? wallJumpPartical : jumpPartical;
rigi2D.velocity = new Vector2(rigi2D.velocity.x, 0);
rigi2D.velocity += dir* jumpForece;
particle.Play();
}
private void WallJump()
{
if((coll.onRightWall && side ==1) || (coll.onRightWall && side == -1))
{
side *= -1;
anim.Flip(side);
}
StopCoroutine(DisableMovement(0));
StartCoroutine(DisableMovement(0.1f));
Vector2 wallDir = coll.onRightWall ? Vector2.left : Vector2.right;
Jump(Vector2.up /1.5f + wallDir /1.5f,true);
wallJumped = true;
}接下来做Dash冲刺相关的函数,但首先要创建一个新脚本用来仿制玩家冲刺生成的残影,这里涉及的DG.Tweening都在我上一篇文章上讲过总的来说是先生成一个动画队列然后调用回调函数让动作按步骤执行并用循环3次生成3个残影。
using System.Collections;
using System.Collections.Generic;
using UnityEngine;
using DG.Tweening;
public class PlayerGhostTrail : MonoBehaviour
{
    private PlayerMovement movement;
    private PlayerAnimation anim;
    private SpriteRenderer sr;

    public Transform ghostParent;

    public Color trailColor;
    public Color fadeColor;
    public float ghostInterval;
    public float fadeTime;
    void Start()
    {
        movement = FindObjectOfType<PlayerMovement>();
        anim = FindObjectOfType<PlayerAnimation>();
        sr = GetComponent<SpriteRenderer>();
    }

    public void ShowGhost()
    {
        Sequence sequence = DOTween.Sequence();

        for (int i = 0; i < ghostParent.childCount; i++)
        {
            Transform currentGhost = ghostParent.GetChild(i);
            sequence.AppendCallback(() => currentGhost.transform.position = movement.transform.position);
            sequence.AppendCallback(() => currentGhost.GetComponent<SpriteRenderer>().flipX = anim.sr.flipX);
            sequence.AppendCallback(() => currentGhost.GetComponent<SpriteRenderer>().sprite = anim.sr.sprite);
            sequence.Append(currentGhost.GetComponent<SpriteRenderer>().material.DOColor(trailColor, 0));
            sequence.AppendCallback(() => FadeSprite(currentGhost));
            sequence.AppendInterval(ghostInterval);

        }
    }

    public void FadeSprite(Transform current)
    {
        current.GetComponent<SpriteRenderer>().material.DOKill();
        current.GetComponent<SpriteRenderer>().material.DOColor(fadeColor, fadeTime);
    }
}
然后再回到PlayerMovement脚本中
private void Dash(float x,float y)
    {
        Camera.main.transform.DOComplete(); //终止所有动画
        Camera.main.transform.DOShakePosition(0.2f, 0.5f, 14, 90, false, true); //这里运用的是我上一篇文章讲到的DOTween的让摄像机震动的效果
        FindObjectOfType<RippleEffect>().Emit(Camera.main.WorldToViewportPoint(transform.position)); //目的是使在玩家位置产生涟漪的效果,也是Github上的一个项目

        hasDashed = true;
        anim.SetATrigger("dash");

        rigi2D.velocity = Vector2.zero;
        Vector2 dir = new Vector2(x, y);

        rigi2D.velocity += dir.normalized * dashSpeed; //让冲刺朝着玩家移动的方向
        StartCoroutine(DashWait());
    }
    IEnumerator DashWait()
    {
        FindObjectOfType<PlayerGhostTrail>().ShowGhost();
        StartCoroutine(GroundDash());
        DOVirtual.Float(14, 0, 0.8f, RigibodyDrag);

        dashPartical.Play();
        rigi2D.gravityScale = 0;
        GetComponent<PlayerBetterJumping>().enabled = false;
        wallJumped = true;
        isDashing = true;

        yield return new WaitForSeconds(0.3f);

        dashPartical.Stop();
        isDashing = false;
        wallJumped = false;
        rigi2D.gravityScale = 3;
        GetComponent<PlayerBetterJumping>().enabled = true;
    }
    IEnumerator GroundDash()
    {
        yield return new WaitForSeconds(0.15f);
        if (coll.onGround)
        {
            hasDashed = false;
        }
    }
Update函数中需要写个判断条件
if(Input.GetButtonDown("Fire1")&& !hasDashed)
        {
            if(xRaw != 0 || yRaw != 0)
            {
                Dash(xRaw,yRaw);
            }
        }
接下来还要实现的还有墙上滑行,抓住墙壁,粒子效果,这里把完整的PlayerMovement贴上来
using System.Collections;
using System.Collections.Generic;
using UnityEngine;
using DG.Tweening;

public class PlayerMovement : MonoBehaviour
{
    [Space]
    [Header("运动参数")]
    [SerializeField] float moveSpeed;
    [SerializeField] float jumpForece;
    [SerializeField] float dashSpeed;
    [SerializeField] float slideSpeed;
    [SerializeField] float wallJumpLefp;

    private PlayerAnimation anim;
    private PlayerCollision coll;
    [HideInInspector]
    public Rigidbody2D rigi2D;

    [Header("判断")]
    public bool canMove;
    public bool hasDashed;
    public bool isDashing;
    public bool wallGrab;
    public bool wallSlide;
    public bool wallJumped;
    private bool groundTouch;

    public int side = 1;

    [Space]
    [Header("粒子系统")]
    public ParticleSystem slidePartical;
    public ParticleSystem dashPartical;
    public ParticleSystem jumpPartical;
    public ParticleSystem wallJumpPartical;

    void Start()
    {
        rigi2D = GetComponent<Rigidbody2D>();
        anim = GetComponentInChildren<PlayerAnimation>();
        coll = GetComponent<PlayerCollision>();
    }


    void Update()
    {
        float x = Input.GetAxis("Horizontal");
        float y = Input.GetAxis("Vertical");
        float xRaw = Input.GetAxisRaw("Horizontal");
        float yRaw = Input.GetAxisRaw("Vertical");
        Vector2 dir = new Vector2(x, y);
        Walk(dir);
        anim.SetHorizontalMovement(x, y, rigi2D.velocity.y);

        //抓住墙壁
        if (coll.onWall && Input.GetButton("Fire3") && canMove)
        {
            if (side != coll.wallSide)
                anim.Flip(side * -1);
            wallGrab = true;
            wallSlide = false;
        }

        //放手
        if(!coll.onWall || !canMove || Input.GetButtonUp("Fire3"))
        {
            wallGrab = false;
            wallSlide = false;
        }

        if (coll.onGround && !isDashing)
        {
            wallJumped = false;
            GetComponent<PlayerBetterJumping>().enabled = true;
        }

        if(wallGrab && !isDashing)
        {
            rigi2D.gravityScale = 0;
            if(x>0.2f || x < -0.2f)
            {
                rigi2D.velocity = new Vector2(rigi2D.velocity.x, 0);
            }

            float speedModifier = y > 0 ? 0.5f : 1f;

            rigi2D.velocity = new Vector2(rigi2D.velocity.x,y * (moveSpeed * speedModifier));
        }
        else
        {
            rigi2D.gravityScale = 3;
        }

        //墙上滑行
        if(coll.onWall && !coll.onGround)
        {
            if (x != 0 && !wallGrab)
            {
                wallSlide = true;
                WallSlide();
            }
        }

        if(!coll.onWall || coll.onGround)
        {
            wallSlide = false;
        }

        //跳跃
        if (Input.GetButtonDown("Jump"))
        {
            anim.SetATrigger("jump");

            if (coll.onGround)
            {
                Jump( Vector2.up,false);
            }else if (coll.onWall && !coll.onGround)
            {
                WallJump();
            }
        }

        if(Input.GetButtonDown("Fire1")&& !hasDashed)
        {
            if(xRaw != 0 || yRaw != 0)
            {
                Dash(xRaw,yRaw);
            }
        }

        if(coll.onGround && !groundTouch)
        {
            GroundTouch();
            groundTouch = true;
        }

        if(!coll.onGround && groundTouch)
        {
            groundTouch = false;
        }

        WallPartical(y);

        if (wallSlide || wallGrab || !canMove)
            return;

        if(x>0)
        {
            side = 1;
            anim.Flip(side);
        }
        if (x < 0)
        {
            side = -1;
            anim.Flip(side);
        }
    }

    private void Walk(Vector2 dir)
    {
        if (!canMove)
            return;

        if (wallGrab)
            return;

        if (!wallJumped)
        {
            rigi2D.velocity = new Vector2(dir.x * moveSpeed, rigi2D.velocity.y);
        }
        else
        {
            rigi2D.velocity = Vector2.Lerp(rigi2D.velocity, new Vector2(dir.x * moveSpeed, rigi2D.velocity.y), wallJumpLefp * Time.deltaTime);
        }
    }
    private void Jump(Vector2 dir,bool wall)
    {
        slidePartical.transform.parent.localScale = new Vector3(ParticalSide(), 1, 1);
        ParticleSystem particle = wall ? wallJumpPartical : jumpPartical;

        rigi2D.velocity = new Vector2(rigi2D.velocity.x, 0);
        rigi2D.velocity += dir* jumpForece;

        particle.Play();
    }
    void GroundTouch()
    {
        hasDashed = false;
        isDashing = false;

        side = anim.sr.flipX ? -1 : 1;

        jumpPartical.Play();
    }
    private void Dash(float x,float y)
    {
        Camera.main.transform.DOComplete(); //终止所有动画
        Camera.main.transform.DOShakePosition(0.2f, 0.5f, 14, 90, false, true); //这里运用的是我上一篇文章讲到的DOTween的让摄像机震动的效果
        FindObjectOfType<RippleEffect>().Emit(Camera.main.WorldToViewportPoint(transform.position)); //目的是使在玩家位置产生涟漪的效果,也是Github上的一个项目

        hasDashed = true;
        anim.SetATrigger("dash");

        rigi2D.velocity = Vector2.zero;
        Vector2 dir = new Vector2(x, y);

        rigi2D.velocity += dir.normalized * dashSpeed; //让冲刺朝着玩家移动的方向
        StartCoroutine(DashWait());
    }
    IEnumerator DashWait()
    {
        FindObjectOfType<PlayerGhostTrail>().ShowGhost();
        StartCoroutine(GroundDash());
        DOVirtual.Float(14, 0, 0.8f, RigibodyDrag);

        dashPartical.Play();
        rigi2D.gravityScale = 0;
        GetComponent<PlayerBetterJumping>().enabled = false;
        wallJumped = true;
        isDashing = true;

        yield return new WaitForSeconds(0.3f);

        dashPartical.Stop();
        isDashing = false;
        wallJumped = false;
        rigi2D.gravityScale = 3;
        GetComponent<PlayerBetterJumping>().enabled = true;
    }
    IEnumerator GroundDash()
    {
        yield return new WaitForSeconds(0.15f);
        if (coll.onGround)
        {
            hasDashed = false;
        }
    }
    void WallPartical(float vertical)
    {
        var main = slidePartical.main;

        if(wallSlide || (wallGrab && vertical < 0))
        {
            slidePartical.transform.parent.localScale = new Vector3(ParticalSide(), 1, 1);
            main.startColor = Color.white;
        }
        else
        {
            main.startColor = Color.clear;
        }
    }

    private void WallJump()
    {
        if((coll.onRightWall && side ==1) || (coll.onRightWall && side == -1))
        {
            side *= -1;
            anim.Flip(side);
        }
        StopCoroutine(DisableMovement(0));
        StartCoroutine(DisableMovement(0.1f));

        Vector2 wallDir = coll.onRightWall ? Vector2.left : Vector2.right;

        Jump(Vector2.up /1.5f + wallDir /1.5f,true);

        wallJumped = true;
    }
    private void WallSlide()
    {
        if(coll.wallSide != side)
        {
            anim.Flip(side * -1);
        }

        if (!canMove)
            return;

        bool pushingWall = false;
        if((rigi2D.velocity.x > 0 && coll.onLeftWall) || (rigi2D.velocity.x<0 && coll.onRightWall))
        {
            pushingWall = true;
        }
        float push = pushingWall ? 0 : rigi2D.velocity.x;

        rigi2D.velocity = new Vector2(push, -slideSpeed);
    }
    IEnumerator DisableMovement(float time)
    {
        canMove = false;
        yield return new WaitForSeconds(time);
        canMove = true;
    }
    void RigibodyDrag(float x)
    {
        rigi2D.drag = x;
    }
    int ParticalSide()
    {
        int particalSide = coll.onRightWall ? 1 : -1;
        return particalSide;
    }
}
除此之外还需要一个脚本来使玩家能大小跳
using System.Collections;
using System.Collections.Generic;
using UnityEngine;

public class PlayerBetterJumping : MonoBehaviour
{
    private Rigidbody2D rigi2D;
    public float fallMultipler = 2.5f;
    public float lowJumpMultipler = 2f;
    void Start()
    {
        rigi2D = GetComponent<Rigidbody2D>();
    }

    void Update()
    {
        if(rigi2D.velocity.y < 0)
        {
            rigi2D.velocity += Vector2.up * Physics2D.gravity.y * (fallMultipler - 1) * Time.deltaTime;
        }
        else if(rigi2D.velocity.y > 0 && !Input.GetButton("Jump"))
        {
            rigi2D.velocity += Vector2.up * Physics2D.gravity.y * (lowJumpMultipler - 1) * Time.deltaTime;
        }
    }
}
这些是所需的所有脚本,其中RippleEffect是玩家需要从源码中下载的。

别忘了给人物填上参数。


以及给我们负责绘制Ground的一个层级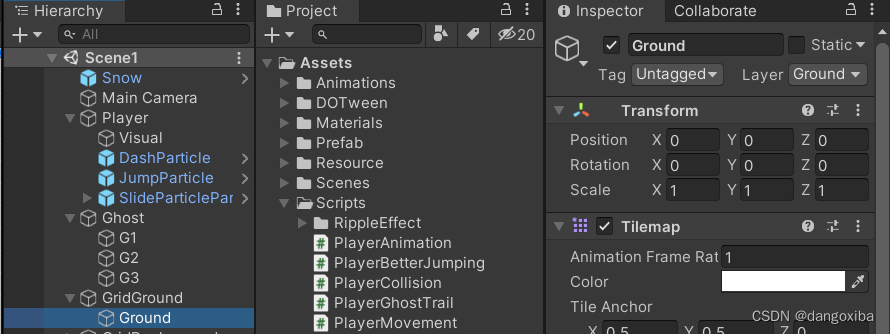
还有我们的Ghost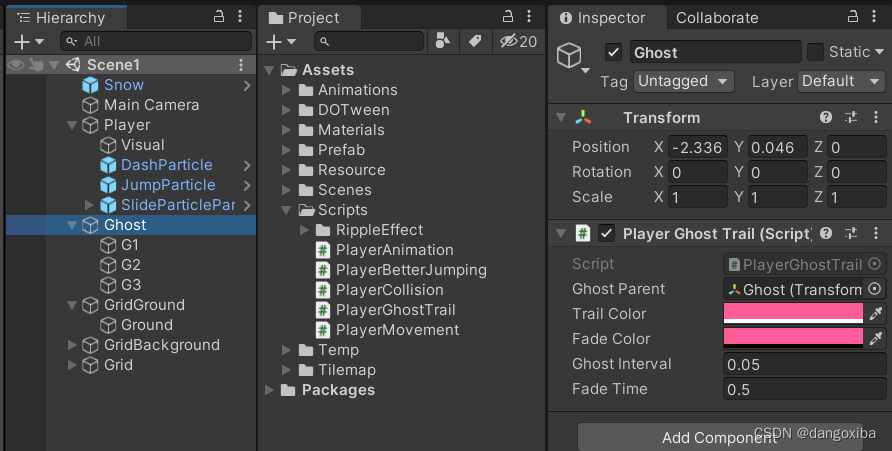
作者用一个名字叫"Ghost"的Material能让它们隐身,当使用的是会显示出来
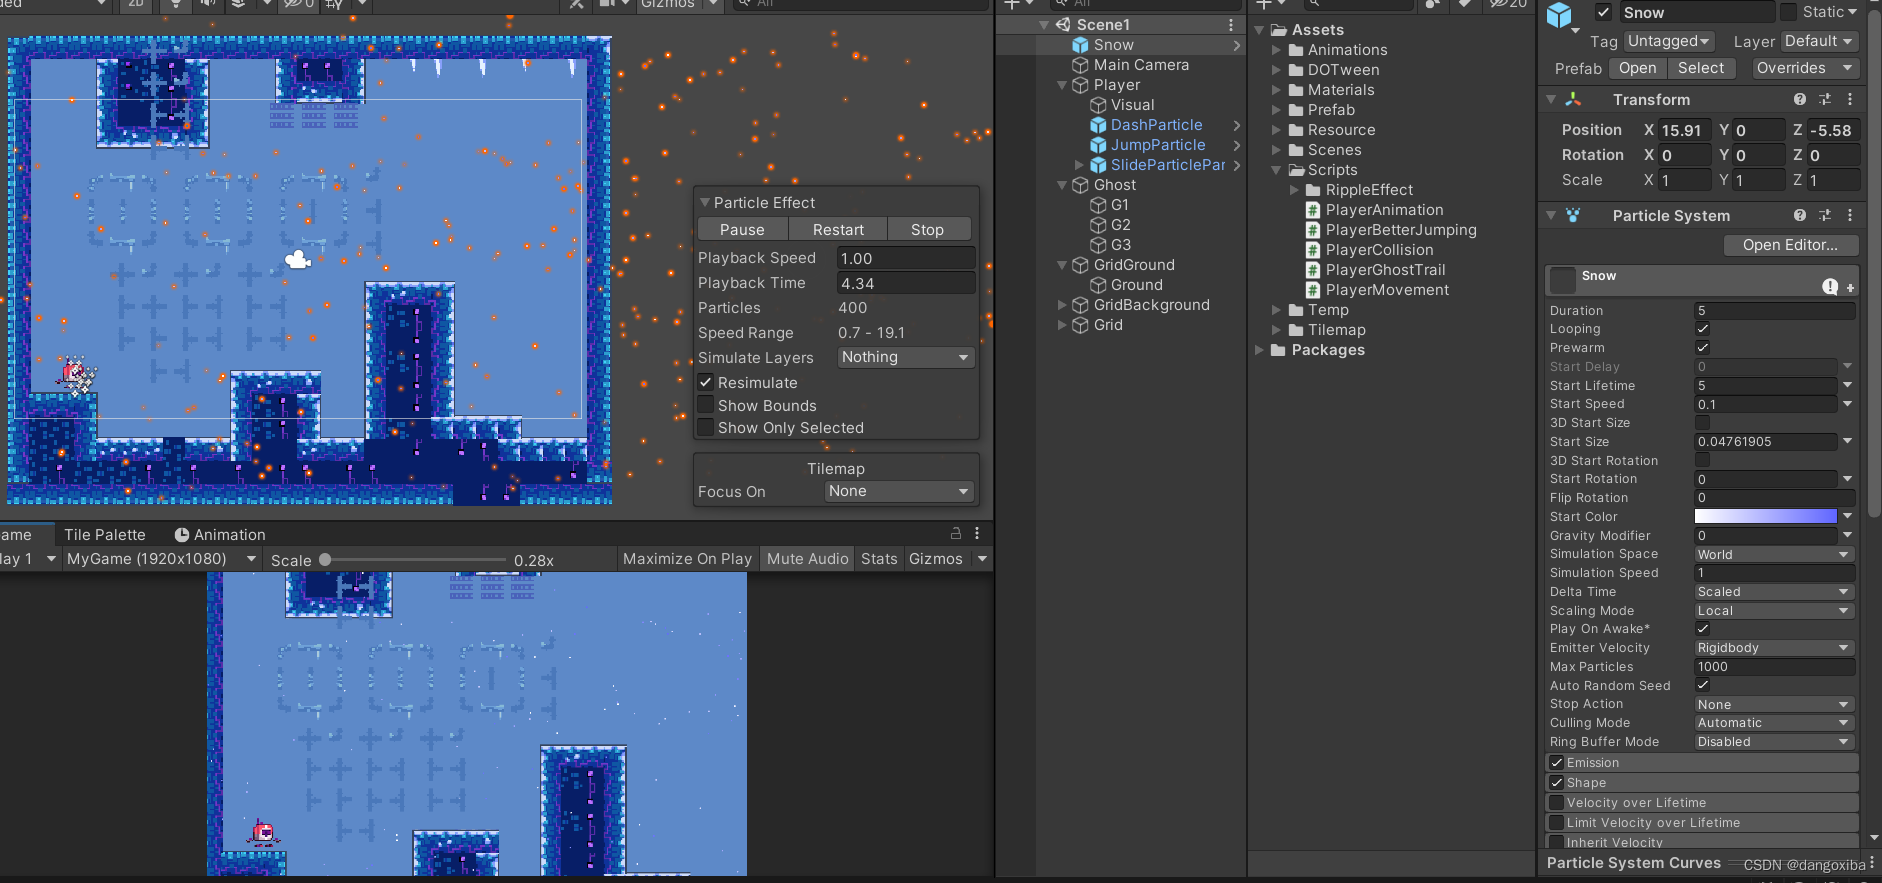
使用作者的Partical System模拟出飘雪的感觉
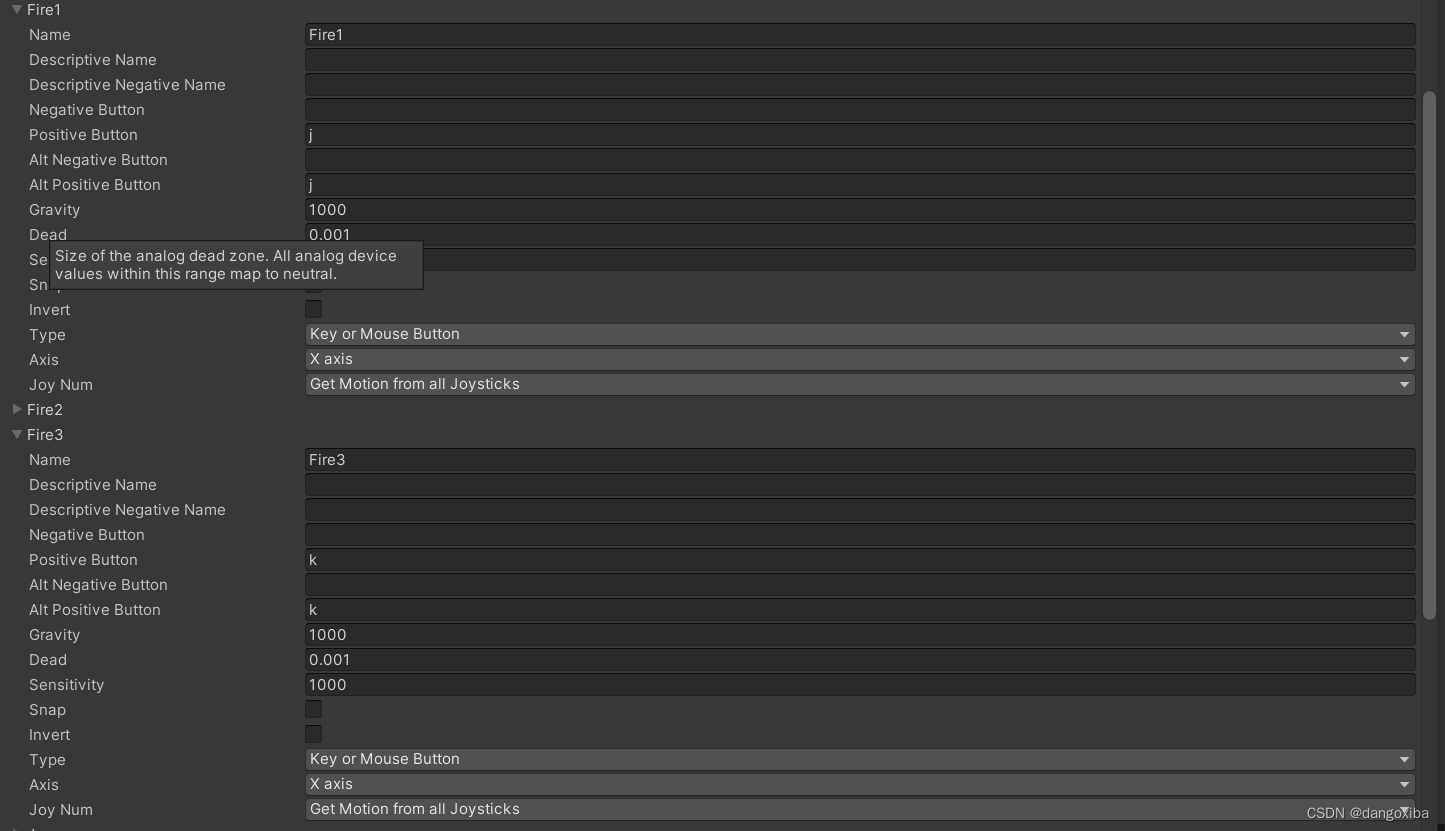
 最后别忘了在Project Settings上更改你的Fire1和Fire3
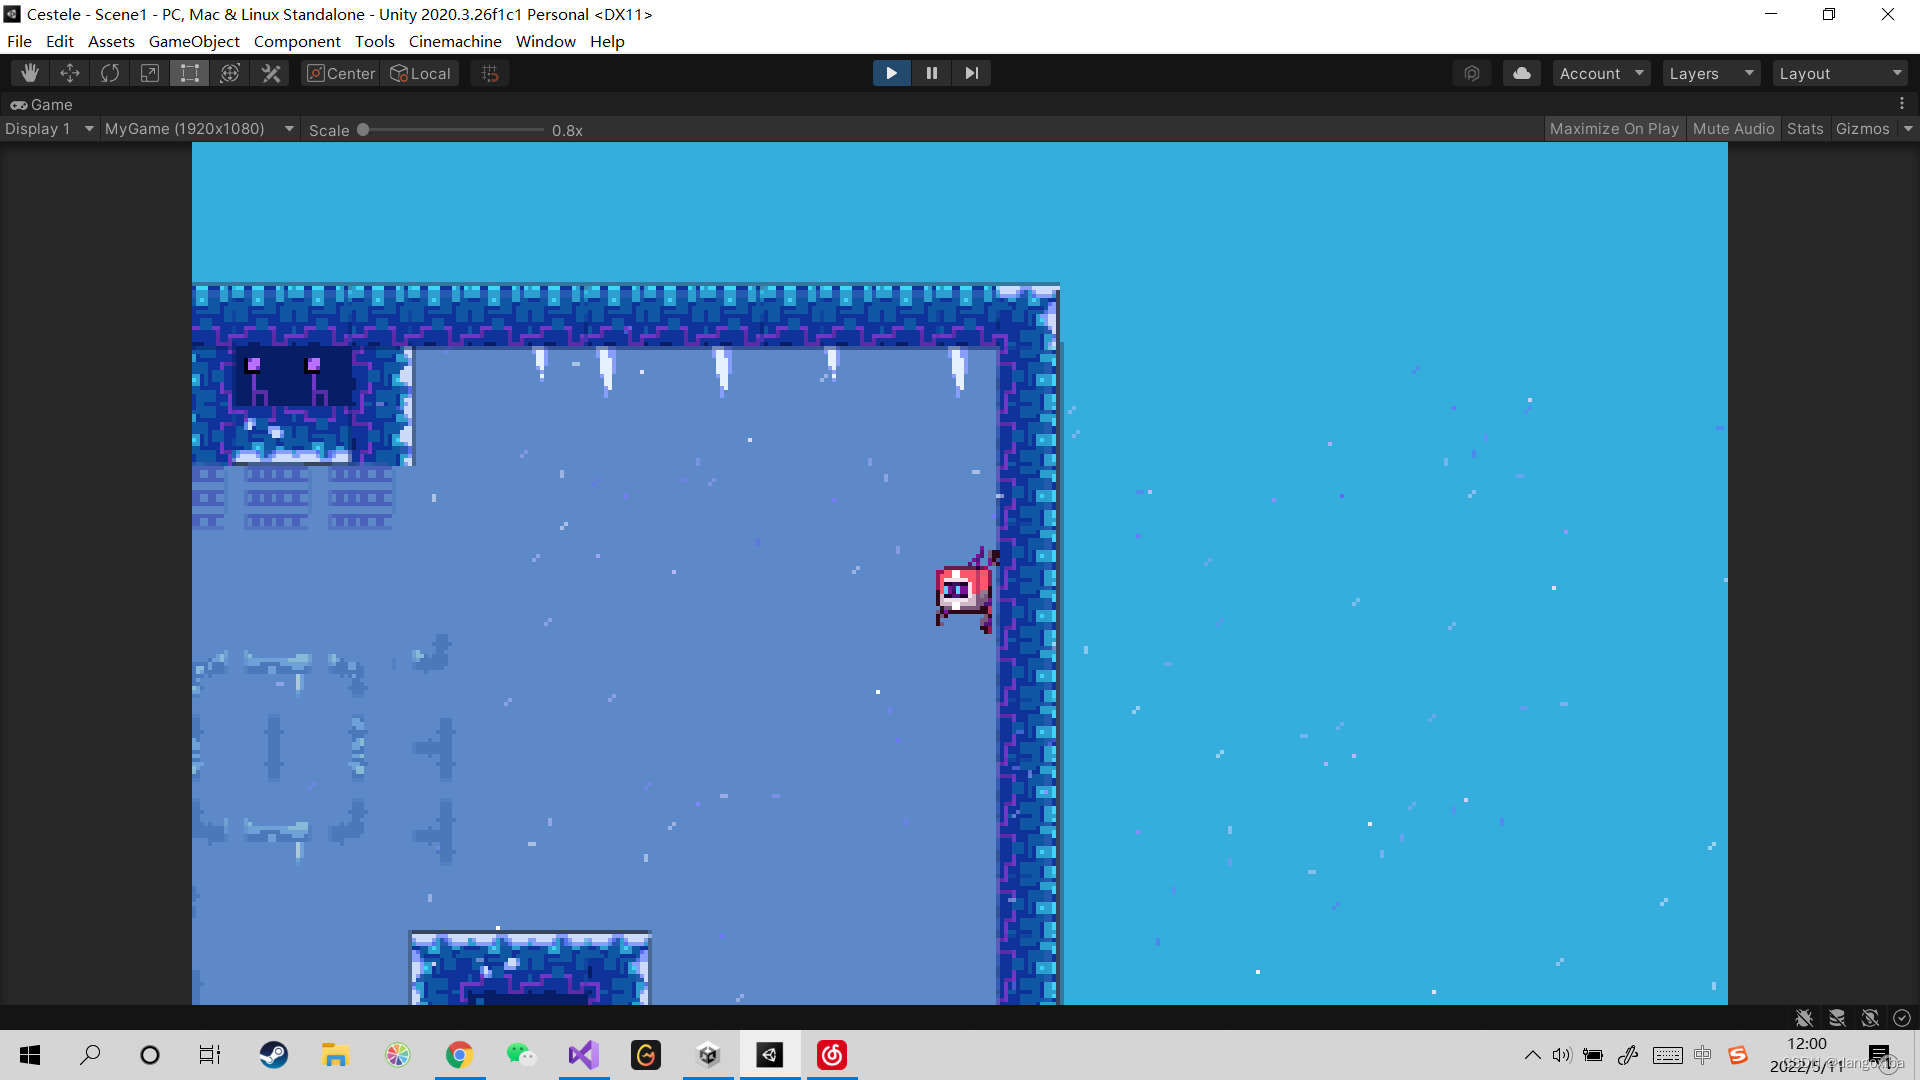
学习产出:
首先是按住Fire1能够悬停在墙上
冲刺的残影这个nm我截不到,按不到暂停所有就算了
总之残影和涟漪效果都是可以实现的。