如果点光源不做遮蔽,那么他后面的墙会被照亮
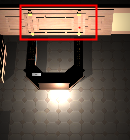
现实中是不会这样的,如果不考虑间接光照的话,他后面应该是被遮蔽的,也就是不会照亮的。
一:builtin下的遮蔽:
在builtin下点光源可以做阴影,而他的阴影的实现方式跟直接光照的实现方式有一些差异。直接光照是直接采样一张(如果有级联则会多张同一方向的)shadowmap,然后根据深度判断遮蔽。
而builtin下的点光源是采样6个方向的深度信息存入cubemap中。然后在采样时取cubemap中的点来确定深度是否足够遮蔽。
计算深度

UNITY_SHADOW_ATTENUATION的实现改为

二.urp下的遮蔽:
如果我们到urp下,如果要利用同样的方式,你会发现他不支持。

urp只能支持烘焙下的光源做遮蔽。
那么我下面的做法是一种比较不一样的做法,我利用了computeshader的特性,我们知道他不需要走完整的管线流程,并通过他的并行计算的效率来步进计算遮蔽来实现。
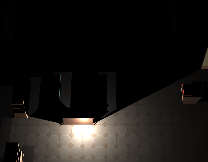
这个是初步的效果,但是我觉得利用以下方式得到的效果不一定有shadowcubemap的效果好,但是这个方式可能会有更好的拓展,比如步进计算间接光照,之后找时间我会研究这方面。
并且想要说明的是我这个效果再手机上得到的也能维持再60帧以上(我在每一个像素上步进了30次,实际上不需要这么多,但是测试效果,先这样吧)

2.2实现步骤:
1.修改RenderObjectsFeature,让他渲染到rt
2.rt中渲染位置及距离衰减
3.computeshader清空数据
4.32x32下步进计算遮挡
5.模糊处理
6.lit下采样屏幕空间信息
2.2.1:修改RenderObjectsFeature,让他渲染到rt
因为我们实际上需要将屏幕上的信息渲染到一张rendertexture下来方便后面计算,而我们不想影响正常输出的图像信息,所以需要修改成一个新的feature方式来支持。
其实就是参考RenderObjects这个feature来实现的

在这里主要设置一个rt信息给到commandbuffer,让他把输出的信息写到这个rt中

2.2.2rt中渲染位置及距离衰减
然后就是我们要在feature下指定我们要渲染的内容以及覆盖的material,用rendererfeature是有优势的,他是不需要重新设置摄像机裁剪等相关的前奏步骤,相当于减少了一些设置,直接是设置dc。

然后我们的Depth指定的是我们的shader,shader的代码主要是xyz放置的是世界坐标的位置,主要世界坐标是有负值而且会大于1,而我又不想设置hdr,所以通过一些数学计算转为小数点下就好了。然后w存的是目标点和我们的光源点的距离信息。
Shader "Unlit/Depth"
{
    Properties
    {
        _MainTex ("Texture", 2D) = "white" {}
    }
    SubShader
    {
        Tags{"RenderType" = "Opaque" "RenderPipeline" = "UniversalPipeline" "IgnoreProjector" = "True"}
        LOD 100

        Pass
        {
            Tags{"LightMode" = "UniversalForward"}
			Blend One Zero
			ZWrite On
			Cull Back

			HLSLPROGRAM
			#include "Assets/pipeline/com.unity.render-pipelines.universal/ShaderLibrary/Core.hlsl"
			#include "Assets/pipeline/com.unity.render-pipelines.universal/ShaderLibrary/Lighting.hlsl"
			#pragma multi_compile_instancing

            #pragma vertex vert
            #pragma fragment frag

            struct appdata
            {
                float4 vertex : POSITION;
                float2 uv : TEXCOORD0;
            };

            struct v2f
            {
                float2 uv : TEXCOORD0;
				float3 posWS : TEXCOORD1;
                float4 vertex : SV_POSITION;
            };

			float3 _AreaLightPos;

            v2f vert (appdata v)
            {
                v2f o;
				VertexPositionInputs vertexInput = GetVertexPositionInputs(v.vertex.xyz);
                o.vertex = vertexInput.positionCS;
				o.posWS = vertexInput.positionWS;
                return o;
            }

            float4 frag (v2f i) : SV_Target
            {
				half3 l = _AreaLightPos - i.posWS;
				half len = min(1, sqrt(l.x * l.x + l.y * l.y + l.z * l.z) / 10);
				half4 col = half4((i.posWS.xyz + 100) / 200, 1 - len);
                return col;
            }
            ENDHLSL
        }
    }
}
2.2.3.computeshader清空数据
这里先说清除是因为我们的rt需要清空数据,而我们的是要上一帧的数据清除,这也就是不能另一个computeshader来做的原因(这个computeshader是计算当前位置的)。可能会模糊,为什么不是全屏清除就好了?因为computeshader有个特点,就是他只能计算1024内的数据,所以如果我们用来计算屏幕信息,那么可能会又出入,现在的机器动不动就几千分辨率,那么这个1024是远远不足的。所以我们要记录上一帧的位置来清除上一帧的rt的数据。
屏幕位置就是用当前的点光源的位置减去512然后加上我们线程id就好了。
calMinDistance.SetTexture(ClearKernel, SDFRGBBlurTexturert, outputRGBBlurRT);
calMinDistance.SetTexture(ClearKernel, SDFRGBTexturert, outputRGBRT);
calMinDistance.SetVector(PrevScreenAreaLightPos, prevScreenLightPos);
cmd.DispatchCompute(calMinDistance, ClearKernel, 32, 32, 1);
computeshader中
[numthreads(32, 32, 1)]
void CSClearPrevRGBKernel(uint3 id : SV_DispatchThreadID)
{
	uint2 uv = uint2(uint2(max(0, _PrevScreenAreaLightPos.x - 512) + id.x, max(0, _PrevScreenAreaLightPos.y - 512) + id.y));
	SDFRGBTexture[uv]= float4(0, 0, 0, 0);
	SDFRGBBlurTexture[uv] = float4(0, 0, 0, 0);
}
2.2.4.32x32下步进计算遮挡
这里就是这个方法的核心了,主要是获取之前给到的世界坐标的信息然后在世界坐标中往目标点步进30次,如果碰到高度高于目标点的,则认为目标点不能照亮。步进过程中每次步进一步需要转换成屏幕位置,这样才能拿到高度信息来比较究竟大还是小。还要步进不能大于我们的目标点。
calMinDistance.SetVector(ScreenAreaLightPos, screenLightPos);
calMinDistance.SetVector(WorldLightPos, sdf.areaLightPos);
calMinDistance.SetTexture(kernel, SDFRGBTexturert, outputRGBRT);
cmd.SetComputeTextureParam(calMinDistance, kernel, RenderObjectsToRTPass.RT.id, RenderObjectsToRTPass.RT.Identifier());
cmd.DispatchCompute(calMinDistance, kernel, 32, 32, 1);
computeshader:
[numthreads(32,32,1)]
void CSMain (uint3 id : SV_DispatchThreadID)
{
	uint2 uv = uint2(uint2(max(0,_ScreenAreaLightPos.x - 512) + id.x, max(0, _ScreenAreaLightPos.y - 512) + id.y));
	SDFRGBTexture[uv] = float4(0,0,0,0);
	//uint2 uv = uint2(id.x, id.y);
	int isClear = 0;
	//世界坐标下的步进
	half3 posW = half3(_RenderObjectsToRTFeature[uv].xyz * 200 - 100);
	half3 dir = normalize(posW - _WorldAreaLightPos);
	for (int i = 1; i <= 30; i++)
	{
		float4 newPosW = float4(_WorldAreaLightPos + dir * float(i), 1);

		half3 distance = posW - _WorldAreaLightPos;
		half3 newDistance = newPosW - _WorldAreaLightPos;
		if ((distance.x * distance.x + distance.y * distance.y + distance.z * distance.z) < (newDistance.x * newDistance.x + newDistance.y * newDistance.y + newDistance.z * newDistance.z))
		{
			break;
		}

		float4 newScreenPos = mul(_VPMatrix, newPosW);
		newScreenPos /= newScreenPos.w;
		newScreenPos = (newScreenPos + float4(1,1,1,1)) / 2;
		newScreenPos = float4(newScreenPos.x * _ScreenRect.x, newScreenPos.y * _ScreenRect.y, newScreenPos.z, newScreenPos.w);
		/*float xScreenPosfrac = newScreenPos.x - float(int(newScreenPos.x));
		float yScreenPosfrac = newScreenPos.y - float(int(newScreenPos.y));*/
		float4 newColorPos = _RenderObjectsToRTFeature[uint2(newScreenPos.xy)] * 200 - 100;

		float3 outDistance = newColorPos - newPosW;
		if (_WorldAreaLightPos.y < posW.y && newColorPos.y > posW.y)
		//if (abs(dot(normalize(float3(0,1,0)), normalize(_WorldAreaLightPos - posW)) - dot(normalize(float3(0, 1, 0)), normalize(_WorldAreaLightPos - newColorPos))) < 0.1)
		{
			SDFRGBTexture[uv] = float4(_RenderObjectsToRTFeature[uv].rgb, 0);
			isClear = 1;
			break;
		}
	}
	if (isClear == 0)
	{
		SDFRGBTexture[uv] = float4(_RenderObjectsToRTFeature[uv].rgb, _RenderObjectsToRTFeature[uv].a);
	}
}
2.2.5.模糊处理
通过上面的步骤其实已经有效果了,但是可以看到还不太完美,因为有很多锯齿,主要原因是我们depth这个材质给到的rt的分辨率的问题,如果你给的是RenderTextureFormat.ARGB64就会好很多,原因是因为你的图片存储的位数越多则越精确。如果保持低分辨率,我们可以通过一些模糊的做法来完善,主要做法是做均值模糊。
calMinDistance.SetTexture(RGBkernel, SDFRGBBlurTexturert, outputRGBBlurRT);
calMinDistance.SetTexture(RGBkernel, SDFRGBTexturert, outputRGBRT);
cmd.DispatchCompute(calMinDistance, RGBkernel, 32, 32, 1);
computeshader:
[numthreads(32, 32, 1)]
void CSRGBKernel(uint3 id : SV_DispatchThreadID)
{

	uint2 uv = uint2(uint2(max(0, _ScreenAreaLightPos.x - 512) + id.x, max(0, _ScreenAreaLightPos.y - 512) + id.y));
	SDFRGBBlurTexture[uv] = float4(0, 0, 0, 0);
	//uint2 uv = uint2(id.x, id.y);
	float4 result = float4(SDFRGBTexture[uv].rgb, SDFRGBTexture[uv].a);

	int distance = 8;

	uint2 uv1 = uint2(uv.x - distance, uv.y);
	uint2 uv2 = uint2(uv.x + distance, uv.y);
	uint2 uv3 = uint2(uv.x, uv.y - distance);
	uint2 uv4 = uint2(uv.x, uv.y + distance);
	uint2 uv5 = uint2(uv.x - distance, uv.y - distance);
	uint2 uv6 = uint2(uv.x - distance, uv.y + distance);
	uint2 uv7 = uint2(uv.x + distance, uv.y - distance);
	uint2 uv8 = uint2(uv.x + distance, uv.y + distance);
	float4 result1 = SDFRGBTexture[uv1];
	float4 result2 = SDFRGBTexture[uv2];
	float4 result3 = SDFRGBTexture[uv3];
	float4 result4 = SDFRGBTexture[uv4];
	float4 result5 = SDFRGBTexture[uv5];
	float4 result6 = SDFRGBTexture[uv6];
	float4 result7 = SDFRGBTexture[uv7];
	float4 result8 = SDFRGBTexture[uv8];

	result += result1 + result2 + result3 + result4 + result5 + result6 + result7 + result8;
	result /= 9;

	SDFRGBBlurTexture[uv] = result;
}
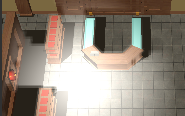
2.2.6.lit下采样屏幕空间信息
当然上面是最终的效果,但我们计算完的是一张rt,里面只有光照信息,所以最终需要贴到地板上

完整的framedebug中的路径是:

可以看到物体渲染是刚开始就渲染的,所以我们每次显示的都是上一帧的信息。这样做的原因是这样我们不需要把之前SetRenderTarget设置回屏幕显示的信息。因为我试了很多次好像都不太成功……