前言
这个博客会讲解MMDetection关于Darknet53这个Backbone的实现源码,之前其实也学了很多个版本的yolov3代码了,但是都是基于各种配置文件的源码,没有完整的网络搭建代码,所以在做实验想改yolov3的网络的时候,会发现自己无从下手,改配置文件,不知道从哪里开始改。刚好最近又在学习MMDetection,所以就打算从这个最简单、最经典的one-stage目标检测网络开始解开MMDetetection的神秘面纱(有点写小作文的感觉了…)。
【Darknet53 网络结构(两张都是盗图,我太懒了,不想自己画)】
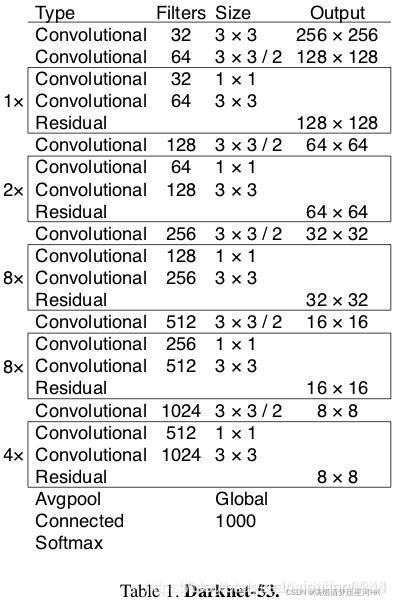
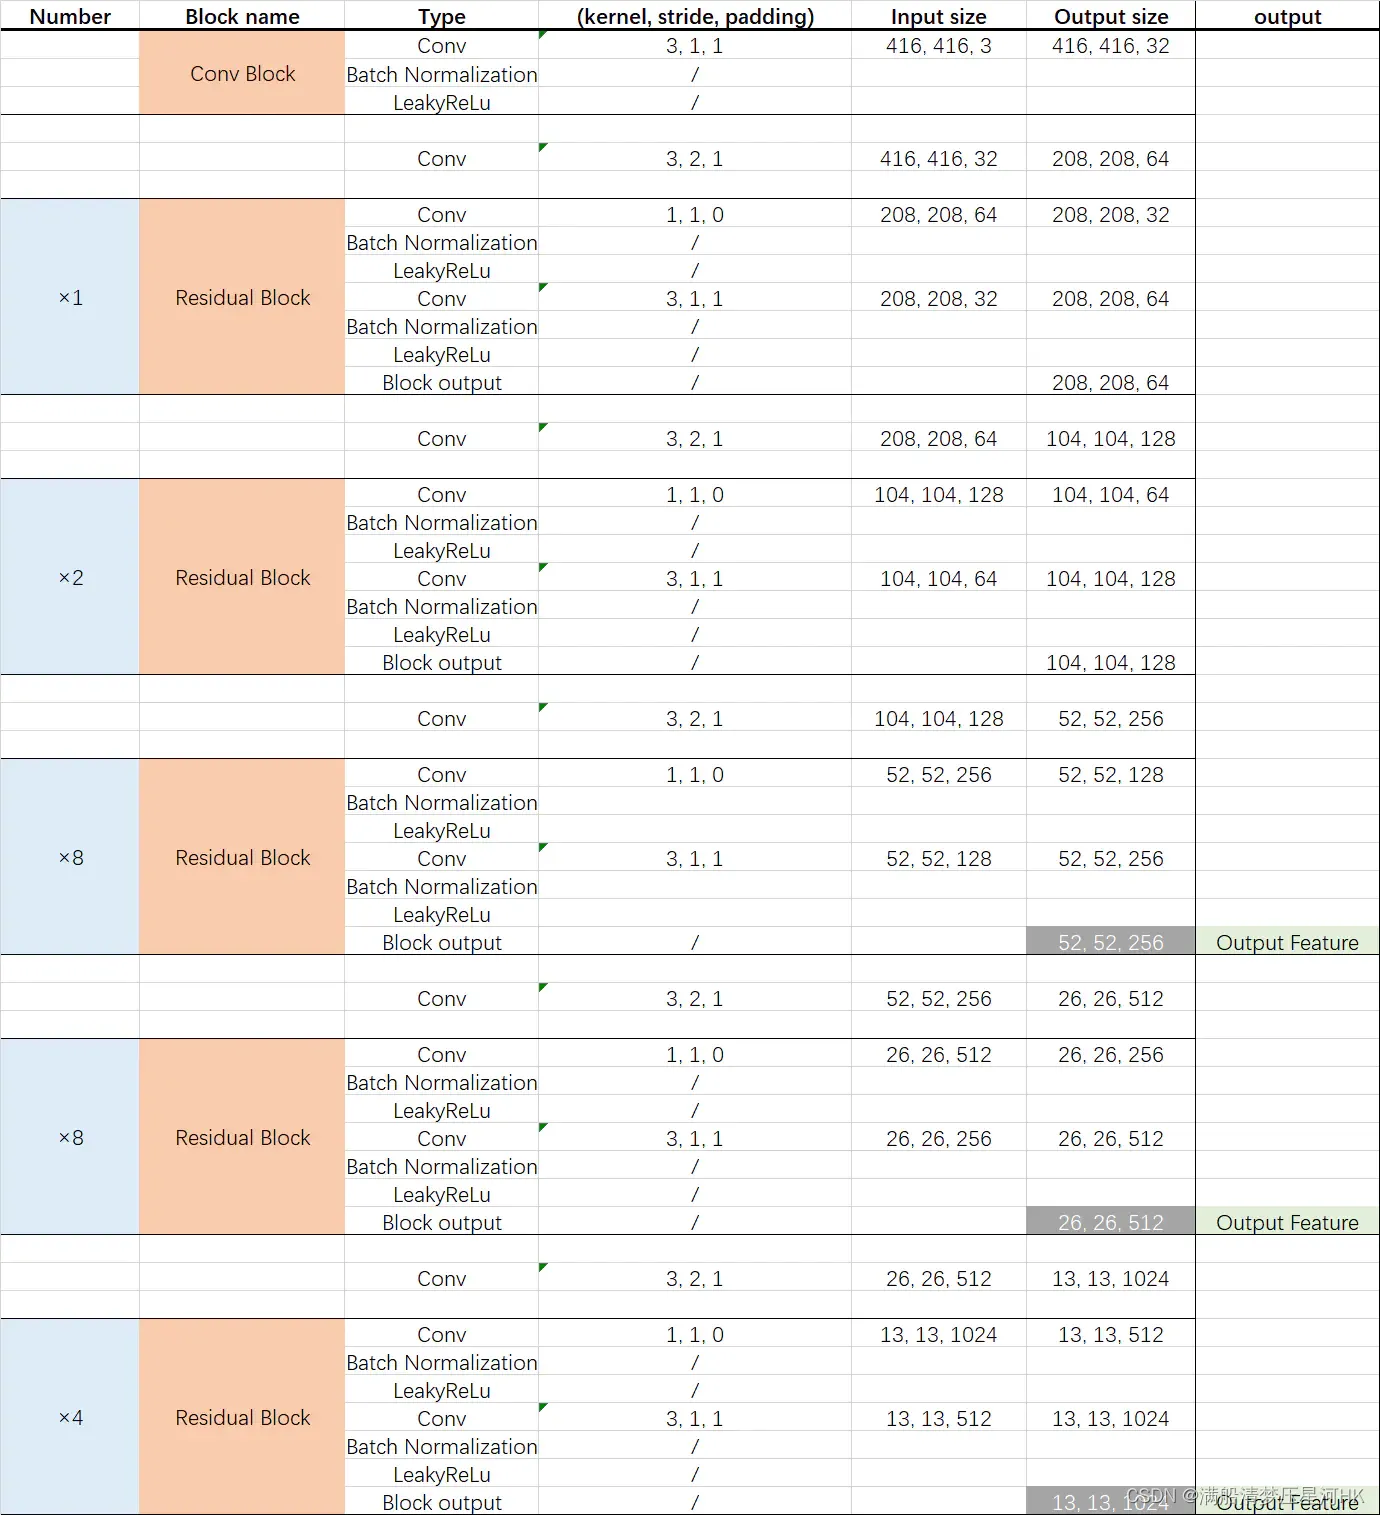
好了,上面对Darkent53有了基础的了解,下面开始搭建Backbone。
一、配置文件
backbone相关配置文件如下所示:
模型名_backbone名_dataset名
yolov3_d53_mstrain-608_273e_pest.py
model = dict(
    type='YOLOV3',
    backbone=dict(
        type='Darknet',  # backbone类型
        depth=53,        # 网络层数
        out_indices=(3, 4, 5),   # 输出的stage的序号
        init_cfg=dict(type='Pretrained', checkpoint='open-mmlab://darknet53')),  # 预训练模型:open-mmlab://darknet53
二、Darknet
这里我不打算从配置文件开始将它是如何如何读取配置再注册找到 class Darknet(BaseModule) 的,我们这里的学习中心会放在 darknet53的搭建上,至于配置文件解读和注册表等MMCV的操作,可以看我的其他源码解读博客: 【MMDetection 目标检测框架学习】.
2.1、Darknet类介绍和全局参数设置
@BACKBONES.register_module()
class Darknet(BaseModule):
    """Darknet backbone.
    Args:
        depth (int): Depth of Darknet. Currently only support 53.
        out_indices (Sequence[int]): Output from which stages.
        frozen_stages (int): Stages to be frozen (stop grad and set eval mode).
            -1 means not freezing any parameters. Default: -1.
        conv_cfg (dict): Config dict for convolution layer. Default: None.
        norm_cfg (dict): Dictionary to construct and config norm layer.
            Default: dict(type='BN', requires_grad=True)
        act_cfg (dict): Config dict for activation layer.
            Default: dict(type='LeakyReLU', negative_slope=0.1).
        norm_eval (bool): Whether to set norm layers to eval mode, namely,
            freeze running stats (mean and var). Note: Effect on Batch Norm
            and its variants only.
        pretrained (str, optional): model pretrained path. Default: None
        init_cfg (dict or list[dict], optional): Initialization config dict.
            Default: None

    Example:
        >>> from mmdet.models import Darknet
        >>> import torch
        >>> self = Darknet(depth=53)
        >>> self.eval()
        >>> inputs = torch.rand(1, 3, 416, 416)
        >>> level_outputs = self.forward(inputs)
        >>> for level_out in level_outputs:
        ...     print(tuple(level_out.shape))
        ...
        (1, 256, 52, 52)
        (1, 512, 26, 26)
        (1, 1024, 13, 13)
    """

    # Dict(depth: (layers, channels))
    arch_settings = {


        # 深度  5个stage的重复个数    5个stage的输入channel和输出channel
        53: ((1, 2, 8, 8, 4), ((32, 64), (64, 128), (128, 256), (256, 512),
                               (512, 1024)))
    }
2.2、__init__初始化
    def __init__(self,
                 depth=53,  # backbone深度
                 out_indices=(3, 4, 5),  # backbone输出的stage的序号(输出向Neck)
                 frozen_stages=-1,  # 哪些层需要冻结权重训练
                 conv_cfg=None,  # 卷积层配置
                 norm_cfg=dict(type='BN', requires_grad=True),  # norm层配置
                 act_cfg=dict(type='LeakyReLU', negative_slope=0.1),  # 激活函数配置
                 norm_eval=True,  # 是否将norm layer设置为eval mode 相应的需要冻结mean and var参数
                 pretrained=None,  # 预训练配置
                 init_cfg=None):  # 初始化配置
        super(Darknet, self).__init__(init_cfg)
        if depth not in self.arch_settings:
            raise KeyError(f'invalid depth {

      depth} for darknet')

        self.depth = depth  # backbone深度
        self.out_indices = out_indices  # backbone输出的stage的序号(输出向Neck)
        self.frozen_stages = frozen_stages  # 哪些层需要冻结权重训练
        # 5个stage的重复个数 5个stage的输入channel和输出channel
        self.layers, self.channels = self.arch_settings[depth]

        # 卷积的配置文件 一般conv_cfg=None  norm_cfg=BN  act_cfg=LeakyReLU
        cfg = dict(conv_cfg=conv_cfg, norm_cfg=norm_cfg, act_cfg=act_cfg)

        # backbone的第一层
        self.conv1 = ConvModule(3, 32, 3, padding=1, **cfg)

        # self.cr_blocks:存放所有的卷积名即通过name可以直接用self.name找到
        self.cr_blocks = ['conv1']

        # 依次遍历搭建其他的5个stage  [1,2,8,8,4]
        for i, n_layers in enumerate(self.layers):
            layer_name = f'conv_res_block{

      i + 1}'  # 每一个stage的name
            in_c, out_c = self.channels[i]  # 每一个stage的输入输出channel
            self.add_module(  # 调用make_conv_res_block函数,搭建当前stage
                layer_name,
                self.make_conv_res_block(in_c, out_c, n_layers, **cfg))
            self.cr_blocks.append(layer_name)  # 更新self.cr_blocks

        # 是否将norm layer设置为eval mode 相应的需要冻结mean and var参数
        # Note: Effect on Batch Norm and its variants only.
        self.norm_eval = norm_eval

        assert not (init_cfg and pretrained), \
            'init_cfg and pretrained cannot be setting at the same time'
        # pretrained=str self.init_cfg 导入预训练初始化配置
        if isinstance(pretrained, str):
            warnings.warn('DeprecationWarning: pretrained is deprecated, '
                          'please use "init_cfg" instead')
            self.init_cfg = dict(type='Pretrained', checkpoint=pretrained)
        # pretrained=None and init_cfg=None  设置为Kaiming初始化配置
        elif pretrained is None:
            if init_cfg is None:
                self.init_cfg = [
                    dict(type='Kaiming', layer='Conv2d'),
                    dict(
                        type='Constant',
                        val=1,
                        layer=['_BatchNorm', 'GroupNorm'])
                ]
        else:
            raise TypeError('pretrained must be a str or None')
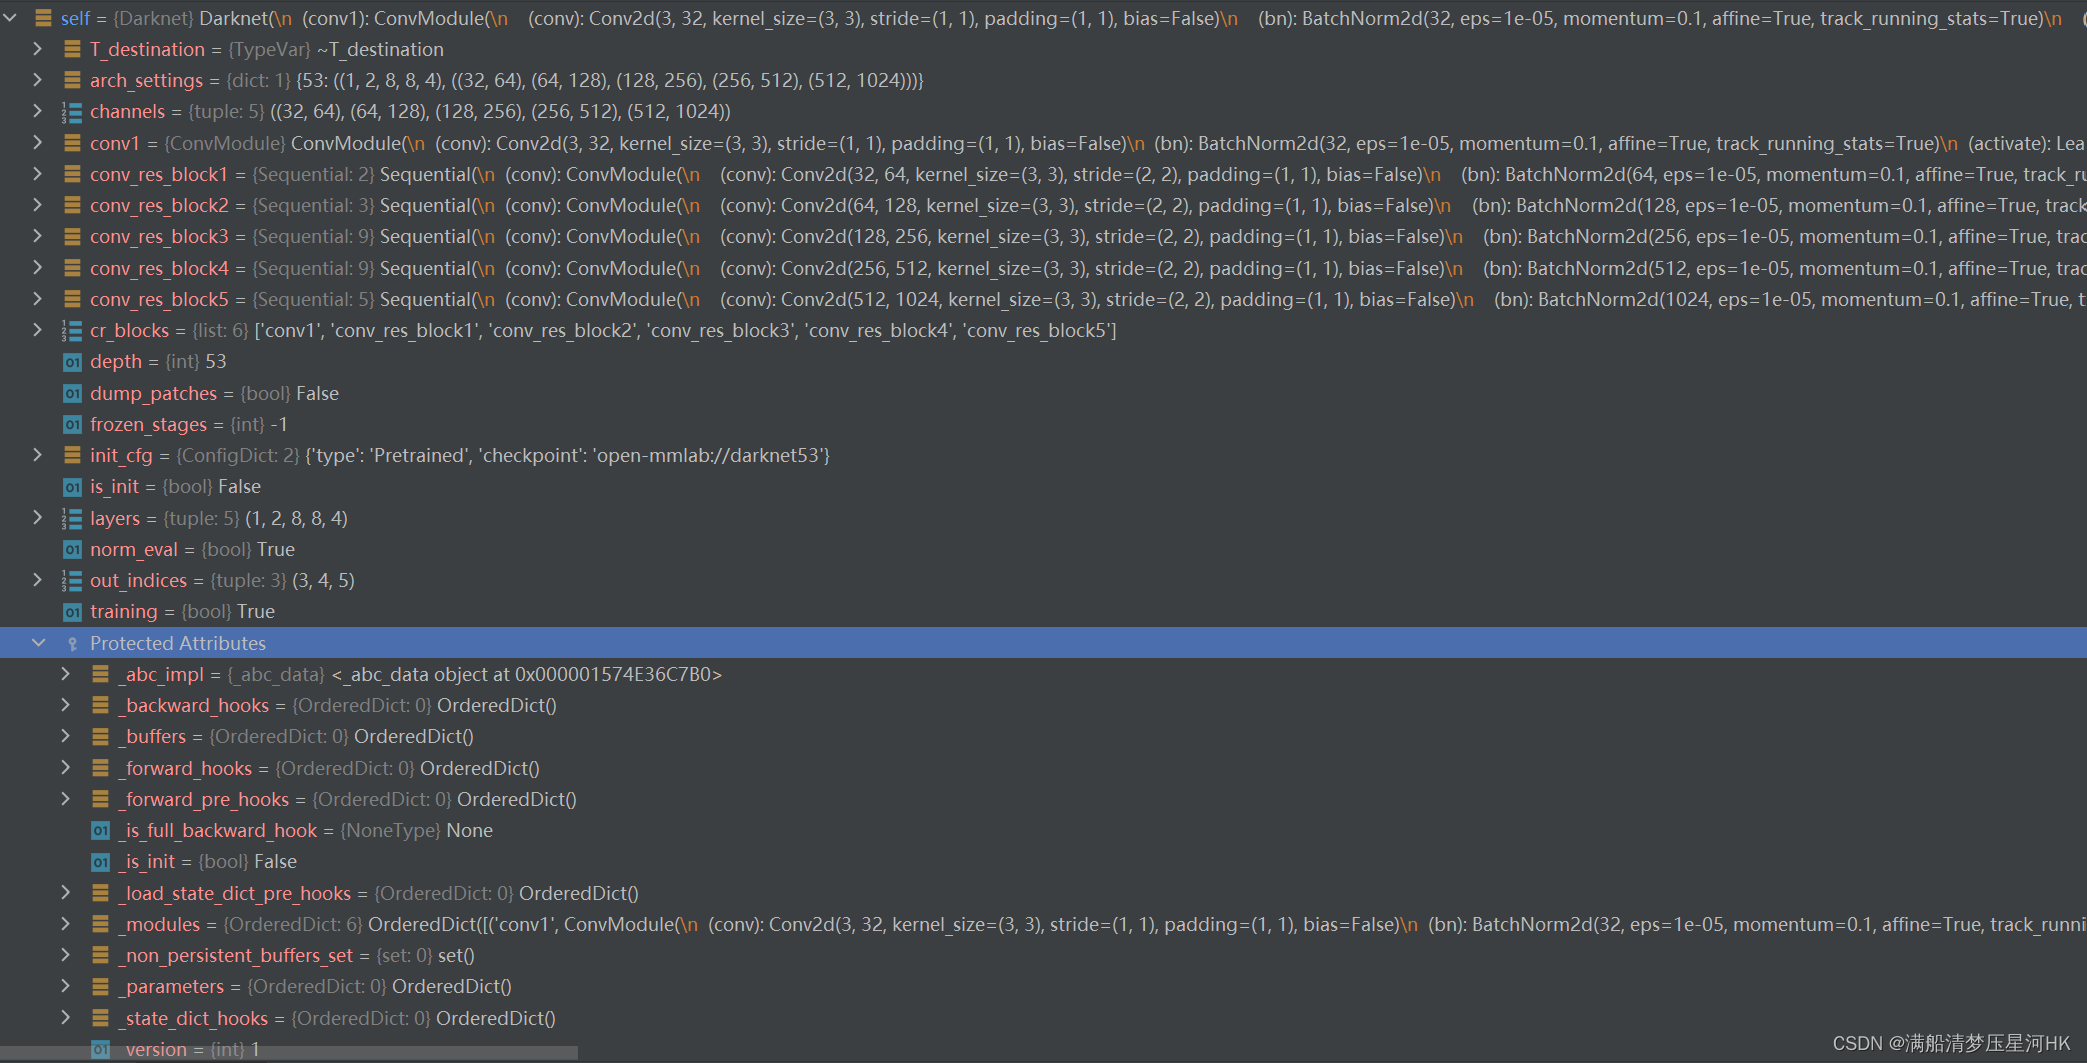
初始化结束之后可以看到self(Darknet)中有这些变量:
2.3、前向推理
    def forward(self, x):
        outs = []  # 存放backbone的3个输出feature map
        for i, layer_name in enumerate(self.cr_blocks):  # 遍历每一个操作名称
            # getattr:返回对象self的一个name=layer_name的属性(就是__init__搭建的一个层结构)
            cr_block = getattr(self, layer_name)
            x = cr_block(x)  # 前向推理
            # 如果i in self.out_indices 就将当前层的输出feature map保存到outs
            # 值得注意的是i=0就是backbone的第一个卷积层  i=1~5就是后面需要在make_conv_res_block中搭建的5个模块
            # 其中第3、4、5三个模块输出到Neck中
            if i in self.out_indices:
                outs.append(x)

        # 返回outs 3个输出feature map会在YOLOV3的forward中传入YOLOv3Neck
        return tuple(outs)
2.4、搭建stage1-5
到这里,结合文章开头的两个图,应该对整个backbone的结构大体上已经非常的熟悉了。剩下的就说一个疑问:这个stage1-stage5是如何搭建起来的,这就涉及两个函数:make_conv_res_block和ResBlock。
make_conv_res_block函数:
    @staticmethod
    def make_conv_res_block(in_channels,  # stage的输入channel
                            out_channels,  # stage的输出channel  out_channels=2*in_channels
                            res_repeat,  # 这个stage的ResBlock重复个数
                            conv_cfg=None,  # 卷积配置 一般是None
                            norm_cfg=dict(type='BN', requires_grad=True),  # norm layer配置 一般是BN
                            act_cfg=dict(type='LeakyReLU',  # 激活函数配置 一般是LeakyReLU
                                         negative_slope=0.1)):
        """In Darknet backbone, ConvLayer is usually followed by ResBlock. This
        function will make that. The Conv layers always have 3x3 filters with
        stride=2. The number of the filters in Conv layer is the same as the
        out channels of the ResBlock.

        Args:
            in_channels (int): The number of input channels.
            out_channels (int): The number of output channels.
            res_repeat (int): The number of ResBlocks.
            conv_cfg (dict): Config dict for convolution layer. Default: None.
            norm_cfg (dict): Dictionary to construct and config norm layer.
                Default: dict(type='BN', requires_grad=True)
            act_cfg (dict): Config dict for activation layer.
                Default: dict(type='LeakyReLU', negative_slope=0.1).
        """
        # 注意:
        # 1、一个stage = Conv(k=3,s=2,p=1) + ResBlock x n
        # 2、整个stage在第一个Conv就将feature map的channel上升为了当前stage输入channel的2倍(即当前stage的输出channel)
        #    wh下采样为输入feature map的一般半 且之后的所有ResBlock部分的feature map wh不变

        # {'conv_cfg': None, 'norm_cfg': {'type': 'BN', 'requires_grad': True}, 'act_cfg': {'type': 'LeakyReLU', 'negative_slope': 0.1}}
        cfg = dict(conv_cfg=conv_cfg, norm_cfg=norm_cfg, act_cfg=act_cfg)

        model = nn.Sequential()
        model.add_module(  # 搭建当前stage的第一个3x3Conv 下采样卷积
            'conv',
            ConvModule(  # mmcv内置的卷积搭建模块 类似Pytorch中的Conv2d
                in_channels, out_channels, 3, stride=2, padding=1, **cfg))

        # 依次搭建res_repeat个ResBlock
        # 注意这res_repeat个ResBlock中所有的卷积输出channel都是out_channels
        for idx in range(res_repeat):
            model.add_module('res{}'.format(idx),
                             ResBlock(out_channels, **cfg))
        return model
ResBlock函数:
class ResBlock(BaseModule):
    """The basic residual block used in Darknet. Each ResBlock consists of two
    ConvModules and the input is added to the final output. Each ConvModule is
    composed of Conv, BN, and LeakyReLU. In YoloV3 paper, the first convLayer
    has half of the number of the filters as much as the second convLayer. The
    first convLayer has filter size of 1x1 and the second one has the filter
    size of 3x3.

    Args:
        in_channels (int): The input channels. Must be even.
        conv_cfg (dict): Config dict for convolution layer. Default: None.
        norm_cfg (dict): Dictionary to construct and config norm layer.
            Default: dict(type='BN', requires_grad=True)
        act_cfg (dict): Config dict for activation layer.
            Default: dict(type='LeakyReLU', negative_slope=0.1).
        init_cfg (dict or list[dict], optional): Initialization config dict.
            Default: None
    """

    def __init__(self,
                 in_channels,  # ResBlock的输入channel=输出channel
                 conv_cfg=None,  # conv配置 一般为None
                 norm_cfg=dict(type='BN', requires_grad=True),  # norm layer配置 一般为BN
                 act_cfg=dict(type='LeakyReLU', negative_slope=0.1),  # 激活函数配置 一般为LeakyReLU
                 init_cfg=None):  # 初始化配置 一般为None
        super(ResBlock, self).__init__(init_cfg)
        # 注意:ResBlock = 1x1Conv+BN+LeakyReLU + 3x3Conv+BN+LeakyReLU
        #      第一个卷积将channel下降为输入channel一半  第二个卷积将channel恢复到输入channel大小
        #      所以整个ResBlock的输入channel和输出channel相等  且整个ResBlock所有的特征的wh都相等

        assert in_channels % 2 == 0  # ensure the in_channels is even
        half_in_channels = in_channels // 2  # 第一个卷积的输出channel 要下降为输入的一半

        # shortcut
        cfg = dict(conv_cfg=conv_cfg, norm_cfg=norm_cfg, act_cfg=act_cfg)

        self.conv1 = ConvModule(in_channels, half_in_channels, 1, **cfg)  # 1x1conv
        self.conv2 = ConvModule(  # 3x3conv
            half_in_channels, in_channels, 3, padding=1, **cfg)

    def forward(self, x):
        residual = x
        out = self.conv1(x)
        out = self.conv2(out)
        out = out + residual

        return out
【Backbone的输出】

返回3个tensor格式的feature map,shape分别为:[bs,256,64,64]、[bs,512,32,32]、[bs,1024,16,16],会传到Neck(FPN)层进行特征融合。
总结
因为学yolo系列的代码已经很久了,看过很多配置文件版的yolov3、yolov4、yolov5,所以这部分整体上我看下来还是比较简单的,基本上看着开头的两个图,根据源码给的注释,再debug看下都能看懂。
不过其实有些关于MMCV的代码我是选择性忽视的,比如:BaseModule和ConvModule等。一个是时间不够只能抓住主要代码看一看,另一个也是我懒(哈哈哈),希望以后可以在MMCV的源码阅读那一块补上这个坑!