各位同学好,今天和大家分享一下如何使用 Tensorflow 搭建 EfficientNetV2 卷积神经网络模型。
EfficientNetV2 在 EfficientNetV1 的基础上进行了改进,引入了Fused-MBConv模块,和渐进式学习策略,训练更快。本篇只介绍如何搭建网络模型,训练过程不做介绍。
EfficientNetV1 的文章在这,感兴趣的可以看一下:https://blog.csdn.net/dgvv4/article/details/123553351
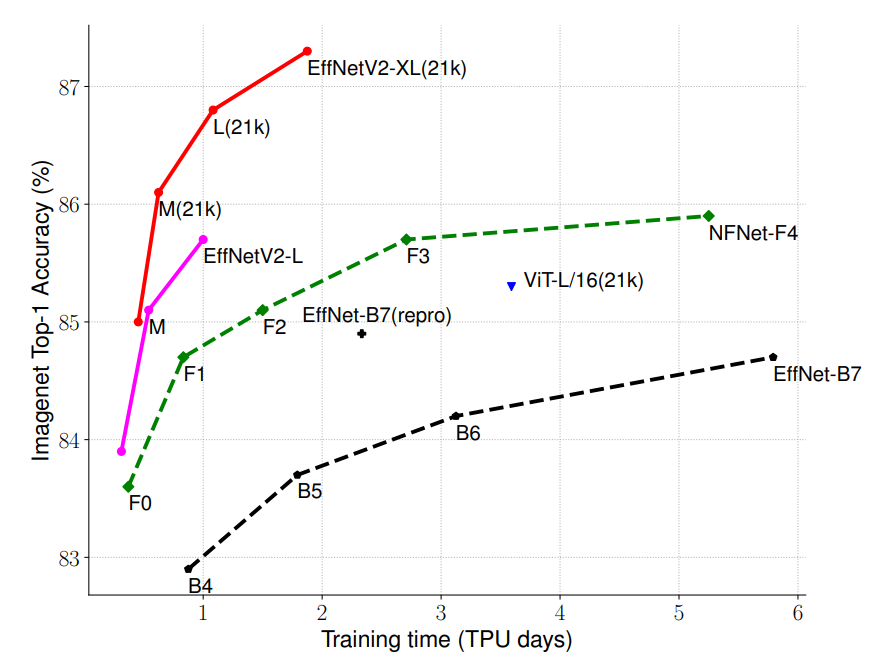
在EfficientNet中作者更关注准确率、参数数量、以及FLOPs,在EfficientNetV2中作者更关心模型的训练速度。
1. EfficientNet 中存在的缺点:
(1)训练图像的尺寸很大时,训练速度非常慢。
针对这个问题一个比较好想到的方法是降低训练图像的尺寸,卷各地训练图像的尺寸不仅能加快训练速度,还能使用更大的batch_size
(2)在网络浅层中使用深度卷积(Depthwise)的速度会很慢。
因为当前深度卷积(Depthwise Convolution)无法使用一些现有的加速器。虽然理论计算量很小,但实际使用起来没有想象的那么快。因此作者引入Fused-MBConv模块,将网络浅层的MBConv模块替换成Fused-MBConv模块。
(3)同等的放大每个stage是次优的
在EfficientNetV1中,每个stage的深度和宽度都是同等放大的。单每个stage对网络的训练速度iji参数数量的贡献并不相同,所以直接使用同等缩放的策略并不合理。因此作者采用了非均匀的缩放策略来缩放模型。
2. EfficientNetV2 的创新点
(1)引入新的网络EfficientNetV2,该网络在训练速度以及参数量上都优于先前的一些网络。
(2)提出改进的渐进学习方法,该方法会根据图像的尺寸动态调节正则化方法,提升训练速度和准确率。
(3)通过实验与先前的一些网络相比,训练速度提升11倍,参数量减少1/6.8
与 EfficientNetV1 的区别
(1)在网络浅层使用Fused-MBConv模块,在深层使用MBConv模块
(2)使用较小的通道上升倍数
(3)偏向使用更小的卷积核size(3*3)
(4)移除了EfficientNetV1中最后一个步距为1的stage
3. 网络核心模块
深度可分离卷积、逆转残差结构、SE注意力机制就不再介绍了,之前的文章中已经详细介绍过几次了,有疑问的可以看:https://blog.csdn.net/dgvv4/article/details/123553351
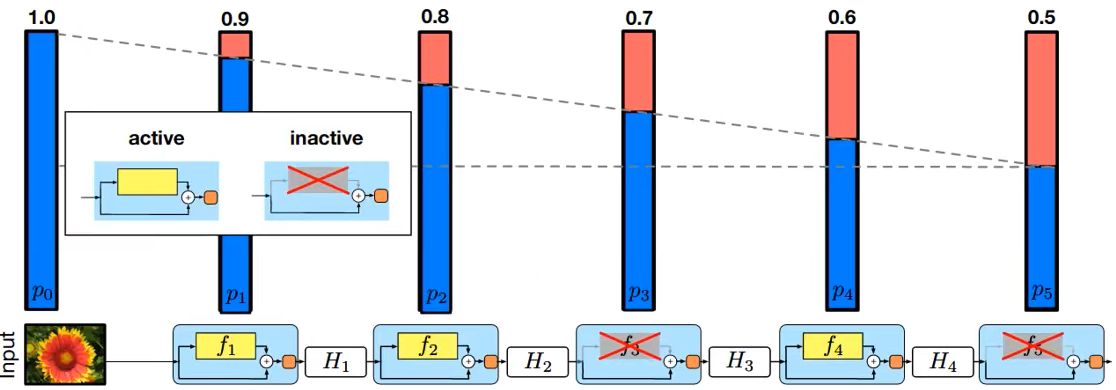
3.1 Stochastic Depth
该Dopout方法和之前的随机概率杀死神经元的Dropout方法不同。如下图,前向传播过程中,有许多残差结构,主分支进行卷积操作,shortcut残差连接输入和输出。
Stochastic Depth 有一定概率丢弃主分支的输出结果,直接将上一层的输出作为该层的输出,相当于没有这一层了,网络的深度变得随机,决定于丢弃了几层。在EfficientNetV2中丢弃概率是0-0.2
这里的Stochastic Depth类型的Dropout层,仅用于Fused-MBConv模块和MBConv模块中的Dropout层,不包括网络最后的全连接层的Dropout层。
该方法提升了训练速度,小幅提升了准确率。代码中只需要比普通的dropout函数多添加一个参数即可。
x = layers.Dropout(rate = dropout_rate,  # 随机丢弃输出层的概率
                   noise_shape = (None,1,1,1))  # 代表不是杀死神经元,是丢弃输出层
3.2 MBConv模块
基本模块(stride=1):图像输入,先经过1x1卷积上升通道数;然后在高纬空间下使用深度卷积;再经过SE注意力机制优化特征图数据;再经过1x1卷积下降通道数(使用线性激活函数);若此时输入特征图的shape和输出特征图的shape相同,那么对1x1卷积降维后的特征图加一个 Stochastic Depth 类型的 Dropout层,防止过拟合;最后残差连接输入和输出

下采样模块(stride=2):大致流程和基本模块相同,不采用Dropout层和残差连接,1x1卷积降维后直接输出特征图。

代码实现:
#(3)逆转残差模块
def MBConv(x, expansion, kernel_size, stride, out_channel, dropout_rate):
    '''
    expansion: 第一个卷积层特征图通道数上升的倍数
    kernel_size: 深度卷积层的卷积核size
    stride: 深度卷积层的步长
    out_channel: 第二个卷积层下降的通道数
    dropout_rate: Dropout层随机丢弃输出层的概率,直接将输入接到输出
    '''
    # 残差边
    residual = x

    # 输入特征图的通道数
    in_channel = x.shape[-1]

    # ① 1*1标准卷积升维
    x = conv_block(inputs = x,
                   filters = in_channel * expansion,  # 上升通道数为expansion倍
                   kernel_size = (1,1),
                   stride = 1,
                   activation = True)

    # ② 3*3深度卷积
    x = layers.DepthwiseConv2D(kernel_size = kernel_size,
                               strides = stride,
                               padding = 'same',
                               use_bias = False)(x)

    x = layers.BatchNormalization()(x)

    x = swish(x)

    # ④ SE注意力机制,输入特征图x,和MBConv模块输入图像的通道数
    x = se_block(inputs = x, in_channel = in_channel)

    # ⑤ 1*1标准卷积降维,使用线性激活
    x = conv_block(inputs = x,
                   filters = out_channel,  # 上升通道数
                   kernel_size = (1,1),
                   stride = 1,
                   activation = False)  # 不使用swish激活

    # ⑥ 只有步长=1且输入等于输出shape,才使用残差连接输入和输出
    if stride == 1 and residual.shape == x.shape:

        # 判断是否进行dropout操作
        if dropout_rate > 0:

            # 参数noise_shape一定的概率将某一层的输出丢弃
            x = layers.Dropout(rate = dropout_rate,  # 丢弃概率
                               noise_shape = (None,1,1,1))

        # 残差连接输入和输出
        x = layers.Add([residual, x])

        return x

    # 如果步长=2,直接输出1*1卷积降维后的结果
    return x
3.3 Fused-MBconv模块
不用上升通道数(expansion == 1):图像输入,经过 3*3 标准卷积,对输出特征图使用 Stochastic Depth 类型的 Dropout层 。当步长=1且该模块的输入图像和卷积输出图像的shape相同,使用残差连接输入和输出;当步长=2下采样阶段,直接输出卷积输出的特征图。

需要上升通道数(expansion != 1):图像输入,先使用 3*3 标准卷积上升通道数,再使用1*1卷积下降通道数,输入特征图经过 Stochastic Depth 类型的 Dropout层 。当步长=1且该模块的输入图像和1*1卷积输出图像的shape相同,使用残差连接输入和输出;当步长=2下采样阶段,直接输出卷积输出的特征图。

代码实现:
#(4)Fused-MBConv模块
def Fused_MBConv(x, expansion, kernel_size, stride, out_channel, dropout_rate):

    # 残差边
    residual = x

    # 输入特征图的通道数
    in_channel = x.shape[-1]

    # ① 如果通道扩展倍数expansion==1,就不需要升维
    if expansion != 1:
        # 3*3标准卷积升维
        x = conv_block(inputs = x,
                       filters = in_channel * expansion,  # 通道数上升为原来的expansion倍
                       kernel_size = kernel_size,
                       stride = stride)

    # ② 判断卷积的类型
    # 如果expansion==1,变成3*3卷积+BN+激活;
    # 如果expansion!=1,变成1*1卷积+BN,步长为1
    x = conv_block(inputs = x,
                   filters = out_channel, # FusedMBConv模块输出特征图通道数
                   kernel_size = (1,1) if expansion != 1 else kernel_size,
                   stride = 1 if expansion != 1 else stride,
                   activation = False if expansion != 1 else True)

    # ④ 当步长=1且输入输出shape相同时残差连接
    if stride == 1 and residual.shape == x.shape:

        # 判断是否使用Dropout层
        if dropout_rate > 0:
            x = layers.Dropout(rate = dropout_rate,  # 随机丢弃输出层的概率
                               noise_shape = (None,1,1,1))  # 代表不是杀死神经元,是丢弃输出层

        # 残差连接输入和输出
        outputs = layers.Add([residual, x])

        return outputs

    # 若步长等于2,直接输出卷积层输出结果
    return x
4. 代码展示
4.1 网络结构图
EfficientNetV2 网络结构图如下。opterator列中MBConv4代表上升通道数为原输入通道数的4倍,channels代表每个模块的输出通道数,layers代表每个模块重复执行多少次。

4.2 完整代码
函数方法搭建网络,代码如下
import tensorflow as tf
from tensorflow import keras
from tensorflow.keras import Model, layers

#(1)swish激活函数
def swish(x):
    x = x * tf.nn.sigmoid(x)
    return x


#(2)标准卷积块
def conv_block(inputs, filters, kernel_size, stride, activation=True):

    # 卷积+BN+激活
    x = layers.Conv2D(filters = filters,
                      kernel_size = kernel_size,
                      strides = stride,
                      padding = 'same',
                      use_bias = False)(inputs)

    x = layers.BatchNormalization()(x)

    if activation:  # 如果activation==True就使用激活函数
        x = swish(x)

    return x


#(3)SE注意力机制
def se_block(inputs, in_channel, ratio=0.25):
    '''
    inputs: 深度卷积层的输出特征图
    input_channel: MBConv模块的输入特征图的通道数
    ratio: 第一个全连接层的通道数下降为MBConv输入特征图的几倍
    '''
    squeeze = int(in_channel * ratio)  # 第一个FC降低通道数个数
    excitation = inputs.shape[-1]  # 第二个FC上升通道数个数

    # 全局平均池化 [h,w,c]==>[None,c]
    x = layers.GlobalAveragePooling2D()(inputs)

    # [None,c]==>[1,1,c]
    x = layers.Reshape(target_shape=(1, 1, x.shape[-1]))(x)

    # [1,1,c]==>[1,1,c/4]
    x = layers.Conv2D(filters = squeeze, # 通道数下降1/4
                      kernel_size = (1,1),
                      strides = 1,
                      padding = 'same')(x)

    x = swish(x)  # swish激活

    # [1,1,c/4]==>[1,1,c]
    x = layers.Conv2D(filters = excitation,  # 通道数上升至原来
                      kernel_size = (1,1),
                      strides = 1,
                      padding = 'same')(x)

    x = tf.nn.sigmoid(x)  # sigmoid激活,权重归一化

    # [h,w,c] * [1,1,c] ==> [h,w,c]
    outputs = layers.multiply([inputs, x])

    return outputs


#(3)逆转残差模块
def MBConv(x, expansion, kernel_size, stride, out_channel, dropout_rate):
    '''
    expansion: 第一个卷积层特征图通道数上升的倍数
    kernel_size: 深度卷积层的卷积核size
    stride: 深度卷积层的步长
    out_channel: 第二个卷积层下降的通道数
    dropout_rate: Dropout层随机丢弃输出层的概率,直接将输入接到输出
    '''
    # 残差边
    residual = x

    # 输入特征图的通道数
    in_channel = x.shape[-1]

    # ① 1*1标准卷积升维
    x = conv_block(inputs = x,
                   filters = in_channel * expansion,  # 上升通道数为expansion倍
                   kernel_size = (1,1),
                   stride = 1,
                   activation = True)

    # ② 3*3深度卷积
    x = layers.DepthwiseConv2D(kernel_size = kernel_size,
                               strides = stride,
                               padding = 'same',
                               use_bias = False)(x)

    x = layers.BatchNormalization()(x)

    x = swish(x)

    # ④ SE注意力机制,输入特征图x,和MBConv模块输入图像的通道数
    x = se_block(inputs = x, in_channel = in_channel)

    # ⑤ 1*1标准卷积降维,使用线性激活
    x = conv_block(inputs = x,
                   filters = out_channel,  # 上升通道数
                   kernel_size = (1,1),
                   stride = 1,
                   activation = False)  # 不使用swish激活

    # ⑥ 只有步长=1且输入等于输出shape,才使用残差连接输入和输出
    if stride == 1 and residual.shape == x.shape:

        # 判断是否进行dropout操作
        if dropout_rate > 0:

            # 参数noise_shape一定的概率将某一层的输出丢弃
            x = layers.Dropout(rate = dropout_rate,  # 丢弃概率
                               noise_shape = (None,1,1,1))

        # 残差连接输入和输出
        x = layers.Add([residual, x])

        return x

    # 如果步长=2,直接输出1*1卷积降维后的结果
    return x


#(4)Fused-MBConv模块
def Fused_MBConv(x, expansion, kernel_size, stride, out_channel, dropout_rate):

    # 残差边
    residual = x

    # 输入特征图的通道数
    in_channel = x.shape[-1]

    # ① 如果通道扩展倍数expansion==1,就不需要升维
    if expansion != 1:
        # 3*3标准卷积升维
        x = conv_block(inputs = x,
                       filters = in_channel * expansion,  # 通道数上升为原来的expansion倍
                       kernel_size = kernel_size,
                       stride = stride)

    # ② 判断卷积的类型
    # 如果expansion==1,变成3*3卷积+BN+激活;
    # 如果expansion!=1,变成1*1卷积+BN,步长为1
    x = conv_block(inputs = x,
                   filters = out_channel, # FusedMBConv模块输出特征图通道数
                   kernel_size = (1,1) if expansion != 1 else kernel_size,
                   stride = 1 if expansion != 1 else stride,
                   activation = False if expansion != 1 else True)

    # ④ 当步长=1且输入输出shape相同时残差连接
    if stride == 1 and residual.shape == x.shape:

        # 判断是否使用Dropout层
        if dropout_rate > 0:
            x = layers.Dropout(rate = dropout_rate,  # 随机丢弃输出层的概率
                               noise_shape = (None,1,1,1))  # 代表不是杀死神经元,是丢弃输出层

        # 残差连接输入和输出
        outputs = layers.Add([residual, x])

        return outputs

    # 若步长等于2,直接输出卷积层输出结果
    return x


#(5)每个模块重复执行num次
# Fused_MBConv模块
def Fused_stage(x, num, expansion, kernel_size, stride, out_channel, dropout_rate):

    for _ in range(num):
        # 传入参数,反复调用Fused_MBConv模块
        x = Fused_MBConv(x, expansion, kernel_size, stride, out_channel, dropout_rate)

    return x

# MBConv模块
def stage(x, num, expansion, kernel_size, stride, out_channel, dropout_rate):

    for _ in range(num):
        # 反复执行MBConv模块
        x = MBConv(x, expansion, kernel_size, stride, out_channel, dropout_rate)

    return x


#(6)主干网络
def efficientnetv2(input_shape, classes, dropout_rate):

    # 构造输入层
    inputs = keras.Input(shape=input_shape)

    # 标准卷积层[224,224,3]==>[112,112,24]
    x = conv_block(inputs, filters=24, kernel_size=(3,3), stride=2)

    # [112,112,24]==>[112,112,24]
    x = Fused_stage(x, num=2, expansion=1, kernel_size=(3,3),
                    stride=1, out_channel=24, dropout_rate=dropout_rate)

    # [112,112,24]==>[56,56,48]
    x = Fused_stage(x, num=4, expansion=4, kernel_size=(3,3),
                    stride=2, out_channel=48, dropout_rate=dropout_rate)

    # [56,56,48]==>[32,32,64]
    x = Fused_stage(x, num=4, expansion=4, kernel_size=(3,3),
                    stride=2, out_channel=64, dropout_rate=dropout_rate)

    # [32,32,64]==>[16,16,128]
    x = stage(x, num=6, expansion=4, kernel_size=(3,3),
              stride=2, out_channel=128, dropout_rate=dropout_rate)

    # [16,16,128]==>[16,16,160]
    x = stage(x, num=9, expansion=6, kernel_size=(3,3),
              stride=1, out_channel=160, dropout_rate=dropout_rate)

    # [16,16,160]==>[8,8,256]
    x = stage(x, num=15, expansion=6, kernel_size=(3,3),
              stride=2, out_channel=256, dropout_rate=dropout_rate)

    # [8,8,256]==>[8,8,1280]
    x = conv_block(x, filters=1280, kernel_size=(1,1), stride=1)

    # [8,8,1280]==>[None,1280]
    x = layers.GlobalAveragePooling2D()(x)

    # dropout层随机杀死神经元
    if dropout_rate > 0:
        x = layers.Dropout(rate=dropout_rate)

    # [None,1280]==>[None,classes]
    logits = layers.Dense(classes)(x)

    # 构建网络
    model = Model(inputs, logits)

    return model


#(7)接收网络模型
if __name__ == '__main__':

    model = efficientnetv2(input_shape = [224,224,3], # 输入图像shape
                           classes = 1000, # 分类数
                           dropout_rate = 0)

    model.summary()  # 查看网络架构
4.3 查看网络结构
通过model.summary()查看网络架构,约有两千万的参数量
--------------------------------
dense (Dense)                   (None, 1000)         1281000     global_average_pooling2d_30[0][0]
==================================================================================================
Total params: 21,612,360
Trainable params: 21,458,488
Non-trainable params: 153,872
__________________________________________________________________________________________________