问题描述
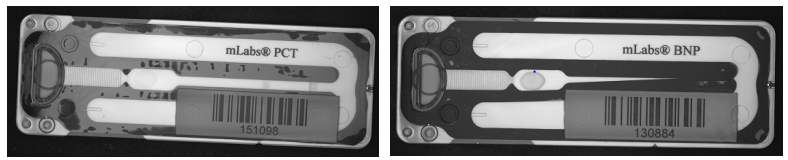
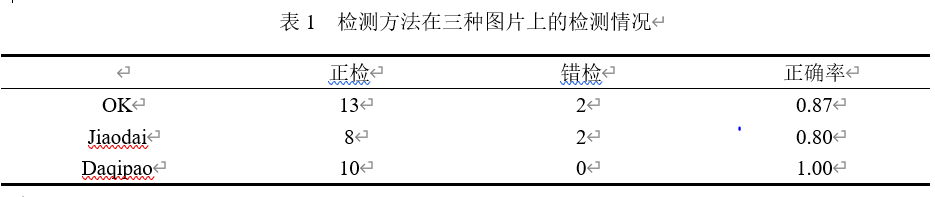
如下图所示为某种用于试剂检验的产品,需要利用机器视觉的方法检测产品的缺陷。 本设计的目的是综合运用图像处理的知识,检测产品是否有严重缺陷。 在检测算法之前, 作为图像的预处理, 检测和定位产品的外轮廓,矫正产品的姿态,对于后续的算法处理有着重要的意义。

数据为真实的工业产品成像,分为放在OK,NG目录下。数据提取地址链接 提取码:s3jl,OK目录下的图像没有缺陷,NG目录是有缺陷的产品,包括如下两种缺陷:
解决方法
1 介绍
随着机器学习的发展,对于工业产品的缺陷检测,深度网络模型检测缺陷的准确率远远高于传统图像处理算法。但是由于成本过高和深度学习的不可解释性,使用传统图像处理方法检测产品缺陷检测在工业上仍占着很大一部分比例。本次课程设计主要是针对磁盘的两种缺陷:胶带和大气泡进行检测。
2 方法
2.1 产品水平矫正
在本次实验中,因图片过大,首先将图片大小重塑至700×700×3。其次要计算产品的倾斜角度,本实验使用的方法是霍夫直线检测算法,该算法通过一种投票算法检测具有特定形状的物体,该过程在一个参数空间中通过计算累计结果的局部最大值得到一个符合该特定形状的集合作为霍夫变换结果,该方法可以进行圆,直线,椭圆等形状的检测。在检测过程中发现在产品上下有一大部分的区域会影响到目标区域的检测,因此将图片裁剪至350×700×3。在检测完直线之后,分别计算每条直线的斜率大小,若两条直线斜率之差小于0.01可近似为一条直线,以相同斜率最多的直线为最终的旋转参考直线。根据目标直线斜率计算倾斜角度,最后对图片进行旋转矫正,结果如图1所示。

2.2 定位产品的外轮廓
先对矫正后的图片进行5×5卷积核的高斯滤波,目的是去掉一些噪声点。其次是对滤波后的图片进行Canny算子边缘检测,查找轮廓之前要进行边缘检测是因为cv2.findContours的图片参数要是Canny算子描述的图片。然后进行卷积核为5×5单位阵卷积核的膨胀、闭操作。最后使用cv2.findContours函数对图片进行轮廓检测如图2所示。

2.3 产品对齐
本实验的对齐是以无缺陷的图片为模板而进行的。我们在上述步骤中得到了OK图片和NG图片的多个外轮廓,所以我们要先筛选出产品的外轮廓。本实验首先采用的方法是求得每个轮廓的最小外接矩形面积,返回最大的最小外接矩形,随即将NG图片大小重塑到OK图片大小,这一步的目的是为了下一步对产品进行多边拟合时有更好的效果。大小匹配完成之后,再对所得图片进行轮廓查找,将所得的轮廓进行筛选后对产品进行多边拟合最终得到四边形的四个顶点。上述步骤所得的四个顶点不能直接用于产品图片对齐,这是因为对齐时四个顶点要由上到下、由左到右的顺序进行排列。因此我们要先将四个顶点进行排列,第一、四个点对列求和后的最小最大的下标获得,第二、三个点由对列求方差后的最小最大下标获得。排列完成之后,我们要将所得点与模板点进行匹配得到变换矩阵m,这里使用的函数是cv2.getPerspectiveTransform,最后使用cv2.warpPerspective函数结合变换矩阵对产品进行对齐,效果如图3所示。从图3我们可以看出产品此时并不是十分的水平,原因是产品的顶点并不是尖点,所以在进行多边形拟合之后上下边并不平行。

2.4 缺陷检测
产品检测是以OK图片为模板,用两种NG图片分别与OK图片进行对比,描述出缺陷之处。首先将对齐好的OK和NG图片进行高斯滤波,卷积核大小为3×3。再对图片进行闭操作,卷积核为3×3的单位阵,迭代次数为1。然后对图片进行Canny算子边缘检测,最后对两张图片进行轮廓查找,如图4。

在获得OK和NG图片的轮廓图之后,就可以用来缺陷检测。因为提供的产品图像之间可能存在旋转、平移、微小的缩放,所以我们不能直接将OK图减去NG图得到缺陷。本次实验我的思路是:因为旋转、平移、微小之间的差异属于几何特征,所以我使用Hu矩对两张图片的轮廓进行比较。具体过程如下:首先对NG图的轮廓进行迭代,用NG图的轮廓与OK图进行对比,得到一系列的相似度,如果这一系列相似度的最小值大于我所设的阈值(本次实验设置为0.45),那么就可以说明NG图的这个轮廓是缺陷处的轮廓。然后在NG图上绘出这个轮廓如图5。最后统计缺陷轮廓的个数(本实验设置为30),当大于某个阈值时那么就可以说明这张图片就是有缺陷的图片,之所以轮廓个数大于某一值才能认定为缺陷图片,是因为可能出现误检地情况, 如图5的喇叭处就是误保留的轮廓再者就是商标和英文字符串是我们不需要关心的但也被检测在内。

3 实验结果及分析
基于上述的缺陷检测的方法分别对OK图片和两种NG图片进行检测,结果如表1所示。由表1可知本实验的检测方法在OK图上的正确率只有0.87,原因可能是受光照的影响而导致图片在边缘检测时边缘差异变大而导致轮廓受影响较大;在胶带缺陷上正确率是0.80,原因是缺陷主要集中在产品中间的白色宽带上,使得轮廓的检测并没有很多(小于所设的阈值);而检测方法在大气泡缺陷的图片上正确率有1.00,这是因为大气泡缺陷形成了大量”离散块”,使得检测到的轮廓很多,轮廓个数很容易超过阈值。
4 讨论
本次实验主要是针对工业产品的缺陷进行检测,我主要是利用了Hu矩描述图片的不变性来判断轮廓的所属类型来达到检测缺陷的目的,只能是粗略地定位,因为绝大部分的缺陷轮廓都是曲线,如果需要更加精确的定位,可能需要运用特征描述子进行特征匹配来实现。其次就是我的方法的误检地区域很多,特别是在图片的喇叭部分。总的来说,检测方法不是很理想,还需要做更多的尝试来达到精确定位缺陷的目标。
代码
import cv2 as cv
import math
import numpy as np
import os
def Horizontal_correction(path) :
    img = cv.imread(path, cv.IMREAD_COLOR)
    img = cv.resize(img, (700, 700))
    img = img[300 : 650]
    gimg = cv.cvtColor(img, cv.COLOR_BGR2GRAY)
    canny = cv.Canny(gimg, 70, 150)
    lines = cv.HoughLines(canny, 1, np.pi / 180, 200)
    lines = np.array(lines)
    angles = []

    for line in lines:
        for rho, theta in line :
            a = np.cos(theta)
            b = np.sin(theta)

            x0 = rho * a
            y0 = rho * b

            x1 = int(x0 + 1000 * (-b))
            y1 = int(y0 + 1000 * a)
            x2 = int(x0 - 1000 * (-b))
            y2 = int(y0 - 1000 * a)

#             cv.line(img, (x1, y1), (x2, y2), (0, 0, 255), 2)

            dy = y2 - y1
            dx = x2 - x1
            angle = math.atan2(dy, dx) * 180 / math.pi
            angles.append(angle)

    angles = sorted(angles, key = lambda x : x)
    best_angle = 0
    angles_temp = []
    i = 0
    while i <= len(angles) - 2 :
        for j in range(i, len(angles)) :
            if abs(angles[j] - angles[i]) < 1e-2 :
                if j == len(angles) - 1 :
                    angles_temp.append(angles[i : j + 1])
                    i = j
                    break
            else :
                angles_temp.append(angles[i : j])
                i = j
                break
    cnt = 0
    for i, lst in enumerate(angles_temp) :
            if cnt < len(lst) :
                cnt = len(lst)
                best_angle = angles_temp[i][0]

    RotateMatrix = cv.getRotationMatrix2D((img.shape[1] / 2, img.shape[0] / 2), best_angle, 1)
    RotImg = cv.warpAffine(img, RotateMatrix, (img.shape[1], img.shape[0]))

#     concatenate = np.concatenate((img, RotImg), axis = 1)
#     print(RotImg.shape, img.shape)
#     print(angles)
#     cv.imshow('concatenate', concatenate)
#     cv.waitKey(0)

    return RotImg

def Rect(contours) :
    areaInitial = 0
    for i in range(len(contours)) :
        contour = contours[i].squeeze()
        min_x, min_y = np.min(contour, axis = 0)
        max_x, max_y = np.max(contour, axis = 0)
#         cv.rectangle(imgGray, (min_x, min_y), (max_x, max_y), color = (0, 0, 255))
        area = (max_x - min_x) * (max_y - min_y)
        if area > areaInitial :
            areaInitial = area
            rectPoint = [min_y, min_x, max_y, max_x]
    return rectPoint

def Biggest(contours) :
    biggest = np.array([])
    max_Area = 0
    for contour in contours :
        area = cv.contourArea(contour)
        if area > 5000:
            C = cv.arcLength(contour, True)
            approx = cv.approxPolyDP(contour, 0.02 * C, True)
            if area > max_Area and len(approx) == 4:
                biggest = approx
                max_Area = area
    return biggest

def FindContours(img) :
    imgGray = img.copy()
    imgBlur = cv.GaussianBlur(imgGray, (5, 5), 1)
    imgCanny = cv.Canny(imgBlur, 100, 200)
    kernel = np.ones((5, 5))
    imgDilate = cv.dilate(imgCanny, kernel, iterations = 2)
    imgErode = cv.erode(imgDilate, kernel, iterations = 1)

    contours, hierarchy = cv.findContours(imgErode, cv.RETR_EXTERNAL, cv.CHAIN_APPROX_SIMPLE)
#     cv.drawContours(imgGray, contours, -1, (0, 0, 255), 2)
#     cv.imshow('imgGray', imgGray)
#     cv.waitKey(0)

    return contours

def Reorder(points):
    points = points.reshape((4, 2))
    Newpoints = np.zeros((4, 2), dtype=np.int32)
    xsum = np.sum(points, axis = 1)
    xdiff = np.diff(points, axis = 1)
    Newpoints[0] = points[np.argmin(xsum)]
    Newpoints[3] = points[np.argmax(xsum)]
    Newpoints[1] = points[np.argmin(xdiff)]
    Newpoints[2] = points[np.argmax(xdiff)]

    return np.float32(Newpoints)

def ImageAlignment(img1, img2) :
    contours1  = FindContours(img1)
    contours2 = FindContours(img2)

    rectPoint1 = Rect(contours1)
    rectPoint2 = Rect(contours2)
    img1 = img1[rectPoint1[0] : rectPoint1[2], rectPoint1[1] : rectPoint1[3]]
    img2 = img2[rectPoint2[0] : rectPoint2[2], rectPoint2[1] : rectPoint2[3]]
    img2 = cv.resize(img2, (img1.shape[1], img1.shape[0]), cv.INTER_CUBIC)

    contours1 = FindContours(img1)
    contours2 = FindContours(img2)

    targetAreaPoint1 = Biggest(contours1)
    targetAreaPoint2 = Biggest(contours2)
    pts1 = np.float32(Reorder(targetAreaPoint1))
    pts2 = np.float32(Reorder(targetAreaPoint2))
    pts = np.float32([[0, 0], [img1.shape[1], 0], [0, img1.shape[0]], [img1.shape[1], img1.shape[0]]])

    RotateMatrix1 = cv.getPerspectiveTransform(pts1, pts)
    RotateMatrix2 = cv.getPerspectiveTransform(pts2, pts)

    out_img1 = cv.warpPerspective(img1, RotateMatrix1, (img1.shape[1], img1.shape[0]))
    out_img2 = cv.warpPerspective(img2, RotateMatrix2, (img1.shape[1], img1.shape[0]))
#     cv.imshow('out_img1', out_img1)
#     cv.imshow('out_img2', out_img2)
#     concatenate = np.concatenate((out_img1, out_img2), axis = 1)
#     cv.imshow('concatenate', concatenate)
#     cv.imshow('img1', img1)
#     cv.imshow('img2', img2)
#     cv.waitKey(0)
    return out_img1, out_img2

def Detect(img1, img2) :
    cimg1, cimg2 = img1.copy(), img2.copy()
    cimg1 = cv.cvtColor(cimg1, cv.COLOR_BGR2GRAY)
    cimg2 = cv.cvtColor(cimg2, cv.COLOR_BGR2GRAY)
    imgBlur1 = cv.GaussianBlur(cimg1, (3, 3), 0)
    imgBlur2 = cv.GaussianBlur(cimg2, (3, 3), 0)
    kernel = np.ones((3, 3))
    imgErode1 = cv.erode(imgBlur1, kernel, iterations = 1)
    imgErode2 = cv.erode(imgBlur2, kernel, iterations = 1)
#     ret1, imgThresh1 = cv.threshold(imgErode1, 100, 255, cv.THRESH_BINARY)
#     ret2, imgThresh2 = cv.threshold(imgErode2, 100, 255, cv.THRESH_BINARY)

    imgCanny1 = cv.Canny(imgErode1, 70, 120)
    imgCanny2 = cv.Canny(imgErode2, 70, 120)

    contours1, hierarchy1 = cv.findContours(imgCanny1, cv.RETR_EXTERNAL, cv.CHAIN_APPROX_SIMPLE)
    contours2, hierarchy2 = cv.findContours(imgCanny2, cv.RETR_EXTERNAL, cv.CHAIN_APPROX_SIMPLE)

    contoursNum = 0
#     cv.drawContours(img1, contours1, -1, (0, 255, 0), 1)
#     cv.drawContours(img2, contours2, -1, (0, 0, 255), 1)
#     concatenate = np.concatenate((img1, img2), axis = 1)
#     cv.imshow('concatenate', concatenate)
    for i in range(len(contours2)) :
        defects = []
        for j in range(len(contours1)) :
            similiarity = cv.matchShapes(contours2[i], contours1[j], cv.CONTOURS_MATCH_I1, 0)
            defects.append(similiarity)
        min_similarity = min(defects)
        if min_similarity > 0.45 :
            cv.drawContours(img2, contours2, i, (0, 255, 0), 1)
            contoursNum += 1

    if contoursNum > 30 :
        print('Approximately defect(s) detected')
    else :
        print('Unable to detect defects')

#     cv.imshow('canny1', img1)
    cv.imshow('canny2', img2)
    cv.waitKey(0)

daqipao_path = list(sorted(os.listdir('opencv_course_design_data/NG/daqipao/')))
jiaodai_path = list(sorted(os.listdir('opencv_course_design_data/NG/jiaodai/')))
OK_path = list(sorted(os.listdir('opencv_course_design_data/OK/')))

for path in daqipao_path :
    RotImg1 = RotImg2 = Horizontal_correction('opencv_course_design_data/OK/OK_0032.bmp')
    RotImg2 = Horizontal_correction(os.path.join('opencv_course_design_data/NG/daqipao', path))
    imgAlignment1, imgAlignment2 = ImageAlignment(RotImg1, RotImg2)
    Detect(imgAlignment1, imgAlignment2)
# for path in jiaodai_path :
#     RotImg1 = RotImg2 = Horizontal_correction('opencv_course_design_data/OK/OK_0032.bmp')
#     RotImg2 = Horizontal_correction(os.path.join('opencv_course_design_data/NG/jiaodai', path))
#     imgAlignment1, imgAlignment2 = ImageAlignment(RotImg1, RotImg2)
#     Detect(imgAlignment1, imgAlignment2)
# for path in OK_path :
#     RotImg1 = RotImg2 = Horizontal_correction('opencv_course_design_data/OK/OK_0032.bmp')
#     RotImg2 = Horizontal_correction(os.path.join('opencv_course_design_data/OK/', path))
#     imgAlignment1, imgAlignment2 = ImageAlignment(RotImg1, RotImg2)
#     Detect(imgAlignment1, imgAlignment2)