搭建鸿蒙开发环境、运行第一个鸿蒙项目、鸿蒙组件与安卓组件的简单对比
安装node.js
首先我们先在node.js官网下载node.js并安装
下载完成后一路next,其中可以选择安装路径,到最后点击finsh安装node.js
安装DevEco Studio
鸿蒙开发的IDE的下载地址:DevEco Studio

下载完成后运行进入DevEco Studio安装向导,在如下安装选项界面勾选DevEco Studio launcher后,点击Next,直至安装完成。

配置开发语言
在菜单栏中tools->SDK Manager中配置SDK,鸿蒙安装会自动勾选Java的SDK,若想使用C/C++或JS语言需自行勾选
配置模拟器
相比于安卓的模拟器,鸿蒙的模拟器是安装在云端的,对与本地的性能消耗会变小极多,对于我这种机械硬盘的渣渣机子简直友好的不行(安卓我只能通过真机调试)
在菜单栏tools->HVD Manager中就可以下载他的模拟器,其中可以选择各个平台的模拟器,手机,手表,电视等等等等,而且我们程序是可以无缝的在这些设备转换的
(需要注意的是:想要下载鸿蒙的模拟器需要注册鸿蒙的开发者并且通过开发者的实名认证,不然是无法下载他们的模拟器的)

至此我们鸿蒙的开发环境已经全部配置完成了,接下来我来运行我的第一个鸿蒙程序吧
第一个鸿蒙程序
在菜单栏file->new->new project新建一个鸿蒙程序

然后我们在选择手机的模拟器然后运行就可以了

可能出现的错误

若出现上图的错误,那就是你的模拟器设备和你的项目规定运行的设备不一致
在config.json中可查找到项目该运行的平台设备
查看规定的设备是否跟模拟器设备相同
只需要改变deviceType的类型和模拟器相同即可运行

按住shilt键点击deviceType即可查看到deviceType的值有多少种

常用布局
鸿蒙不仅是在系统UI上与安卓颇为一致,即使是代码实现上也是极为相似的
这也有利于我们开发者可以快速的学习开发以及方向转移
DirectionalLayout
这与安卓中的线性布局对标
在这个布局下子组件的特有属性:
ohos:layout_alignment属性规范组件位置
ohos:weight规范组件权重
例子
<?xml version="1.0" encoding="utf-8"?>
<DirectionalLayout
    xmlns:ohos="http://schemas.huawei.com/res/ohos"
    ohos:height="match_parent"
    ohos:width="match_parent"
    ohos:orientation="vertical">

    <Text
        ohos:id="$+id:text_helloworld"
        ohos:height="match_content"
        ohos:width="match_content"
        ohos:background_element="$graphic:background_ability_main"
        ohos:layout_alignment="horizontal_center"
        ohos:text="Hello World"
        ohos:text_size="50"
    />
    <Text
        ohos:height="match_content"
        ohos:width="0vp"
        ohos:weight="1"
        ohos:layout_alignment="horizontal_center"
        ohos:text_size="50"/>
    <Text
        ohos:height="match_content"
        ohos:width="match_content"
        ohos:text="text1"
        ohos:background_element="$graphic:background_ability_main"
        ohos:layout_alignment="horizontal_center"
        ohos:text_size="50"
        />
</DirectionalLayout>
Demo

DependentLayout
这与安卓中的约束布局相似
在这个布局中可通过两种属性来规范组件位置
相对与同级组件的位置关系属性
ohos:above:处于指定组件之上
ohos:below:处于指定组件之下
ohos:left_of:处于指定组件之左
ohos:right_of:处于指定组件之右
ohos:right_of:处于指定组件之右
ohos:start_of:处于指定组件之前
ohos:end_of:处于指定组件之后
相对与父组件的位置关系属性
ohos:align_parent_left:处于父组件左侧
ohos:align_parent_right:处于父组件右侧
ohos:align_parent_start:处于父组件开始侧
ohos:align_parent_end:处于父组件结束侧
ohos:align_parent_top:处于父组件上侧
ohos:align_parent_bottom:处于父组件下侧
ohos:center_in_parent:处于父组件中间
例子
<?xml version="1.0" encoding="utf-8"?>
<DependentLayout
xmlns:ohos="http://schemas.huawei.com/res/ohos"
ohos:height="match_parent"
ohos:width="match_parent">
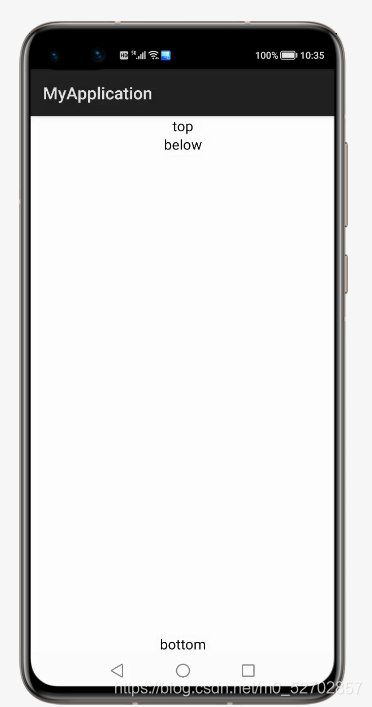
<Text
ohos:id="$+id:top"
ohos:height="match_content"
ohos:width="match_content"
ohos:align_parent_top="true"
ohos:center_in_parent="true"
ohos:background_element="$graphic:background_ability_main"
ohos:text="top"
ohos:text_size="50"
/>
<Text
ohos:id="$+id:text_helloworld"
ohos:height="match_content"
ohos:width="match_content"
ohos:below="$id:top"
ohos:center_in_parent="true"
ohos:background_element="$graphic:background_ability_main"
ohos:text="below"
ohos:text_size="50"
/>
<Text
ohos:id="$+id:text_helloworld"
ohos:height="match_content"
ohos:width="match_content"
ohos:background_element="$graphic:background_ability_main"
ohos:align_parent_bottom="true"
ohos:center_in_parent="true"
ohos:text="bottom"
ohos:text_size="50"
/>
</DependentLayout>
Demo
StackLayout
层叠布局,在层叠布局中先创建的组件会显示在后创建组件的下层,后创建的组件会覆盖先创建的组件,这样就可以实现一种悬浮的样式,类似于悬浮按钮
在这个布局下的可以通过ohos:layout_alignment属性来规范组件位置
例子
<?xml version="1.0" encoding="utf-8"?>
<StackLayout
    xmlns:ohos="http://schemas.huawei.com/res/ohos"
    ohos:id="$+id:stack_layout"
    ohos:height="match_parent"
    ohos:width="match_parent">

    <Text
        ohos:id="$+id:text_blue"
        ohos:text_alignment="bottom|horizontal_center"
        ohos:text_size="24fp"
        ohos:text="txet1"
        ohos:height="400vp"
        ohos:width="400vp"
        ohos:background_element="#40FF00" />

    <Text
        ohos:id="$+id:text_light_purple"
        ohos:text_alignment="bottom|horizontal_center"
        ohos:text_size="24fp"
        ohos:text="text2"
        ohos:height="200vp"
        ohos:width="200vp"
        ohos:background_element="#2EFEF7" />
    <Text
        ohos:id="$+id:text_orange"
        ohos:text_alignment="center"
        ohos:text_size="24fp"
        ohos:text="text2"
        ohos:height="100vp"
        ohos:width="100vp"
        ohos:background_element="#FF0080" />
    <Button
        ohos:id="$+id:button"
        ohos:height="40vp"
        ohos:text="button"
        ohos:width="80vp"
        ohos:layout_alignment="right"
        ohos:background_element="#3399FF"/>
</StackLayout>
Demo
总结
1.鸿蒙所采用的开发模式与安卓的开发模式是类似的,这有利于我们这些安卓开发者向鸿蒙开发转移
2.相较于安卓应用,鸿蒙开发的应用可以实现多平台共同开发及无缝的衔接,节省开发者对多平台的适配时间,有利多平台的开发
作者:张森
原文地址