刚开始看购物车效果觉得挺复杂,但是把这个功能拆开来一步一步实现会发现并不难,其实就涉及到:ItemDecoration的绘制、recyclerview的滑动监听、贝塞尔曲线和属性动画相关内容,剩下的就是RecyclerView滑动和点击时左右两个列表联动的相关逻辑。
复杂的东西拆开来看就简单多了,下面我将一步一步带你来实现购物车效果。
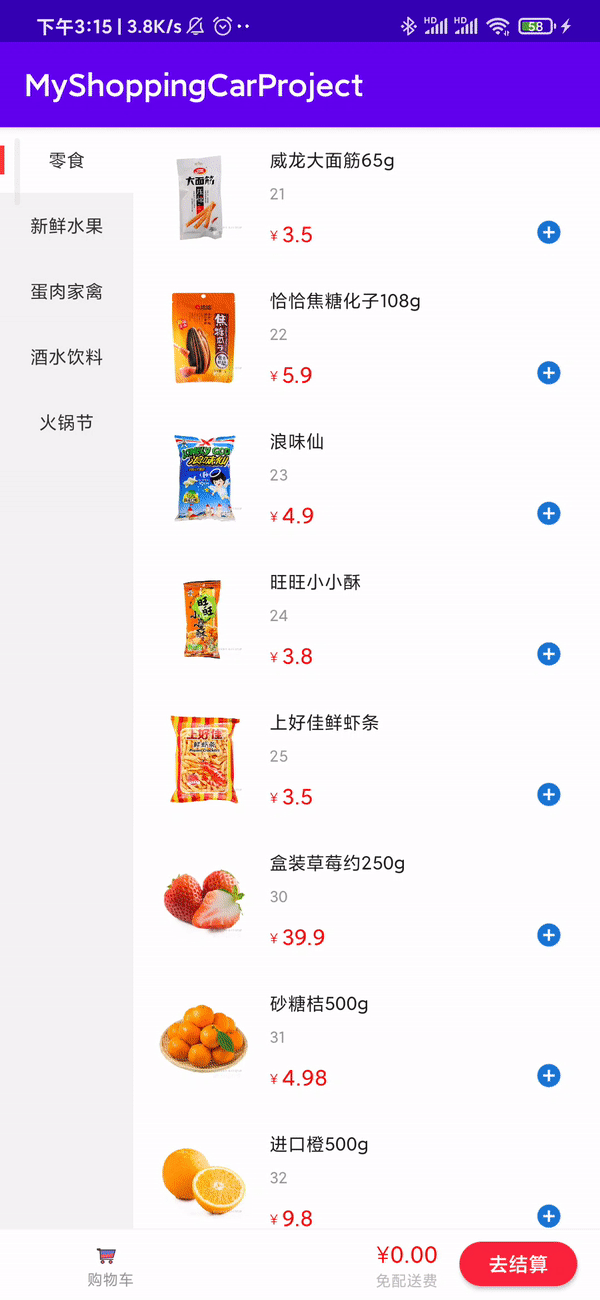
效果图

实现步骤
1. 数据项格式
open class ProductItemParent {


    //记录当前类所选的商品数量
    var typeSelectCount:Int=0
}
我们用ProductItem记录左侧的分类,Product记录右侧的产品
//总体分类
data class ProductItem (
    var productList: List<Product>,
    //类别ID
    var typeId: String,
    //类别名称
    var typeName: String
):ProductItemParent()

//该分类中的某个产品
data class Product(
    //所属类别ID
    var parentId: String,
    //产品ID
    var productId: String,
    //产品图片
    var productImg: Int,
    //产品价格
    var productMoney: Double,
    //产品月销售量
    var productMonthSale: Int,
    //产品名称
    var productName: String
)
2. 左侧列表适配器
要实现效果:左侧列表的点击事件,点击选中时显示红线,背景变色;显示数量
思路:
- 左侧列表商品数量的数字角标我们使用TextView通过其背景显示红色圆圈shape而表示,其显示与隐藏通过判断ProductItem中的typeSelectCount字段是否>0来设置,数字角标的值设为typeSelectCount
- 选中与未选中左侧列表,我们使用selector来更改ItemView的背景颜色
- 选中与未选中左侧列表的红色线,我们通过更改visibility属性来控制
2.1 itemView布局
<?xml version="1.0" encoding="utf-8"?>
<LinearLayout xmlns:android="http://schemas.android.com/apk/res/android"
    android:id="@+id/left_menu_item"
    android:layout_width="match_parent"
    android:layout_height="wrap_content"
    android:background="@drawable/selector_item_select"
    android:clickable="true"
    android:gravity="center"
    android:orientation="vertical">

    <RelativeLayout
        android:layout_width="match_parent"
        android:layout_height="43dp">

        <TextView
            android:id="@+id/left_menu_textview"
            android:layout_width="wrap_content"
            android:layout_height="wrap_content"
            android:layout_centerInParent="true"
            android:text="零食"
            android:textColor="#333333"
            android:textSize="12dp" />

        <!--数字角标-->
        <TextView
            android:id="@+id/tv_left_menu_count"
            android:layout_width="wrap_content"
            android:layout_height="wrap_content"
            android:layout_alignTop="@+id/iv_shopping_cart_img"
            android:layout_alignRight="@+id/left_menu_textview"
            android:layout_marginRight="-8dp"
            android:background="@drawable/shape_shopping_cart_num_bg"
            android:gravity="center"
            android:padding="2dp"
            android:text="0"
            android:textColor="#FFFFFF"
            android:textSize="8dp"
            android:visibility="invisible" />

        <!--左侧竖线区域,选中展示-->
        <View
            android:id="@+id/v_left_menu_item_line"
            android:layout_width="3dp"
            android:layout_height="match_parent"
            android:layout_marginTop="12dp"
            android:background="#fe3939"
            android:layout_marginBottom="12dp" />

    </RelativeLayout>


</LinearLayout>
2.2 LeftTypeAdapter
左侧列表适配器
class LeftTypeAdapter(private var dataList: MutableList<ProductItem>) : RecyclerView.Adapter<LeftTypeAdapter.MyLeftViewHolder>() {


    companion object{


        const val TAG = "ceshi_left"
    }

    //默认选中的位置
    var selectPosition = 0

    //要更新的左侧分类的typeId号
    var mUpdateTypeId=""
    //要更新的typeId号的数量
    var mUpdateTypeCount =0

    override fun onCreateViewHolder(parent: ViewGroup, viewType: Int): LeftTypeAdapter.MyLeftViewHolder {


        var view = LayoutInflater.from(parent.context).inflate(R.layout.left_item,parent,false)
        return MyLeftViewHolder(view)
    }

    override fun getItemCount(): Int {


        return dataList.size
    }

    override fun onBindViewHolder(holder: LeftTypeAdapter.MyLeftViewHolder, position: Int) {


        var productItem = dataList[position]
        //设置分类名
        holder.typeName.text = productItem.typeName

        //是选中位置,小红线显示
        if(selectPosition==position){


            holder.typeLine.visibility = View.VISIBLE
            //布局设置为选中,主要是为了更新itemView选中后的背景颜色(背景使用了selector)
            holder.typeLayout.isSelected = true
        }else{


            //不是选中位置,则小红线隐藏
            holder.typeLine.visibility = View.INVISIBLE
            //布局设置为未选中
            holder.typeLayout.isSelected = false
        }

        //设置数量(要更新的类别的产品数量,将productItem类内typeSelectCount数量进行更新)
        if(productItem.typeId==mUpdateTypeId){


            productItem.typeSelectCount = mUpdateTypeCount
        }
        //设置数量显示
        if(productItem.typeSelectCount>0){


            holder.typeSelectCount.visibility = View.VISIBLE
            holder.typeSelectCount.text = productItem.typeSelectCount.toString()
        }else{


            holder.typeSelectCount.visibility = View.INVISIBLE
        }

        //左侧布局的点击事件
        holder.typeLayout.setOnClickListener {


            if(holder.adapterPosition in 0 until itemCount){


                this.selectPosition = holder.adapterPosition
                //这个就实现了selected的更新了
                notifyDataSetChanged()
            }
        }
    }

    inner class MyLeftViewHolder(view: View):RecyclerView.ViewHolder(view){


        //名称
        val typeName = view.findViewById<TextView>(R.id.left_menu_textview)
        //已选中的数量
        val typeSelectCount = view.findViewById<TextView>(R.id.tv_left_menu_count)
        //左侧布局(为了更改背景颜色)
        val typeLayout = view.findViewById<LinearLayout>(R.id.left_menu_item)
        //左侧选中时的线条
        val typeLine = view.findViewById<View>(R.id.v_left_menu_item_line)

    }
}
2.3 添加数据显示
var data = mutableListOf<ProductItem>()
lateinit var leftAdapter: LeftTypeAdapter
override fun onCreate(savedInstanceState: Bundle?) {


    initData()
    leftAdapter = LeftTypeAdapter(data)
    left_menu.layoutManager = LinearLayoutManager(this)
    left_menu.adapter = leftAdapter
}
/**
     * 初始化数据
     */
private fun initData() {


    var productItem1List = mutableListOf<Product>()
    productItem1List.add(Product("1", "1", R.drawable.ic1, 3.5, 21, "威龙大面筋65g"))
    productItem1List.add(Product("1", "2", R.drawable.ic2, 5.9, 22, "恰恰焦糖化子108g"))
    var productItem2List = mutableListOf<Product>()
    var productItem2 = ProductItem(productItem2List, "2", "新鲜水果")
	productItem2List.add(Product("2", "6", R.drawable.ic6, 39.9, 30, "盒装草莓约250g"))
    productItem2List.add(Product("2", "7", R.drawable.ic7, 4.98, 31, "砂糖桔500g"))
    ......
}
2.5 效果

3.右侧列表适配器
下面我们分步骤来实现
3.1 数据绑定展示
思路: 看到右侧布局,你可能第一眼想到多布局,确实多布局可以实现,但是,如果想要吸顶的动画效果,实现起来比较麻烦,你可以参考Android 美团购物车效果这篇文章的实现方法,它会默认显示一个布局来实现吸顶,然后通过动画来实现效果。
对于右侧适配器绑定的数据,我原先绑定的是集合MutableList<ProductItem>,getItemCount()返回的是里面的子项Product的个数,虽然可以,但是每次在onBindViewHolder()里设置数据时,都要先根据position来计算获取它在ProductItem集合里面的Product对象,然后才设置数据,倒不如我们先提前将右侧Product的数据集合MutableList<Product>先获取到,然后再绑定数据,这样我们用的时候就不需要这么麻烦了。
class RightProductAdapter(private var dataList: MutableList<Product>) :
RecyclerView.Adapter<RecyclerView.ViewHolder>() {


    /**
     * 产品的ViewHolder
     */
    inner class MyRightProductViewHolder(view: View) : RecyclerView.ViewHolder(view) {


        //产品名称
        var productName = view.findViewById<TextView>(R.id.tv_item_life_product_name)

        //产品月售个数
        var productSaleCount = view.findViewById<TextView>(R.id.tv_item_life_product_monty)

        //产品价格
        var productPrice = view.findViewById<TextView>(R.id.tv_item_life_product_money)

        //添加到购物车的数量
        var selectCount = view.findViewById<TextView>(R.id.tv_group_list_item_count_num)

        //减
        var reduce = view.findViewById<ImageView>(R.id.iv_group_list_item_count_reduce)

        //加
        var add = view.findViewById<ImageView>(R.id.iv_group_list_item_count_add)

        //图片
        var image = view.findViewById<ImageView>(R.id.iv_item)
    }

    override fun onCreateViewHolder(parent: ViewGroup, viewType: Int): RecyclerView.ViewHolder {


        var view = LayoutInflater.from(parent.context)
        .inflate(R.layout.item_life_product_bf, parent, false)
        return MyRightProductViewHolder(view)

    }

    override fun getItemCount(): Int {


        return dataList.size
    }

    override fun onBindViewHolder(holder: RecyclerView.ViewHolder, position: Int) {


        //根据下标获取商品,这个position是右侧数据展示的下标
        var product = dataList[position]

        var productHolder = holder as MyRightProductViewHolder
        //商品名称
        productHolder.productName.text = product?.productName
        //价格
        productHolder.productPrice.text = product?.productMoney.toString()
        //已售个数
        productHolder.productSaleCount.text = product?.productMonthSale.toString()
        //商品图片
        productHolder.image.setImageResource(product?.productImg)
    }
}
效果:
3.2 绘制头部
思路:
- 通过ItemDecoration来实现头部效果
- 如果ItemDecoration还没用过的话,可以看看我的这篇入门文章地址
3.2.1 整理数据
其实也是很简单,因为我们的右侧数据Product构成的集合是有类别区分的,所以我们只需要在每一组类别数据的开头绘制即可。
这里我们可以将右侧数据集合所对应的typeName组成一个头部集合,内部typeName为标题名字。所以我们得到的集合就是{“零食”,“零食”,“零食”,…“新鲜水果”,“新鲜水果”,…}
那么怎么判断该标题名字是不是该组类型数据中的第一个呢?我们将当前位置的标题与上一个位置的标题进行对比,如果相同则代表不是第一个,不同则代表是这组分类中的第一个。
var titleDataList = mutableListOf<String>()
override fun onCreate(savedInstanceState: Bundle?) {


    initTitleDataList()
    ...
    rightRecyclerview.addItemDecoration(MyItemDecoration(this,titleDataList))
    ...
}

/**
* 记录右侧每一项所对应的typeName()
*/
private fun initTitleDataList() {


    for (i in data.indices) {


        for (j in data[i].productList.indices) {


            titleDataList.add(data[i].typeName)
        }
    }
}
3.2.2 头部偏移要绘制矩形的高度
因为我们需要在每组的第一个itemView绘制一个矩形,所以我们在getItemOffsets()方法里偏移一定高度
override fun getItemOffsets(
    outRect: Rect,
    view: View,
    parent: RecyclerView,
    state: RecyclerView.State
) {


    super.getItemOffsets(outRect, view, parent, state)
    val pos = parent.getChildAdapterPosition(view)

    //只有是同一组的第一个才显示悬浮栏
    if (pos == 0 || isFirstInGroup(pos)) {


        //距离ItemView的上方偏移topHeight高度
        outRect.top = topHeight
    } else {


        outRect.top = 0
    }
}
/**
* 判断是不是组中的第一个位置
* @param pos
* @return
*/
private fun isFirstInGroup(pos: Int): Boolean {


    return if (pos == 0) {


        true
    } else {


        //当前位置所对应的类型名
        val typeName = titleDataList[pos]
        //前一个位置所对应的类型名
        val previewTypeName = titleDataList[pos - 1]
        //判断前一个字符串 与 当前字符串 是否相同,相同返回true,不同返回false
        previewTypeName != typeName
    }
}
3.2.3 绘制矩形和文字
先初始化各种画笔
class MyItemDecoration(
    context: Context,
    private val titleDataList: List<String>
) : ItemDecoration() {


    //绘制标题文字的画笔
    private val textPaint: TextPaint

    //绘制背景颜色的画笔
    private val paint: Paint

    //想要的矩形的高度
    private val topHeight: Int

    //字体度量对象,记录我们要绘制字体的有关信息
    private var fontMetrics: Paint.FontMetrics


    init {


        val res = context.resources
        //设置悬浮栏的画笔---paint
        paint = Paint()
        //设置绘制背景的画笔颜色
        if (Build.VERSION.SDK_INT >= Build.VERSION_CODES.M) {


            paint.color = res.getColor(R.color.bgcolor, null)
        } else {


            paint.color = res.getColor(R.color.bgcolor)
        }


        //设置悬浮栏中文本的画笔
        textPaint = TextPaint()
        textPaint.isAntiAlias = true
        textPaint.textSize = DensityUtil.dip2px(context, 14f).toFloat()
        textPaint.color = Color.DKGRAY
        textPaint.textAlign = Paint.Align.LEFT
        fontMetrics = Paint.FontMetrics()
        //决定悬浮栏的高度等
        topHeight = res.getDimensionPixelSize(R.dimen.sectioned_top)

    }
}
在onDraw()中绘制我们的标题框
/**
* 针对的是每个Item
* @param c
* @param parent
* @param state
*/
override fun onDraw(
    c: Canvas,
    parent: RecyclerView,
    state: RecyclerView.State
) {


    super.onDraw(c, parent, state)
    val left = parent.paddingLeft
    val right = parent.width - parent.paddingRight

    //获取当前页面总共的Item数量(测试发现是当前页面可以显示的item数量)
    val childCount = parent.childCount
    for (i in 0 until childCount) {


        val view = parent.getChildAt(i)
        //获取当前view在总共集合中的位置
        val position = parent.getChildAdapterPosition(view)
        //获取当前view的分类名
        val groupName = titleDataList[position]

        //获取textPaint中的字体信息  setTextSize要在它前面
        fontMetrics = textPaint.fontMetrics
        //当是第一个或者是每组中的第一个时才绘制
        if (position == 0 || isFirstInGroup(position)) {


            //往上移动就要减
            val top = view.top - topHeight.toFloat()
            val bottom = view.top.toFloat()

            //基线距离文字中心的距离
            val distance =
            (fontMetrics.bottom - fontMetrics.top) / 2 - fontMetrics.bottom
            //基线的位置
            val textBaseLine = (bottom + top) / 2 + distance
            //绘制悬浮栏
            c.drawRect(left.toFloat(), top, right.toFloat(), bottom, paint)
            //绘制文本
            c.drawText(groupName, left.toFloat(), textBaseLine, textPaint)
        }
    }
}
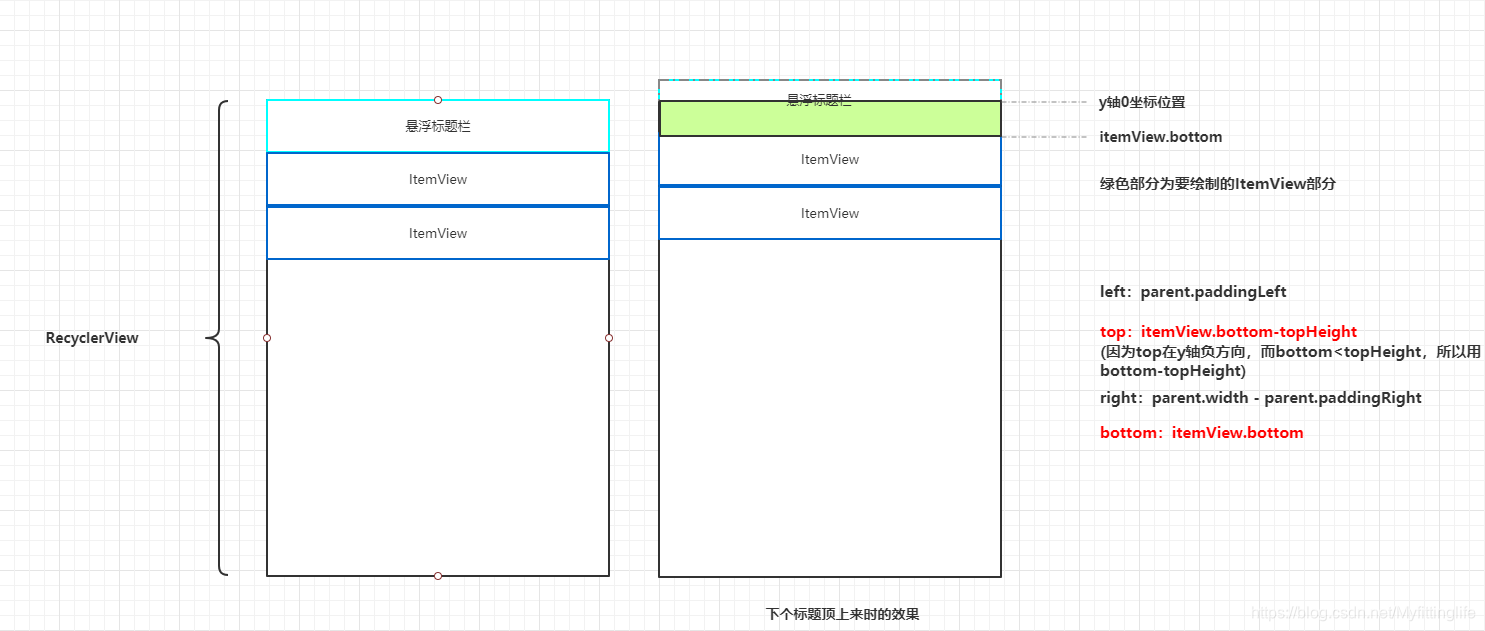
绘制标题框图解:

绘制标题框矩形的话,可参照该图进行理解,知道标题框的上下左右,用drawRect()方法即可绘制出矩形框
绘制文字图解:

绘制标题文字,有一个难点是怎么将文字居中显示,我们要知道绘制文本的时候,是根据baseline基线来绘制的。具体解析可按照如图序号顺序来理解。可参考这篇文章链接地址
我们在上面绘制的矩形框的中心点Y轴坐标为:(bottom+top)/2 注意: 这里的bottom和top是包含正负的
基线距离文字中心的距离(这里指距离,代表为正):distance=(fontMetrics.bottom - fontMetrics.top) / 2 - fontMetrics.bottom
所以文字的中心Y轴坐标为:baseline-distance(因为baseline对应的Y轴位置为0,向上为负)
要让文字的中心和矩形框的中心一致,即baseline-distance=(bottom+top)/2
所以最终baseline的位置为:(bottom+top)/2+distance
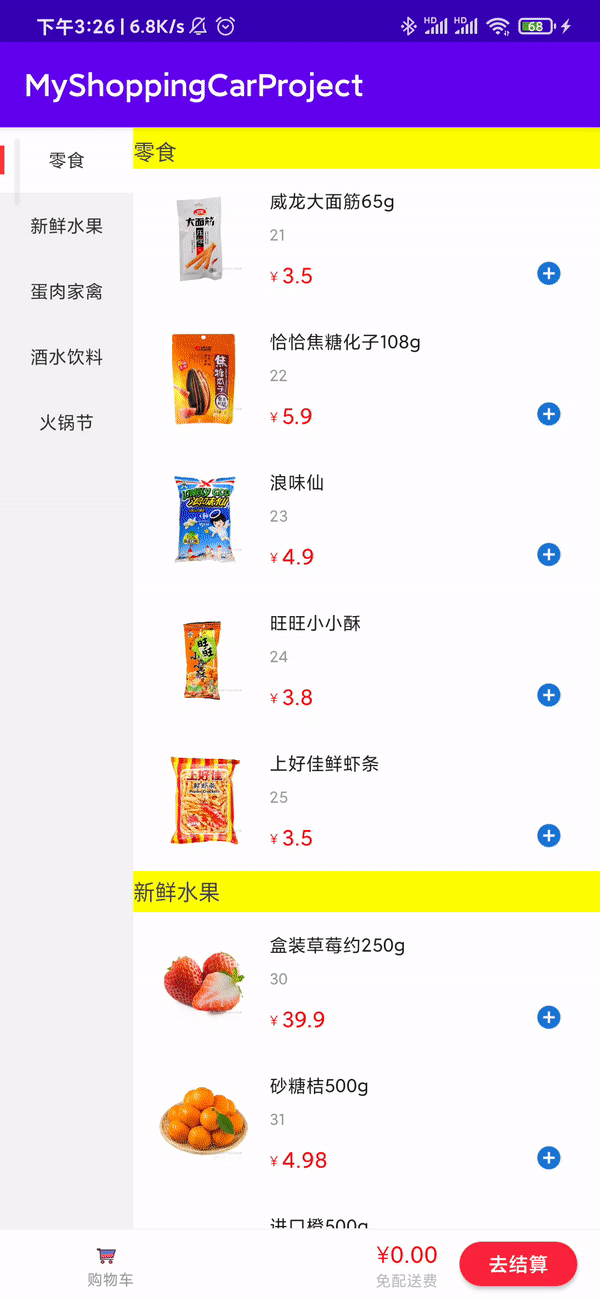
3.3 效果

4. 悬浮头部(有动画)
使用onDrawOver()方法, onDrawOver()是在RecyclerView绘制完内容之后再调用,相当于可以在RecyclerView之上再绘制一层内容。
因为我们在移动的时候,只有当下一个分组绘制的标题栏顶上来的时候,我们的悬浮头部才会发生动画,慢慢的顶上去并消失,这里其实就是不断改变悬浮头部的高度,让其变小,从而实现我们想要的效果。
图解:
具体解析可看图所示,其实和前面onDraw()中的绘制矩形和文字一样,不同的只是top和bottom的位置不同,
绘制矩形所需要的参数top和bottom如图解释,绘制字体同理。
override fun onDrawOver(c: Canvas, parent: RecyclerView, state: RecyclerView.State) {


    super.onDrawOver(c, parent, state)
      	val left = parent.paddingLeft
        val right = parent.width - parent.paddingRight
        //当前布局的名字
        var groupTitleName =""
        //因为我们只需要在当前界面可显示的第一条数据上方绘制,所以这个就getChildAt(0)
        val itemView = parent.getChildAt(0)
        val position = parent.getChildAdapterPosition(itemView)
        //获取该位置的标题名称
        groupTitleName = titleDataList[position].toUpperCase()

        //绘制悬浮标题栏在该布局
        //默认是指定的高度
        var viewTitleHeight: Float = topHeight.toFloat()
        //获取当前itemView的底部
        val viewBottom = itemView.bottom

        //-------这里实现了上升和下拉平滑的效果--------
        //下一个item的标题名字
        val nextGroupTitleName: String = titleDataList[position + 1]
        //下一个item的名字和顶部0位置的标题名字不同,说明要更换新的标题了(viewBottom<viewTitleHeight,
        // 说明itemView向上移动,此时要绘制的标题的高度其实就是顶部下标为0的itemView的bottom的距离,因为recyclerview最上面是0坐标)
        if (nextGroupTitleName !== groupTitleName && viewBottom < viewTitleHeight) {


            //所以此时的高度,就为剩下的itemView距离0点的高度了,因为是动态变化的,所有就有了效果
            viewTitleHeight = viewBottom.toFloat()
        }

        //获取paint中的字体信息  settextSize要在他前面
        val fontMetrics = textPaint.fontMetrics
        //基线距离文字中心的距离
        val distance = (fontMetrics.bottom - fontMetrics.top) / 2 - fontMetrics.bottom
        //因为按道理一直在第一项,所以高应该为0,但是这么写相当于固定了头部,因为要有动画效果,所以可能变化,这里的top和bottom都要发生变化
        c.drawRect(left.toFloat(), viewTitleHeight - topHeight, right.toFloat(), viewTitleHeight, paint)

        //绘制文字
        c.drawText(groupTitleName, left.toFloat(), (2 * viewTitleHeight - topHeight)/2 + distance, textPaint)
}
4.1 效果

5. 左右联动
- 点击左侧右侧滑动
- 滑动右侧左侧变化
- 点击加减号左侧数字角标变化
5.1 点击左侧列表联动滑动右侧
首先在LeftTypeAdapter内设置监听器来进行接口回调
/**
* 接口回调
*/
interface  LeftTypeClickListener{


    //点击布局
    fun onItemClick(position: Int)
}
override fun onBindViewHolder(holder: LeftTypeAdapter.MyLeftViewHolder, position: Int) {


    ......
     holder.typeLayout.setOnClickListener {


           ...
           //写个接口回调来滑动右侧recyclerview布局
		   leftTypeClickListener?.onItemClick(position)
        }
}
然后在MainActivity里进行监听
leftAdapter.setLeftTypeClickListener(this)
/**
* 左侧列表的点击事件
*/
override fun onItemClick(position: Int) {


    leftClickType = true

    //计算右侧所对应的组数据,然后得到该组内的第一条数据所在的位置
    var sum = 0
    for (i in 0 until position) {


        sum += data[i].productList.size
    }
    var layoutManager = rightRecyclerview.layoutManager as LinearLayoutManager

    //将该item移动到第一项
    layoutManager.scrollToPositionWithOffset(sum, 0)
    Log.i(TAG, "onItemClick: 左侧点击右侧联动")

}
这里,当我们点击左侧列表时,先通过计算,得到该分类在右侧所对应的组,然后得到该组内的第一项数据在右侧列表内所对应的位置。
然后通过scrollToPositionWithOffset()方法来将该条数据移动到顶部。
这里使用scrollToPositionWithOffset()而不是scrollToPosition(),因为scrollToPositionWithOffset() 会把 Item 移动到可见 Item 的第一项,即使它已经在可见 Item 之中。 而
scrollToPosition只会把不在屏幕的 Item 移动到屏幕上,原来在RecyclerView上方没显示的 Item 移动到可见 Item 的第一项,在RecyclerView下方没显示的移动到屏幕可见 Item 的最后一项。已经显示的 Item 不会移动。
效果:

5.2 滑动右侧列表带动左侧列表滑动
主要是为右侧列表添加滑动监听器进行监听
-
当右侧列表滑动到底部时,左侧列表直接选中最后一项并更新视图
-
当是因为点击左侧列表联动的滑动右侧列表时,右侧列表不做处理,这里用leftClickType字段判断
-
当主动滑动右侧列表时,我们找到右侧列表中的第一项,并判断该对象所对应左侧列表的分类,然后将该分类设置为选中状态即可
具体内容如下述代码所示
//右侧菜单滑动联动左侧菜单选择
right_menu.addOnScrollListener(object : RecyclerView.OnScrollListener() {


    override fun onScrollStateChanged(recyclerView: RecyclerView, newState: Int) {


        super.onScrollStateChanged(recyclerView, newState)
    }

    override fun onScrolled(recyclerView: RecyclerView, dx: Int, dy: Int) {


        super.onScrolled(recyclerView, dx, dy)
        //当无法上滑时,即右侧列表滑动到底部时,移动左侧列表到最后一项,将左侧的最后一项Item变为选中状态
        if (!recyclerView.canScrollVertically(1)) {


            leftAdapter.setSelectedNum(data.size - 1)

        }else{


            //当右侧主动滑动时,才联动左侧列表;左侧列表带动的右侧列表滑动时,不再返回来联动左侧列表
            if (leftClickType) {


                leftClickType = false
            } else {


                //当右侧列表滑动时,获取右侧列表的第一条数据,找其所对应的左侧列表的Title对象即:productItem
                var position =
                (right_menu.layoutManager as LinearLayoutManager).findFirstVisibleItemPosition()

                var productItem = getTitleByPosition(position, data)
                //找到该productItem在左侧列表对应的position
                for (i in data.indices) {


                    if (data[i] === productItem) {


                        //左侧列表适配器设置选中项并进行更新
                        leftAdapter.setSelectedNum(i)
                        break
                    }
                }
            }
        }
    }
})
/**
* 根据position位置来获取相应的标题Bean !!!(用于滑动右侧时联动左侧)
*/
fun getTitleByPosition(_position: Int, dataList: MutableList<ProductItem>): ProductItem? {


    var sum = 0
    for (productItem in dataList) {


        sum += productItem.productList.size
        if (_position < sum) {


            return productItem
        }
    }
    return null
}
class LeftTypeAdapter(private var dataList: MutableList<ProductItem>) :
RecyclerView.Adapter<LeftTypeAdapter.MyLeftViewHolder>() {


	......
    /**
     * 选中左侧区域,主要用于滑动右侧时需要联动左侧列表
     */
    fun setSelectedNum(selectedNum: Int) {


        if (selectedNum in 0 until itemCount) {


            selectPosition = selectedNum
            notifyDataSetChanged()
        }
    }
	......
}
效果
5.3 点击右侧加减号,左侧列表数值变化
5.3.1这里我们定义一个购物车类,用来记录添加的商品的数量,即记录某类商品的总数量
class ShopCart {


    //总共的商品数量
    var totalAmount:Int = 0
    //总共的商品价格
    var totalPrice:BigDecimal = BigDecimal.valueOf(0.0)
    //保存各个产品添加的数量,将产品作为key,因为每个产品都不一样
    val productNumMap: MutableMap<Product, Int> = mutableMapOf()
    //保存同类产品的数量
    val typeCountMap:MutableMap<String,Int> = mutableMapOf()


    //商品数量添加
    fun addProductNum(product: Product){


        //该商品数量+1
        if(productNumMap.containsKey(product)){


            productNumMap[product] = productNumMap[product]!!+1
        }else{


            productNumMap[product] = 1
        }

        //该商品所在类别数量+1
        //虽然是第一次添加商品,但对于parentId来说,第一次添加的商品这个所属的类的数量可能为0
        if(typeCountMap.containsKey(product.parentId)){


            typeCountMap[product.parentId] = typeCountMap[product.parentId]!!+1
        }else{


            typeCountMap[product.parentId] = 1
        }

        //总体数量+1
        totalAmount += 1
        //总体价格
        totalPrice = totalPrice.add(BigDecimal.valueOf(product.productMoney))

    }

    //商品数量减少
    fun reduceProductNum(product: Product){


        //该商品数量-1
        productNumMap[product] = productNumMap[product]!!-1
        //该商品所在的类别数量-1
        typeCountMap[product.parentId] = typeCountMap[product.parentId]!!-1

        //总体数量-1
        totalAmount -= 1
        //总体价格
        totalPrice = totalPrice.subtract(BigDecimal.valueOf(product.productMoney))
    }
}
5.3.2 右侧列表适配器增加item内的加减号点击事件
-
在
onBindViewHolder()方法里,我们根据传来的shopCart实例来根据当前商品的数量来动态的更改右侧列表加减号中间的数字。 -
为加减号增加点击事件,当点击的时候更改shopCart内该商品的数量,并更新该RecyclerView,来实现右侧列表加减号中间的数字更新,同时这里通过shopCartListener来调用
onReduce()和onAdd()方法,目的是来更改左侧列表的商品类别数量
class RightProductAdapter(private var dataList: MutableList<Product>,private var shopCart: ShopCart) :
RecyclerView.Adapter<RecyclerView.ViewHolder>() {


    override fun onBindViewHolder(holder: RecyclerView.ViewHolder, position: Int) {


        //已下单的个数显示与隐藏
        if (shopCart.productNumMap.containsKey(product)) {


            if (shopCart.productNumMap[product]!! > 0) {


                //数量不为零
                productHolder.selectCount.text = shopCart.productNumMap[product].toString()
                productHolder.selectCount.visibility = View.VISIBLE
                productHolder.reduce.visibility = View.VISIBLE
            } else {


                //数量为0不显示
                productHolder.selectCount.visibility = View.INVISIBLE
                productHolder.reduce.visibility = View.INVISIBLE
            }
        } else {


            productHolder.selectCount.visibility = View.INVISIBLE
            productHolder.reduce.visibility = View.INVISIBLE
        }

        //增加商品
        productHolder.add.setOnClickListener {


            product?.let {

     it1->
                shopCart.addProductNum(it1)
                notifyItemChanged(position)
                shopCartListener?.onAdd(
                    it,
                    product.parentId,
                    shopCart.typeCountMap[product.parentId]!!
                )
            }
        }
        //减少商品
        productHolder.reduce.setOnClickListener {


            product?.let {

    it1->
                shopCart.reduceProductNum(it1)
                notifyItemChanged(position)
                shopCartListener?.onReduce(
                    product.parentId,
                    shopCart.typeCountMap[product.parentId]!!
                )
            }
        }

    }
	......

}
interface ShopCartListener {


    fun onReduce(parentId:String, parentCount:Int)

    fun onAdd(view: View, parentId: String, parentCount: Int)
}
/**
     * 设置监听器
     */
fun setShopCartListener(_shopCartListener: ShopCartListener) {


    shopCartListener = _shopCartListener
}
5.3.3 左侧列表类别数量更改
再回调来更改购物车中的产品数量
class MainActivity : AppCompatActivity(),
LeftTypeAdapter.LeftTypeClickListener, RightProductAdapter.ShopCartListener {


    //购物车实体类
    private var shopCart = ShopCart()

    override fun onCreate(savedInstanceState: Bundle?) {


        ....
        rightAdapter = RightProductAdapter(productDataList,shopCart)
        rightAdapter.setShopCartListener(this)
    }

    /**
     * 减少
     */
    override fun onReduce(parentId: String, parentCount: Int) {


        //更新左侧列表类别数量
        leftAdapter.updateTypeCount(parentId,parentCount)

        //更新购物车的数量
        if(shopCart.totalAmount>0){


            tv_shopping_cart_count.visibility = View.VISIBLE
            tv_shopping_cart_count.text = shopCart.totalAmount.toString()
        }else{


            tv_shopping_cart_count.visibility = View.INVISIBLE
        }

        //更新购物车的价格
        tv_shopping_cart_money.text = shopCart.totalPrice.toString()
    }

    /**
     * 增加
     */
    override fun onAdd(view: View, parentId: String, parentCount: Int) {


        //更新左侧列表类别数量
        leftAdapter.updateTypeCount(parentId,parentCount)
        //更新购物车的数量
        if(shopCart.totalAmount>0){


            tv_shopping_cart_count.visibility = View.VISIBLE
            tv_shopping_cart_count.text = shopCart.totalAmount.toString()
        }else{


            tv_shopping_cart_count.visibility = View.INVISIBLE
        }

        //更新购物车的价格
        tv_shopping_cart_money.text = shopCart.totalPrice.toString()
    }
}
class LeftTypeAdapter(private var dataList: MutableList<ProductItem>) :
RecyclerView.Adapter<LeftTypeAdapter.MyLeftViewHolder>() {


    //要更新的ID号
    var mUpdateTypeId = ""

    //要更新的ID号的数量
    var mUpdateTypeCount = 0

    /**
     * 更新左侧列表角标(用于右侧添加或减少商品时它数量的更新)
     */
    fun updateTypeCount(parentId:String,parentCount:Int){


        mUpdateTypeId = parentId
        mUpdateTypeCount = parentCount
        notifyDataSetChanged()

    }
}
5.3.4 效果

6. 添加数据效果
主要用到了二阶贝塞尔曲线、属性动画、插值器
-
传入控制点和终点通过
quadTo()方法形成二阶贝塞尔曲线路径 -
使用LinearInterpolator插值器来形成匀速滑动的效果
-
使用valueAnimator属性动画来实现将小圆球按照二阶贝塞尔曲线路径匀速进行移动的效果
具体详见代码
效果:

总结
按照以上步骤即可完成购物车的功能。刚开始没什么头目,但按照步骤,一部分一部分实现就挺简单的。
其实本片内容主要参考了两篇文章:
一Android 美团购物车效果,参考了它的购物车类,这个思路很好。它绘制悬浮头部的方式是xml里固定有个View,然后通过动画的方式来显示隐藏实现效果。它的右侧列表滑动到底部左侧列表最后一项不会选中。
二Android-使用RecyclerView的ItemDecoration 实现炫酷的 吸顶效果它的绘制是使用itemDecoration,但是它的onDrawover()方法使用了循环判断,其实我们只需要对第一个itemView进行绘制即可。
多看看别人的找到思路后学会用自己的方式进行优化才能进步。 如果本文对你有帮助,请别忘记三连,如果有不恰当的地方也请提出来,下篇文章见。
参考文章
Android-使用RecyclerView的ItemDecoration 实现炫酷的 吸顶效果
⭐插值器
⭐自定义控件三部曲之动画篇(四)——ValueAnimator基本使用