用定向滤波器检测边缘
放大图像中的高频成分,再用高通滤波器进行边缘检测
Sobel滤波器
Sobel滤波器,只对垂直和水平方向的图像频率器作用(具体方向取决于滤波器选用的内核),所以被认为是一种定向滤波器。
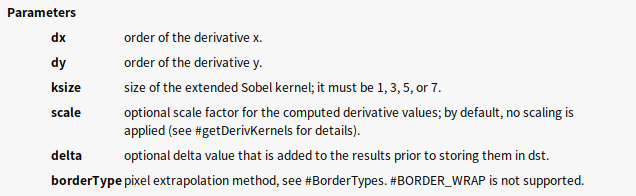
void Sobel(InputArray src, OutputArray dst, int ddepth, int dx, int dy, int ksize = 3, double scale = 1, double delta = 0, int borderType = BORDER_DEFAULT)
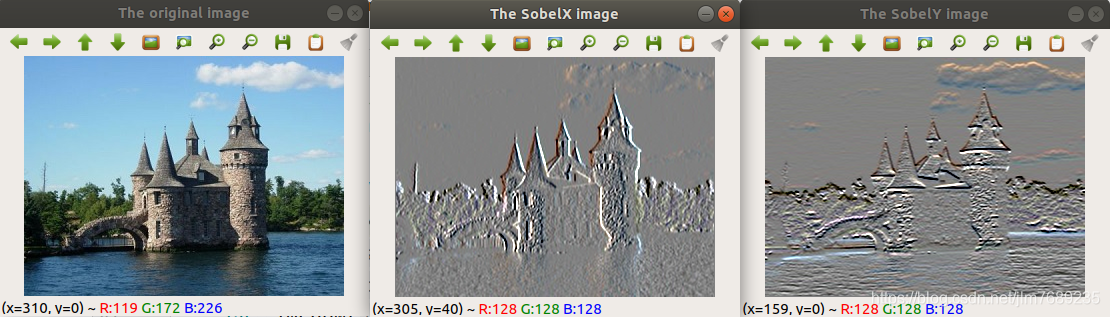
- 水平方向调用方法
    cv::Sobel(image,                // 输入矩阵
              SobelX,               // 输出矩阵
              CV_8U,                // 图像类型
              1, 0,                // 内核规格   这里主要是水平方向和垂直方向的控制
              3,                   // 正方形内核的尺寸
              0.4, 128);           // 比例和偏移量
- 垂直方向调用方法
   cv::Sobel(image,     // 输入矩阵
              SobelY,   // 输出矩阵
              CV_8U,     // 图像类型
              0, 1,// 内核规格
              3,    // 正方形内核的尺寸
              0.4, 128); // 比例和偏移量
示例程序
#include <iostream>
#include <opencv2/core/core.hpp>
#include <opencv2/highgui/highgui.hpp>
#include <opencv2/imgproc/imgproc.hpp>

using namespace std;

int main(int argc, char** argv) {


    if( argc != 2)
    {


        cerr << "please enter the right numbers of images" << endl;
        return -1;
    }
    cv::Mat image = cv::imread(argv[1]);
    if (image.empty())
    {


        cerr << "don`t get the data of the argv[1]" << endl;
        return -1;
    }
    cv::imshow("The original image", image);
    cv::waitKey(0);
    cv::Mat SobelX;
    cv::Sobel(image,                // 输入矩阵
              SobelX,               // 输出矩阵
              CV_8U,                // 图像类型
              1, 0,          // 内核规格
              3,               // 正方形内核的尺寸
              0.4, 128);  // 比例和偏移量
    cv::imshow("The SobelX image", SobelX);
    cv::waitKey(0);
    cv::Mat SobelY;
    cv::Sobel(image,     // 输入矩阵
              SobelY,   // 输出矩阵
              CV_8U,     // 图像类型
              0, 1,// 内核规格
              3,    // 正方形内核的尺寸
              0.4, 128); // 比例和偏移量
    cv::imshow("The SobelY image", SobelY);
    cv::waitKey(0);
    return 0;
}
示例程序
#include <iostream>
#include <opencv2/core/core.hpp>
#include <opencv2/highgui/highgui.hpp>
#include <opencv2/imgproc/imgproc.hpp>

using namespace std;

int main(int argc, char** argv) {


    if( argc != 2)
    {


        cerr << "please enter the right numbers of images" << endl;
        return -1;
    }
    cv::Mat image = cv::imread(argv[1]);
    if (image.empty())
    {


        cerr << "don`t get the data of the argv[1]" << endl;
        return -1;
    }
    cv::imshow("The original image", image);
    cv::waitKey(0);
    cv::Mat SobelX;
    cv::Sobel(image, SobelX, CV_16S, 1, 0);
    cv::Mat SobelY;
    cv::Sobel(image, SobelY, CV_16S, 0, 1);
    cv::Mat sobel;
    sobel = abs(SobelX) + abs(SobelY);
    double sobmin, sobmax;
    cv::minMaxLoc(sobel, &sobmin, &sobmax);
    cv::Mat sobelImage;
    sobel.convertTo(sobelImage, CV_8U, -255./sobmax, 255);
    cv::imshow("The Processed image", sobelImage);
    cv::waitKey(0);
    cv::Mat sobelThresholded;
    cv::threshold(sobelImage, sobelThresholded, 150, 255, cv::THRESH_BINARY);
    cv::imshow("sobelThresholded image", sobelThresholded);
    cv::waitKey(0);
    return 0;
}

具体请看参考博客
https://blog.csdn.net/u012566751/article/details/77046445