本系列教程是根据孙忠潇编著的<<Simulink仿真及代码生成技术入门到精通>>学习笔记。
目录
Simulink仿真入门到精通(一) Simulink界面介绍
Simulink仿真入门到精通(二) Simulink模块
Simulink仿真入门到精通(三) Simulink信号
Simulink仿真入门到精通(四) Simulink子系统
Simulink仿真入门到精通(五) Simulink模型的仿真
Simulink仿真入门到精通(六) Simulink模型保存为图片
Simulink仿真入门到精通(七) Simulink的回调函数
Simulink仿真入门到精通(八) M语言对Simulink模型的自动化操作及配置
Simulink仿真入门到精通(九) Simulink的流控制
Simulink仿真入门到精通(十) S函数
Simulink仿真入门到精通(十一) 模块的封装
Simulink仿真入门到精通(十二) Publish发布M文件
Simulink仿真入门到精通(十三) Simulink创建自定义库
Simulink仿真入门到精通(十四) Simulink自定义环境
Simulink仿真入门到精通(十五) Simulink在流程工业中的仿真应用
Simulink仿真入门到精通(十六) Simulink基于模型设计的工业应用概述
Simulink仿真入门到精通(十七) Simulink代码生成技术详解
Simulink仿真入门到精通(十八) TLC语言
Simulink仿真入门到精通(十九) 总结回顾
目录
- 14.1 Simulink 环境自定义功能
- 14.2 Simulink 工具栏菜单自定义
- 14.3 Simulink Library Browser 菜单栏自定义
- 14.4 Simulink 目标硬件自定义
- 14.5 Simulink 参数对话框控制
14.1 Simulink环境自定义功能
sl_sustomization.m函数是Simulink提供给用户使用MATLAB语言自定义Simulink标准人机界面的函数机制。若sl_sustomization.m函数存在于MATLAB的搜索路径中,在当Simulink启动时就会读取此文件的内容进行Simulink的人机界面的初始化。Simulink本身就提供了这个函数,用户每次修改之后,必须重启Simulink或者使用命令sl_refresh_customizations使变更起作用。
参考:https://www.mathworks.com/help/simulink/ug/registering-customizations.html
Reading and Refreshing the Customization File
The sl_customization.m file is read when Simulink starts. If you change the sl_customization.m file, either restart Simulink or enter this command to see the changes:
sl_refresh_customizationsThis command runs all sl_customization.m files on the MATLAB path and in the current folder. Some side-effects of running sl_refresh_customizations include:
-
Rebuilding the Simulink Toolstrip
-
Rebuilding all Simulink Editor menus
-
Rebuilding the Library Browser menus and toolbars
-
Clearing the Library Browser cache and refreshing the Library Browser
-
Reloading the Viewers and Generators Manager data
14.2 Simulink工具栏菜单自定义
可以在Simulink提供的现有菜单栏的基础上进行菜单项的添加。Simulink Model Editor中用于添加菜单项的位置有3个:顶层菜单的末尾、菜单栏和右键菜单的开始或结尾处。
添加的对象成为项目(item),为了添加项目,需要以下步骤:
- 创建一个定义项目的模式函数(schema function);
- 将这个定义菜单项目的函数注册在sl_customization.m中;
- 为这个菜单项目定义一个触发运行的回调函数。
例:增加一个显示当前所选模块属性列表的菜单项目。
首先创建一个定义此项的模式函数。
function schema = get_block_property(callbackInfo)
schema = sl_action_schema;    %使用sl_action_schema函数创建一个对象
schema.label = 'block property';
schema.userdata = 'Custom';
schema.callback = @custom_callback;
end
选中此菜单时触发回调函数 custom_callback,显示当前选中的模块的属性列表。
function custom_callback(callbackInfo)
inspect(gcbh);
disp('### The property of current block is displayed.');
end
接着将定义的函数注册到sl_customization.m中。
以下代码将Simulink菜单栏以及子层菜单的WidgetId显示出来。

使用addCustomMenuFcn方法可以注册一个自定义菜单项目函数。
function sl_customization(cm)
%% Register custom menu function.
cm.addCustomMenuFcn('Simulink:ToolsMenu', @custom_items);
end
在注册的cuntom_items函数中使用句柄函数方式,亦成为匿名函数。
%% Define the custom menu function.
function schemaFcns = custom_items(callbackInfo)
schemaFcns = {@get_block_property};
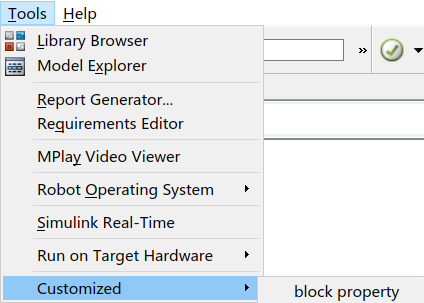
end这样,就在Tools菜单最末一项得到所设定的菜单项。

注:函数custom_items、get_block_property和custom_callback的参数callbackInfo并没有被使用,可使用~表示。
自定义Model Editor的菜单不仅可以是一级菜单,还可以是多级菜单。此时需要在sl_container_schema函数创建一个容器对象,并将刚才创建的菜单项目作为其成员添加进去。
%% Define the schema function for first menu item.
function schema = menu_control(callbackInfo)
schema = sl_container_schema;
schema.label = 'Customized';
schema.childrenFcns = {@get_block_property;}
end
在sl_costomization.m中注册菜单项目模式函数时将最上层的模式容器对象注册进去。即将@get_block_property改为@menu_control。
自定义菜单项也可以添加到右键菜单中。只需将sl_customization.m中addCustomMenuFcn函数的首个参数'Simulink:ToolMenu'改为'Simulink:ContextMenu'即可。
14.3 Simulink Library Browser菜单栏自定义
可参考:https://www.mathworks.com/help/simulink/ug/customizing-the-library-browser.html
Simulink Library Browser菜单栏也可以添加用户自定义的菜单,方法同前。
更改各个Simulink工具线的顺序:Simulink Library Browser中各个工具箱的排列顺序是内置的,由优先级和名称2个因素决定。优先级数字越小工具箱排位越靠前;对于同一优先级的工具箱按照字母顺序排列。默认情况下Simulink库优先级为-1,其他工具箱优先级为0。
cm.LibraryBrowserCustomizer.applyOrder({'Embedder Coder',-2});该命令将Embedded Coder工具箱显示在首位。
cm.LibraryBrowserCustomizer.applyFilter({'Embedded Coder','Hidden'});
cm.LibraryBrowserCustomizer.applyFilter({'Simulink','Disabled'});
sl_refresh_customizations
以上代码将Embedded Coder工具箱隐藏,将Simulink工具箱设置为不可用。
14.4 Simulink目标硬件自定义
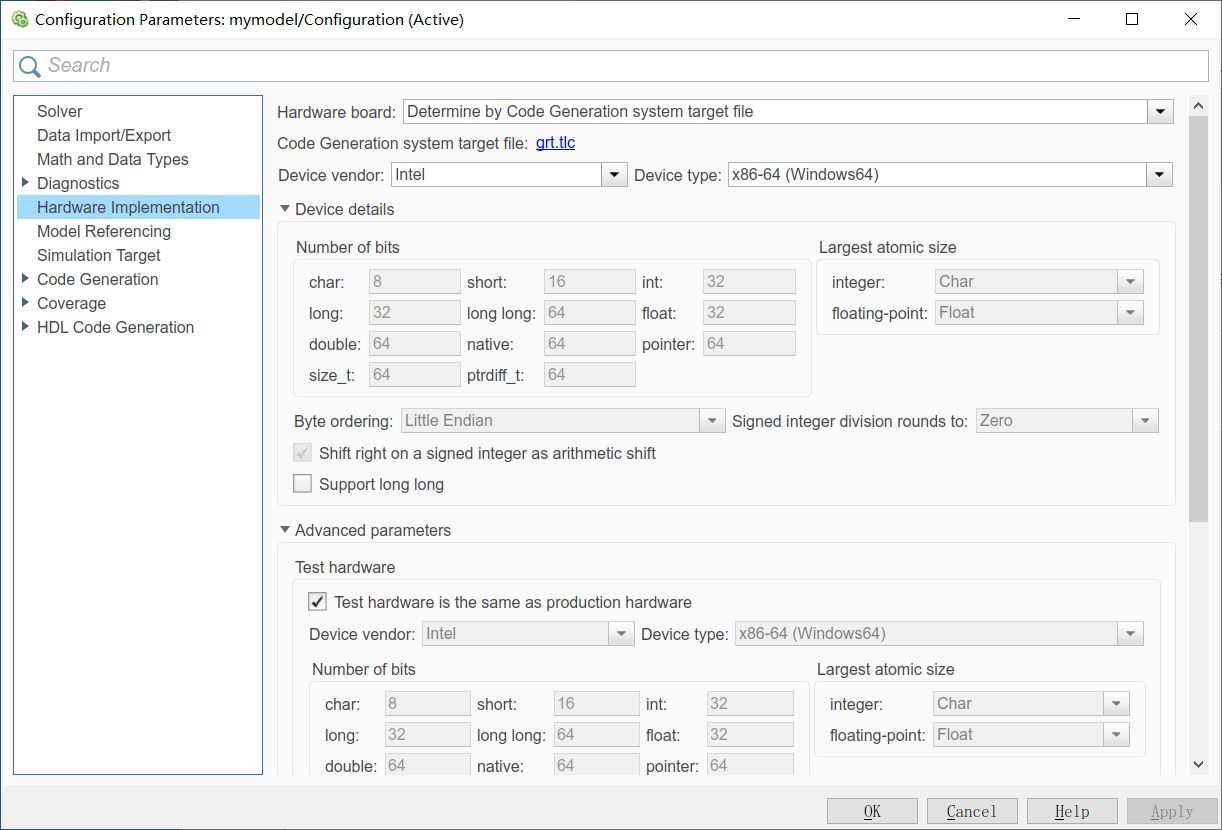
在Configuration Parameter对话框中的Hardware Implementation子页面可以选择各个厂家提供的各种目标硬件芯片类型,设置其大小端方式、所支持的各种数据类型的位数等。
在sl_customization.m中使用loc_register_device注册一个函数,在这个函数中对硬件的属性进行描述即可。描述目标硬件的结构体对象需要使用RTW.HWDeviceRegistry创建并配置。需要配置的成员信息有:
| 配置成员名 | 说明 |
| Vendor | 芯片生产商 |
| Type | 芯片系列号或类型名 |
| Alias | 芯片别名,不使用时不用设置,为空 |
| Platform | Production hardware以及Test hardware两个组别中是否都显示控件清单,二者组别名分别以字符串'prod','test'表示 |
| setWordSizes | 设置各种数据类型的位数,按照长度顺序char≤short≤int≤long,long以外类型位数必须为8的整数倍,最大为32位,long型位数不能少于32位 |
| LargestAtomicInteger | 最大原子整数,生成代码中存在数据拷贝时使用,若对位数大于此选项设置的数据进行整数数据拷贝,则检测数据拷贝完整性体现在代码生成中 |
| LargestAtomicFloat | 最大原子浮点数,生成代码中存在数据拷贝时使用,若对位数大于此选项设置的数据进行浮点数数据拷贝,则检测数据拷贝完整性体现在代码生成中 |
| Endianess | 字节次序设定,打断big或小端little |
| IntDivRoundTo | 有符号整数进行除法时的四舍五入方法选择,'zero','floor'或'undefined' |
| ShiftRightIntArith | true/false,设置是否将有符号整数的右移操作作为算数右移 |
| setEnabled | 选择此目标硬件时哪些GUI控件是可选的 |
例:描述一个虚拟目标硬件商Custom提供的SimulinkType系列芯片。
function sl_customization(cm)
cm.registerTargetInfo(@loc_register_device);

end

% loc_register_devie resigters self defined device into Simulink Parameter
% cofiguration
function thisprod = loc_register_device
  thisprod = RTW.HWDeviceRegistry;
  thisprod.Vendor = 'Custom';
  thisprod.Type = 'Simulink Type';
  thisprod.Alias = {};
  thisprod.Platform = {'Prod','Test'};
  thisprod.setWordSizes([8 16 16 32 32]);
  thisprod.LargestAtomicInteger = 'Char';
  thisprod.LargestAtomicFloat = 'Float';
  thisprod.Endianess = 'Big';
  thisprod.IntDivRoundTo = 'floor';
  thisprod.ShiftRightIntArith = true;
  thisprod.setEnabled({'BitPerPointer'});
end
刷新后可以看到vendor中新增了Custom选项,上述配置已添加进去。

14.5 Simulink参数对话框控制
Simulink环境下的对话框也可以通过属性设置的方法进行一定的自定义。
实现步骤是首先在sl_customization.m中使用addDlgPreOpenFcn方法注册一个回调函数,回调函数绑定在目标控件的父对象上。再在回调函数中编写设置目标控件属性的M语句。对一个控件的回调函数需要注册到其父对象的ConfigSet中,本质就是在其父控件被打开之前调用这个自定义的回调函数实现某控件的使能及可见性设置。
例:将SolverType隐藏,将仿真StartTime变为不可编辑。
function sl_customization(cm)
cm.addDlgPreOpenFcn('Simulink.SolverCC',@disable_solver_type);

end

function disable_solver_type(dialogH)
dialogH.hideWidgets({'Simulink.SolverCC.SolverType'});
dialogH.disableWidgets({'Simulink.SolverCC.StartTime'});
end