前言
Spring Security Oauth2提供了默认的令牌访问端点,如果某些业务场景下,我们需要修改这些端点,应该怎么做呢?
修改默认端点路径
Spring Security Oauth2支持修改访问路径,如果使用默认的访问路径,可能存在安全问题,因为大家都知道这个地址。
我们可以将默认的访问路径修改为自定义路径,比如将/oauth/token 修改为/custom/token。
直接在AuthorizationServerEndpointsConfigurer配置中添加路径就可以了:
    @Override
    public void configure(AuthorizationServerEndpointsConfigurer endpoints) throws Exception {


        //... 省略其他
        // 修改默认端点路径
        endpoints.pathMapping("/oauth/token","/custom/token");
    }
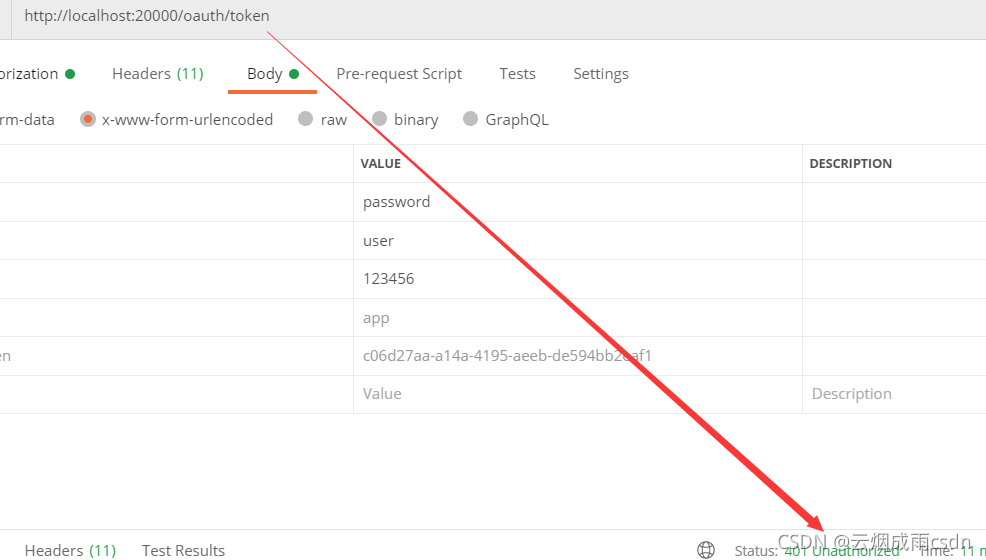
修改后,发现默认端点已经不能访问了,直接返回了401:
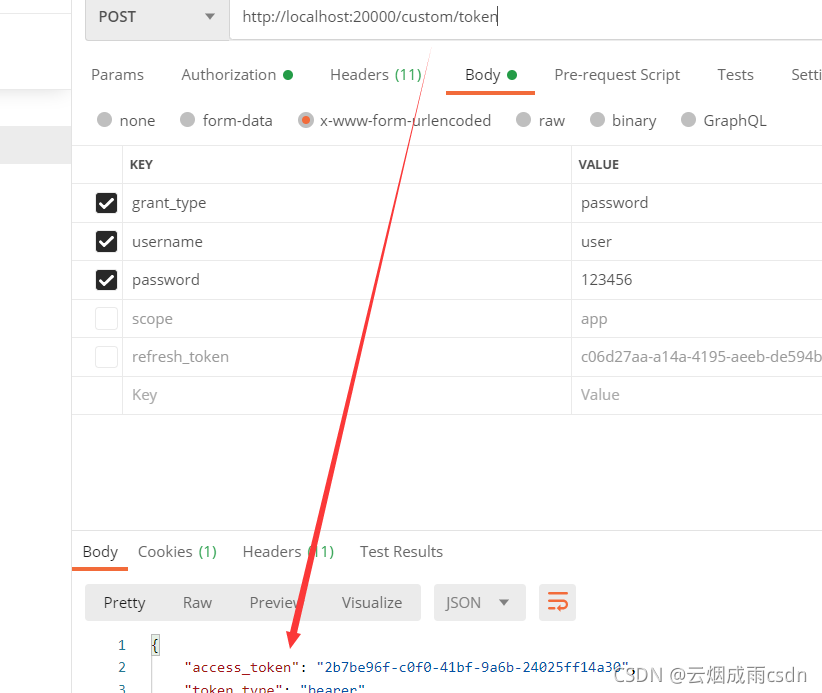
使用自定义路径,则可以正常返回令牌:
自定义令牌端点
如果我们想自己写一个获取令牌的接口,应该怎么写呢?不推荐这么写,但是某些情况下,需要这么干,也是可以的,我们可以参照获取令牌流程,模仿源码写一个。
演示需求:微服务架构下,自家平台登陆,不想传客户端信息,直接配置在后端,登陆只需要提交用户名和密码就行了。
需求实现方案:
- 可以直接写一个登陆接口,然后在这个接口中调用默认的令牌端点,此时方式最简单,也是比较low的。就不介绍怎么使用了。
- 参考默认的令牌端点,copy相关代码,在登录接口进行认证和令牌生成等操作,这里使用这个方案
1. 添加配置类
添加配置类,主要是配置客户端的ID和密码:
@Data
@ConfigurationProperties(prefix = "pearl.oauth")
public class PearlOauth2Properties {


    private String clientId;
    private String clientSecret;
}
yml中添加配置:
pearl:
  oauth:
    client-id: client
    client-secret: secret
在配置类上引入配置类:
@Configuration
@EnableConfigurationProperties(PearlOauth2Properties.class)
@EnableAuthorizationServer
public class MyAuthorizationServerConfiguration extends AuthorizationServerConfigurerAdapter
2. 授权服务器自定义令牌端点
先写一个登陆接口,返回一个认证令牌对象(实际开发应该封装统一结果集)。
@RequiredArgsConstructor
@RestController
@RequestMapping("/pearl")
public class AuthEndpoint {


    /**
     * 自定义获取令牌端点
     * 直接通过用户名和密码进行令牌申请,客户端信息直接通过后端配置
     *
     * @return
     */
    @PostMapping(value = "/login")
    @ResponseBody
    public ResponseEntity<OAuth2AccessToken> doLogin(String userName,String password) {


        return null;
    }
}
然后参考BasicAuthenticationFilter和TokenEndpoint类,进行客户端认证和令牌颁发:
@Slf4j
@RestController
@RequestMapping("/pearl")
@RequiredArgsConstructor
public class AuthEndpoint {


    private final PearlOauth2Properties pearlOauth2Properties;

    private final MessageSourceAccessor messages = SpringSecurityMessageSource.getAccessor();

    private final ClientDetailsService clientDetailsService;

    private final PasswordEncoder passwordEncoder;

    private final AuthorizationServerEndpointsConfiguration conf;

    private GrantedAuthoritiesMapper authoritiesMapper = new NullAuthoritiesMapper();

    /**
     * 自定义获取令牌端点
     * 直接通过用户名和密码进行令牌申请,客户端信息直接通过后端配置
     *
     * @return
     */
    @PostMapping(value = "/login")
    @ResponseBody
    public ResponseEntity<OAuth2AccessToken> doLogin(HttpServletRequest request, String username, String password) {


        // 1. 对客户端进行认证,ps: 可以不需要直接设置认证成功
        String clientId = pearlOauth2Properties.getClientId();
        UsernamePasswordAuthenticationToken authenticationToken = new UsernamePasswordAuthenticationToken(clientId, pearlOauth2Properties.getClientSecret());
        authenticationToken.setDetails(new WebAuthenticationDetails(request));
        Authentication authentication = authenticate(authenticationToken); // 进行认证并返回
        if (authentication == null) {

     // 认证失败
            throw new InsufficientAuthenticationException(
                    "There is no client authentication. Try adding an appropriate authentication filter.");
        }

        // 2. 创建密码模式认证请求
        Map<String, String> parameters = new HashMap<>(); // 封装相关参数
        parameters.put("clientId", clientId);
        parameters.put(OAuth2Utils.GRANT_TYPE, "password");
        parameters.put("username", username);
        parameters.put("password", password);
        ClientDetails authenticatedClient = clientDetailsService.loadClientByClientId(clientId);
        TokenRequest tokenRequest = conf.getEndpointsConfigurer().getOAuth2RequestFactory().createTokenRequest(parameters, authenticatedClient);

        // 3. 调用令牌发放器,颁发令牌
        OAuth2AccessToken token = conf.getEndpointsConfigurer().getTokenGranter().grant(tokenRequest.getGrantType(), tokenRequest);
        if (token == null) {


            throw new UnsupportedGrantTypeException("Unsupported grant type: " + tokenRequest.getGrantType());
        }
        // 4. 返回给客户端
        return getResponse(token);
    }

    private ResponseEntity<OAuth2AccessToken> getResponse(OAuth2AccessToken accessToken) {


        HttpHeaders headers = new HttpHeaders();
        headers.set("Cache-Control", "no-store");
        headers.set("Pragma", "no-cache");
        headers.set("Content-Type", "application/json;charset=UTF-8");
        return new ResponseEntity<>(accessToken, headers, HttpStatus.OK);
    }

    /**
     * 对客户端信息进行认证
     */
    public Authentication authenticate(Authentication authentication) throws AuthenticationException {


        Assert.isInstanceOf(UsernamePasswordAuthenticationToken.class, authentication, () -> this.messages.getMessage("AbstractUserDetailsAuthenticationProvider.onlySupports", "Only UsernamePasswordAuthenticationToken is supported"));
        try {


            // 1. 根据clientId 查询数据库客户端信息
            String clientId = authentication.getName();
            ClientDetails clientDetails = clientDetailsService.loadClientByClientId(clientId);
            String clientSecret = clientDetails.getClientSecret();
            // 2. 校验密码
            additionalAuthenticationChecks(clientDetails, authentication);
            // 3. 校验密码通过 则创建认证成功对象
            UserDetails user = new User(clientId, clientSecret, clientDetails.getAuthorities());
            return createSuccessAuthentication(clientId, authentication, user);
        } catch (UsernameNotFoundException | NoSuchClientException e) {


            throw new UsernameNotFoundException(e.getMessage(), e);
        } catch (Exception e) {


            throw new InternalAuthenticationServiceException(e.getMessage(), e);
        }
    }

    /**
     * 创建认证成功的认证信息
     */
    protected Authentication createSuccessAuthentication(Object principal, Authentication authentication, UserDetails user) {


        UsernamePasswordAuthenticationToken result = new UsernamePasswordAuthenticationToken(principal, authentication.getCredentials(), this.authoritiesMapper.mapAuthorities(user.getAuthorities()));
        result.setDetails(authentication.getDetails());
        log.debug("Authenticated user");
        return result;
    }

    /**
     * 校验密码
     */
    protected void additionalAuthenticationChecks(ClientDetails clientDetails, Authentication authentication) throws AuthenticationException {


        if (authentication.getCredentials() == null) {


            log.debug("Failed to authenticate since no credentials provided");
            throw new BadCredentialsException(this.messages.getMessage("AbstractUserDetailsAuthenticationProvider.badCredentials", "Bad credentials"));
        } else {


            String presentedPassword = authentication.getCredentials().toString();
            if (!passwordEncoder.matches(presentedPassword, clientDetails.getClientSecret())) {


                log.debug("Failed to authenticate since password does not match stored value");
                throw new BadCredentialsException(this.messages.getMessage("AbstractUserDetailsAuthenticationProvider.badCredentials", "Bad credentials"));
            }
        }
    }
}
最后在WebSecurityConfigurerAdapter配置类中,放行登录接口:
    @Override
    public void configure(WebSecurity web) throws Exception {


        // 将 check_token 暴露出去,否则资源服务器访问时报错
       web.ignoring().antMatchers("/oauth/check_token","/sms/send/code","/pearl/login");
    }
测试
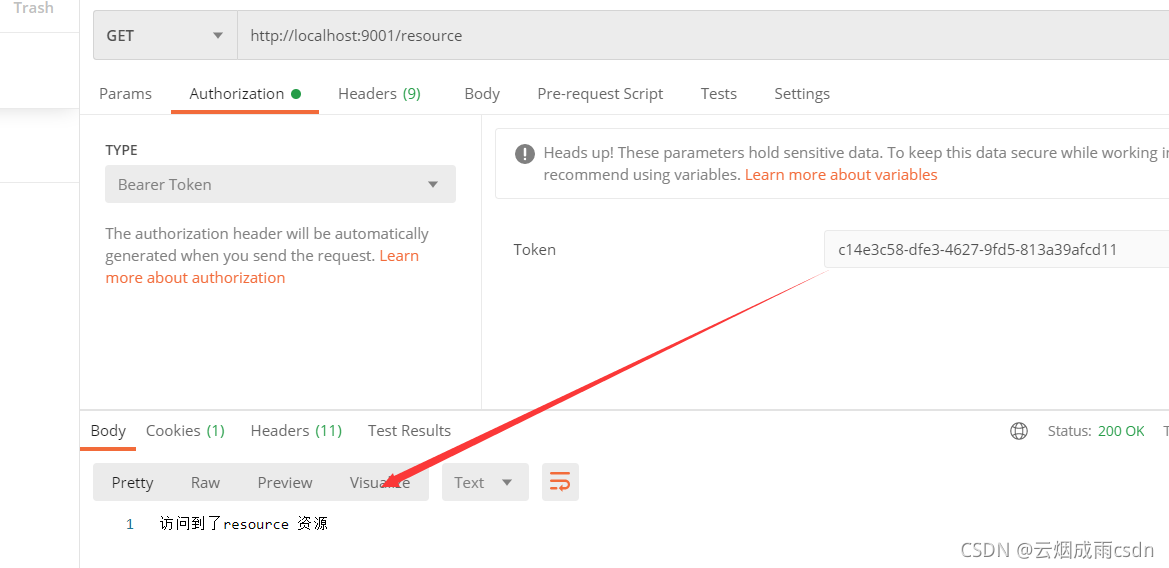
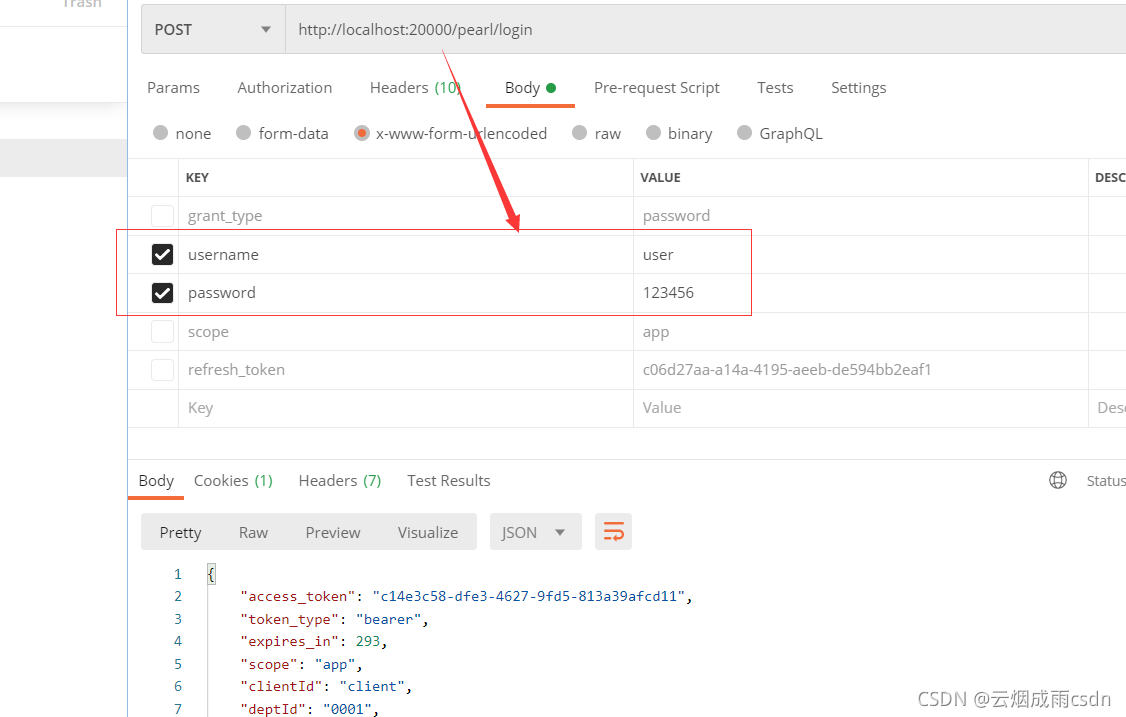
只传递用户名和密码参数,使用自定义的端点登录,发现成功返回了令牌。
使用这个令牌访问资源服务器,发现也能正常访问。