是一个项目的一个功能之一,调试了两小时,终于能够
javascript设置开始计和暂停计时 监控人脸 记录时间了
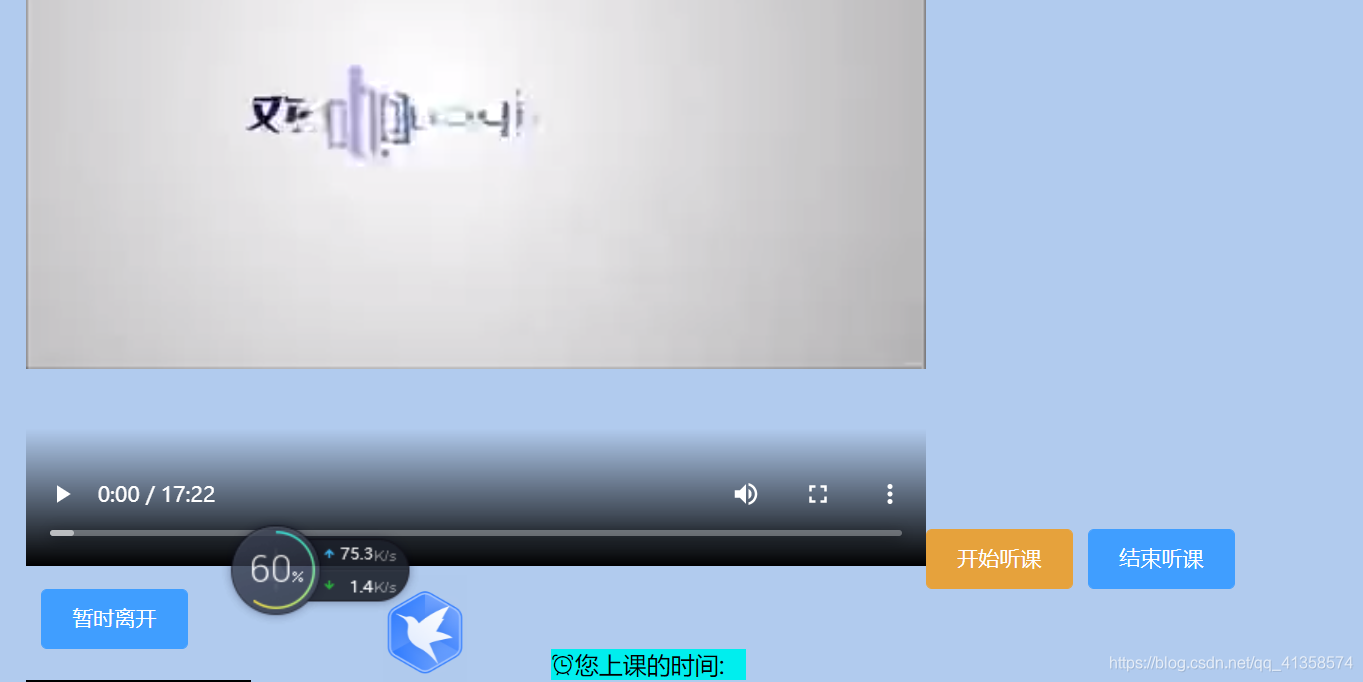
效果图:
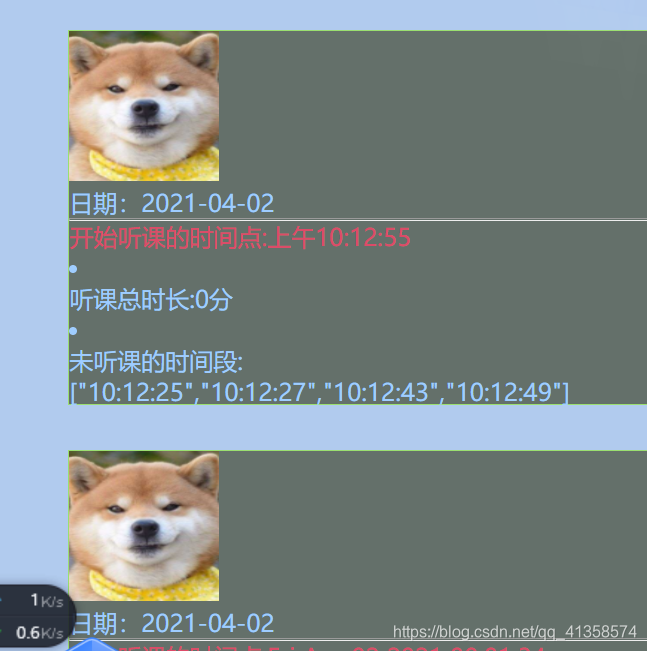

离开页面之后回到页面会从0计时(不是关闭页面,而是页面失去焦点)
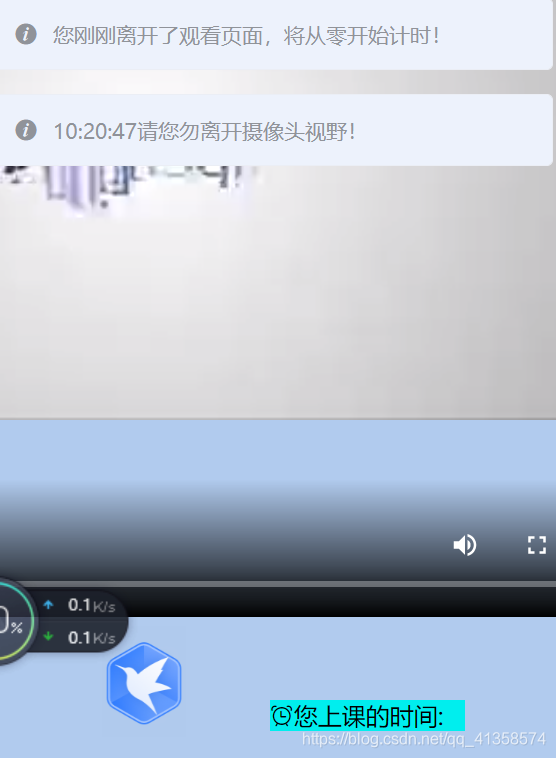
离开摄像头时会弹出提示。
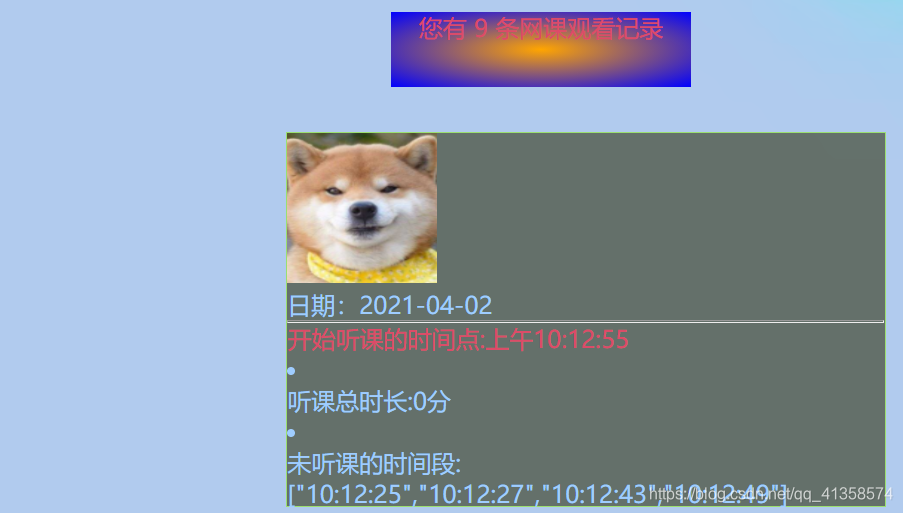
离开摄像头反馈给后端的时间。
全部代码:
<template>
  <div class="camera_outer">

    <video src="../assets/shu.mp4" style="width: 600px;height: 600px;margin-left: 150px" controls="controls"></video>
<hr>
    <el-button type="warning" @click.native="gettime()" style="margin-left: 300px"><i class="el-icon-video-camera-solid"></i> 开始听课</el-button>

    <el-button type="primary" @click="computetime()"><i class="el-icon-price-tag"></i> 结束听课</el-button>
    <el-button type="success" @click="out()"><i class="el-icon-loading
"></i> 暂时离开</el-button>


    <div style="width: 130px;background: #00eeee;margin-left: 350px" v-if="this.set==true">

      <i class="el-icon-alarm-clock">
      </i>您上课的时间:<div ref="startTimer"></div></div>

    <video
        id="videoCamera"
        :width="videoWidth"
        :height="videoHeight"
        autoplay
    ></video>
    <br>
    <canvas

        id="canvasCamera"
        :width="videoWidth"
        :height="videoHeight"
    ></canvas>
  </div>

</template>
<script>

export default {


  beforeRouteLeave (to, from, next) {


    // 这里需要elementui的支持,如果使用其他界面组件自行替换即可
    this.$confirm('正在离开本页面,本页面时间将从零开始计时', '警告', {


      confirmButtonText: '确定',
      cancelButtonText: '取消',
      type: 'warning'
    }).then(() => {


      // 正常跳转
      next()
    }).catch(() => {


      // 如果取消跳转地址栏会变化,这时保持地址栏不变
      window.history.go(1)
    })
  },
  data() {


    return {


      activeIndex2: '1',
      timer: "",
      content: "",
      hour: 0,
      minutes: 0,
      seconds: 0,
      videoWidth: 150,
      videoHeight: 150,
      imgSrc: "",
      thisCancas: null,
      thisContext: null,
      thisVideo: null,
      total:0,
      nowtime:[],
      set:true,
      yes:true,
      begintime:''
    };
  },
  created() {


    document.addEventListener('visibilitychange', this.startStopVideo)
  },
  mounted() {


      this.getCompetence();

      //this.gettime()

      var _this = this;
      this.thisCancas = document.getElementById("canvasCamera");
      this.thisContext = this.thisCancas.getContext("2d");
      this.thisVideo = document.getElementById("videoCamera");
      window.setInterval(
          this.setImage
          , 2000);

  },
  methods: {


       startStopVideo() {


  if (document.visibilityState === 'hidden') {


    if(this.yes==true){


      var stop1 = clearInterval(this.startTimer);
      this.yes = false;
    }
    else if(this.yes==false) {


      var stop2 = clearInterval(this.startTimer);
      this.yes = true

    }
window.location.reload()
  } else if (document.visibilityState === 'visible') {


    this.$message({


      message: '您刚刚离开了观看页面,将从零开始计时!',
      type: 'warning'
    });


    this.getCompetence();
    var _this = this;
    this.thisCancas = document.getElementById("canvasCamera");
    this.thisContext = this.thisCancas.getContext("2d");
    this.thisVideo = document.getElementById("videoCamera");
    window.setInterval(
        this.setImage
        , 2000);
  }
},
    out(){


      var stop1 = clearInterval(this.timer);
    },
    startTimer () {


        this.seconds += 1;
        if (this.seconds >= 60) {


          this.seconds = 0;
          this.minutes = this.minutes + 1;
        }

        if (this.minutes >= 60) {


          this.minutes = 0;
          this.hour = this.hour + 1;
        }
        this.total = this.minutes + this.hour * 60
        this.$refs.startTimer.innerHTML = (this.minutes < 10 ? '0' + this.minutes : this.minutes) + ':' + (this.seconds < 10 ? '0' + this.seconds : this.seconds) + '  total:' + this.total;

    },
    computetime(){


         var that = this
    this.set = false;
      this.$axios.post(
          "/gettime",
          {


            timenot: this.nowtime,
            total: this.total + '分',
            begintime: this.begintime

          }
      ).then(resp => {


        if (resp && resp.status === 200) {


          //
          that.$message({


                type: 'success',
                message: '您有一条新的学习记录生成!'}
            )
        }
        })
    },
    gettime(){


         this.begintime=new Date().toLocaleTimeString();
      this.timer = setInterval(this.startTimer, 1000);
    },
    // 调用权限(打开摄像头功能)
    getCompetence() {


      var _this = this;
      this.thisCancas = document.getElementById("canvasCamera");
      this.thisContext = this.thisCancas.getContext("2d");
      this.thisVideo = document.getElementById("videoCamera");
      // 旧版本浏览器可能根本不支持mediaDevices,我们首先设置一个空对象
      if (navigator.mediaDevices === undefined) {


        navigator.mediaDevices = {

     };
      }
      // 一些浏览器实现了部分mediaDevices,我们不能只分配一个对象
      // 使用getUserMedia,因为它会覆盖现有的属性。
      // 这里,如果缺少getUserMedia属性,就添加它。
      if (navigator.mediaDevices.getUserMedia === undefined) {


        navigator.mediaDevices.getUserMedia = function (constraints) {


          // 首先获取现存的getUserMedia(如果存在)
          var getUserMedia =
              navigator.webkitGetUserMedia ||
              navigator.mozGetUserMedia ||
              navigator.getUserMedia;
          // 有些浏览器不支持,会返回错误信息
          // 保持接口一致
          if (!getUserMedia) {


            return Promise.reject(
                new Error("getUserMedia is not implemented in this browser")
            );
          }
          // 否则,使用Promise将调用包装到旧的navigator.getUserMedia
          return new Promise(function (resolve, reject) {


            getUserMedia.call(navigator, constraints, resolve, reject);
          });
        };
      }
      var constraints = {


        audio: false,
        video: {


          width: this.videoWidth,
          height: this.videoHeight,
          transform: "scaleX(-1)",
        },
      };
      navigator.mediaDevices
          .getUserMedia(constraints)
          .then(function (stream) {


            // 旧的浏览器可能没有srcObject
            if ("srcObject" in _this.thisVideo) {


              _this.thisVideo.srcObject = stream;
            } else {


              // 避免在新的浏览器中使用它,因为它正在被弃用。
              _this.thisVideo.src = window.URL.createObjectURL(stream);
            }
            _this.thisVideo.onloadedmetadata = function (e) {


              _this.thisVideo.play();
            };
          })
          .catch((err) => {


            console.log(err);
          });
    },
    //  绘制图片(拍照功能)
    setImage() {


      var date = new Date();

      date .getYear(); //获取当前年份(2位)

      date .getFullYear(); //获取完整的年份(4位)

      date .getMonth(); //获取当前月份(0-11,0代表1月)

      date .getDate(); //获取当前日(1-31)

      date.getDay(); //获取当前星期X(0-6,0代表星期天)

      date.getTime(); //获取当前时间(从1970.1.1开始的毫秒数)

      date.getHours(); //获取当前小时数(0-23)

      date.getMinutes(); //获取当前分钟数(0-59)

      date.getSeconds(); //获取当前秒数(0-59)
      var _this = this;


      _this.thisContext.drawImage(
          _this.thisVideo,
          0,
          0,
          _this.videoWidth,
          _this.videoHeight
      );
      // 获取图片base64链接
      var image = this.thisCancas.toDataURL("image/png").split('base64,')[1];
      _this.imgSrc = image;
      console.log(_this.imgSrc)
      this.$axios.post('http://localhost:5000/getpic', {

     data: _this.imgSrc}).then(resp => {


        if (resp && resp.status === 200) {


          //状态码为200为请求成功
          //手动构造base64路径:前缀+返回码
          this.base64code = 'data:image/png;base64,' + resp.data.base64code
          if(resp.data == 'b')

          {

       this.$message.error( date.getHours()+':'+date.getMinutes()+':'+date.getSeconds()+"请您勿离开摄像头视野!")
            let thistime =date.getHours()+':'+date.getMinutes()+':'+date.getSeconds()
            this.nowtime.push(thistime)
          }

          _this.thisContext.clearRect(0,0, _this.videoWidth,_this.videoHeight);
          // location.reload();
          //console.log(this.base64code)
        }
      })
    }
  }, beforeDestroy() {


    document.removeEventListener('visibilitychange', this.startStopVideo)

  }

};
</script>
其中包含了图片解码编码,打开摄像头,获取后端结果。
服务器有两个,一个是python的pytorch深度学习处理图片 在flask框架下,一个是java的springboot来获得离开摄像头的时间。
java部分:
实体类:
package com.naughty.userlogin02.bean;

import lombok.Data;

@Data
public class Nowtime {


    int id;
     String timenot;
   String total;
  String  nowtime;
  String begintime;

}
跨域请求:
@RestController
public class Timecontroller {


    @Autowired
    TimeDao timeDao;

    static int id = 0;
    @CrossOrigin
    @PostMapping("/gettime")
    public String getteacherList(@RequestBody String time){


        id++;
        System.out.println(time);
    //    System.out.println(nowtime.getId());
     Map<String, Object> jsonMap = JSON.parseObject(time);
        System.out.println(jsonMap.get("total"));
        LocalDate date = LocalDate.now();
        System.out.println(date);
        Nowtime nowtime = new Nowtime();
        nowtime.setNowtime(date.toString());
        String ns=jsonMap.get("timenot").toString();
        String totaltime=jsonMap.get("total").toString();
        String begintime = jsonMap.get("begintime").toString();
        nowtime.setTimenot(ns);
        nowtime.setTotal(totaltime);
        nowtime.setId(id);
        nowtime.setBegintime(begintime);
        timeDao.addtime(nowtime);
        return "ok";


        //return timenot;
    }
    @GetMapping("/gettime")
    public String getalltime(){


        System.out.println("time!");
     List<Nowtime> nowtimes = timeDao.getall();
        HashMap<String, Object> res = new HashMap<>();
        res.put("data",nowtimes);
        String users_json = JSON.toJSONString(res);
        return users_json;
    }

}
xml语句:
<?xml version="1.0" encoding="UTF-8"?>
<!DOCTYPE mapper PUBLIC "-//mybatis.org//DTD Mapper 3.0//EN"
        "http://mybatis.org/dtd/mybatis-3-mapper.dtd">
<mapper namespace="com.naughty.userlogin02.dao.TimeDao">

    <insert id="addtime" parameterType="com.naughty.userlogin02.bean.Nowtime">
        insert into data1.gettime(timenot,total,nowtime,begintime) values (#{timenot},#{total},#{nowtime},#{begintime});
    </insert>
    <select id="getall" resultType="com.naughty.userlogin02.bean.Nowtime">
        SELECT * FROM gettime
        <if test="nowtime !=null">
            WHERE nowtime like #{nowtime}
        </if>

    </select>
</mapper>
python的主程序:
import base64
from predict import class_names
import torch
from torchvision import datasets, models, transforms
import cv2
import numpy as np
import requests
from flask import Flask,make_response, jsonify
import flask
from flask_cors import CORS
import socket
import threading
import json
import os
from io import BytesIO
from multiprocessing import Process
import io
from PIL import Image
# 配置全局app
app = Flask(__name__)
# 导入index中定义的所有函数
#from autotrade.server.index import *

def run_index():
    # 启动web服务器,使用多线程方式,接收所有http请求
    app.run(host='0.0.0.0', port=5000, threaded=True)

def make_new_response(data):
    res = make_response(jsonify({

    'code': 0, 'data': data}))
    res.headers['Access-Control-Allow-Origin'] = '*'
    res.headers['Access-Control-Allow-Method'] = '*'
    res.headers['Access-Control-Allow-Headers'] = '*'

    return res


def decode_base64(data):
    """Decode base64, padding being optional.

    :param data: Base64 data as an ASCII byte string
    :returns: The decoded byte string.

    """
    missing_padding = len(data) % 4
    if missing_padding != 0:
        data += b'='* (4 - missing_padding)
    # return base64.decodestring(data)
    return base64.b64decode(data)


@app.route("/test")
def test():
    res = "{'no':'dddd'}"
    return make_new_response(res)

CORS(app, resources=r'/*', supports_credentials=True)


basedir = os.path.abspath(os.path.dirname(__file__))


transform=transforms.Compose([
            transforms.Resize(224),
            transforms.CenterCrop(224),
            transforms.ToTensor(),
            transforms.Normalize(mean=[0.485,0.456,0.406],
                                 std=[0.229,0.224,0.225])
                            ])
@app.route('/getpic', methods=['POST'])
def getpic():
    data = json.loads(flask.request.get_data("data"))
    data_64 = str.encode(data['data'])
    print(type(data_64))

    #print(data_64)
    print('------------------------')
    print(str(data_64, 'utf8'))
    imgdata = decode_base64(data_64)
    file = open('1.jpg', 'wb')
    file.write(imgdata)
    file.close()
    image = Image.open(r"1.jpg").convert('RGB')
    image = transform(image).unsqueeze(0)
    modelme = torch.load('modefresnet.pkl')
    modelme.eval()
    outputs = modelme(image)
    _, predict = torch.max(outputs.data, 1)
    for j in range(image.size()[0]):
        print('predicted: {}'.format(class_names[predict[j]]))

    return class_names[predict[j]]

if __name__ == "__main__":
    app.run(debug=True)
深度学习的处理图片的网络模型就不贴了,需要的可以留言
用的是Resnet残差网络。识别速度还是很快的,判断的正确率也比较高。(训练的数据集很少,只有六百多张)
##Y1BCojf69##4;1%yBNfY3ne6a!/
下例为从指定的层提取ResNet50的特征。
import torch
from torch import nn
import torchvision.models as models
import torchvision.transforms as transforms
import cv2
class FeatureExtractor(nn.Module): # 提取特征工具
def init(self, submodule, extracted_layers):
super(FeatureExtractor, self).init()
self.submodule = submodule
self.extracted_layers = extracted_layers
def forward(self, x):
    outputs = []
    for name, module in self.submodule._modules.items():
        if name is "fc":
            x = x.view(x.size(0), -1)
        x = module(x)
        if name in self.extracted_layers:
            outputs.append(x)
    return outputs
model = models.resnet50(pretrained=True) # 加载resnet50工具
model = model.cuda()
model.eval()
img=cv2.imread(‘test.jpg’) # 加载图片
img=cv2.resize(img,(224,224));
img=cv2.cvtColor(img,cv2.COLOR_BGR2RGB)
transform = transforms.Compose(
[transforms.ToTensor(),
transforms.Normalize((0.5, 0.5, 0.5), (0.5, 0.5, 0.5))])
img=transform(img).cuda()
img=img.unsqueeze(0)
model2 = FeatureExtractor(model, [‘layer3’]) # 指定提取 layer3 层特征
with torch.no_grad():
out=model2(img)
print(len(out), out[0].shape)